It is time for all the latest updates in FG Funnels from the week of May 8th through May 15th, 2024. If you have questions about any of these updates, or FG Funnels in general, please reach out to [email protected] or live chat in the app and our team will be happy to help.
Workflows
Mini Map Enhancement
We’ve revamped the UI of the mini-map, introducing visual differentiations to distinguish it from the canvas, ensuring a more intuitive and user-friendly experience.
Now, users can zoom in and out of the workflow builder within the mini-map, providing greater control and visibility of workflow elements.
Search Bar Enhancements
We have made significant changes in the Search Bar that will improve the user experience and also increase the visibility of the actions and triggers.
The search bar present in the builder which is used to search for actions and triggers was only able to search based on the names that were stored in the backend. Now you can search on the basis of :
“Categories” – Now, by entering a category name in the search bar, users can easily find all actions or triggers within that category.
“Tags” – We have assigned tags to actions and triggers and user can search on the basis of those. For eg. If the user enters Chat in the search Bar GPT action will populate as the search result.
“Name” – The original name search remains, but now includes both front-end and back-end names, providing you with even more flexibility.
Prioritized Results:
To ensure you find the most relevant options quickly, search results are prioritized in this order:
Exact Name Matches: If your search term perfectly matches an action or trigger name, it appears first.
Matching Tags: Actions and triggers with matching tags come next.
Category Matches: Finally, actions and triggers within your searched category will populate the results.
Resolved – Rename Tag Issues in workflow
Previously, renaming a tag from the “Tags” section caused the tag to be removed from workflows and triggering any associated workflows with a “Removed Tag” filter. With this update, renaming tags from the “Tags” section will seamlessly update the tag in workflows without triggering any associated workflows for tag changes.
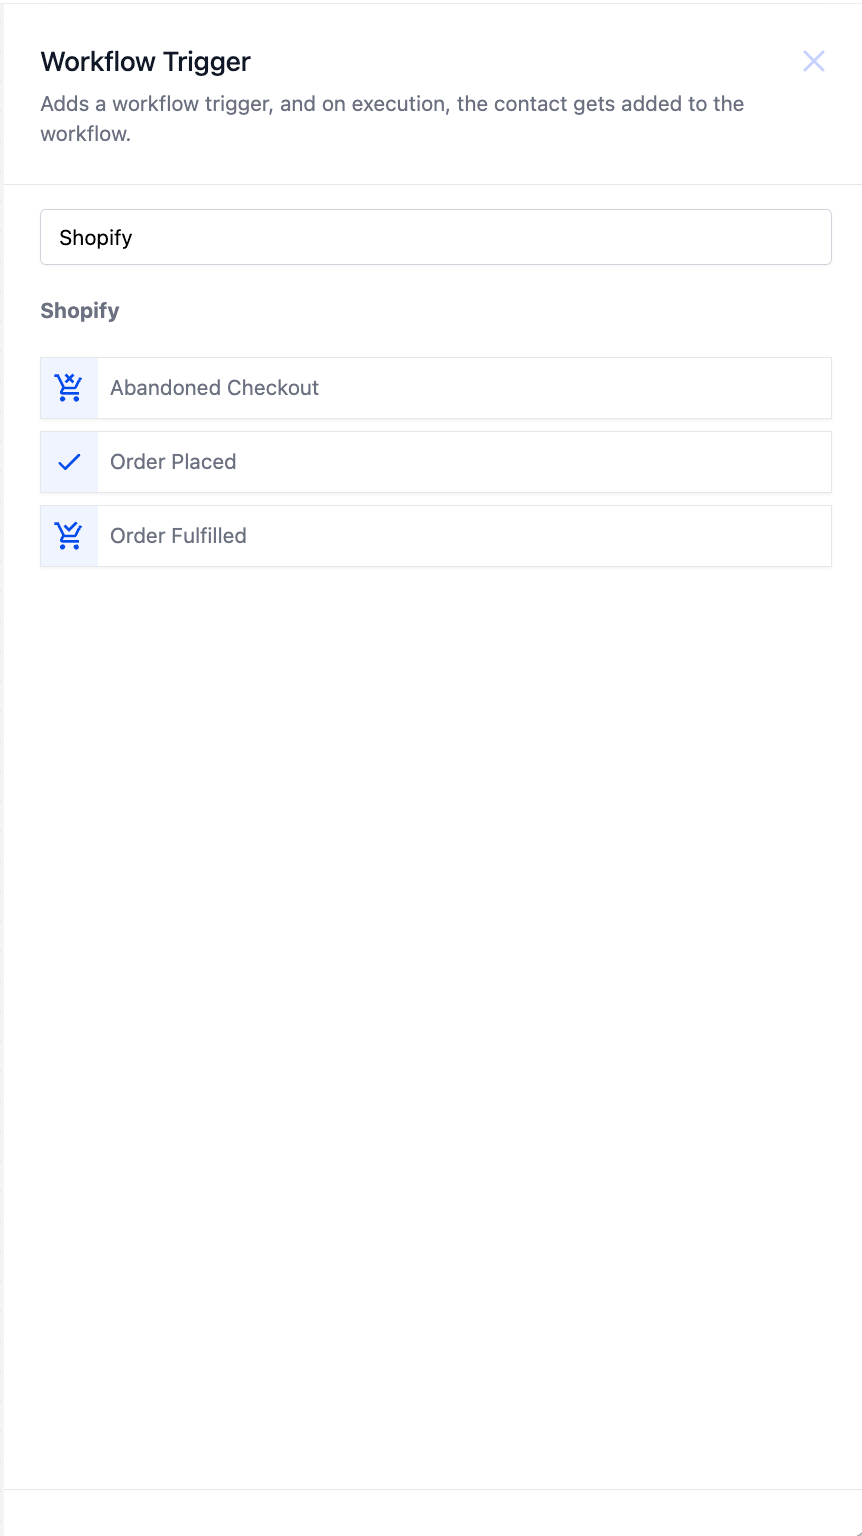
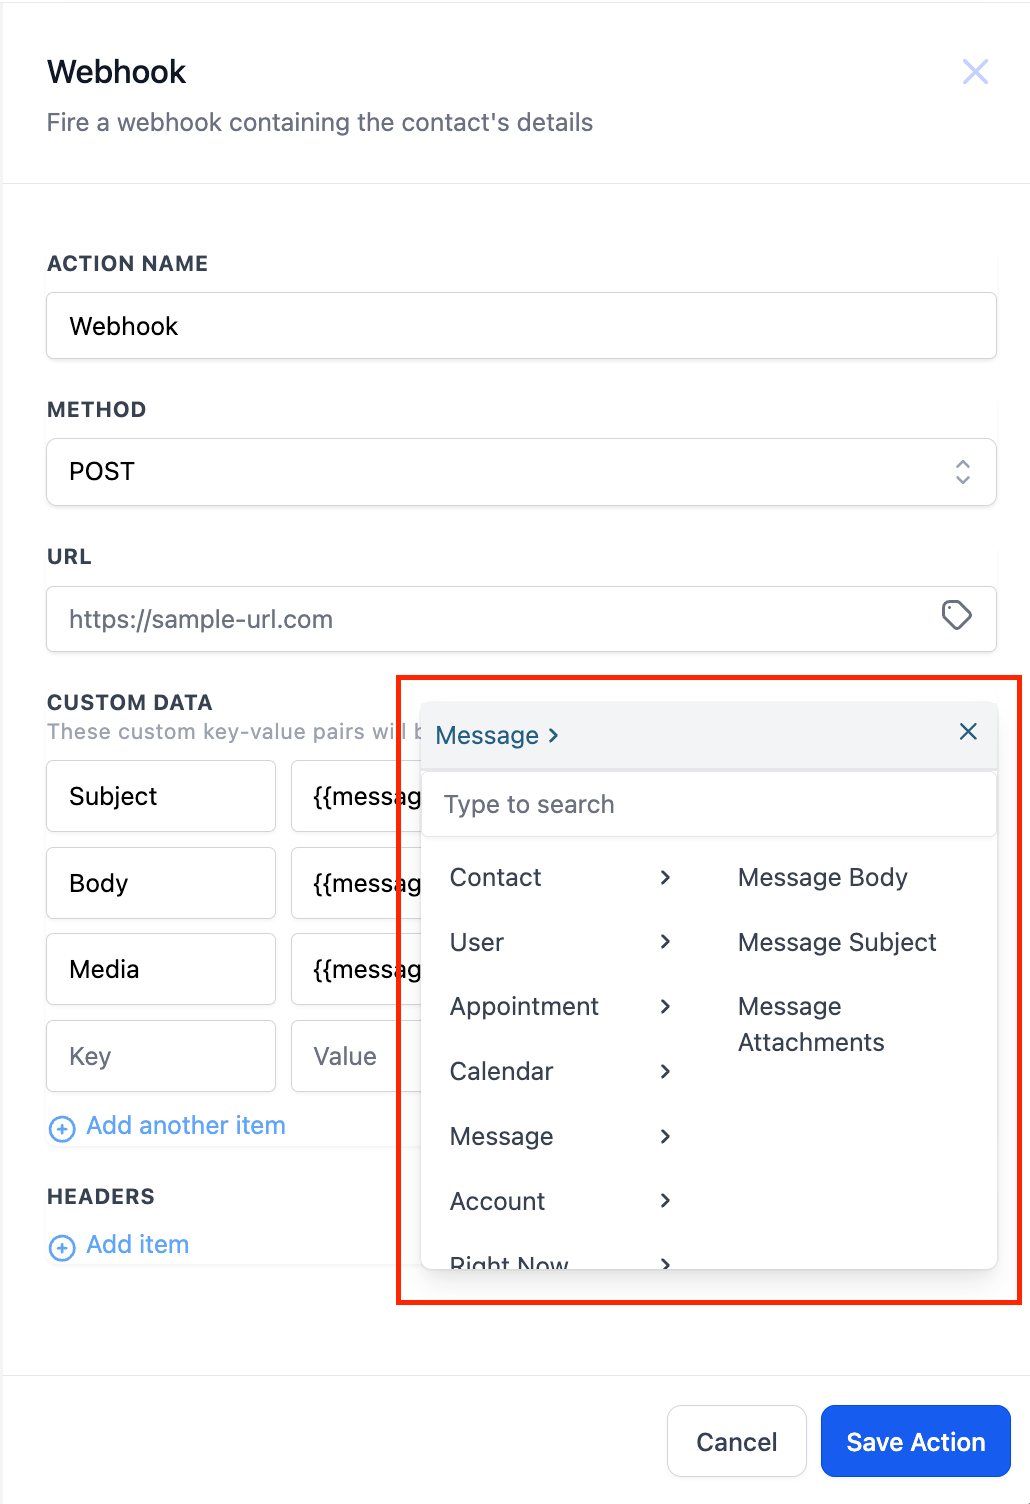
Exposing Media Attachment in Custom Value Picker
Previously, we were only exposing the Message Subject and Message Body in workflows. This was limiting for users with media attachments in the messages. Going forward you will be able to use Message Attachments also from the custom value picker
How to use?
Select the Message option in the Custom Value Picker
Select the “Message Attachment”
What’s New Feature
On the top bar, there is a chip called What’s New – Automation Updates. Once clicked, the user will be able to see a catalog of our newly released features and they can click on them to read feature summary.
There is a Learn More button which takes the user to the support doc link, if there is any for that feature.
LC Phone
Updates to Wallet Recharge Frequency
We’re implementing a change aimed at optimizing your wallet experience by reducing unnecessary recharges. Starting soon, you’ll notice adjustments to our auto-recharge feature.
What’s Changing?
Recharge Optimization: To streamline your wallet management, we’re introducing a modification that reduces the frequency of auto-recharges. Specifically, after triggering three auto-recharges in a single day, your recharge amount will increase automatically.
What You Need to Know
Notification Process: If you reach the three-recharge threshold, you’ll receive an email notification informing you of this change.
Managing Your Settings: You retain full control over your recharge preferences. Should you wish to adjust your recharge amount, you can easily do so from the billing page.
Next Recharge Amount: If your current recharge amount is in one of the specified tiers, the next recharge amount will be the next tier amount in the sequence. For example: (I) If your current recharge amount is $10 and it triggers the three recharges on the same day, your next recharge amount will be $25.
Disabling Auto Upgrade: Currently, we do not have a feature to disable the auto-upgrade functionality. However, we’re continuously working to improve our services and may consider adding this option in the future.
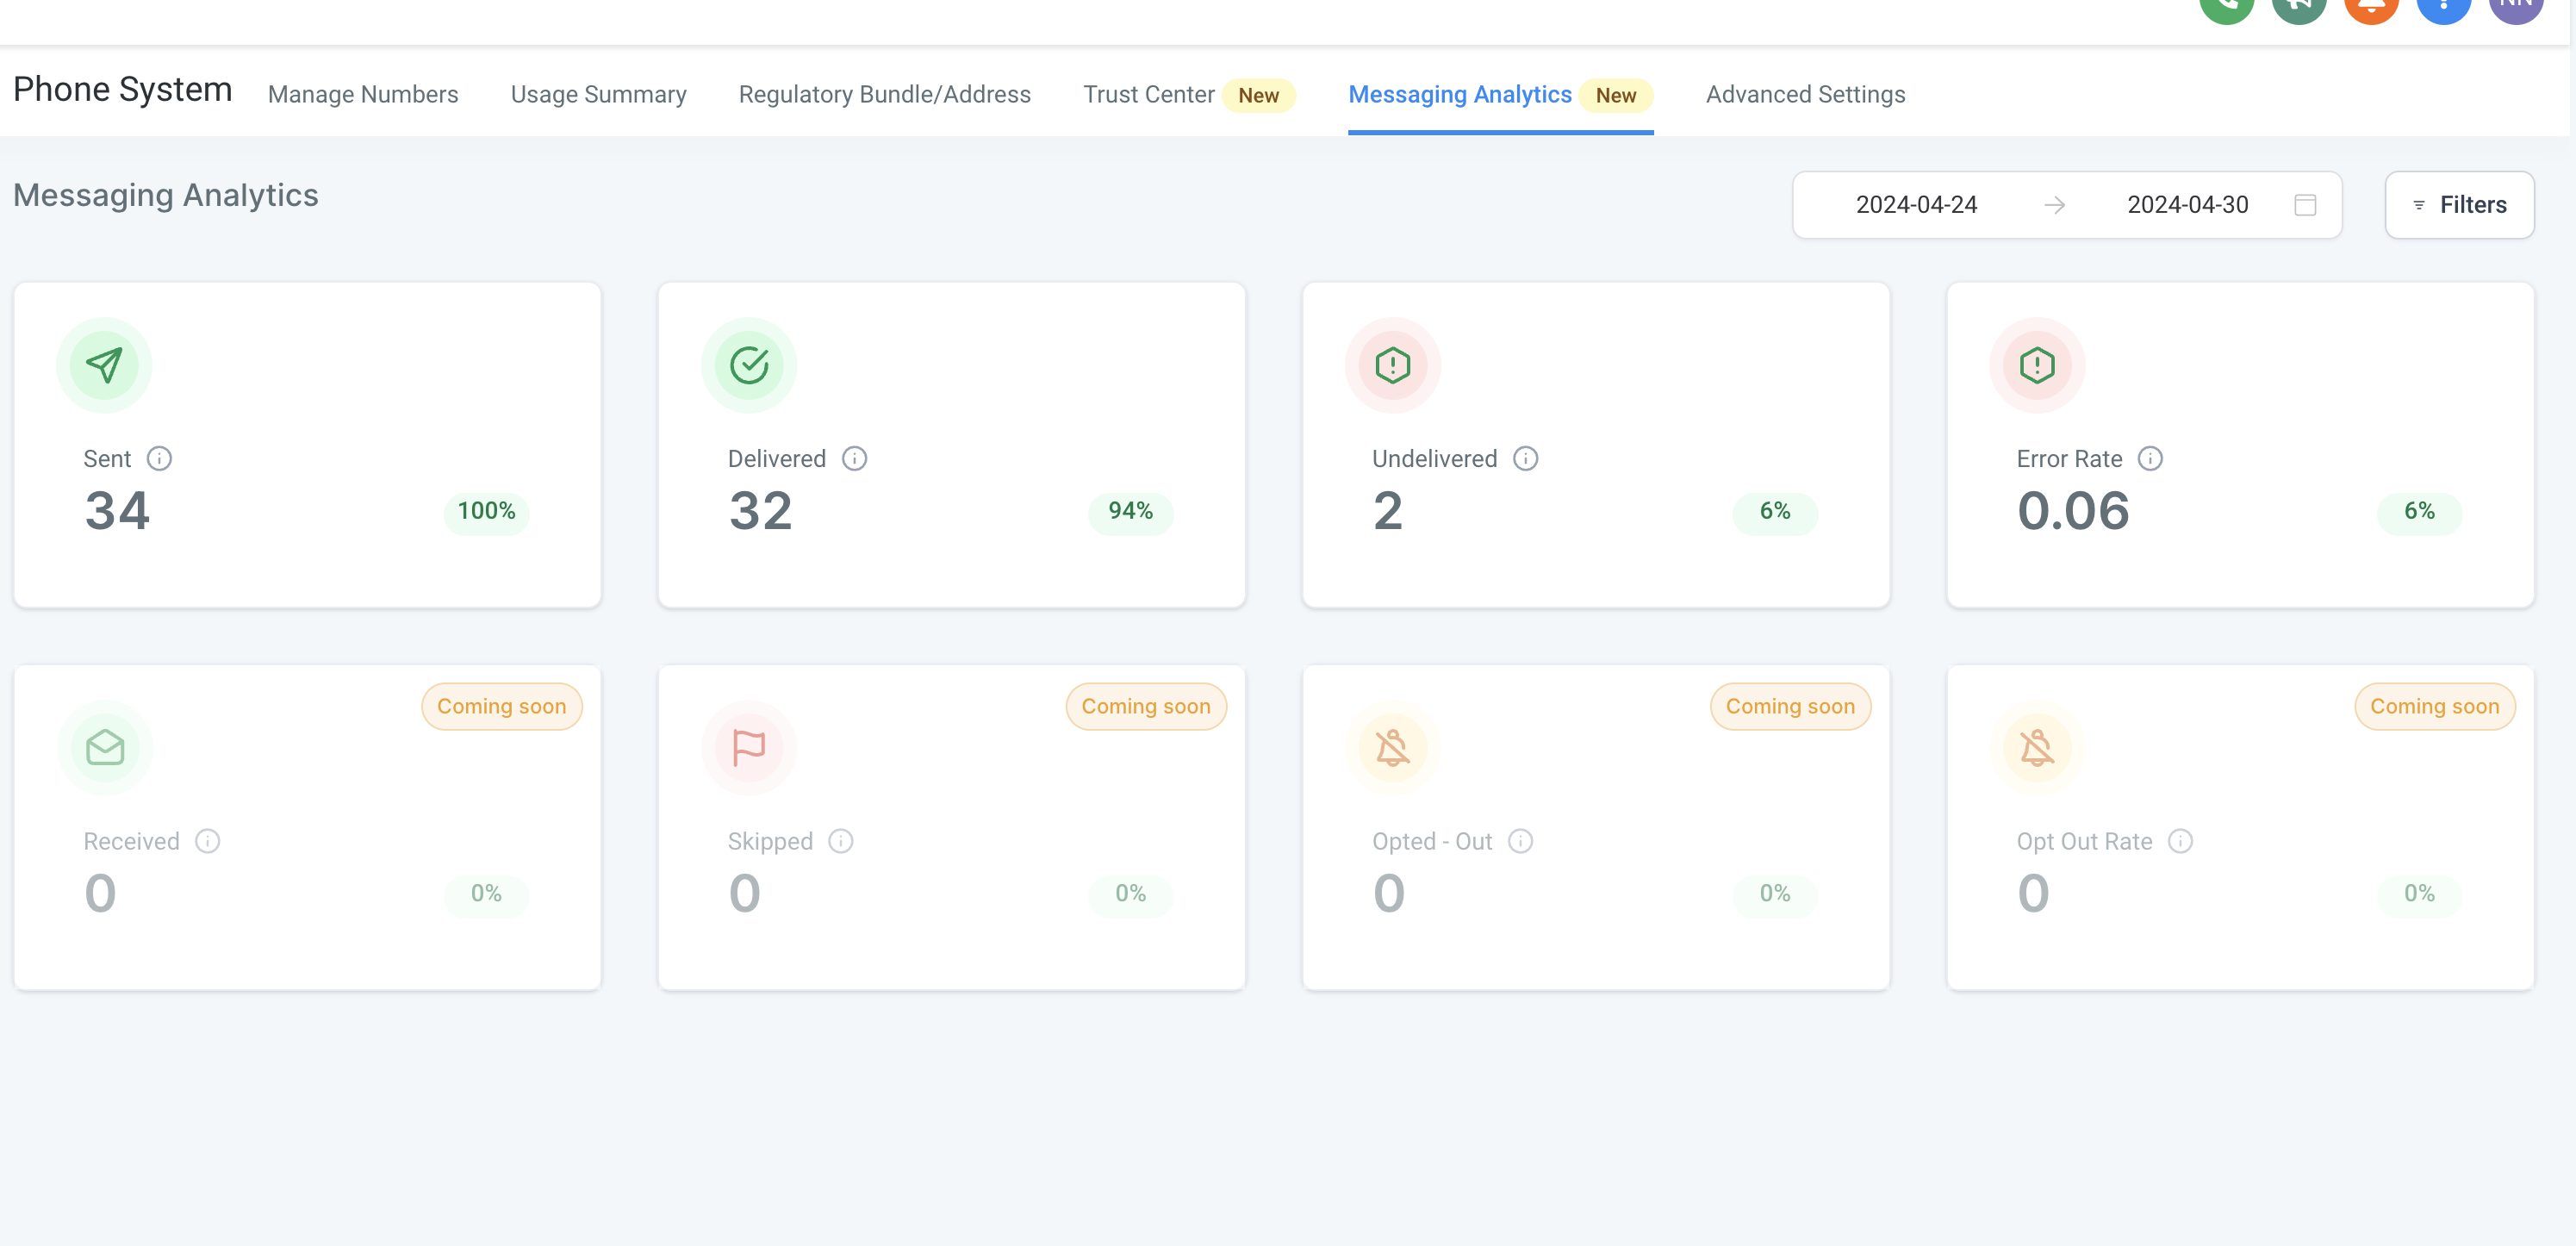
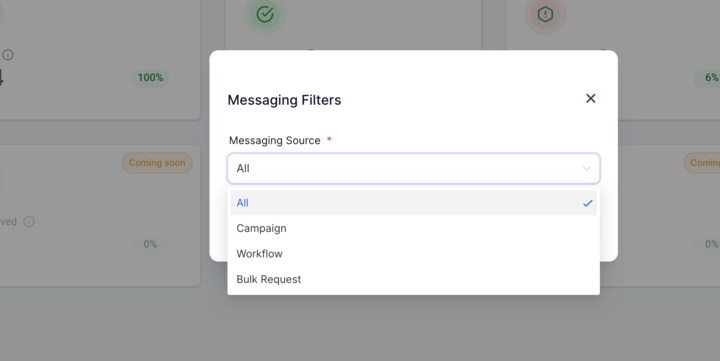
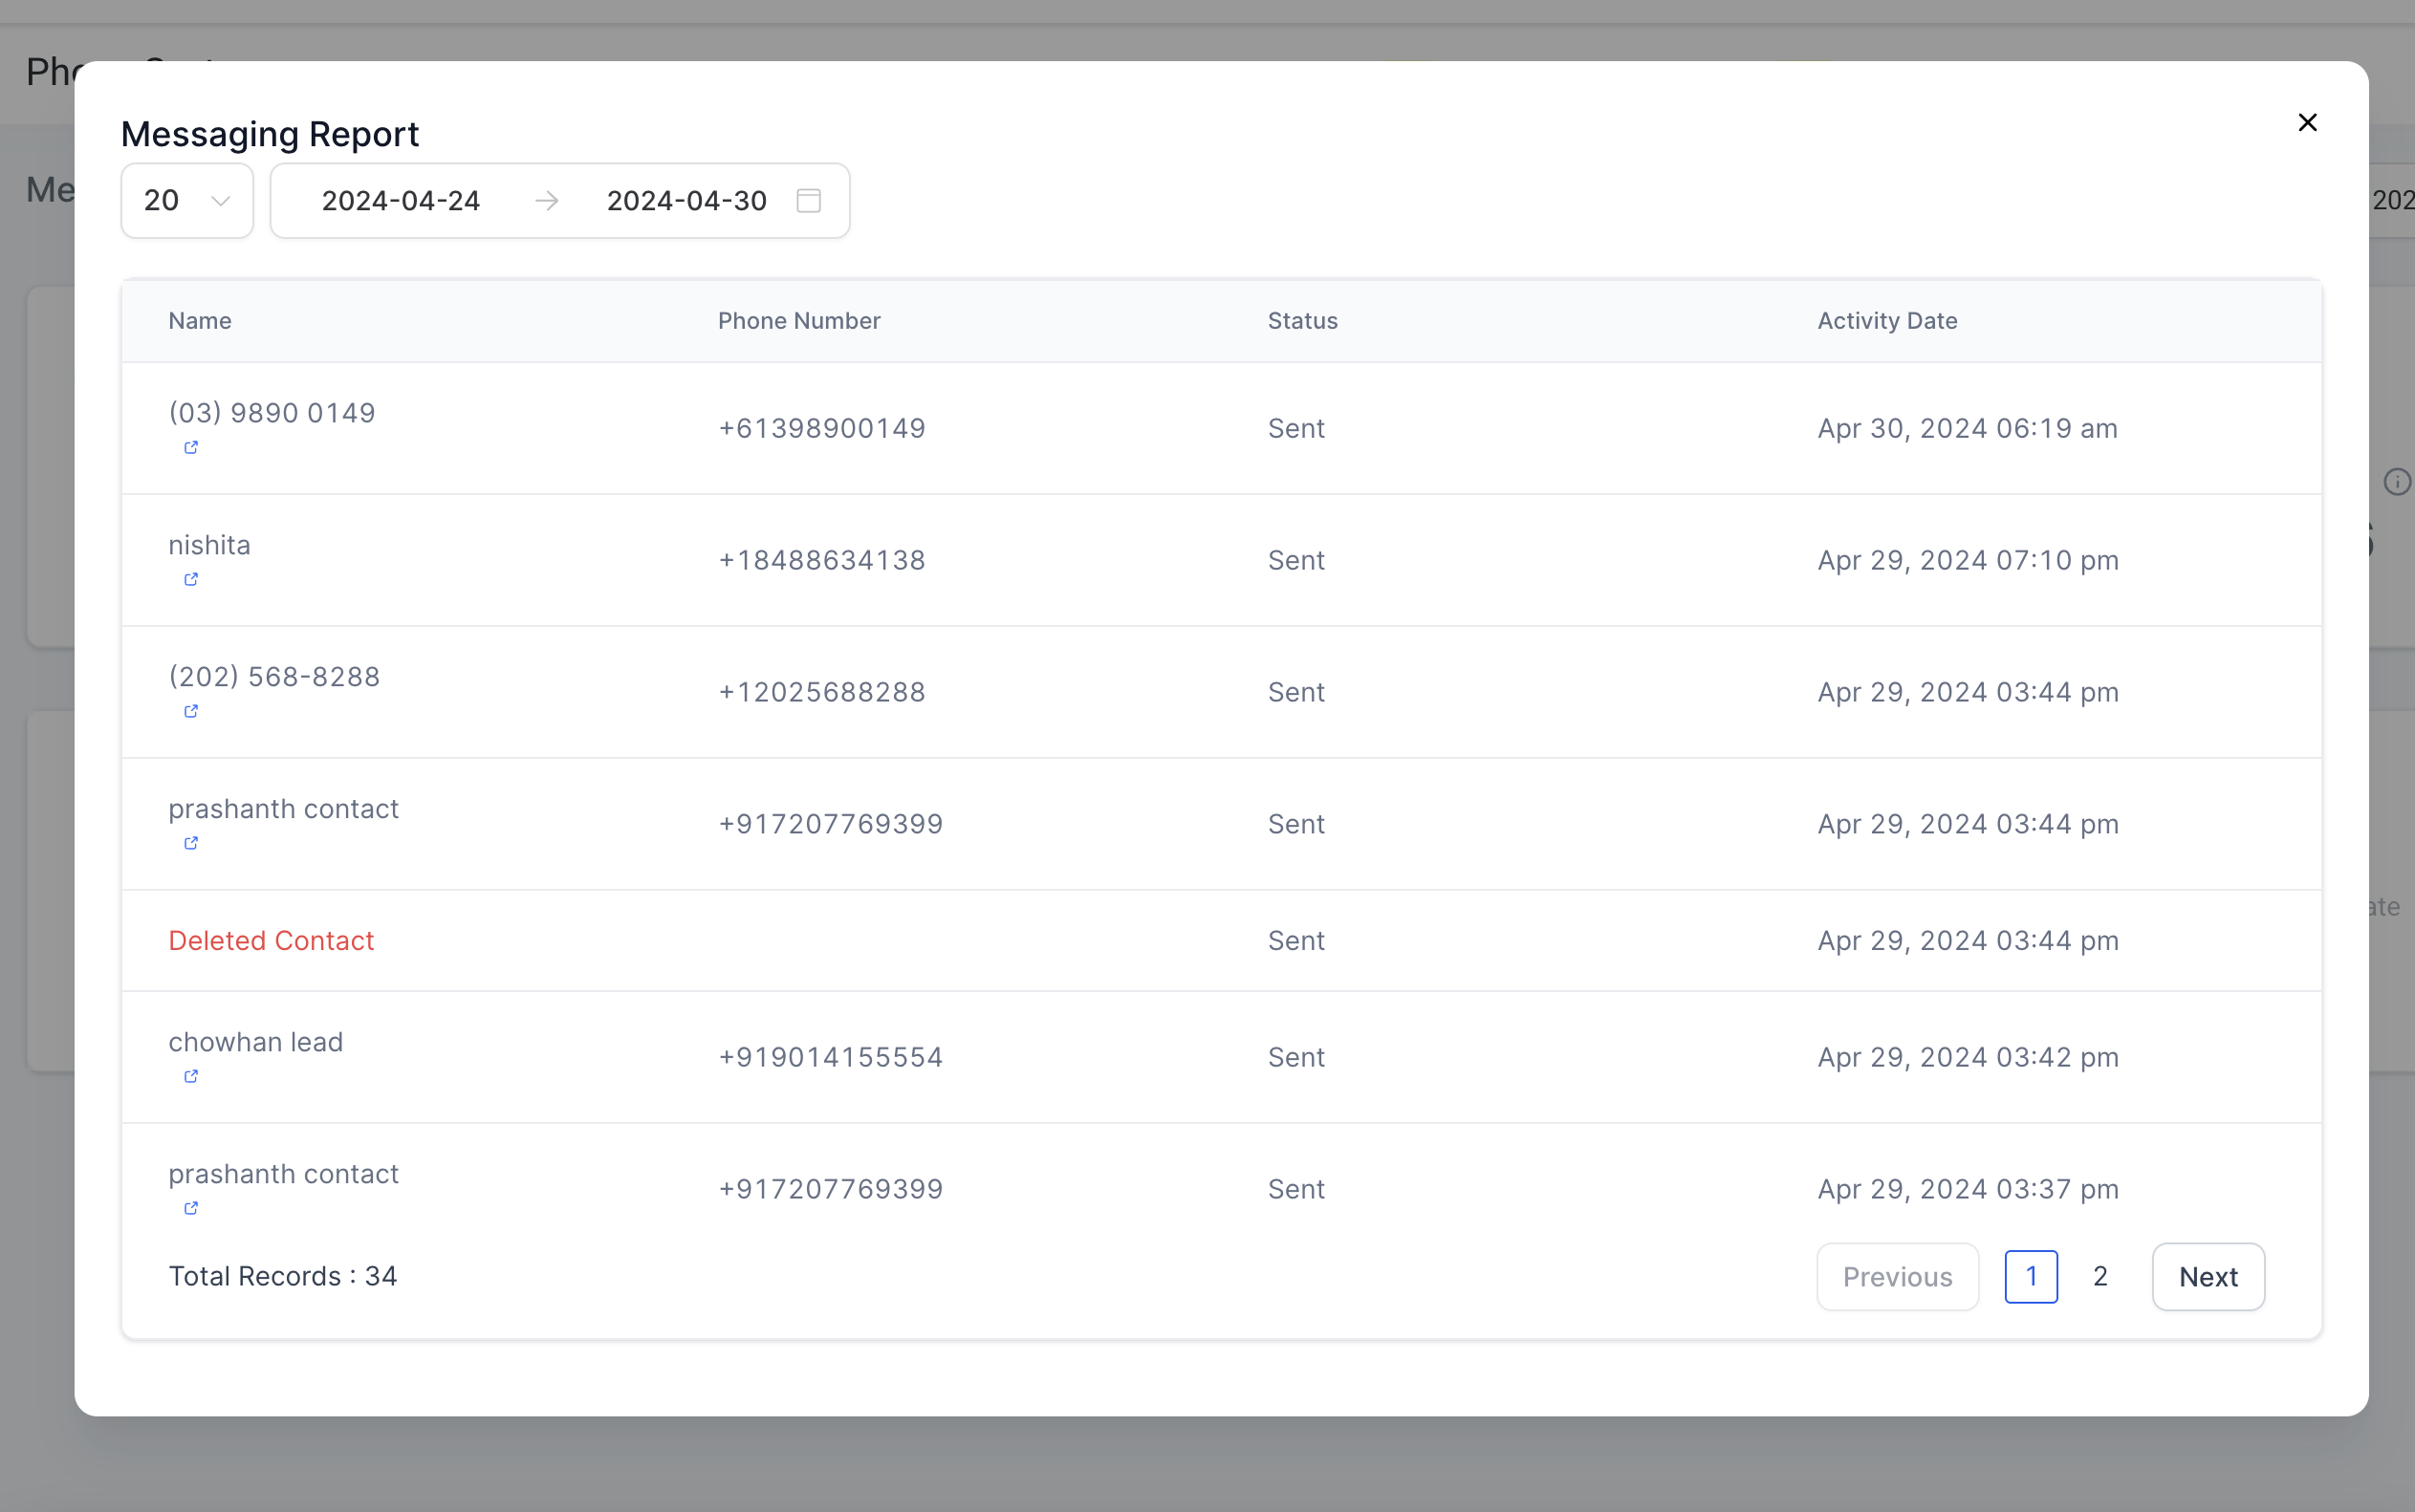
Messaging analytics for LC phone and Advance Settings
We’re excited to introduce Messaging Analytics for LC phone clients, now accessible under the Phone Number page. Gain insights and track the effectiveness of your SMS campaigns. Key features include:
Comprehensive Metrics: Monitor sent, delivered, undelivered, and error rates.
Advanced Filtering: Utilize filters like campaign, workflow, and bulk request along with date filters to drill down into your data.
Detailed Reports: Access detailed message reports for each status, with the ability to navigate directly to the conversation page for full context.
How It Works:
Navigate to the Settings>Labs
Select Messaging Analytics>Enable
Enhance your control with two new additions to the Advanced Settings tab under the Phone Number page.
SMS Limit: Set and monitor SMS sending limits your account. View current limits and track how often these limits are reached.
Voicemail & Missed Call Textback Settings: Upload custom voicemail greetings and set up incoming call timeouts to better manage caller experiences.
How It Works:
Navigate to the Settings > Labs to enable either feature.
Bug Fixes
Phone Number Relinking/Delinking: We’ve fixed an issue affecting the relinking and delinking of phone numbers to the A2P messaging service across multiple accounts.
A2P Submission Error: The “Invalid status transition for bundle” error, which occurred in A2P submissions when the customer profile was in draft, has been successfully resolved.
Calendars
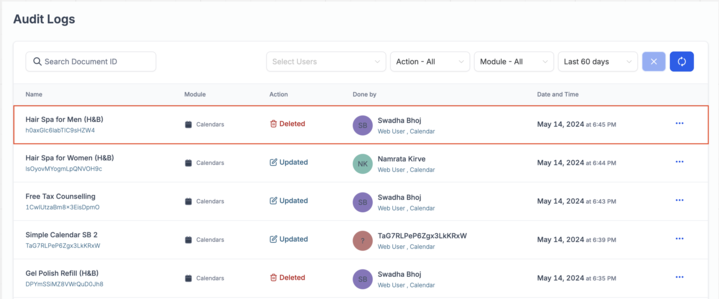
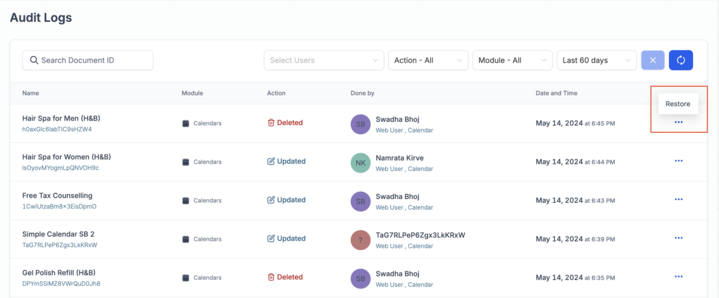
Restore Calendar Functionality
Users can now utilize the “Restore Calendar” feature to recover deleted calendars along with their appointments. This functionality fills a crucial gap, allowing users to undo their actions with ease.
How to Use?
Navigate to Settings > Audit Logs.
Identify the log entry corresponding to the deleted calendar.
Click on the three dots next to the log entry and select “Restore.”
Your calendar, along with all its previously deleted appointments, will be successfully restored.
Please Note:
If you’ve deleted a calendar, all appointments associated with it are also deleted.
Appointments deleted within ±30 minutes of the calendar deletion time will be restored.
Any appointments deleted outside of this timeframe will not be recovered.
Audit logs are retained for a maximum of 60 days. Ensure timely restoration of deleted calendars to avoid data loss.
For example, if you delete a calendar on May 15th at 10:00 AM, all appointments of that calendar will be immediately deleted as well. These appointments are essentially deleted within a timeframe of 30 minutes from the calendar deletion time. When you restore your calendar, all such deleted appointments will be restored. However, if you had deleted an appointment on May 15th at 9:00 AM, that appointment won’t be restored.
Funnels & Websites
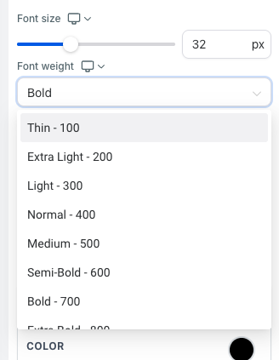
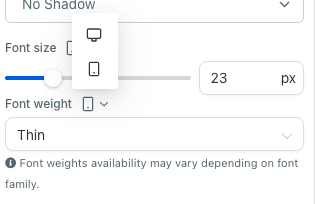
Font Weight Option
Users now have the flexibility to select the font weight for any given component within their website or funnel. The font weight option is available across a wide range of components, including text components, buttons, category navigation, FAQs, countdown components, navigation menus, store components, and image feature components.
You can choose to show different font weight for mobile and desktop view.
How to use it?
Navigate to the page builder interface.
Select any component from the list mentioned above.
Below the font size settings, you’ll find a new dropdown option for font weight.
Choose your desired font weight. You can also customize different font weights for mobile and desktop versions.
Save or publish your changes to see the updated font weight reflected on your website or funnel.
Note:
1- Not all font families support all the font weight which means select font weight might not have any effect on text style if the family doesn’t support the given font weight.
2- Font weight option will not apply if you have bold the text using text editor. Text editor bold option will take priority over font weight option.
Loading and navigation speeds
With this update, users will notice a remarkable improvement in the time it takes to open the builder and switch between pages, restoring pages, opening and routing back to the main app. Enjoy a smoother, more efficient workflow as you create and edit your funnels or website with ease.
What has improved?
Faster page switching in the builder: Switching the pages no longer reload the whole app, page switches are now faster than 80%.
Improved version restore process: Opening the versions page and restoring the page is now faster without the need of reloading the whole builder.
Switch between the builder and main app almost instantaneously: Routing between the main app and the builder is now significantly faster (back buttons)
New enhanced loader: A new loader has been introduced when the builder is opening instead of a blank white screen. This will help indicate the user that the builder is loading.
Internal code cleanup : We have cleared up a lot of code from the old builder, which helps in improving the builder performance and scaling with new features!
What’s next?
We plan on improving the performance of the builder and adding more features that can improve the user experience of building funnels & websites.
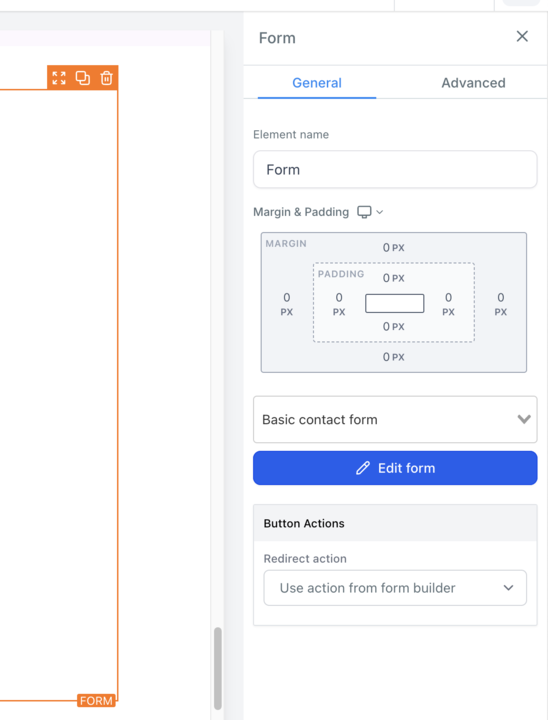
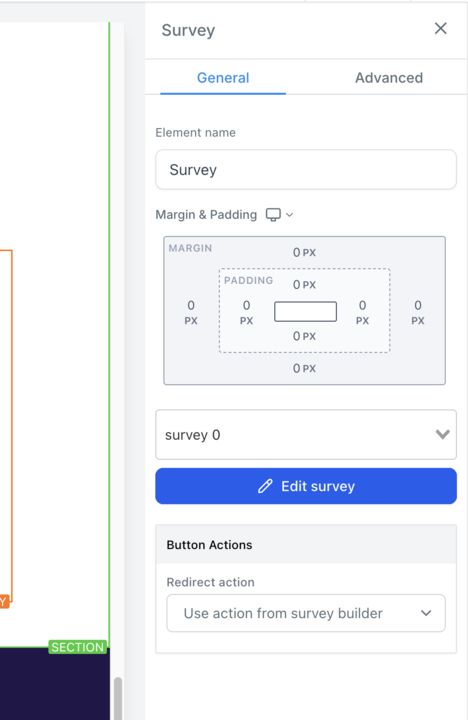
New Edit Button in Builder
What’s New?
Introduced a new edit button for form and surveys element in the funnel builder.
Users will now be able to open the form or survey builder directly from the funnel builder to make changes on the go.
On clicking the edit button, the respective builder will be opened in a new tab.
Once you make changes in your forms and surveys, it will automatically be visible on funnel preview.
On refreshing funnel builder changes will also be reflected in the builder.
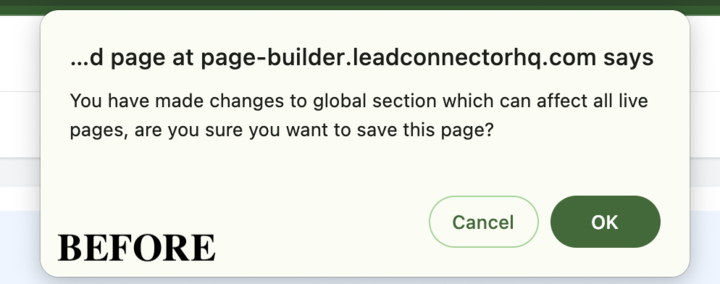
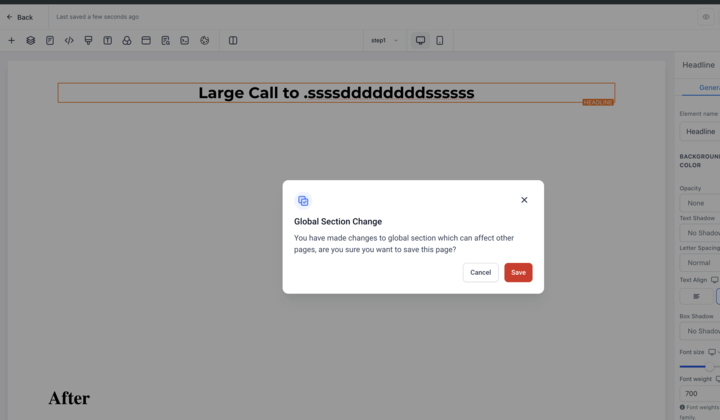
Builder Alerts
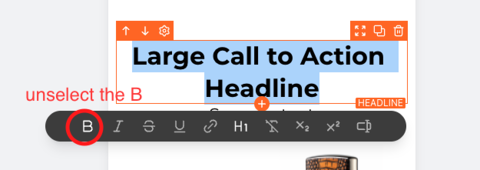
We’ve replaced the native browser alerts with sleek custom modals across the funnel builder. Now, when users encounter alerts, they’ll see our custom modals instead of the default browser ones, ensuring a consistent and polished experience throughout.
Social Planner
Updated UI Settings
We are bringing a better improved UI to help users get a better experience. For Social Planner, following things with the Social Planner Settings
Social planner is growing with the number of socials, the screen requires lot of scroll to find the expired and connect new connect socials
With the options of creating new category with better tags and pagination
For rendering the watermark image in the list view
Bringing better organization and UI of Social Planner
Notification for Failed Post, Account PreExpiry, Account Post Expiry
We have added 4 new Email Notifications( now a total of 6) for informing our customers using Social Planner.
Account Expired – Social Accounts whose tokens have expired
Account PreExpiry – Social Accounts like Facebook pages have expiry of 90 days, before 90 – around 80th day user to get notified to refresh the token
Request for Approval – Social Post which is scheduled for approval, requesting the user to approve the scheduled post.
Post Approved update to Creator – Notifying the creator of the post if the scheduled post was approved
Post Rejected update to Creator – Notifying the creator of the post if the scheduled post was rejected
Post Failed – Notifying the users selected about the scheduled post has failed
To change the template, the user can click on settings to edit the template or they can edit the template form Emails > Template > New > Template Library > In template library, on side navigation there is option to change the system templates.
How It Works:
For Setting up the notification, navigate to Marketing > Social Planner. There is an option of Settings beside the Create New Post option. Users can enable or disable the email notifications.
Memberships
Deleted offers in revenue analytics & Post details revamp
Introducing the new and improved Lesson Details Page – your go-to guide for getting the most out of your learning journey! Explore each lesson with updated features, making learning easier and more enjoyable than ever.
Presenting our new video player, designed for an upgraded viewing experience.
Enjoy effortless file management with our improved upload and download features.
Explore our upgraded text editor for a smoother writing process.
Deleted offers in revenue analytics
Previously, when offers were deleted, they were not included in the revenue analytics data, leading to inconsistent information. Now, deleted offers will be included in the revenue analytics dashboard, providing more accurate insights into one-time purchase revenue.
In the charts, deleted offers will be represented by different shades of red, making it easier to distinguish them from active offers. Additionally, deleted offers will be displayed in a table format, with a column indicating the date of deletion, enhancing visibility and understanding of the data.
E-commerce
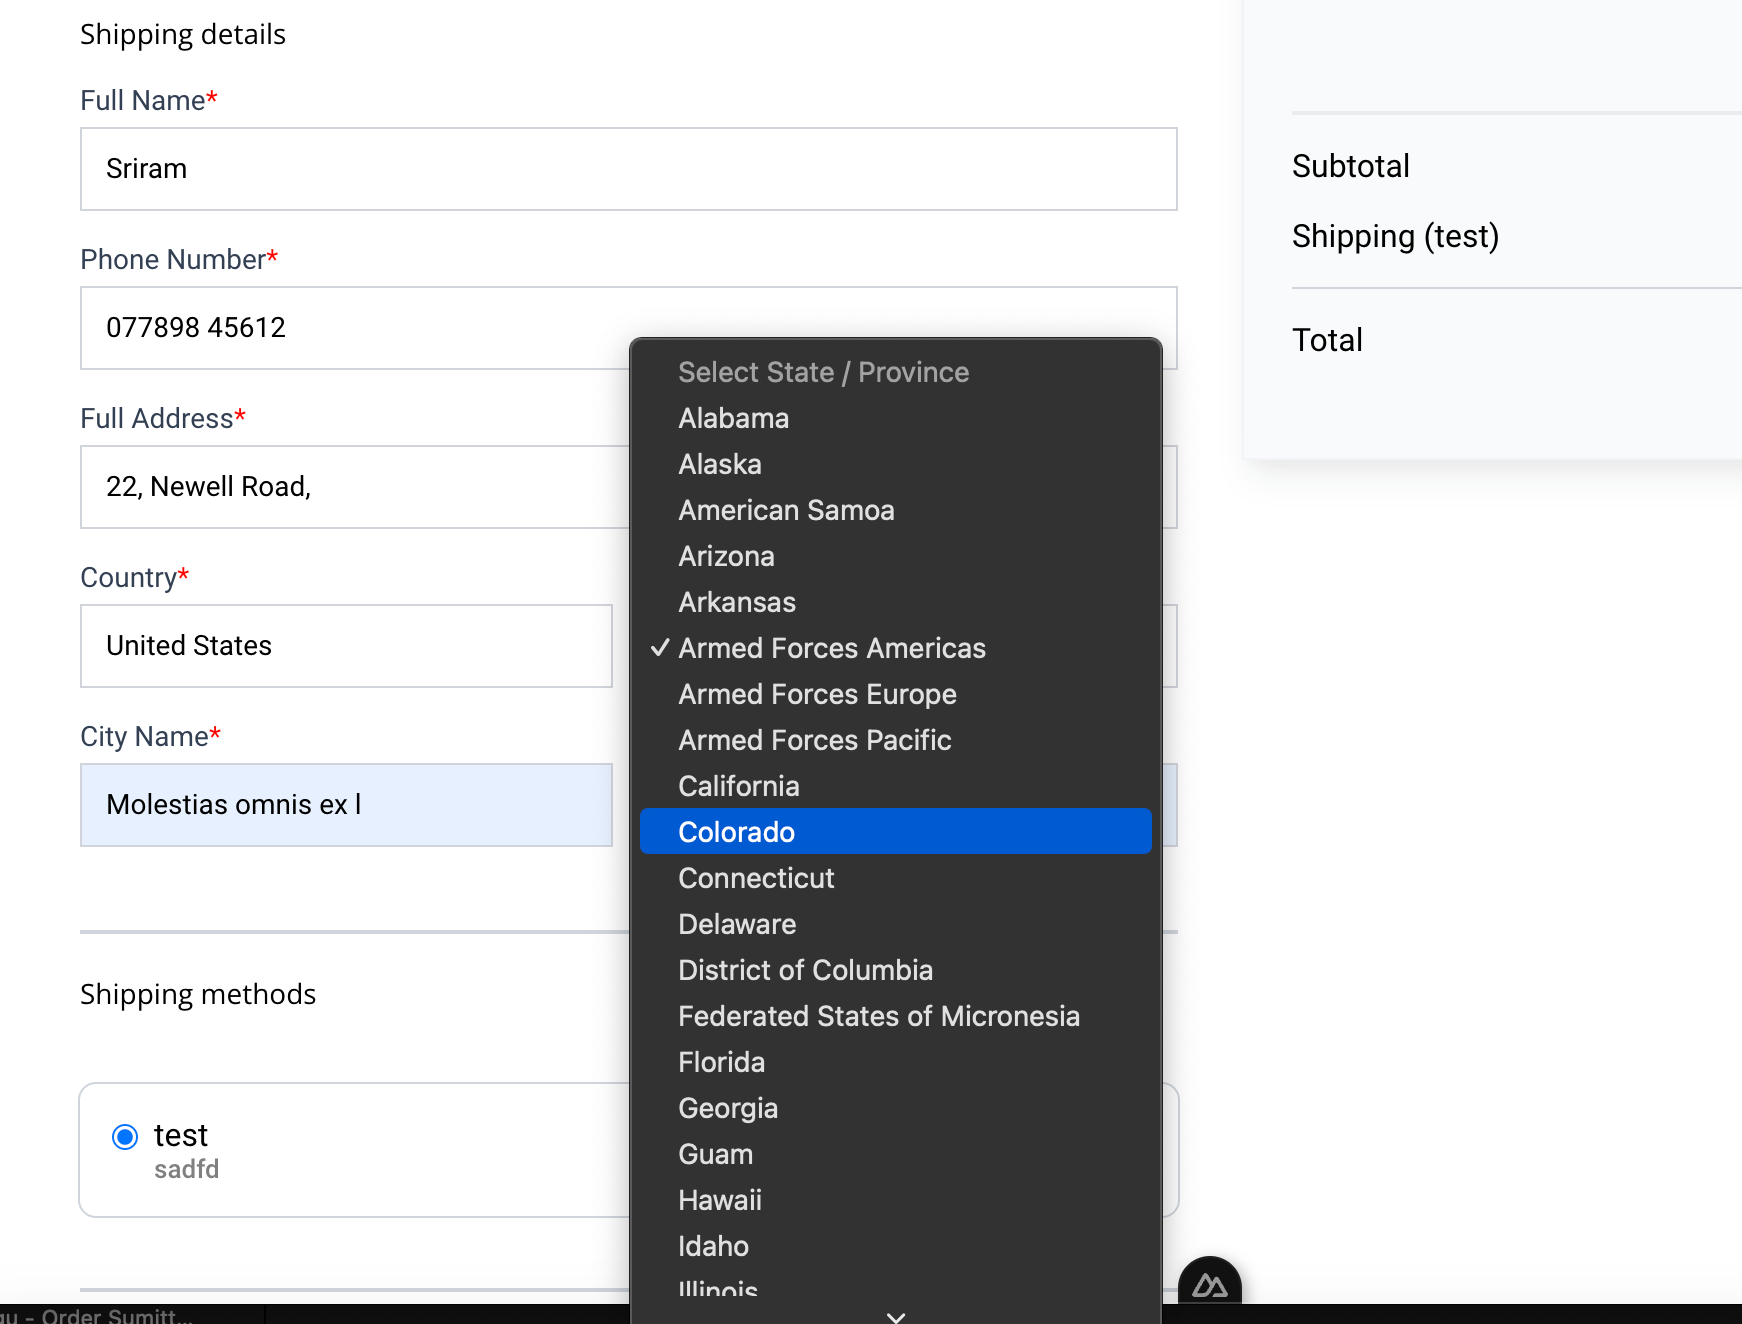
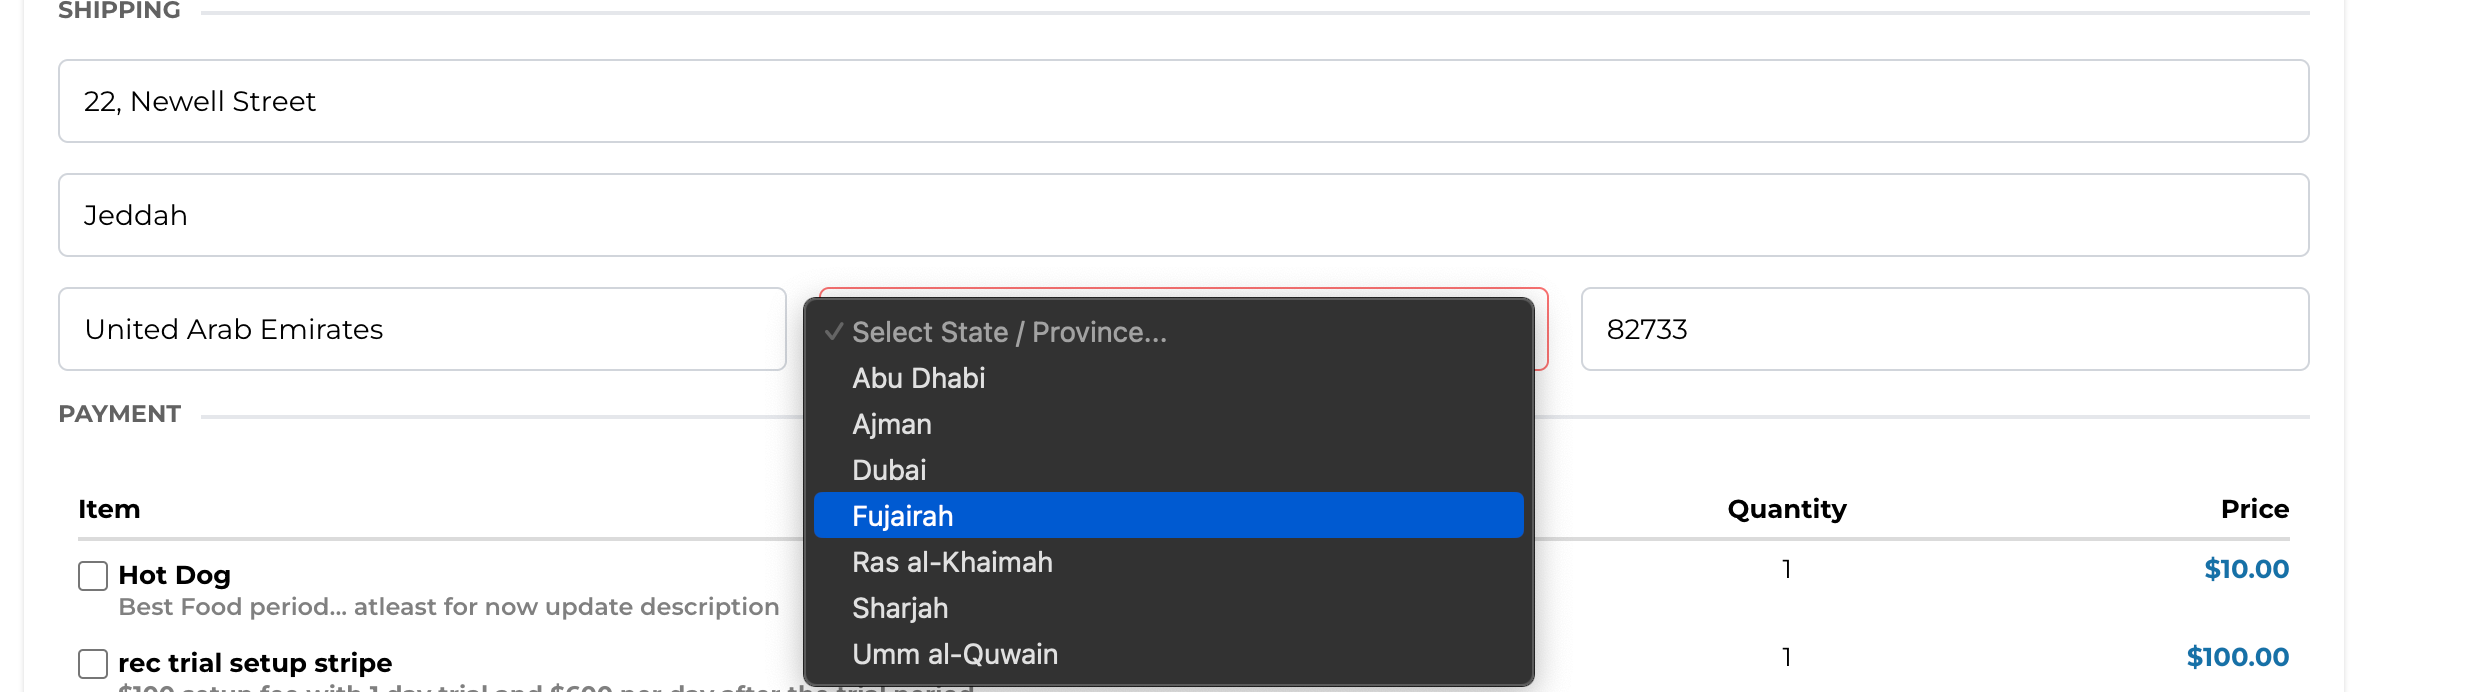
State dropdown in E-commerce stores & order forms
Earlier, users needed to manually enter the states for a country which was a string based field. This was leading to issues on mapping the state codes to a specific state and the entered state couldn’t be mapped properly. To avoid this issue, we have brought a state drop down field where a user can choose States/ Provinces/ Territories mapped to a specific country. This will also help us with upcoming features like Printful integrations, Shipping, etc.
Description:
Order forms and Ecommerce now have dropdown for the ‘State/Province’ field.
Upon selecting a country, the respective set of states would load for the given country, and a selection can be made from that list.
If there are no states present in the country, the state field will not be shown.
This helps us track addresses and states better and would help us with the upcoming features.
Ecommerce Store checkout page:
Order forms page:
New Search Bar
How to use it?
Navigate to the page builder of your store, and add the Search Bar Element. This would be under the Store section in the elements.
If you would like to enable the search bar in your navigation menu, you can use the “Show search bar” toggle present in the navigation menu settings.
Configure properties for the search bar. Some of the properties that can be configured are:
Search button color
Search input box text and background color
Search dropdown text and background color
Border color for input field and dropdown
Font size and weights.
Note: Navigation menu customization for search bar is limited. All customization options are available only in the standalone element.
Click on save/Publish to view your changes in your site!
Some key aspects:
Only websites where stores can add this element, into any page (Store, non-store).
The search suggestions (Dropdown), will have search results searching from the title/name of the product.
Upon clicking on search, the user is navigated to the product list page, showing search results, which would search based on title as well as description
Forms & Surveys
UI/UX Enhancement
What’s new?
Opening Form/Survey Builder have flicker between Old default style and New Default Theme
Renamed folder option “Edit” to “Rename”
Delete/Upload template/ share/ duplicate/ move to folder all these option was not showing form/survey name on popup which was creating confusion
Color of export button should be blue it is red which was not consistent
Able to create a folder without any name on the UI.
Alphabetical casing consistency throughout product
Documents & Contracts
Add Descriptions To Products
Now you can add descriptions to your product list that helps to explain the service/product to the signer better.
How to Use?
Drag a Product List element from the element tab
Add a product and the description gets auto populated
Click on the description and edit it if needed
Conversations
Live Chat: Automatic Contact Merging
When a live chat visitor provides a phone number or email that matches an existing contact, the new contact is automatically merged with the existing one. All conversation history will also be merged when a contact is merged.
Client Portal
Kollab by LeadConnector is Now Live on the Android Play Store
We’re super excited to share that Kollab is now rocking it on the Android Play Store. Simply visit the Play Store, search for Kollab by LeadConnector , and tap “Download”.
How to sign-in:
Make sure you are signed up with a Community group, Course or Client Portal.
Use the same credentials to sign-in i.e. same email ID and password.
If you have forgotten your password (just like me!), Sign in with OTP
If you are a part of multiple domains, you’ll receive the option to choose which domain to enter into. Choose the relevant one to sign-in.
Once you are signed-in, enjoy your courses, groups all on the go!