
Welcome to your weekly round up of updates through October 16, 2025.This week’s release is packed with high-impact upgrades across Voice AI, Automations, Forms, and more. If you have any questions regarding these updates, please email us at [email protected] or in live chat within the app.
Your AI agents can now place outbound calls automatically, turning follow‑ups, reminders, and lead outreach into hands‑free, 24/7 conversations. No manual dialing, no missed leads—just faster connections and smarter engagement.
Step 1: Enable Outbound Calling and Accept the T&C
Step 2: Do your KYC (with Persona) to verify your account
Step 3: View all the non compliant product touchpoints. All products should seek consent from user to receive an automated business call. This is a very important legal consideration to limit spams calls to your customers.
Step 4: Insert the right consent disclaimer. Consult with your legal team for the right consent msg, they should contain the following consent language.
Notes & Limits
Calls are made at a rate of one call per minute per location. Each location can make up to 100 calls per day. Each phone number can be called only once per day (additional calls are scheduled for the next day). Max 4 calls in 2 weeks to any number. Calls are scheduled only between 10:00 AM and 6:00 PM in the contact’s timezone. Calls can only be made to opted‑in US numbers, with DND off. Toll‑free not supported. Voice engine charges waived until Dec 31, 2025 (LLM pricing applies).
Compliance & Transparency
AI disclosure at call start; optional recording consent; DNC & KYC checks.
Address Auto‑Complete is now unlocked for all accounts in Forms and Surveys—no cost and unlimited usage.

Capture Custom Object and Company Object data directly in Forms, Surveys, and Quizzes—no workarounds.

A clearer guided builder (IF → STATE → VALUE), expanded field support, new operators like Between, slide‑level branching, and richer show/hide rules.
Choose Manual (hand‑picked) or Smart (rule‑based) collections to organize products.
Manual: Search, browse, and select products to add.
Smart: Define rules using fields like Title, Variant Title, Price, or Inventory.
Save your collection. Smart collections auto‑update when product data changes.
Key Notes
Permanent type (cannot switch), inclusive matching by variant/row, rule validation, background processing, new products auto‑added if they match.

Connect to Printify’s 85+ providers and 1,000+ POD products with product and fulfillment sync.

In the Advanced Builder, click the Workflow Switcher button on the left sidebar (or Shift + W).
A side panel opens showing your most recent workflows (plus search).
Selecting a workflow opens it in a new browser tab so your current canvas stays put.

In Advanced Builder, click the Keyboard Shortcuts pill (or press K) to open the overlay.
Shortcuts are grouped by tabs: Essential, Edit, View, Navigation, Tools.
Use ⌘ on Mac / Ctrl on Windows/Linux.
Highlights
Edit: ⌘/Ctrl + X/C/V; copy/cut/paste all onward: ⌘/Ctrl + Shift + C/X
View: + / – / 0 / 1
Navigation: →/←/↑/↓; Shift + ←/→
Tools: ⌘/Ctrl + S, ⌘/Ctrl + A, Delete/Backspace, ⌘/Ctrl + Delete, Tab/Shift+Tab

Lay out independent branches in one canvas; each branch can run separately.
Set a start action per trigger—no more giant if/else stacks.

Disable any action during testing without deleting it.

Run workflows on a schedule—hourly, daily, weekly, monthly, cron‑style.

View attempted, matched, and unmatched counts with contact‑level reasons.

Readable summaries of trigger filters directly on the card.

Track versions with timestamps, editors, status—and restore drafts.

Step back or forward through canvas edits; jump to any recent change.

Describe an automation goal; AI builds the full workflow and content.

A centralized dashboard for enrollments, triggers, and errors.

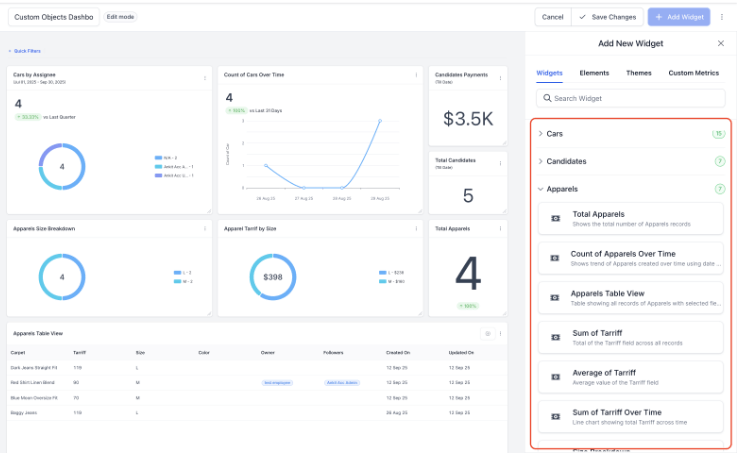
Create object‑specific widgets (count, sum, average) for deeper insight.
Step 1: Settings → Objects → Add Custom Object.
Step 2: Add singular/plural names, internal name, primary display field, icon, description → Create.
Add Widgets: Open Dashboard/Report → Edit → Add Widget → Custom Objects → configure filters/chart/theme → Save.
Add widgets for Purchases, Clicks, Spend, CPC, CPM, CTR, Conversions, Reach, Top Campaigns, and more.
Open Dashboard/Report → Edit → Add Widget → Meta → customize filters/chart/theme → Save.

A single Voicemail tab with search, playback, transcripts, and one‑click follow‑ups.
Dialer shows contact’s local time and warns before calling outside 8am–9pm.
Edit friendly name, recording, forwarding; view call flow; route to devices/users.
Enable in Labs (Company) → then Sub‑account Settings → Phone Numbers → Edit Configuration.

Full support for transferring IVR calls, including multiple transfers per call.
Receive calls from up to 10 selected locations—ringing even if you’re in a different sub‑account.
New app drawer, universal search, role‑based visibility, dark mode, faster performance, and an Ask AI assistant.
Send images (JPG, JPEG, PNG, HEIC) and PDFs—up to 5 files per message.
Visitors click the paperclip (or drag files on desktop), pick up to five files, type a short message, then Send.
In Conversations, click images to preview or download; HEIC/PDF will download.
Real‑time, browser‑based voice conversations inside the Chat Widget—no phone numbers or apps.
Step 1: Settings → Labs → enable “Voice AI Chat Widget.”
Step 2: Sites → Chat Widgets → Create (Voice AI type) → select Voice AI Agent and Agent Name → Save.
Step 3: Get Code → paste the script on your site/funnel page.
Visitors click the mic icon to talk to your AI agent in the browser.

Track Google Trends, Pinterest Keywords, Wikipedia Pageviews, TikTok breakout songs/hashtags, YouTube trending content—all inside Social Planner.
Open Social Planner → Social Listening tab → select a data point → apply filters → use insights to plan content.

Open Social Planner → Connect Threads → authenticate via Instagram login → create posts (text/images/videos) → save/schedule/auto‑publish.

Open Social Planner → + Socials → Connect Bluesky → authenticate with handle + app password → compose posts (300 chars, 4 images or 1 video), tag users → save/schedule/auto‑publish.

Open Social Planner → Comments → select a post → view/reply in the new Comments tab → use filters for top/all comments.

Sites → Blogs → Import via CSV (from New Post → “Import Blog Posts from CSV”).
Download the sample template → upload file → review in Bulk Composer → fix errors if needed → confirm to import as Published/Scheduled/Draft.

Sites → Blogs → Blog Builder → Site Editor.
Drag Subscribe Form onto your page → style → publish.
(Option) Set up RSS email campaigns by tag to auto‑notify subscribers.

In Workflows, search Typeform → select a trigger or action → Connect Now → log in to Typeform.
(Triggers are instant; actions are premium and billed per execution.)
Sub‑account Settings → Integrations → Google Business Profile.
Connect/manage pages → add WhatsApp/Text numbers (CRM numbers recommended) and social links → review & save.
Campaigns → Import → connect FirstPromoter via API → select campaigns → resolve affiliate conflicts (merge/skip) → start import.
Dashboard now shows revenue, customers, churn, leads, commissions.

Format notes/tasks with bold, italics, underline, lists, links; consistent rendering across Contacts, Opportunities, Companies, Dashboards.

Auto‑save edits, faster load, unified panels, keyboard shortcuts, sticky save bar, and persistent preferences.
Admins can rename Contacts, Opportunities, Companies (singular/plural) across the app.

Contacts → ⋮ Find Duplicates → choose match keys (Email/Phone/Name) → review up to 10,000 dupes → merge up to 10 at once with conflict resolution → confirm.
Exports run asynchronously and appear on Bulk Actions with status + download. Push notifications alert you when ready; files retained 30 days. Only Location Admins can download.

Settings → Pipelines → select pipeline → assign View / Edit / No Access by user/role → use Bulk Reassignment when revoking owner access.

Settings → Pipelines → [Pipeline] → Smart Tags → Add Smart Tag (color, name, rule) → preview → save.
Show tags on cards via Customize Card → Add fields → Smart Tags.

Link a single task to multiple records (Contacts, Opportunities, Companies, Custom Objects). Find tasks with advanced filters and see all links in the “Associated Objects” panel.
Marketing → Email Builder → Campaigns → create → Send/Schedule → Smart Send → Get Recommendation → launch and review uplift.
Marketing → Email Builder → Campaigns → Workflow campaigns (or Automations → Workflow campaigns) → add/edit Email Action → start from Quick Compose/Smart Builder/Template Library → expand Advanced Settings (Link Tracking, UTM, Tags on Actions) → save.
Contacts → Smart Lists → select contacts → Send email → choose Quick Compose/Smart Builder/Template Library → Advanced Settings → review/send.
Reputation → Overview → Competitor Analysis → add competitors → explore Positioning Grid, Sentiment HeatMap, Keyword Themes, Ratings by Source.
Available under Reputation → Settings → Reviews AI.
FGF Notifications

![]()
![]()
![]()
![]()