Here are our release notes for FG Funnels from October 18th, 2023 through October 27th, 2023. If you have any questions about these updates, or other questions about FG Funnels, please reach out to [email protected] or live chat in the app and our team will be happy to help
Calendars
Service Menu (including Service calendar)
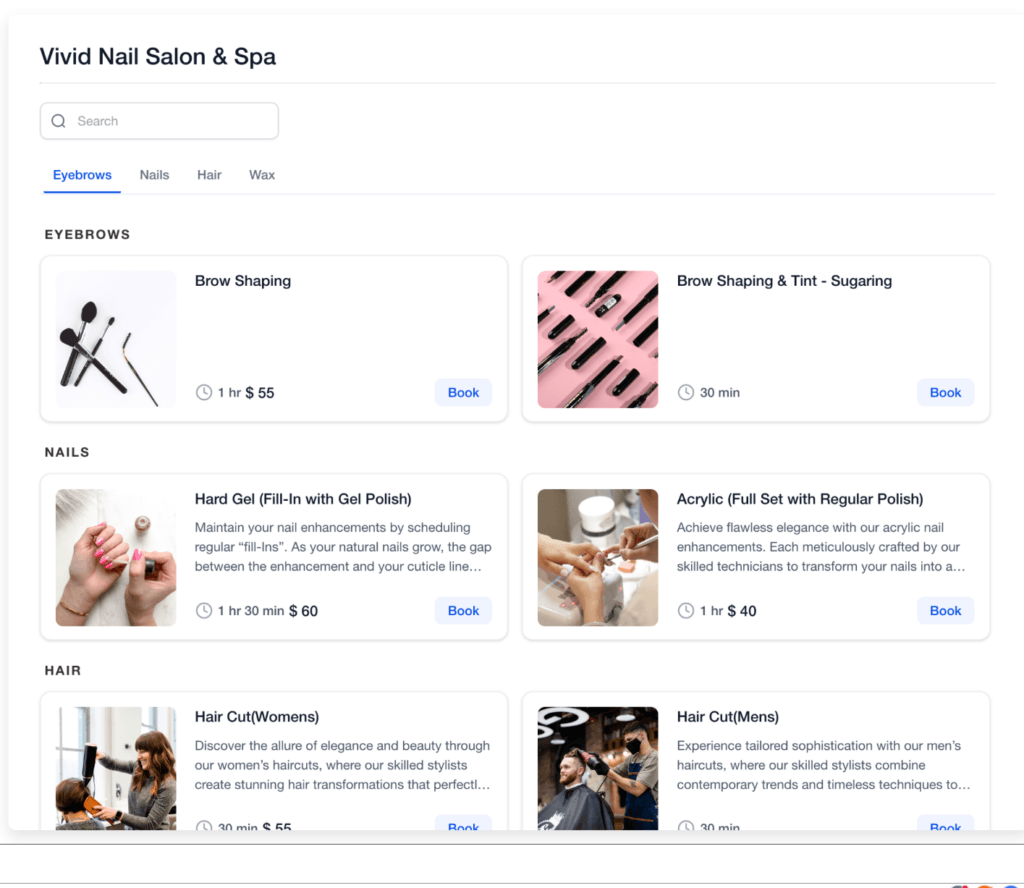
We are thrilled to introduce the Service Calendar, a powerful tool designed to simplify the scheduling process for service-based businesses.
Centralized Service Listing:
Imagine neatly categorized services accessible through a streamlined scheduling link.
Clients can seamlessly book multiple services for themselves or their guests via a single booking widget.
Organize Calendars into Categories:
Set up dedicated calendars for each service, ensuring efficient management.
Group calendars into categories (e.g., “Hair Care” or “Skin Care”) for simplified navigation.
Choose specific groups/services to display on the scheduling page, eliminating confusion for clients.
Streamlined Booking Experience:
Clients can effortlessly book multiple services or appointments for multiple individuals.
Select preferred staff members during booking.
Access essential details like service duration, cost, and assigned staff member for each appointment.
Who Can Benefit?
Salons and Hairdressers
Spas and Wellness Centers
Massage and Therapy Clinics
Fitness Studios and Trainers
Healthcare Providers
Event Planners
Pet Groomers
And more!
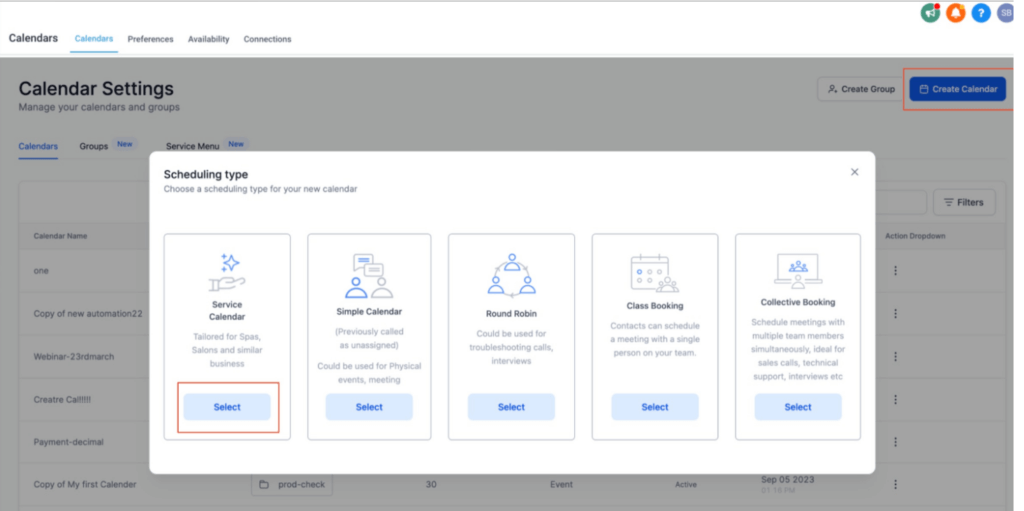
This also includes the release of Service Calendars.
Create Customized Service Calendars
Define unique services and group them by categories.
Integrate with staff availability, allowing configuration of team members, service assignments, durations, and payments.
Hassle-Free Setup Process
Easily create calendars by providing essential details such as name, description, and service duration.
Customize further with advanced options, including service logos and appointment invite titles.
Streamlined Booking Experience
Configure appointment duration, post-buffer times, and minimum scheduling notice for efficient bookings.
Collect client information seamlessly with default or custom forms, enhancing user experience.
Accept payments directly within the calendar, ensuring smooth transactions.
Key Benefits:
Simplified Booking: Clients can effortlessly navigate and book services from a single, organized interface.
Enhanced Client Experience: Access to crucial service details ensures clients make informed choices, leading to higher satisfaction rates.
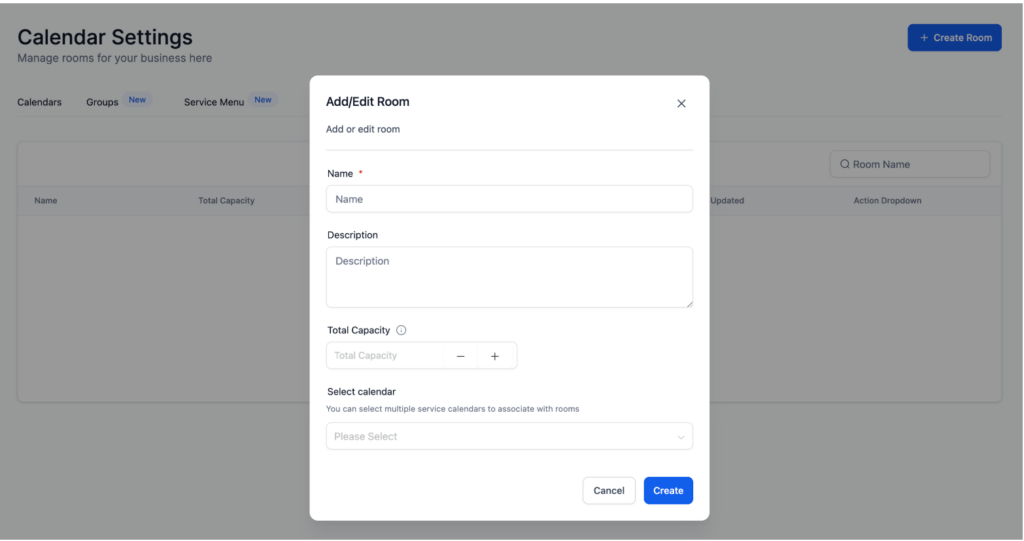
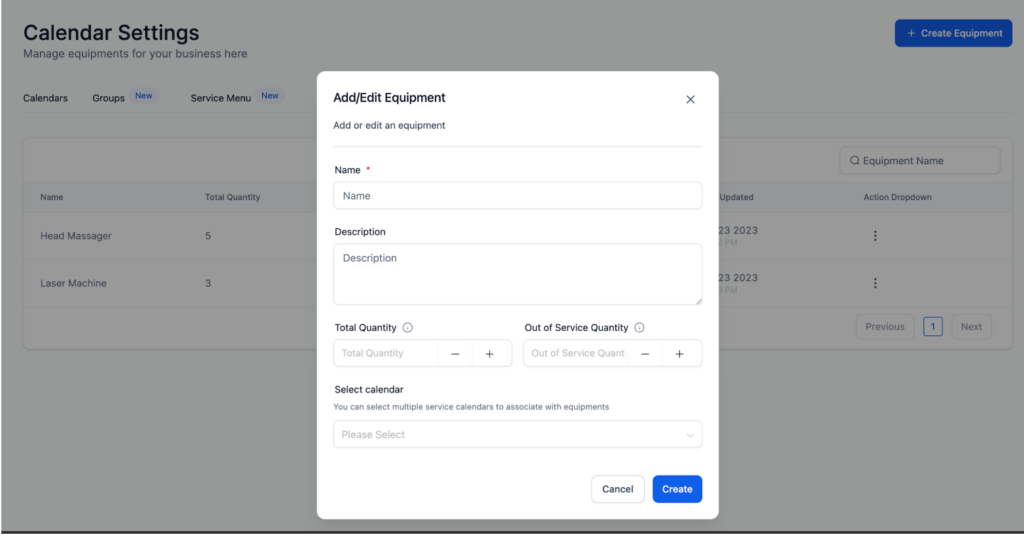
Rooms and Equipments
We are excited to introduce a new feature to enhance our user’s scheduling experience ; Rooms and Equipments.
What are Rooms and Equipments?
Rooms: Represent specific locations within your business where services are provided, such as Massage Rooms or Pedicure Stations.
Equipments: Refer to specialized tools and devices used to deliver services, from advanced machines to simple chairs.
Designed for Service-Based Businesses, this feature is tailored for service-based businesses like doctors’ offices, salons, and healthcare providers, helping them efficiently manage their physical locations and specialized equipment.
Key Benefits:
Create and Manage Rooms
Define unique rooms in your business and maintain a list of available equipment tailored to your needs.
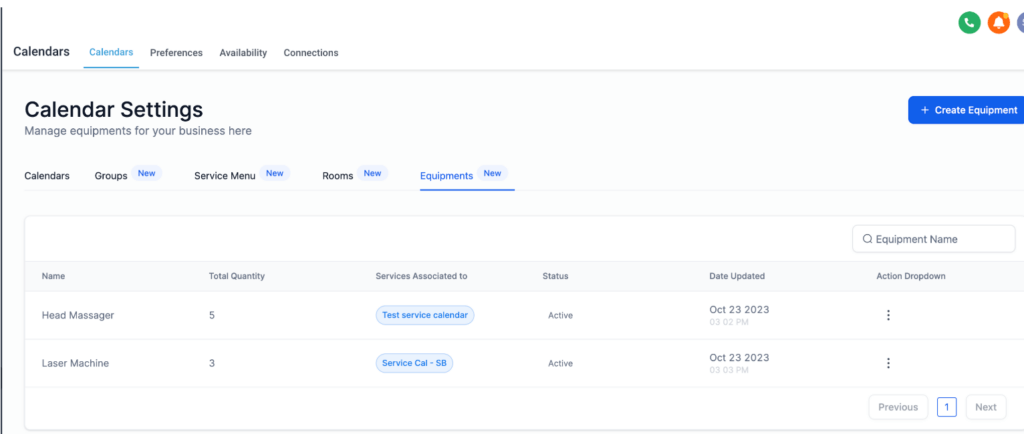
Associate with Service Calendars
Link rooms and equipment to your service calendars.
Bookings automatically reserve the necessary rooms and equipment, streamlining the process.
Avoid Double Bookings
The system considers user availability, room, and equipment availability, preventing double bookings and ensuring seamless scheduling.
Important Notes:
Each calendar can be linked to only one equipment. For example, ‘Laser Machine’ can be connected to multiple calendars, but each calendar can have only one associated equipment, such as ‘Laser Machine.’
By leveraging this feature, you can optimize your resources, ensuring seamless bookings and enhancing customer service.
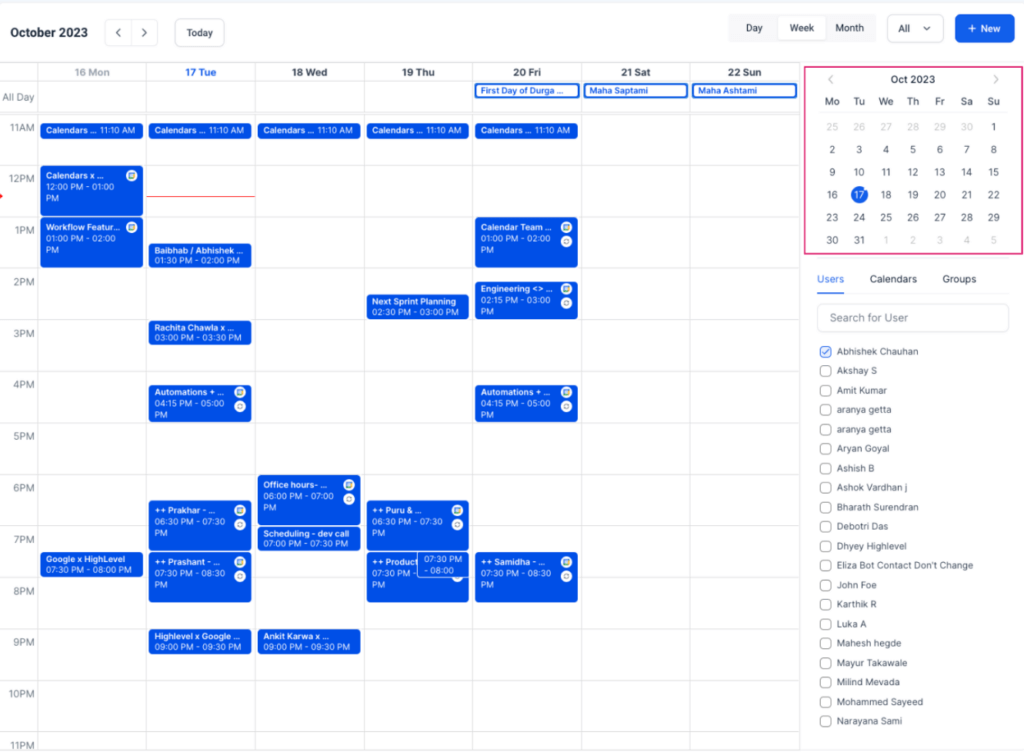
New Calendar view with Calendar Overlay
We have a new, enhanced calendar experience designed to streamline your appointments and elevate your scheduling efficiency. Here’s a breakdown of the key features in this release:
Quick Month View:
Seamlessly navigate through future dates with our intuitive month view, ensuring you stay ahead of your appointments.
Multi-User Selection:
Manage multiple users effortlessly by selecting them at once, providing a consolidated view of their appointments in a single glance.
Multi-Calendar View:
Simplify your schedule by choosing different calendars and consolidating all their appointments into one unified display. No more juggling between calendars—everything you need is in one place.
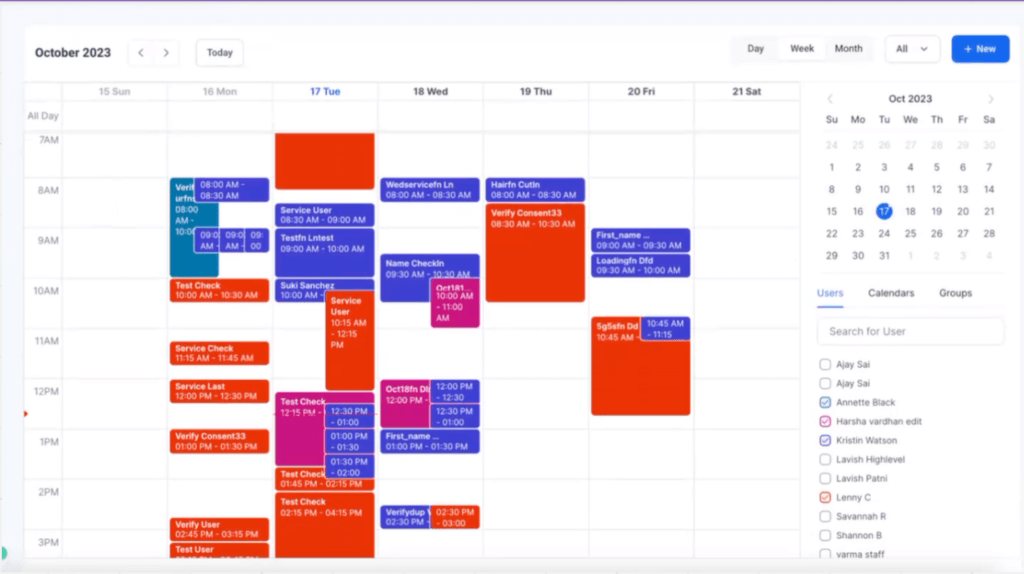
Multi-Group View:
Select multiple groups effortlessly. Appointments within these groups overlay on your calendar, offering a comprehensive overview of your day.
Color Coding for Clarity:
Users: Each user’s appointments are color-coded, allowing easy distinction of schedules at a glance.
Groups and Calendars: Appointments are displayed in colors based on your customized settings, ensuring quick identification.
Intuitive Icons:
Instantly recognize events with our new icons:
Google Event: Synced from Google Calendars
Outlook Event: Synced from Outlook Calendars
Apple Event: Synced from iCloud Calendars
Recurring Event
Blocked Slot: Indicates unavailable time slots
Invalid: Highlights marked invalid events
Persistent Multi-Select:
Your selected calendars and users are remembered, allowing you to seamlessly resume your preferred view with just a click.
Additional Info on Hover:
Hover over any appointment for a detailed snapshot, including event type, title, start, and end times. Stay informed without the need to click—simplicity at your fingertips.
Google Organic Booking Redirect
With Google Organic Booking, Calendars now allows businesses based in the US and having a Google Business Profile to seamlessly integrate their Calendars and Service Menu/Group calendars. This integration enables the automatic upload of booking links to the Google booking feed. As a result, the services start appearing directly in Google search results, enhancing your visibility to potential customers.
How It Works:
Selection Flexibility
Choose specific Calendars and Service Menu/Group calendars that you want to showcase in Google search results.
Boost Your Online Presence:
By having your booking links in the Google booking feed, businesses gain increased visibility, making it easier for potential customers to discover and book their services directly from Google search.
Eligibility Criteria:
Google Organic Booking is applicable to businesses located in the United States.
The business must have an active Google Business Profile.
This feature is poised to enhance our customers’ businesses significantly by amplifying their online presence and furnishing direct booking links to their calendars directly through Google search results.
Workflows
Inbound Calls IVR (Interactive Voice Response)
We are thrilled to announce the launch of our latest innovation: the Interactive Voice Response (IVR) feature, designed to transform customer engagements across diverse businesses. Here’s a breakdown of the exciting functionalities and how they benefit your business:
Record Voicemail Action: Clients articulate detailed preferences, allowing your team to grasp their unique needs and tailor services accordingly, ensuring personalized and memorable experiences.
Say/Play Action: Broadcast compelling promotions, service highlights, or relevant information, captivating clients and driving increased engagement, ultimately leading to higher conversion rates.
IVR Connect Call: Connect clients promptly with the right personnel, ensuring swift and accurate responses. Streamline transactions and issue resolutions, optimizing operational efficiency and client satisfaction.
Benefits for Users
Enhanced Customer Experience: Provide personalized, attentive service, fostering client satisfaction and loyalty.
Increased Engagement: Captivate clients with targeted promotions and engaging content, boosting interaction rates and driving business growth.
Help Article: https://doc.clickup.com/8631005/d/h/87cpx-121087/b8f5a98078c1453
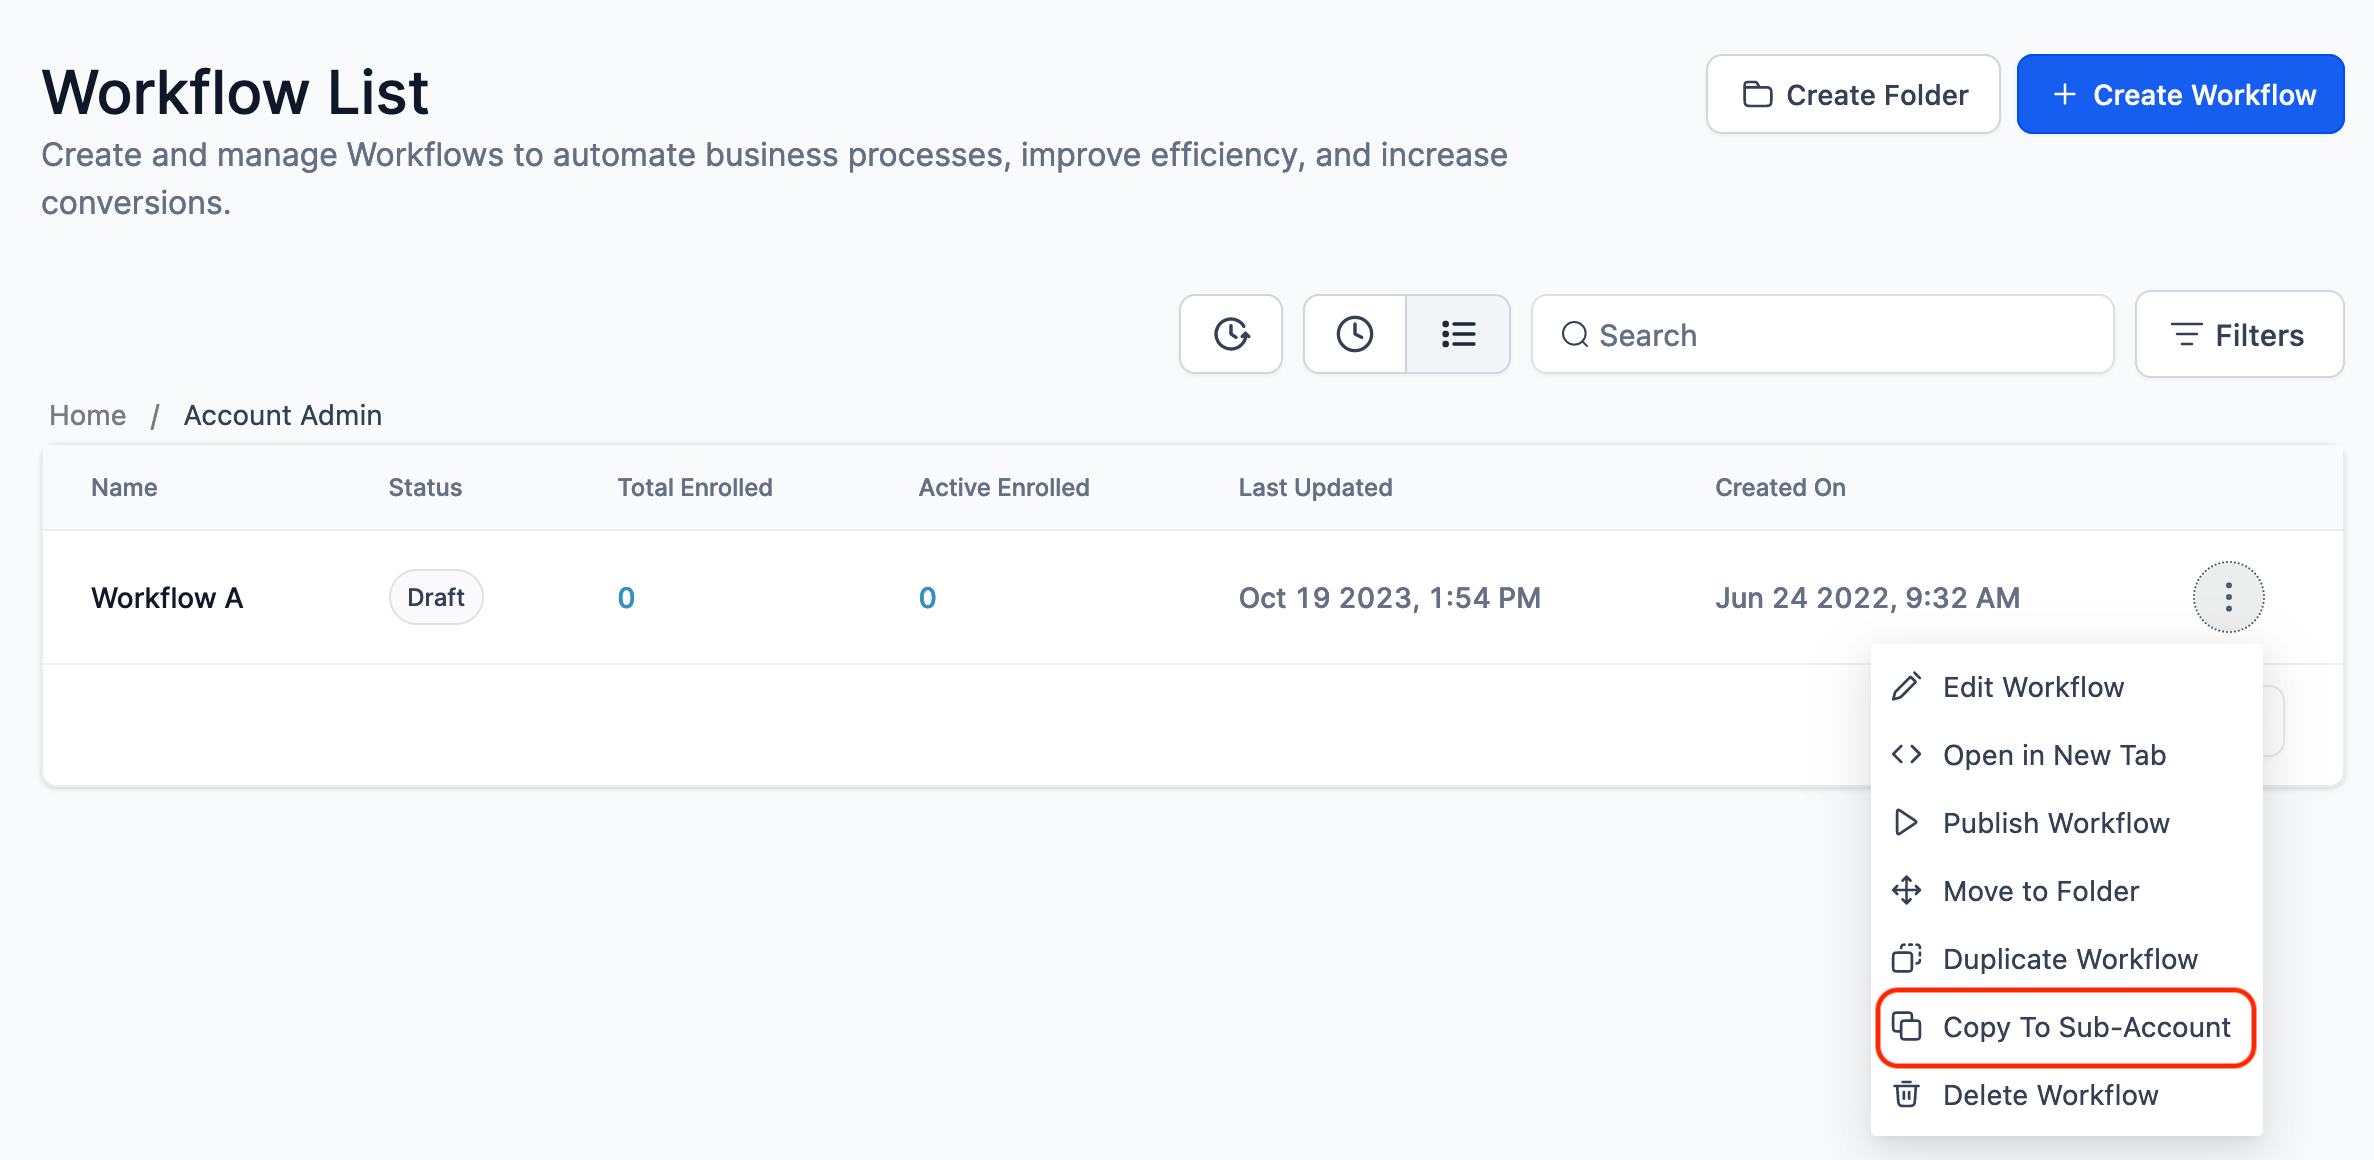
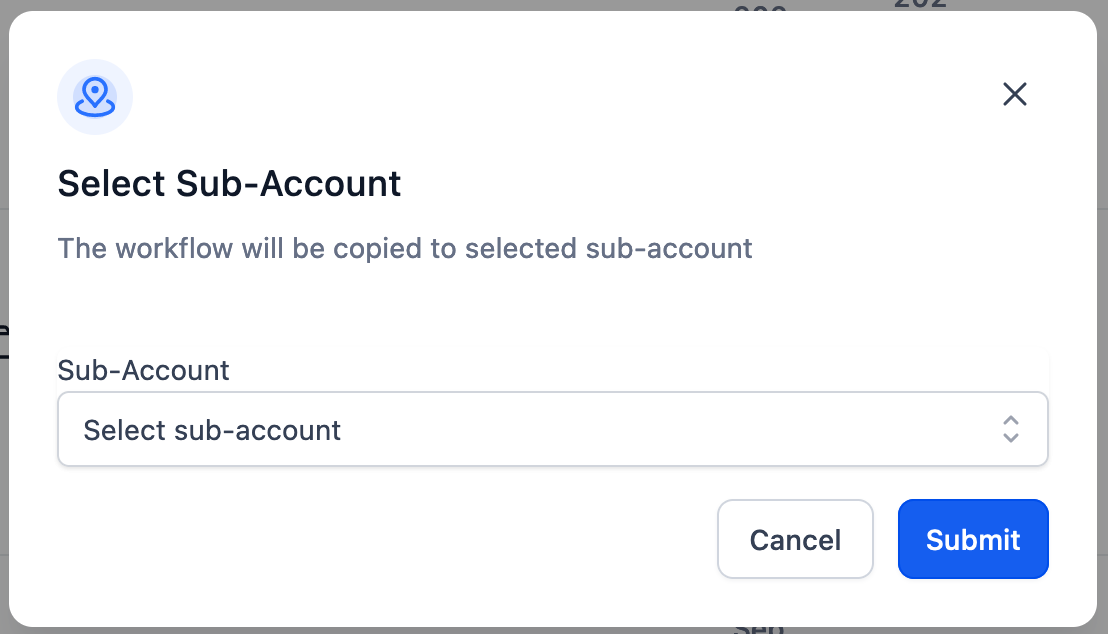
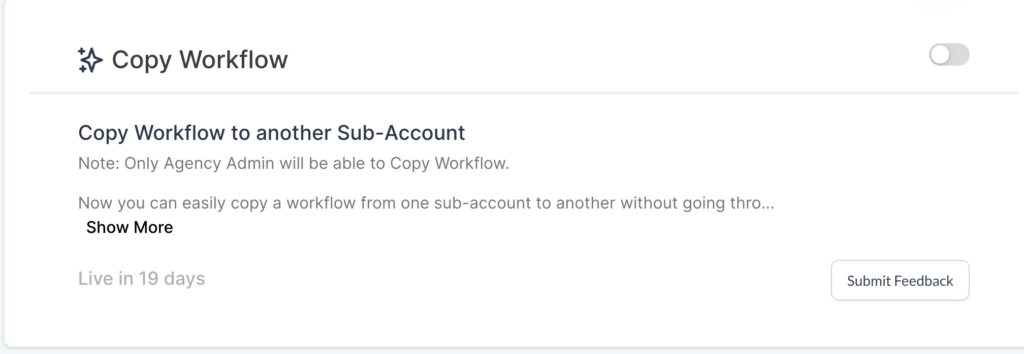
Copy Workflow to Sub- Accounts
Now you can easily copy a workflow from one sub-account to another without going through the full “Snapshot” process. Note: Only Agency Admins will be able to copy a workflow.
How do I enable Copy Workflow feature in my location?
Go to location settings -> Labs -> Enable “Copy Workflow” feature
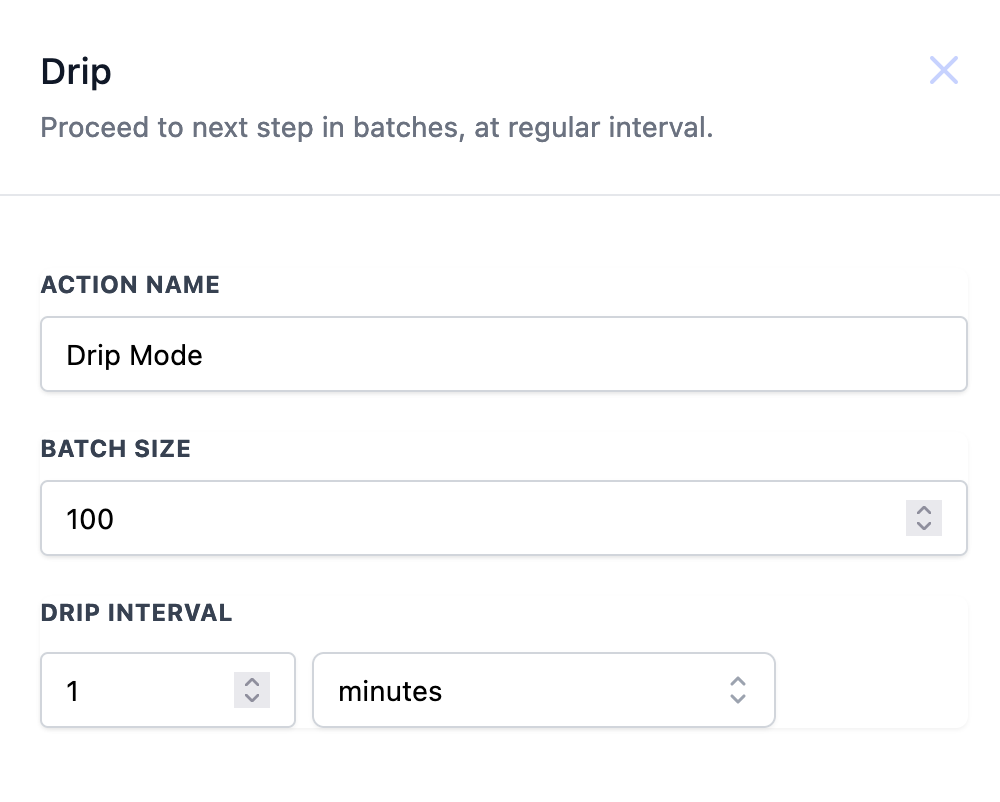
Drip Action (BETA)
Now you can limit or prevent a high number of simultaneous executions using Drip Action
Set the batch size and enter the next step in a defined number for the given interval.
Payments
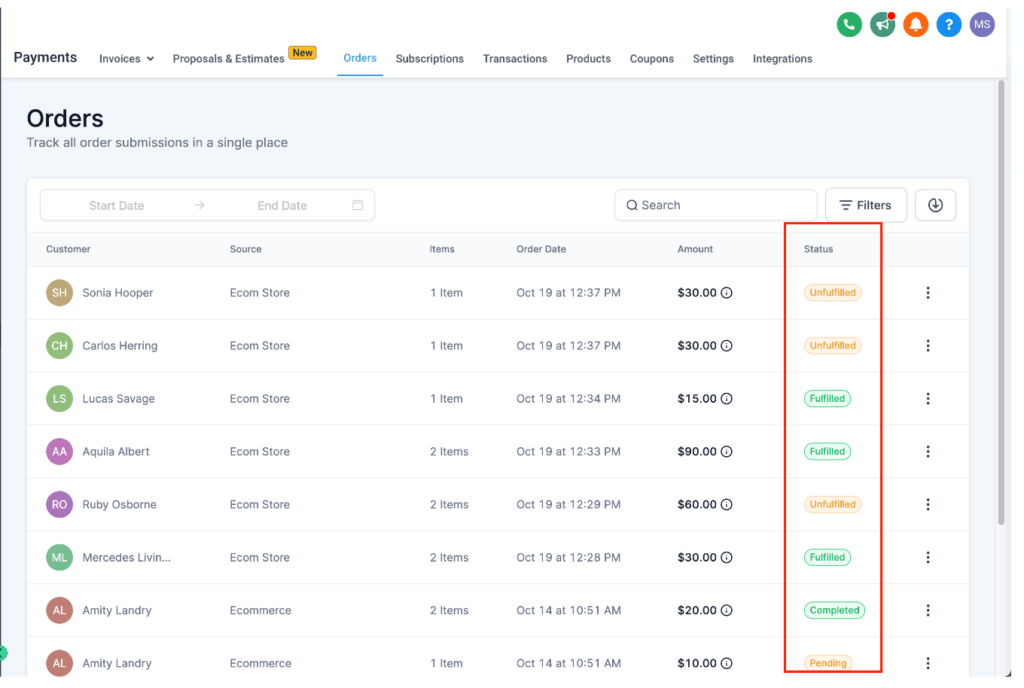
Fulfill orders placed on E-Commerce Stores and share tracking details with customer
Business users will have the ability to manually mark the orders placed on e-commerce stores as Fulfilled
By default, when an order is placed on the online store, the status of the order would be Unfulfilled
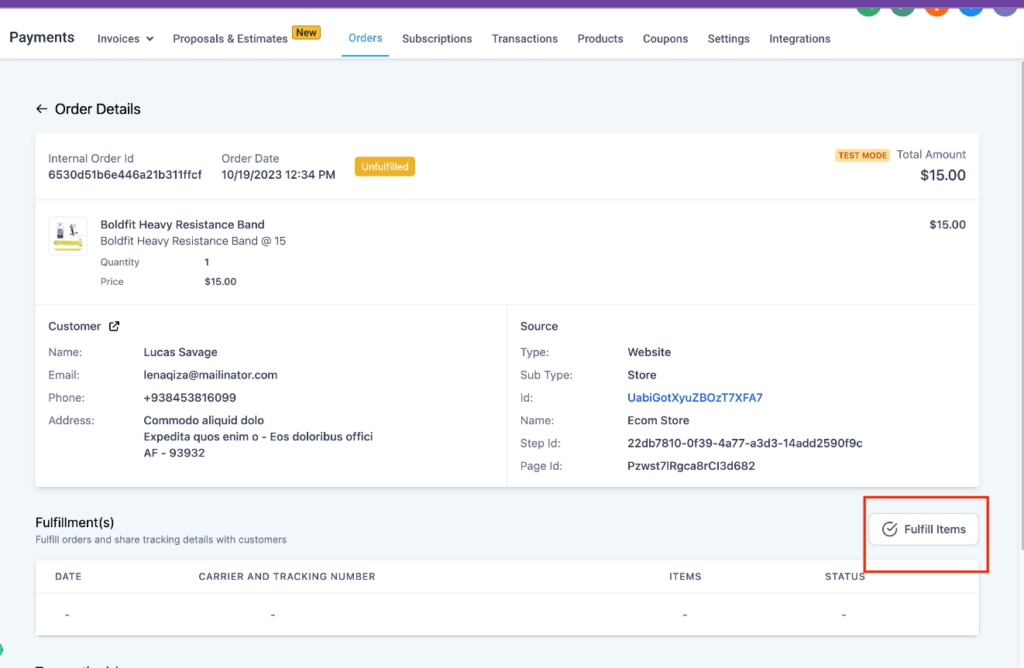
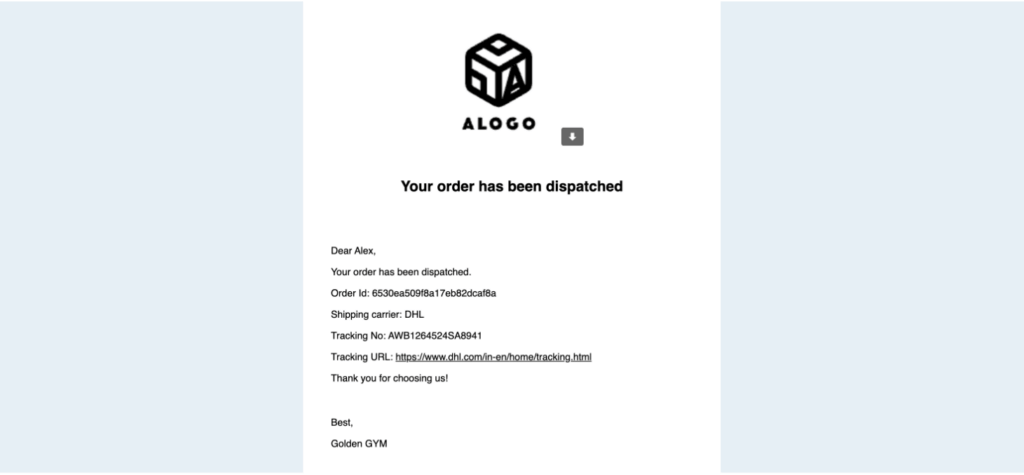
Business users will be able to Fulfill items placed in the order and share tracking details with the customer without any additional step, all in one place
Users will have the ability to attach a tracking number, provider, and a URL to track the status of the shipment
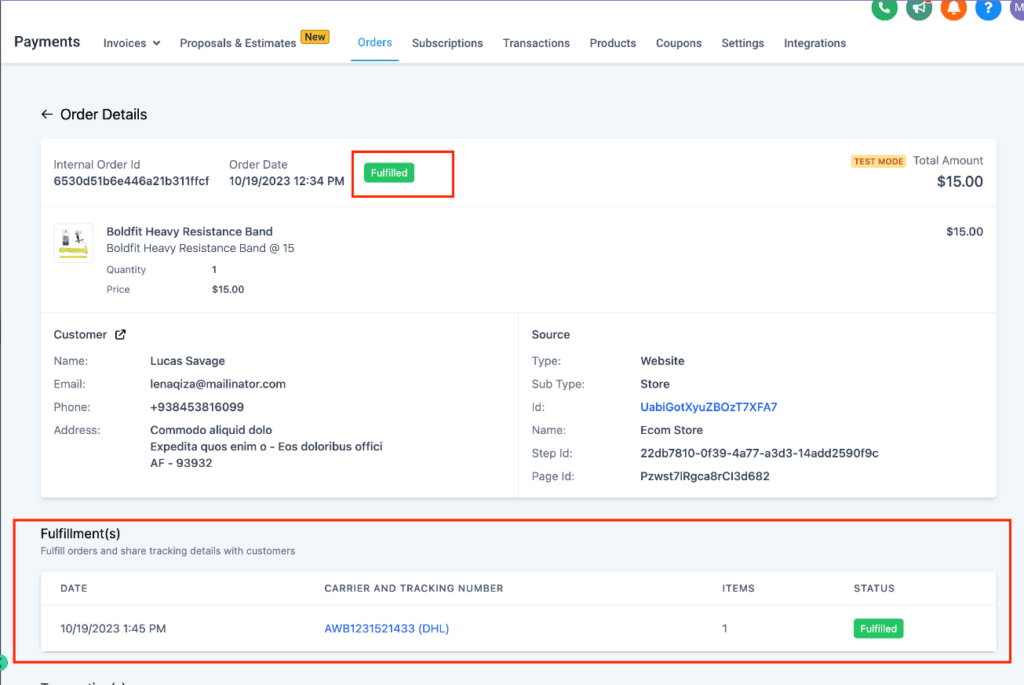
When an order is marked as fulfilled, an entry related to the fulfillment will be included in the order details, highlighting the date on which fulfillment was done, tracking details, and the number of items fulfilled in the order
Funnels and Websites
Websites now support building an ONLINE STORE for your business
Businesses will now be able to create an online store within their websites for selling products or services anywhere across the globe
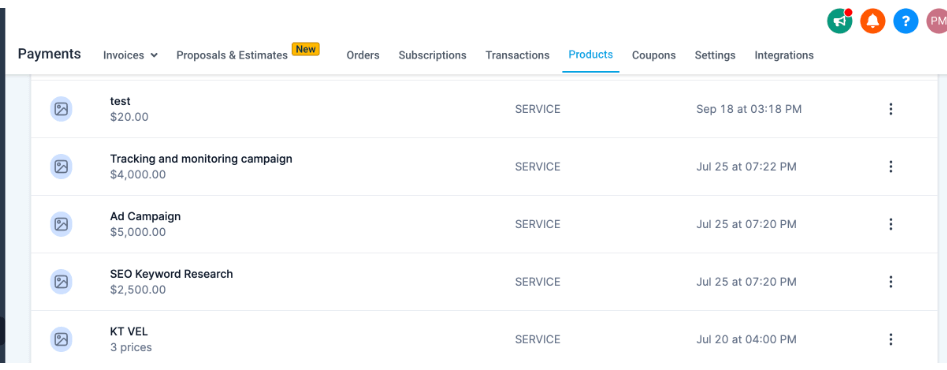
Create and configure products to display in the online store
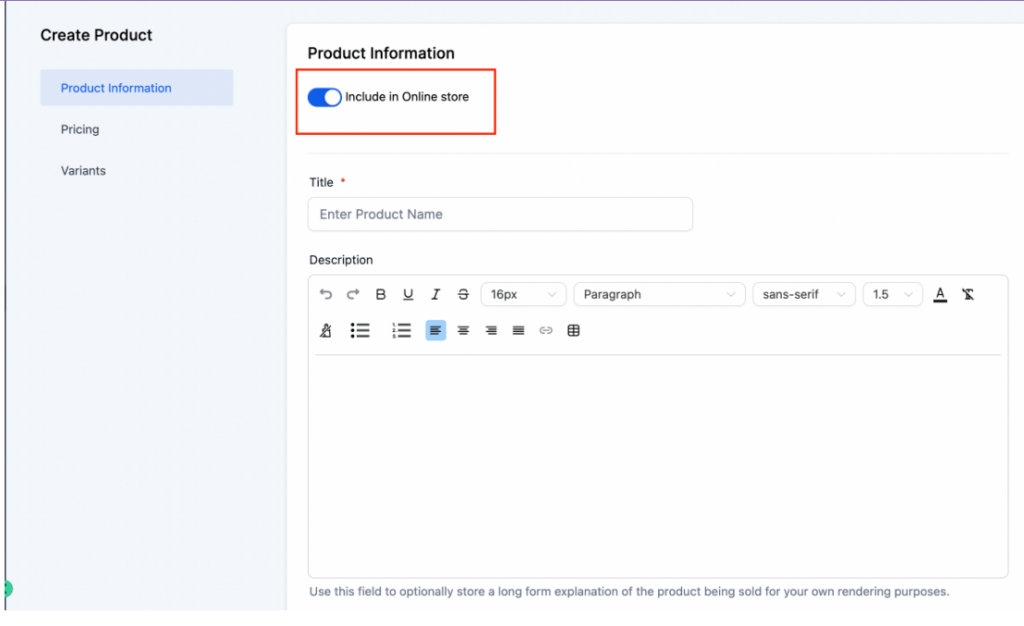
Businesses will be able to create and control which products will get displayed in the online store under Payments -> Products using the Toggle to Show in online store in the product details page.
Additionally, businesses will now be able to have 3 core functionalities required for presenting products/services in their online store
Enable rich text description – Businesses will be able to provide a rich text description for the products they are offering, including formatting, alignment, Bold, and Italics for emphasis on a few aspects, bulleted lists, or table elements. This description for the product will auto-populate on the Product details page
Attach multiple images/videos for products – Displaying appropriate images and videos for products is a crucial part of your e-commerce store. Businesses will be able to attach multiple images and videos to products
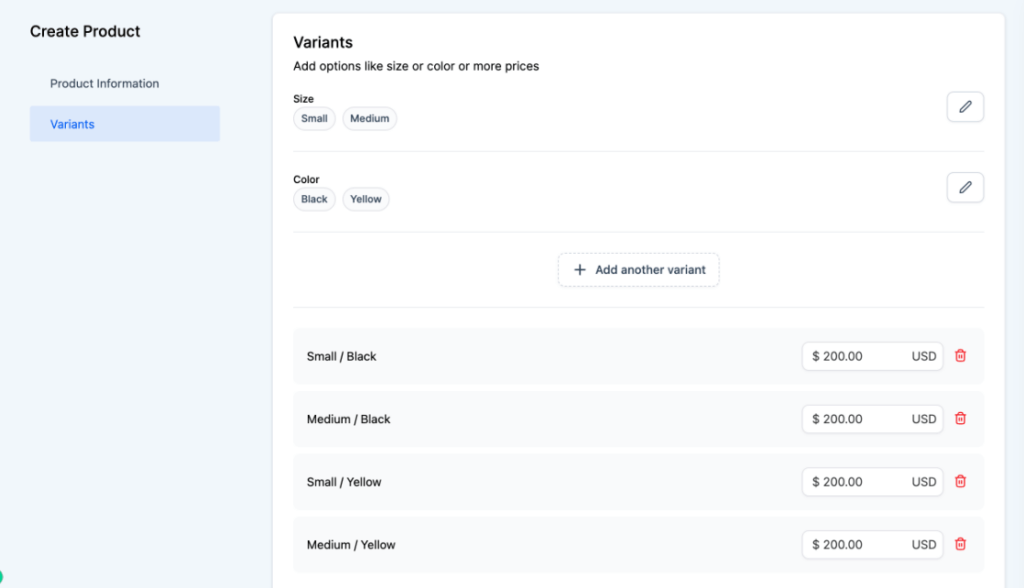
Create variants for products – Businesses will now be able to add variants like Size/Color/Material etc. for the products they configure. This will allow selling different variant options for the same product along with their customized prices
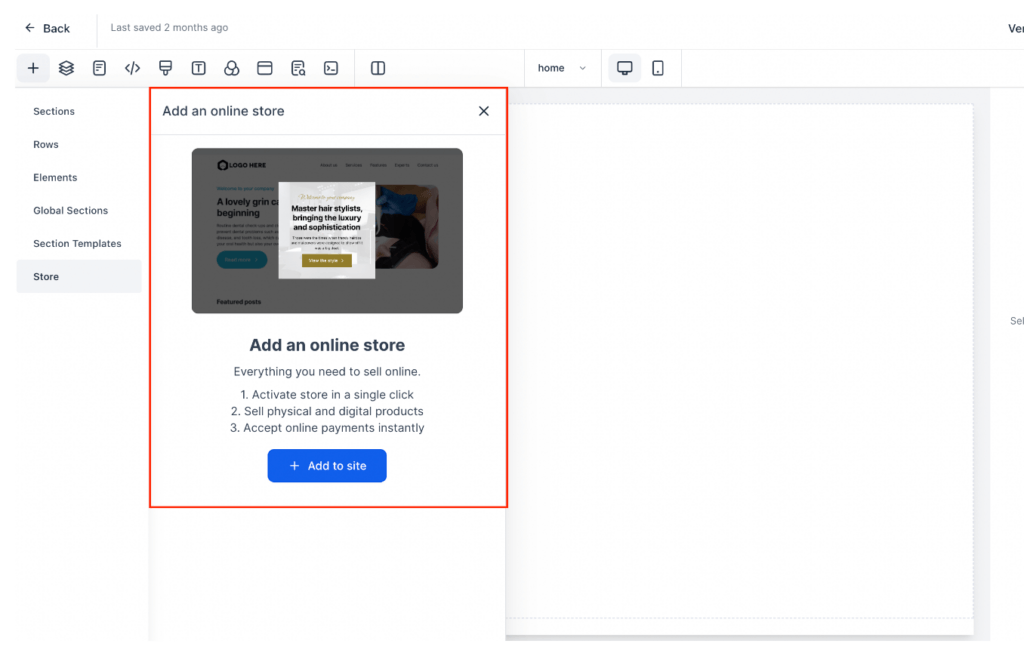
How to activate an online store?
An online store can be added both to an existing website as well as to a new website being created from scratch
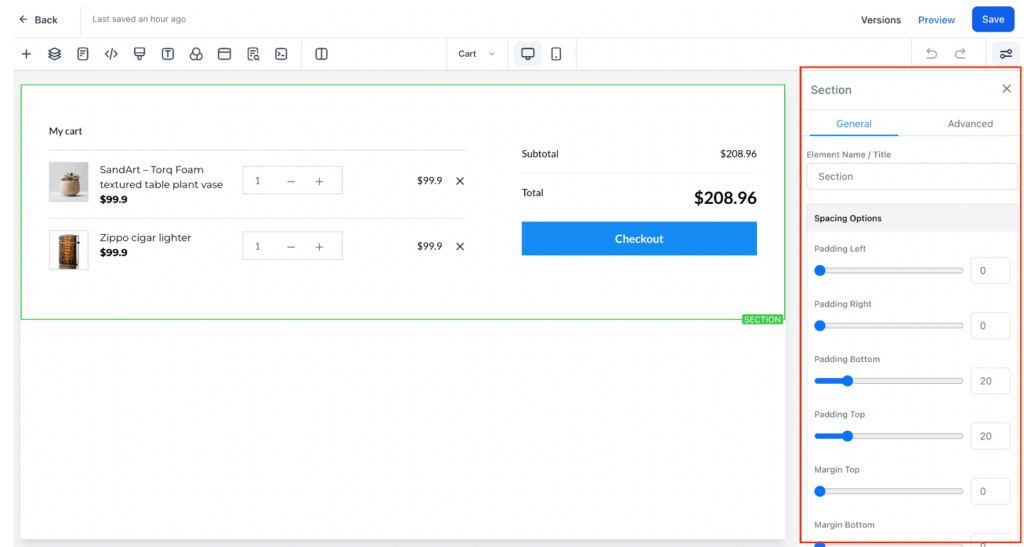
Businesses will have the option to activate an online store by clicking on the + icon in the website builder
When an online store is added to a website, 5 pages are added by default to the website which will form the building blocks for your store. Businesses will be able to add any other kind of elements around the store elements that will help them in giving an overall customized experience to their customers that suits their brand needs
Products list page – This will contain the element to showcase all your products or services to your customers.
Product details page – This will allow the presentation of rich text product descriptions that contain useful information beneficial while making a purchase
Cart page – This will allow customers to have a summary of the items they intend to purchase, add or remove any services before proceeding to checkout
Checkout page – This will allow the potential leads/customers to enter their shipping information, email, and other details, apply any coupon codes, and make an online payment using card, Apple Pay or Google Pay
Thank you page – This will allow the business to display an order confirmation automatically after the payment is successfully made for the purchase
Users will be able to format the elements added by default to match the brand aesthetics of their overall website. Each element will have General and Advanced settings for formatting.
Additional notes while creating an online store
Only one-time products will be included in the online store. Businesses can still sell recurring products using funnels and order forms
Automates sales receipts, Order Submitted trigger, Shopping cart element inside email builder to auto-populate line items purchased, Payments received trigger, and coupon codes will automatically work with any online store created
All existing products will not be available in the online store by default. Businesses can choose which products they would want to showcase in the store and turn the toggle on for those respective products
Businesses will be able to track the orders submitted, payments received, initiate any refunds, etc using the Orders and Transactions lists under the Payments menu
Canonical Links
About this release
We are excited to introduce the Canonical Links feature in our SEO toolkit, enhancing your website’s SEO capabilities. This powerful addition allows users to establish canonical links effortlessly, ensuring better search engine visibility and improved website performance.
What’s New
Canonical Links feature: Users can now streamline their SEO efforts by adding canonical links to specific pages. This feature is designed to boost search engine rankings and prevent duplicate content issues by specifying the preferred version of a page.
Benefits
SEO optimization: Canonical links contribute to improved SEO by consolidating link equity and directing search engines to the primary version of a page. This can lead to better search rankings and enhanced visibility for your content.
Duplicate content prevention: By setting canonical links, users can prevent issues related to duplicate content, which can negatively impact SEO. This feature helps maintain the integrity of your website’s content in search engine results.
Enhanced website performance: With Canonical Links, users can optimize their website’s performance by providing clear signals to search engines about the preferred version of a page. This can result in more efficient crawling and indexing.
How to Use
Users can add canonical links to their pages with the following steps:
Navigate to the SEO Meta Data tab in the navigation menu.
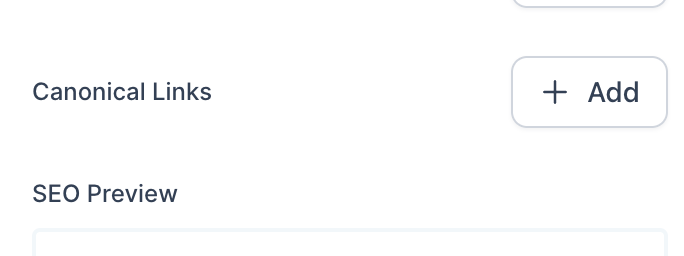
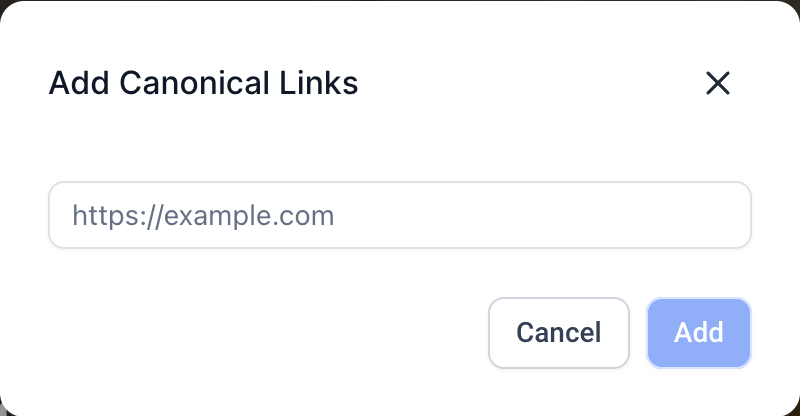
Scroll down to find the “Add Canonical Links” option.
Enter the URL of the preferred version of the page.
Save SEO metadata and save the funnel to apply the changes.
Preview the page to ensure the canonical link is correctly implemented.
How to Verify
To confirm the implementation of canonical links, follow these steps:
Right-click on the page.
Select “View Source Code” from the context menu.
Check the source code to verify that the canonical link is present and points to the intended URL.
Example:
Memberships
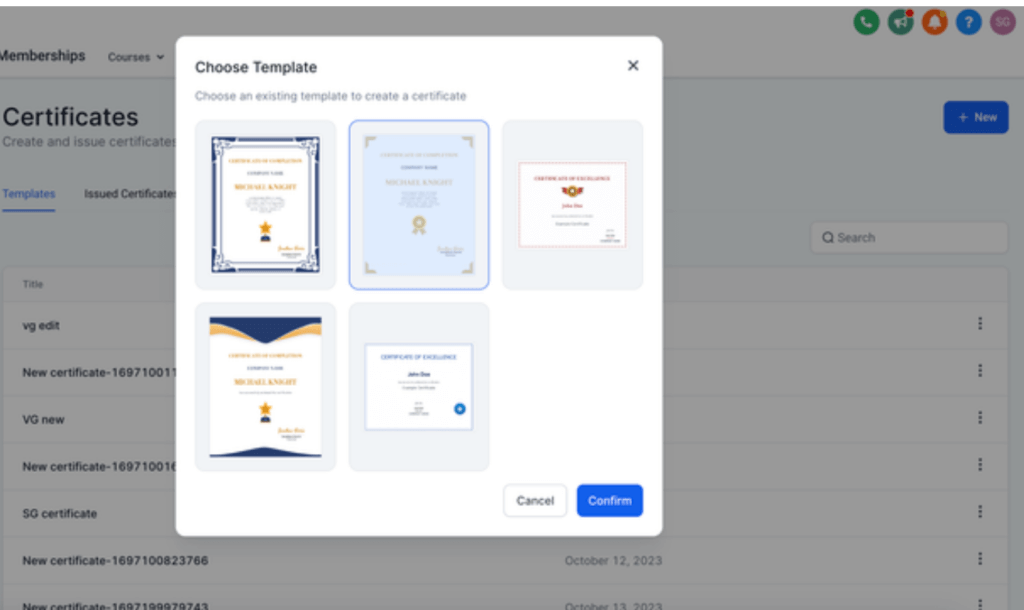
Certificates – Build Certificates
Users can now create customized certificates and issue to the new users.
How to:
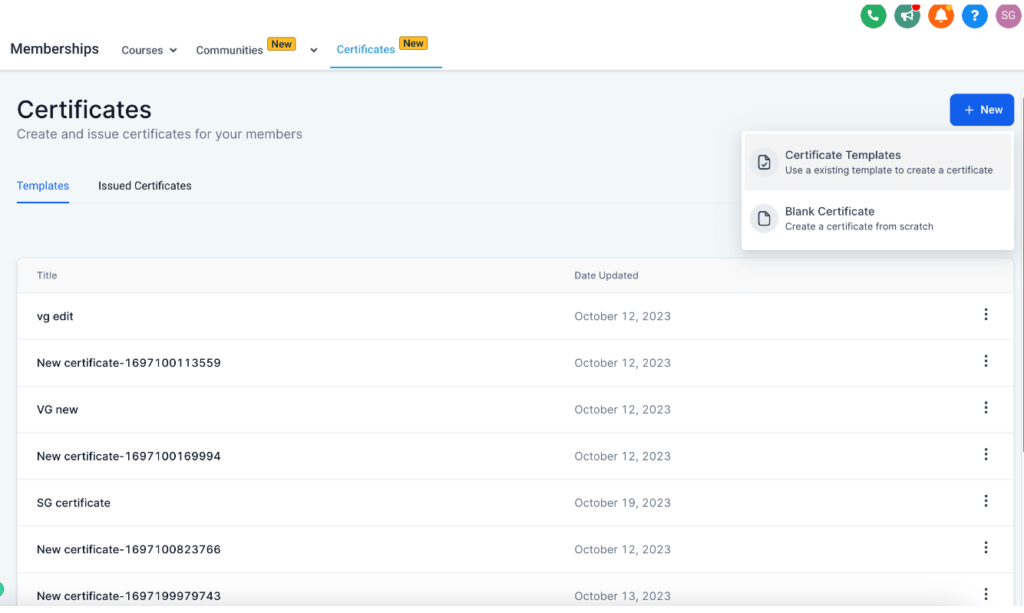
Go to Memberships > Certificates
You can create an end-to-end customised certificate template with the all new Certificate builder (start from scratch or choose a template)
Key Features
The new editor we’ve introduced empowers users to customize templates with ease:
It incorporates a drag-and-drop feature, allowing you to effortlessly modify and arrange elements in your templates by simply dragging them to the desired location
This intuitive interface simplifies the template customization process, making it accessible and user-friendly for all
Whether you’re adjusting text, images, or other elements, this editor streamlines the editing experience, providing greater flexibility and creative control
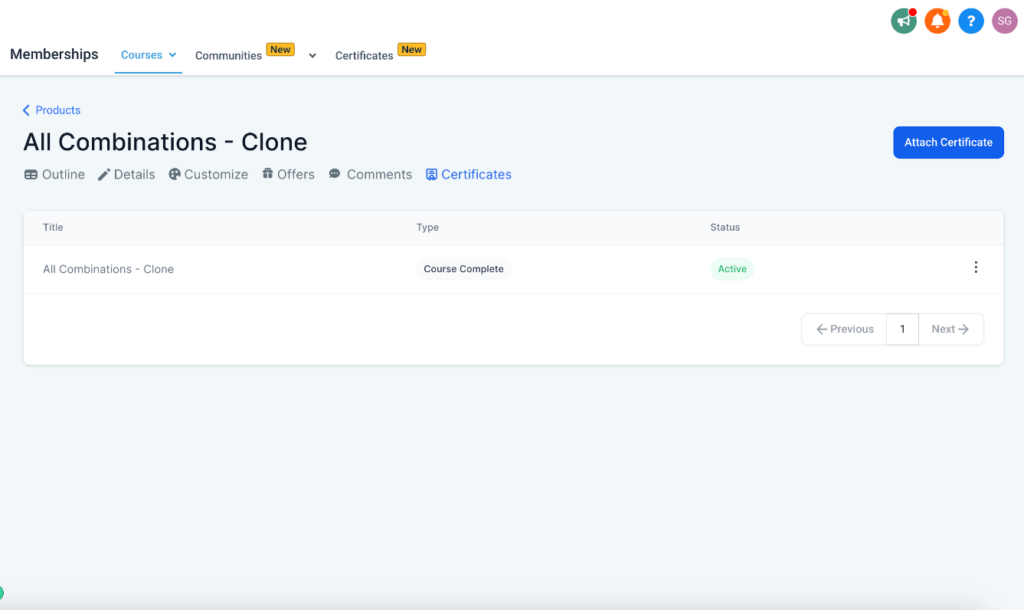
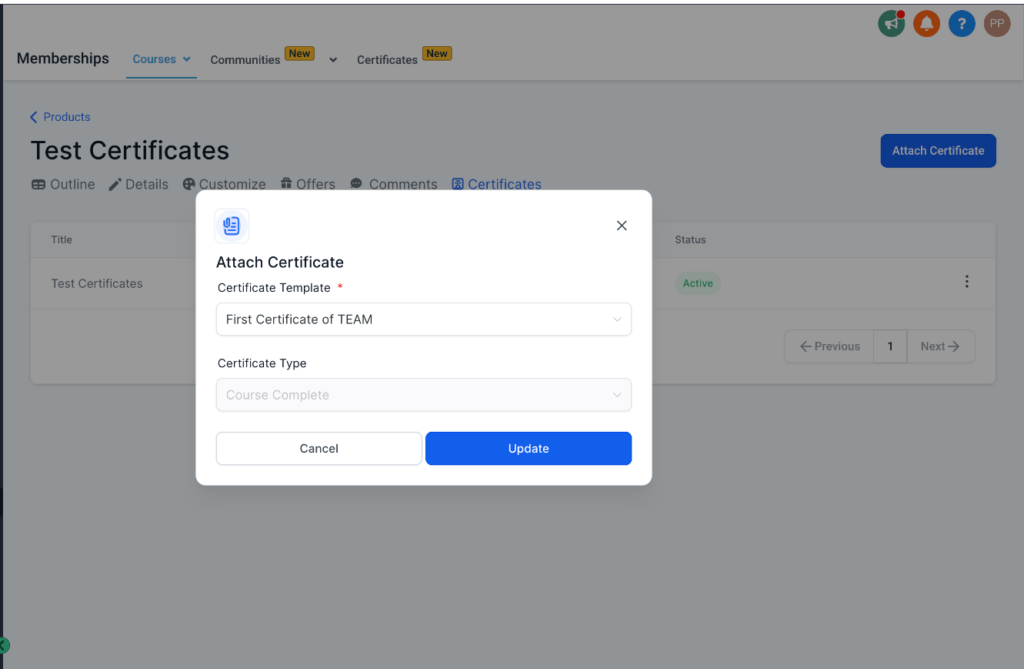
Certificates on course completion
users can now create customised certificates and issue to the new users for course completion.
How to:
Certificates can be issued to course learners by attaching them to a course (Go to a Course > Certificates > Attach a certificate)
Learners receive emails with link to access and share their certificates, which can be further downloaded as a PDF
Courses inside Communities (Learning Tab)
We’re delighted to introduce an exciting feature Courses in the Learning Tab – the ability to add and access free courses!
Key Features:
Adding Free Courses: Admins and owners can now effortlessly add free courses to the Learning Tab.
How to Add a Free Course:
Navigate to the Learning Tab.
Click “Add Course.”
Select a course from the available options (List of courses created in Memberships)
When specifying the payment type, choose “Free”
Removing Courses:
Admins and owners have the flexibility to remove courses from the community group
For members:
All community members can access the courses listed under the Learning Tab
Note
– All courses added currently can be Free courses only
Campaigns
New Email Campaign with Product Showcase
Introducing a new update to Email Campaigns that allows you to showcase your products through a product catalogue.
Adding a product catalogue in emails serves several crucial purposes:
Visual Engagement: Captivate your audience with stunning visuals of your products, making your emails far more engaging and memorable than plain text.
Convenience is Key:Allow customers to effortlessly browse through a curated selection of offerings right from their inbox. No need to navigate away, saving them time and hassle.
Boost Conversion Rates: : Leverage the power of visual persuasion. Studies have shown that emails with product catalogs enjoy higher conversion rates, simplifying the path from browsing to buying.
Tailored Personalisation: Customize product selections based on customer preferences and behavior. Provide a unique shopping experience that resonates and increases the likelihood of a purchase.
Cross-Selling Opportunities: Showcase complementary or related items alongside main products, unlocking additional sales potential with every email.
Spotlight New Arrivals & Promotions:Instantly draw attention to new products, special promotions, or exclusive offers. Create a sense of urgency and excitement that drives immediate action.
Strengthen Brand Identity: Consistent, visually appealing presentations reinforce your brand’s identity. Customers easily recognize and remember your unique style and offerings.
Unparalleled Insights with Analytics: Gain valuable insights by tracking customer interactions with specific products. Understand what captivates your audience the most, refining your marketing strategy.
Mobile-Friendly Experience: Optimise your product catalog for various screen sizes. With the prevalence of mobile browsing, ensure a seamless experience for users on the go.
Gain a Competitive Edge: Stand out in a crowded inbox. Offering a visually enticing product catalog sets you apart from competitors relying solely on text-based emails.
Forge Stronger Connections: Elevate your customer relationships by providing a convenient, visually appealing shopping experience. Strengthen brand loyalty and build lasting connections.
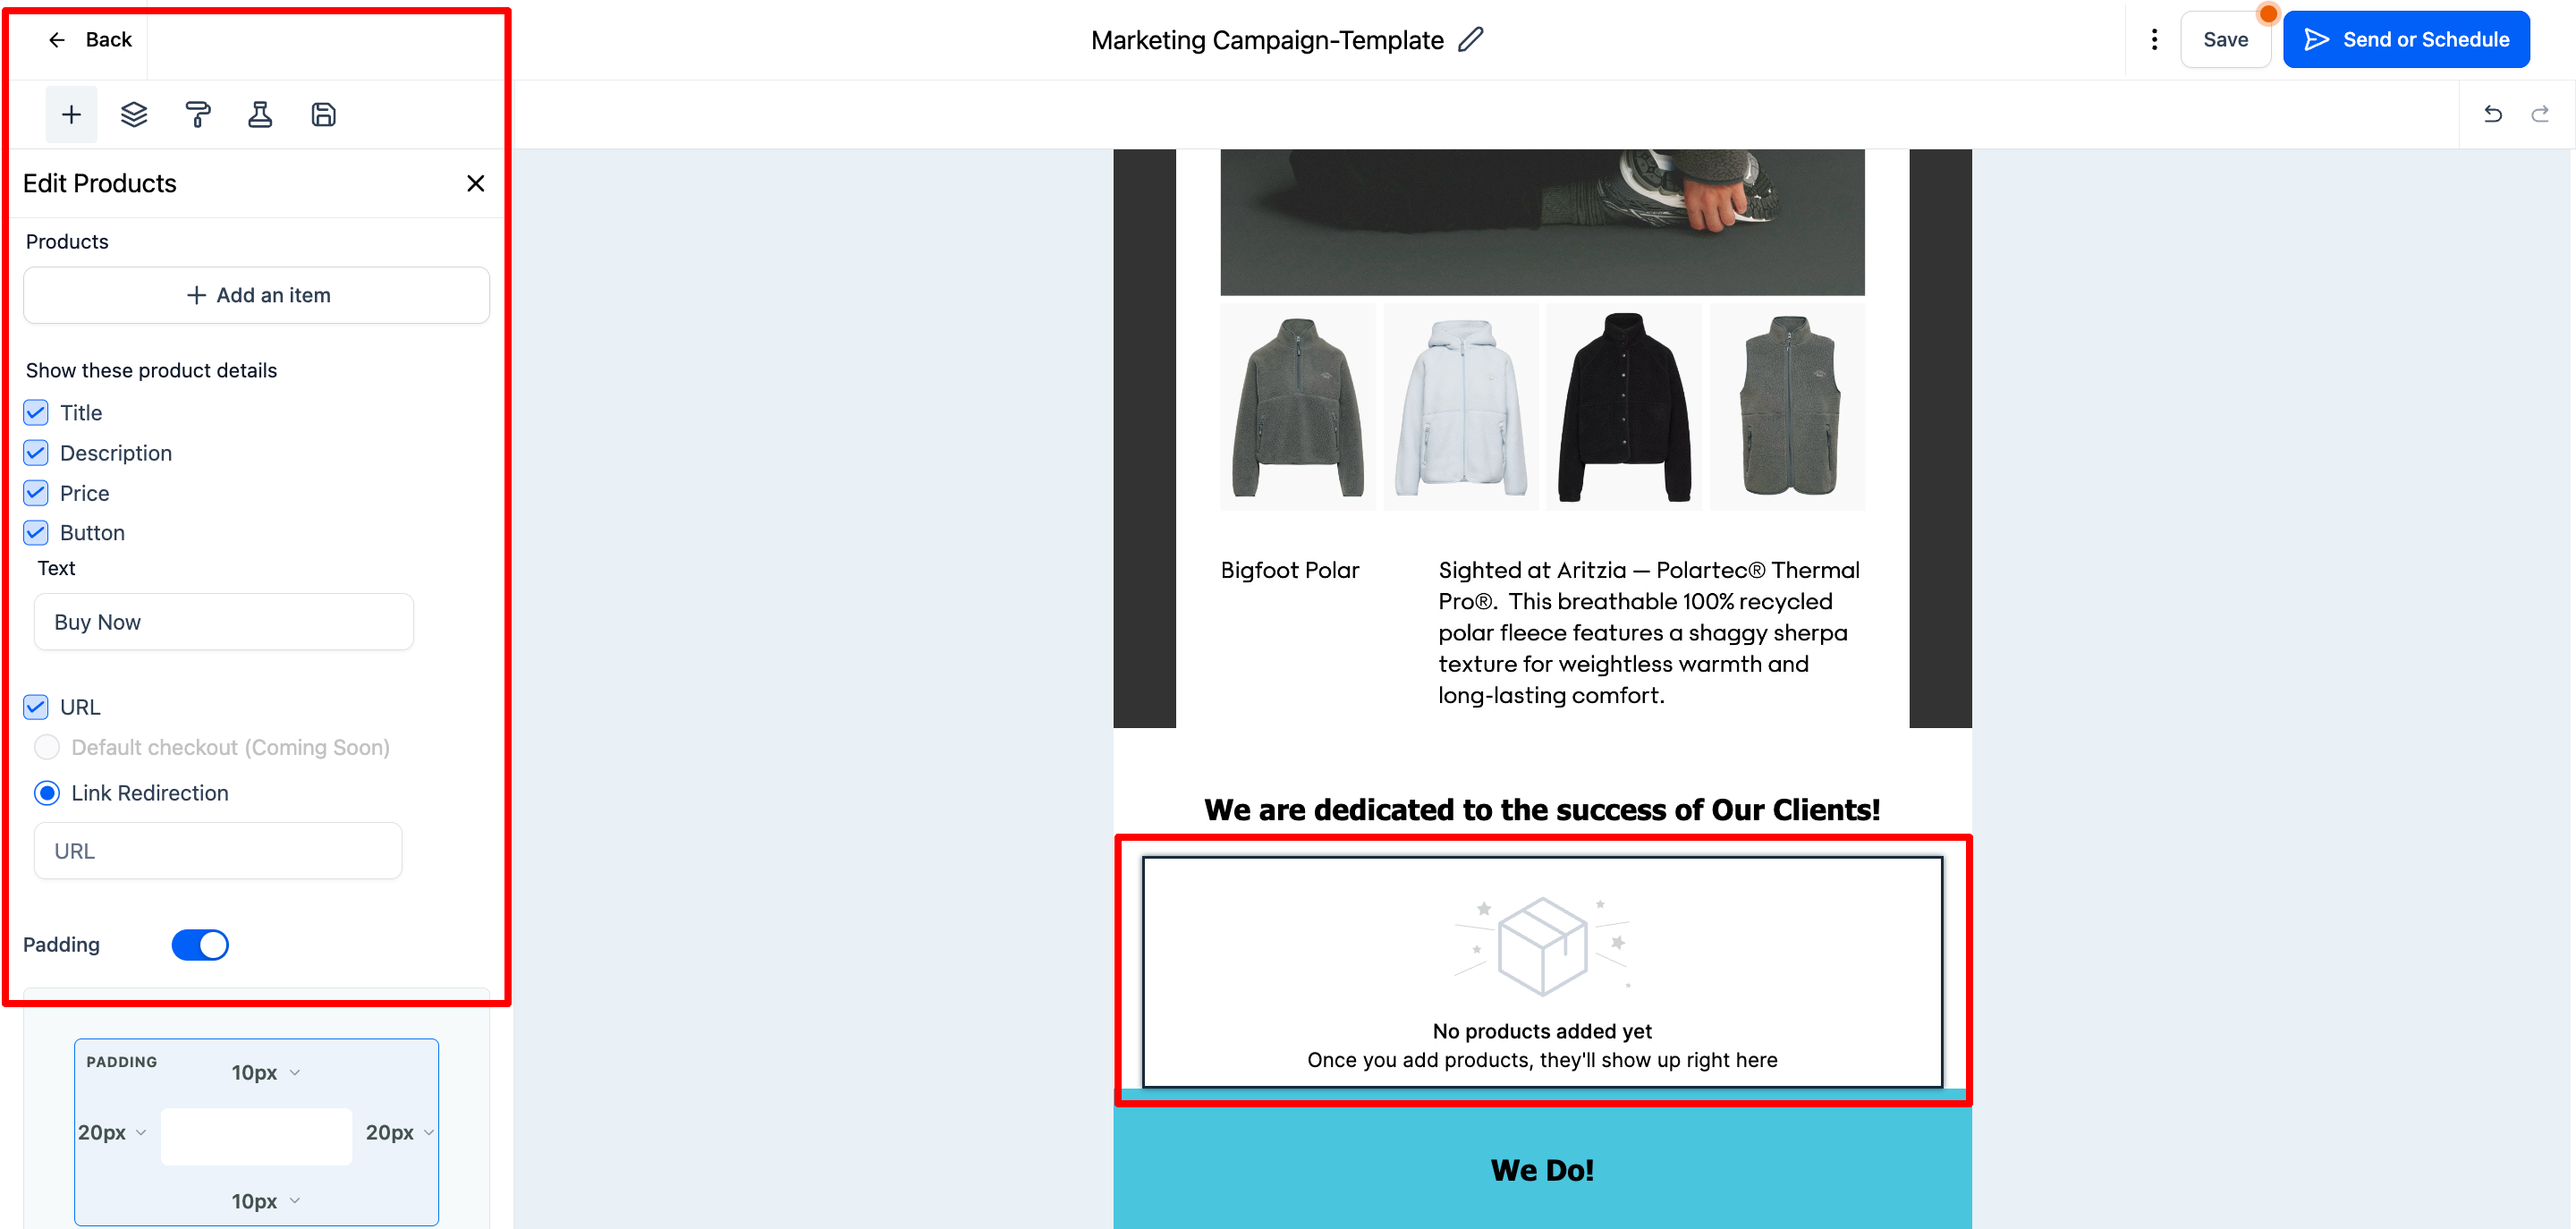
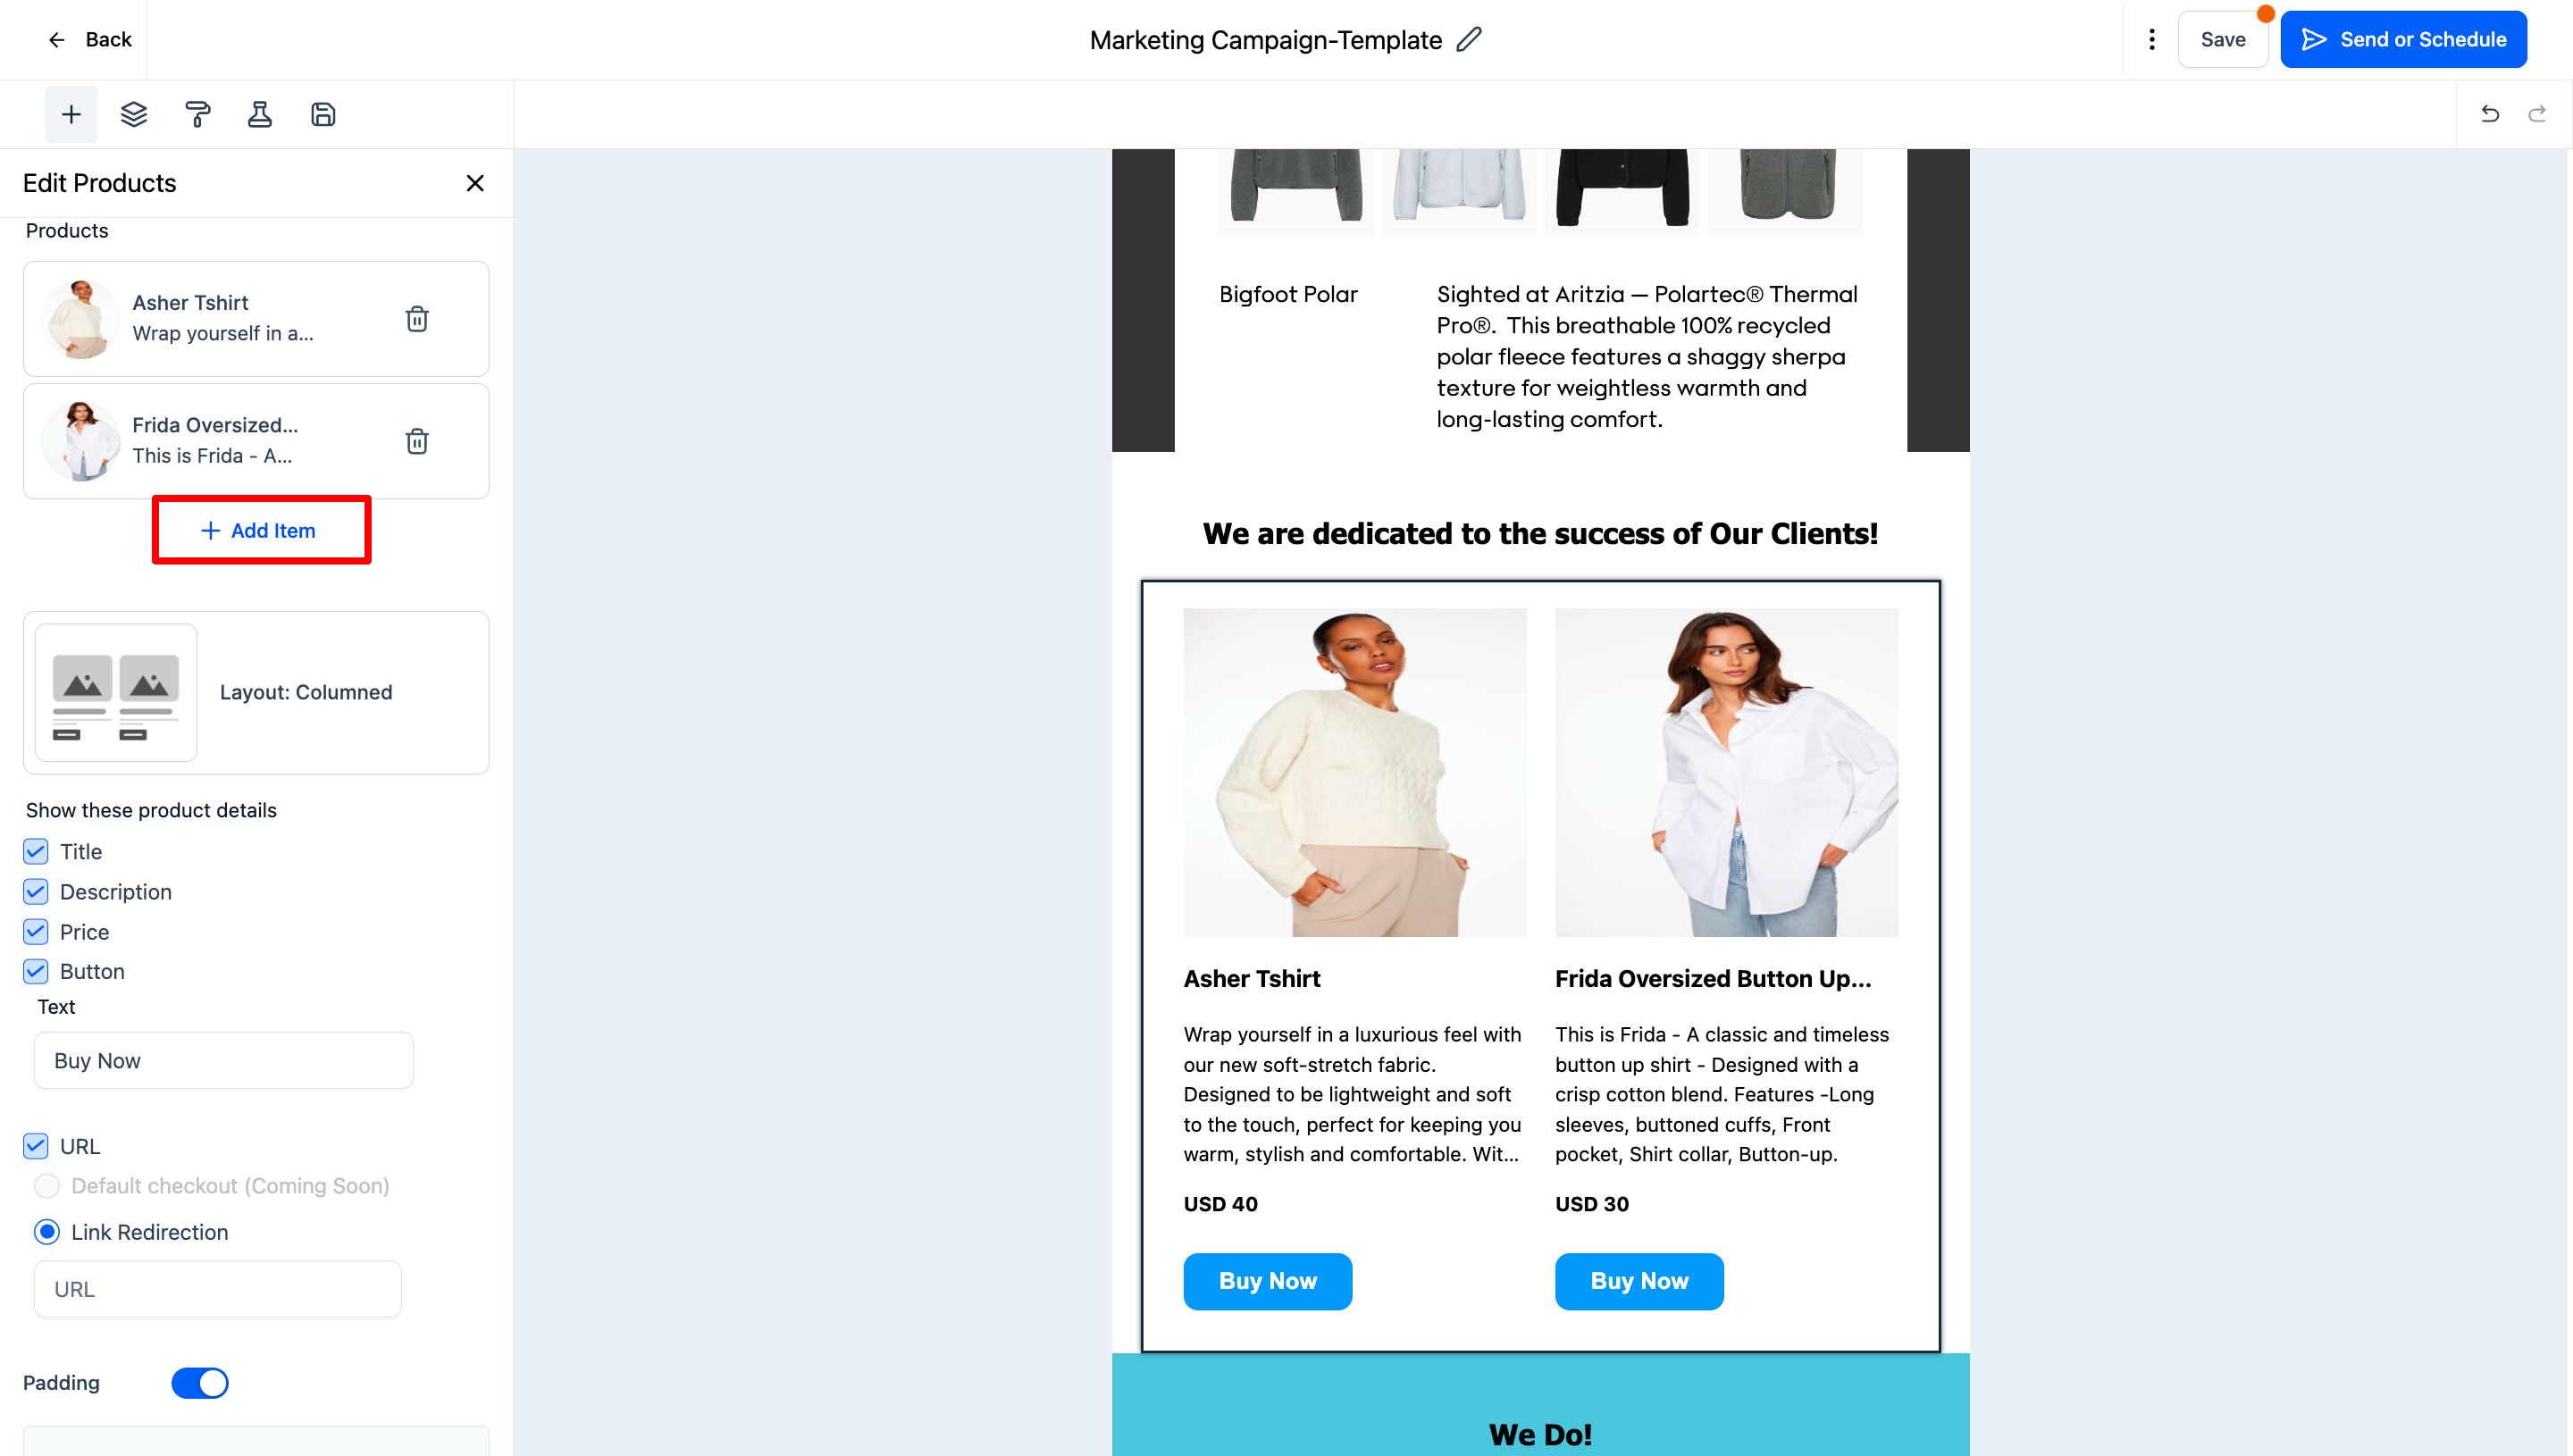
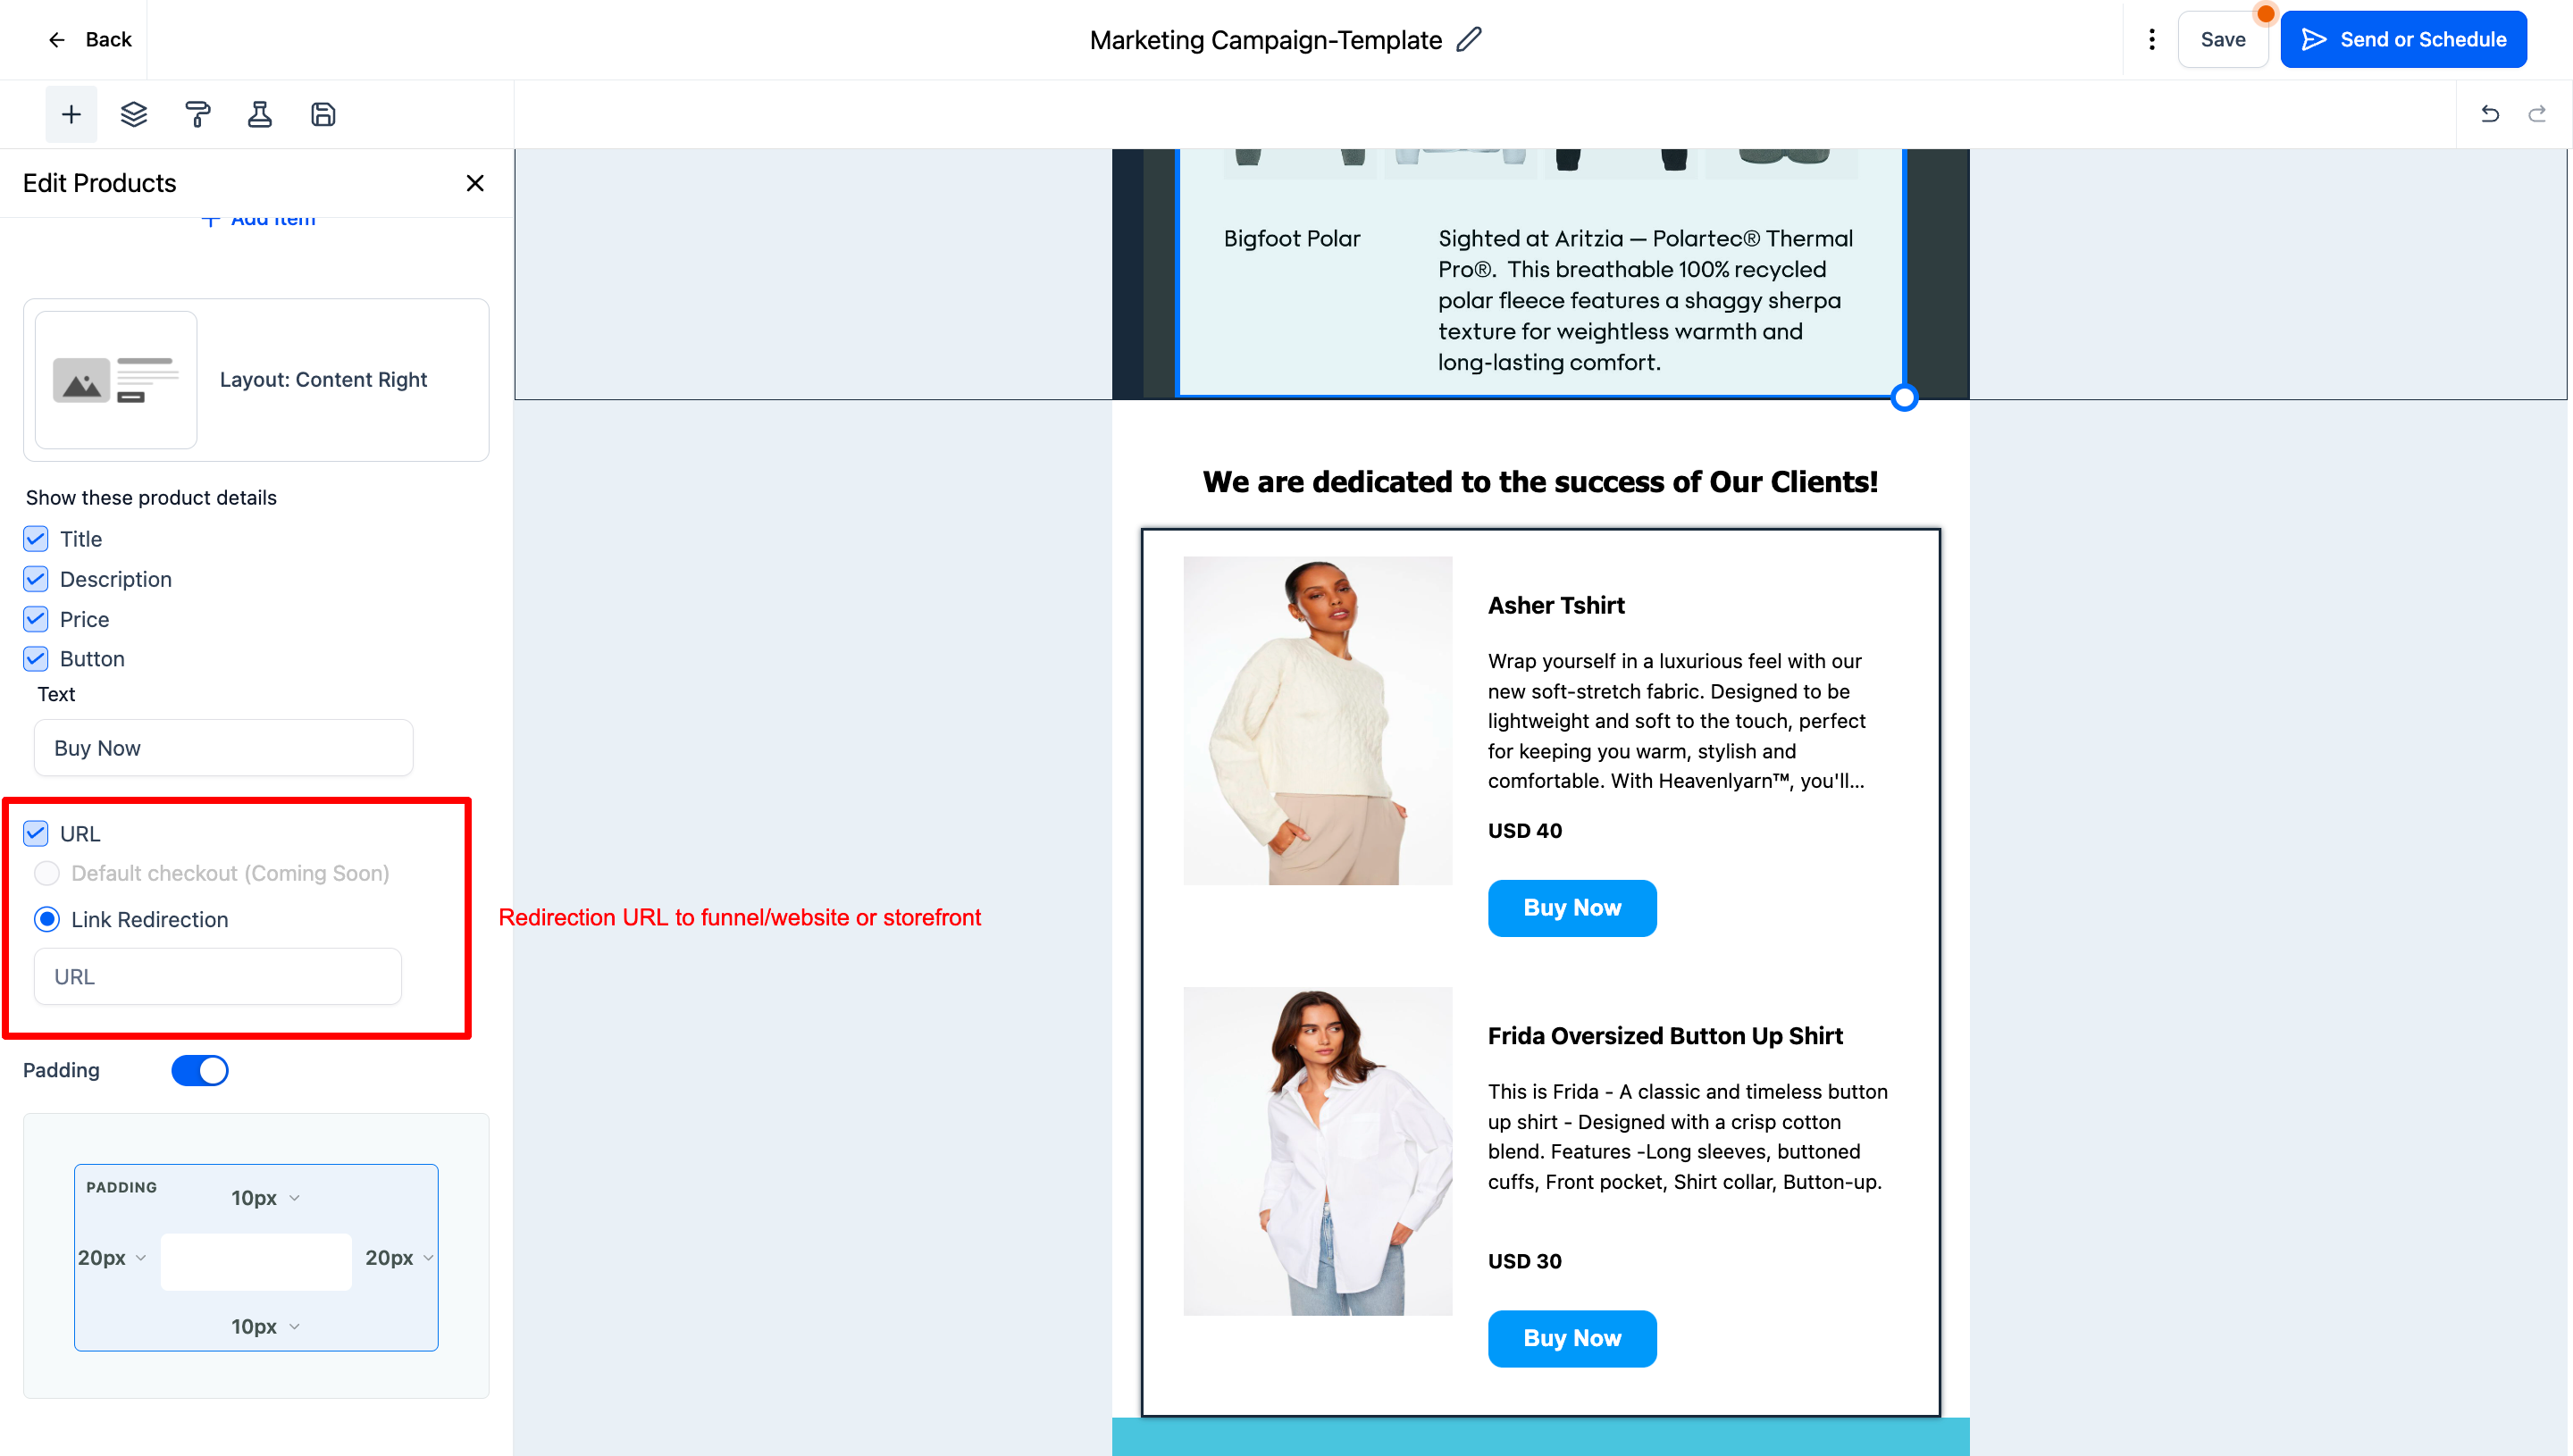
How to use Product Element in Email Campaigns?
Go to Marketing > Emails > Campaign
Create New Campaign or go to other draft campaigns
In the element, there will be option to add products
Prerequisite for using product element- Add Product Element in Payments > Products with one time or subscription with title, description and images.
Add items of product which you would like to add
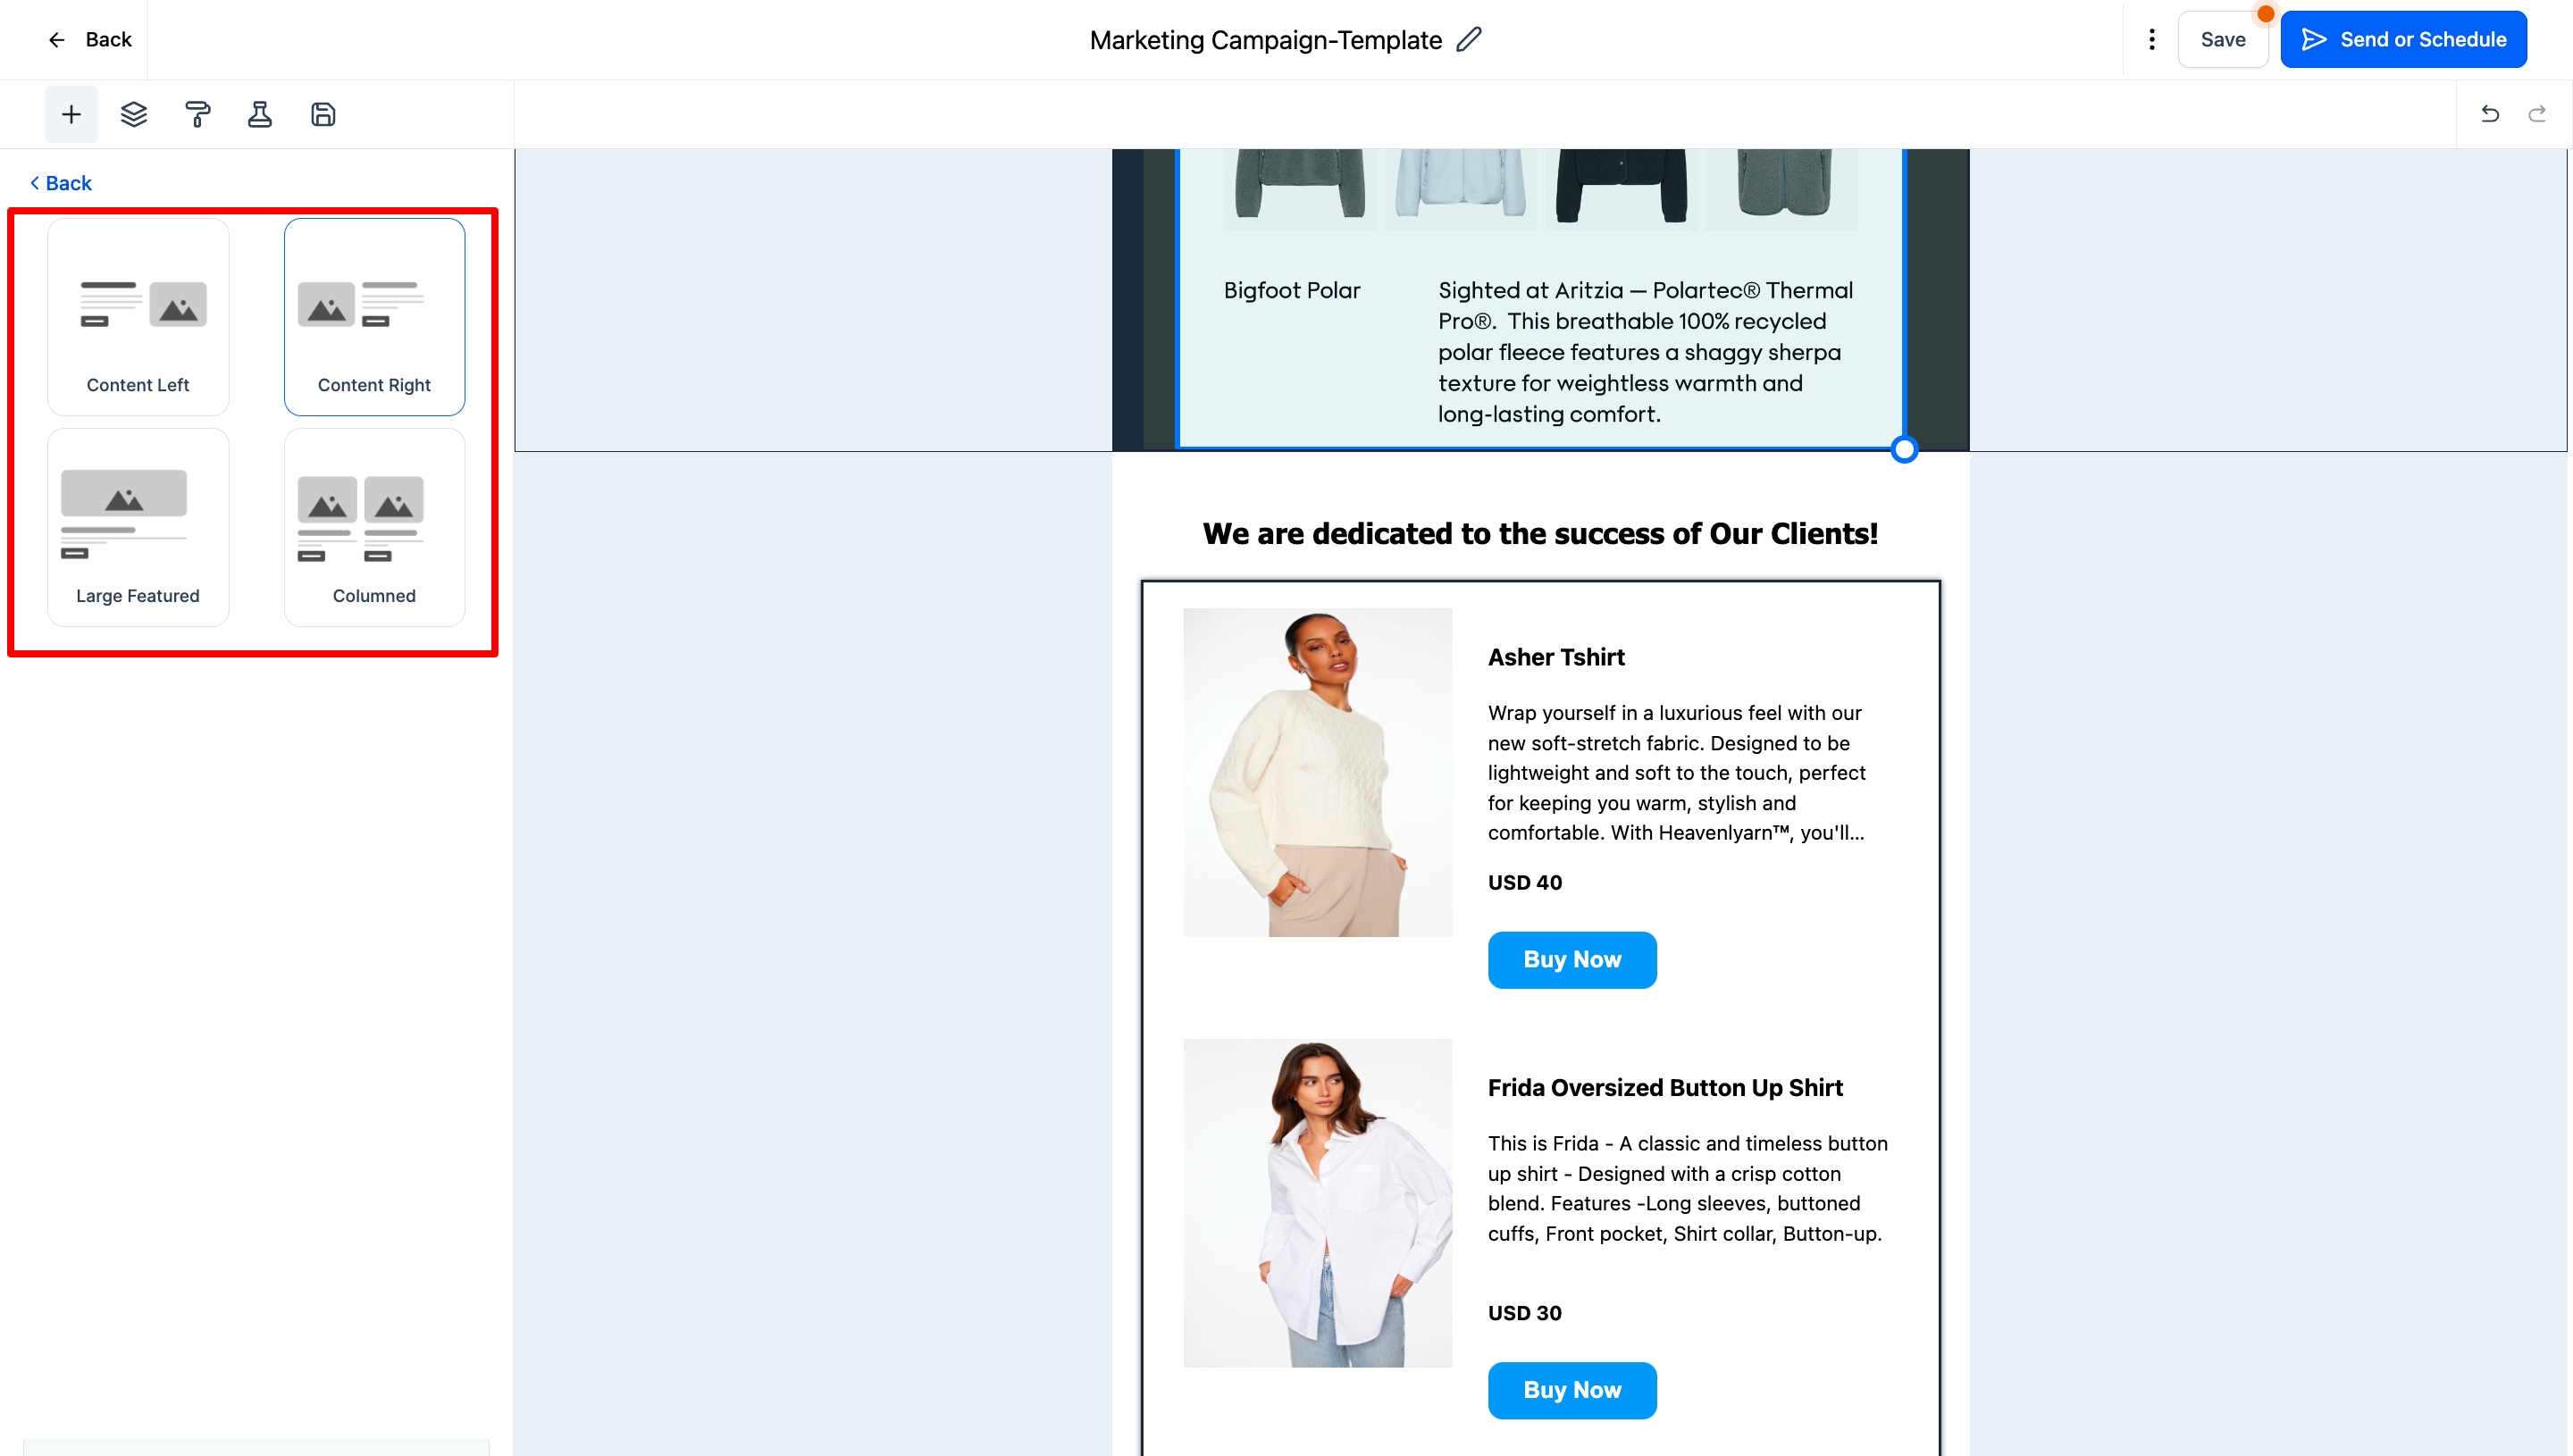
You can also choose the designs option about how to showcase in your newsletter
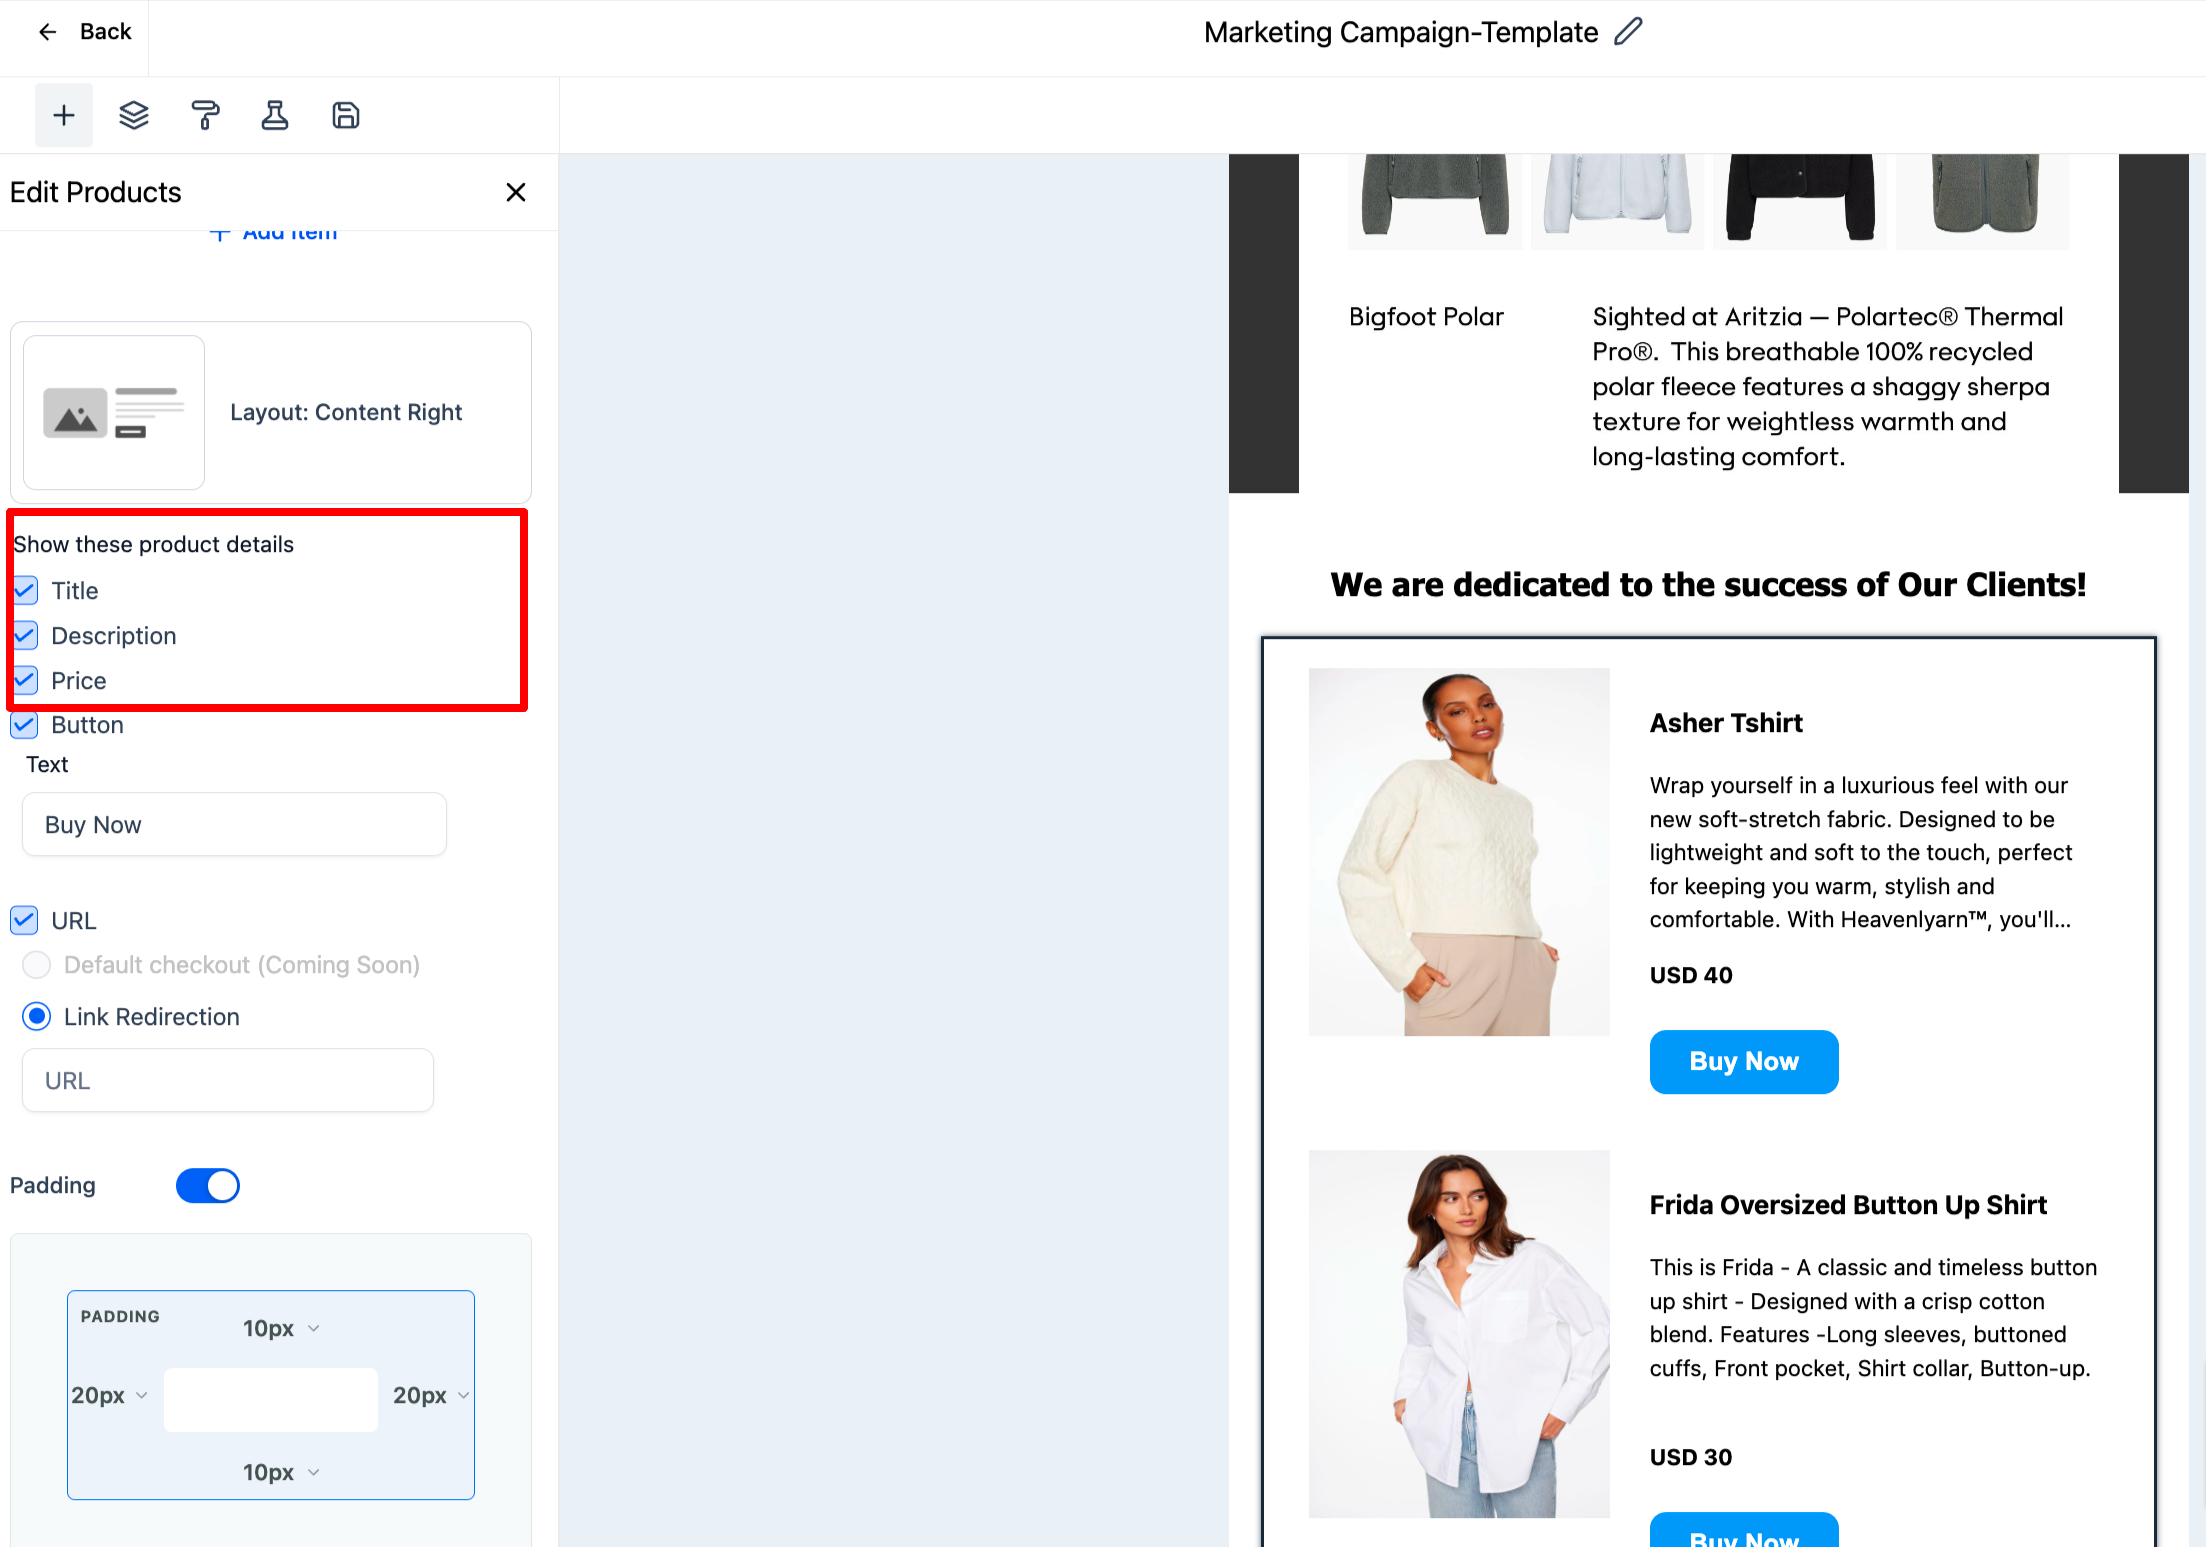
There are option to show the title, description, prices
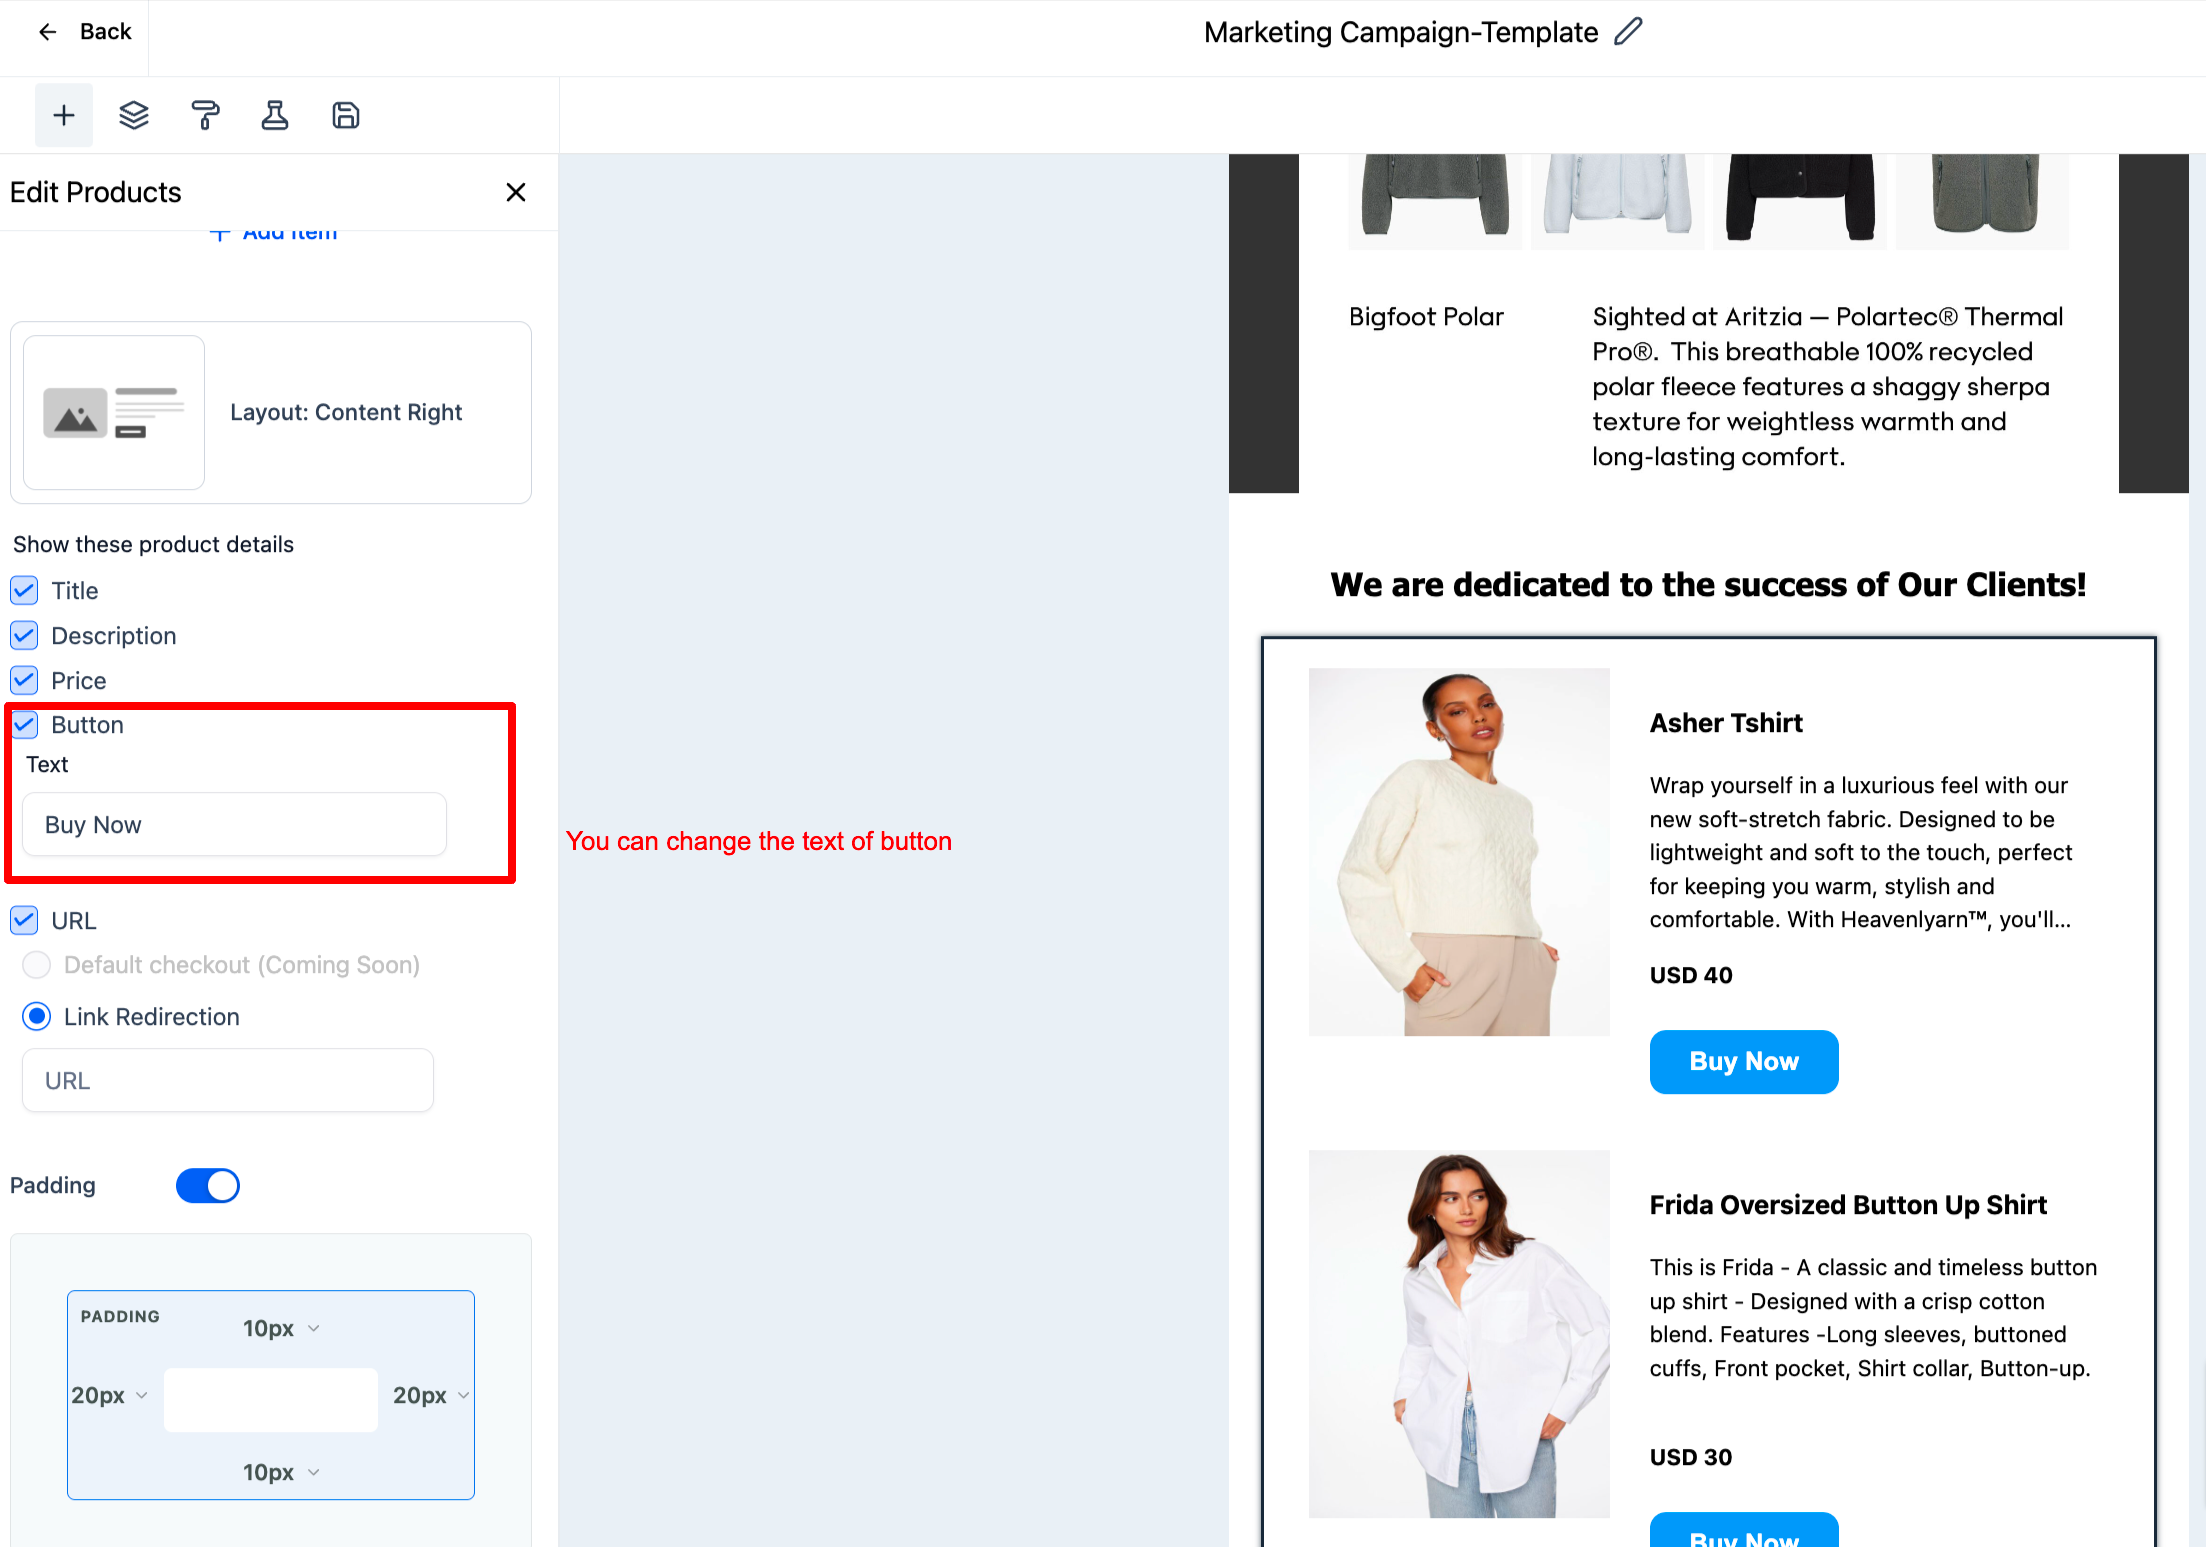
There option to rename the button
In URL, you can add url redirect of funnel/website
What does the future holds with Product Element?
We will allow direct custom checkout to convert product sales
There will be option to redirect to specific product detail pages in future with ecommerce
Product Element will help in recording ROI and revenue per recipient.
Our dynamic product feature for emails! Elevate your customer engagement and boost conversion rates with visually stunning product displays right in their inbox. Convenient, personalized, and a surefire way to increase sales. Don’t miss out on this competitive edge – showcase your offerings like never before!”
Social Planner
[Beta Release] Share your 5 star reviews via the Social Planner
How to create Review Automation in Social Planner?
How to create Review Automation in Social Planner?
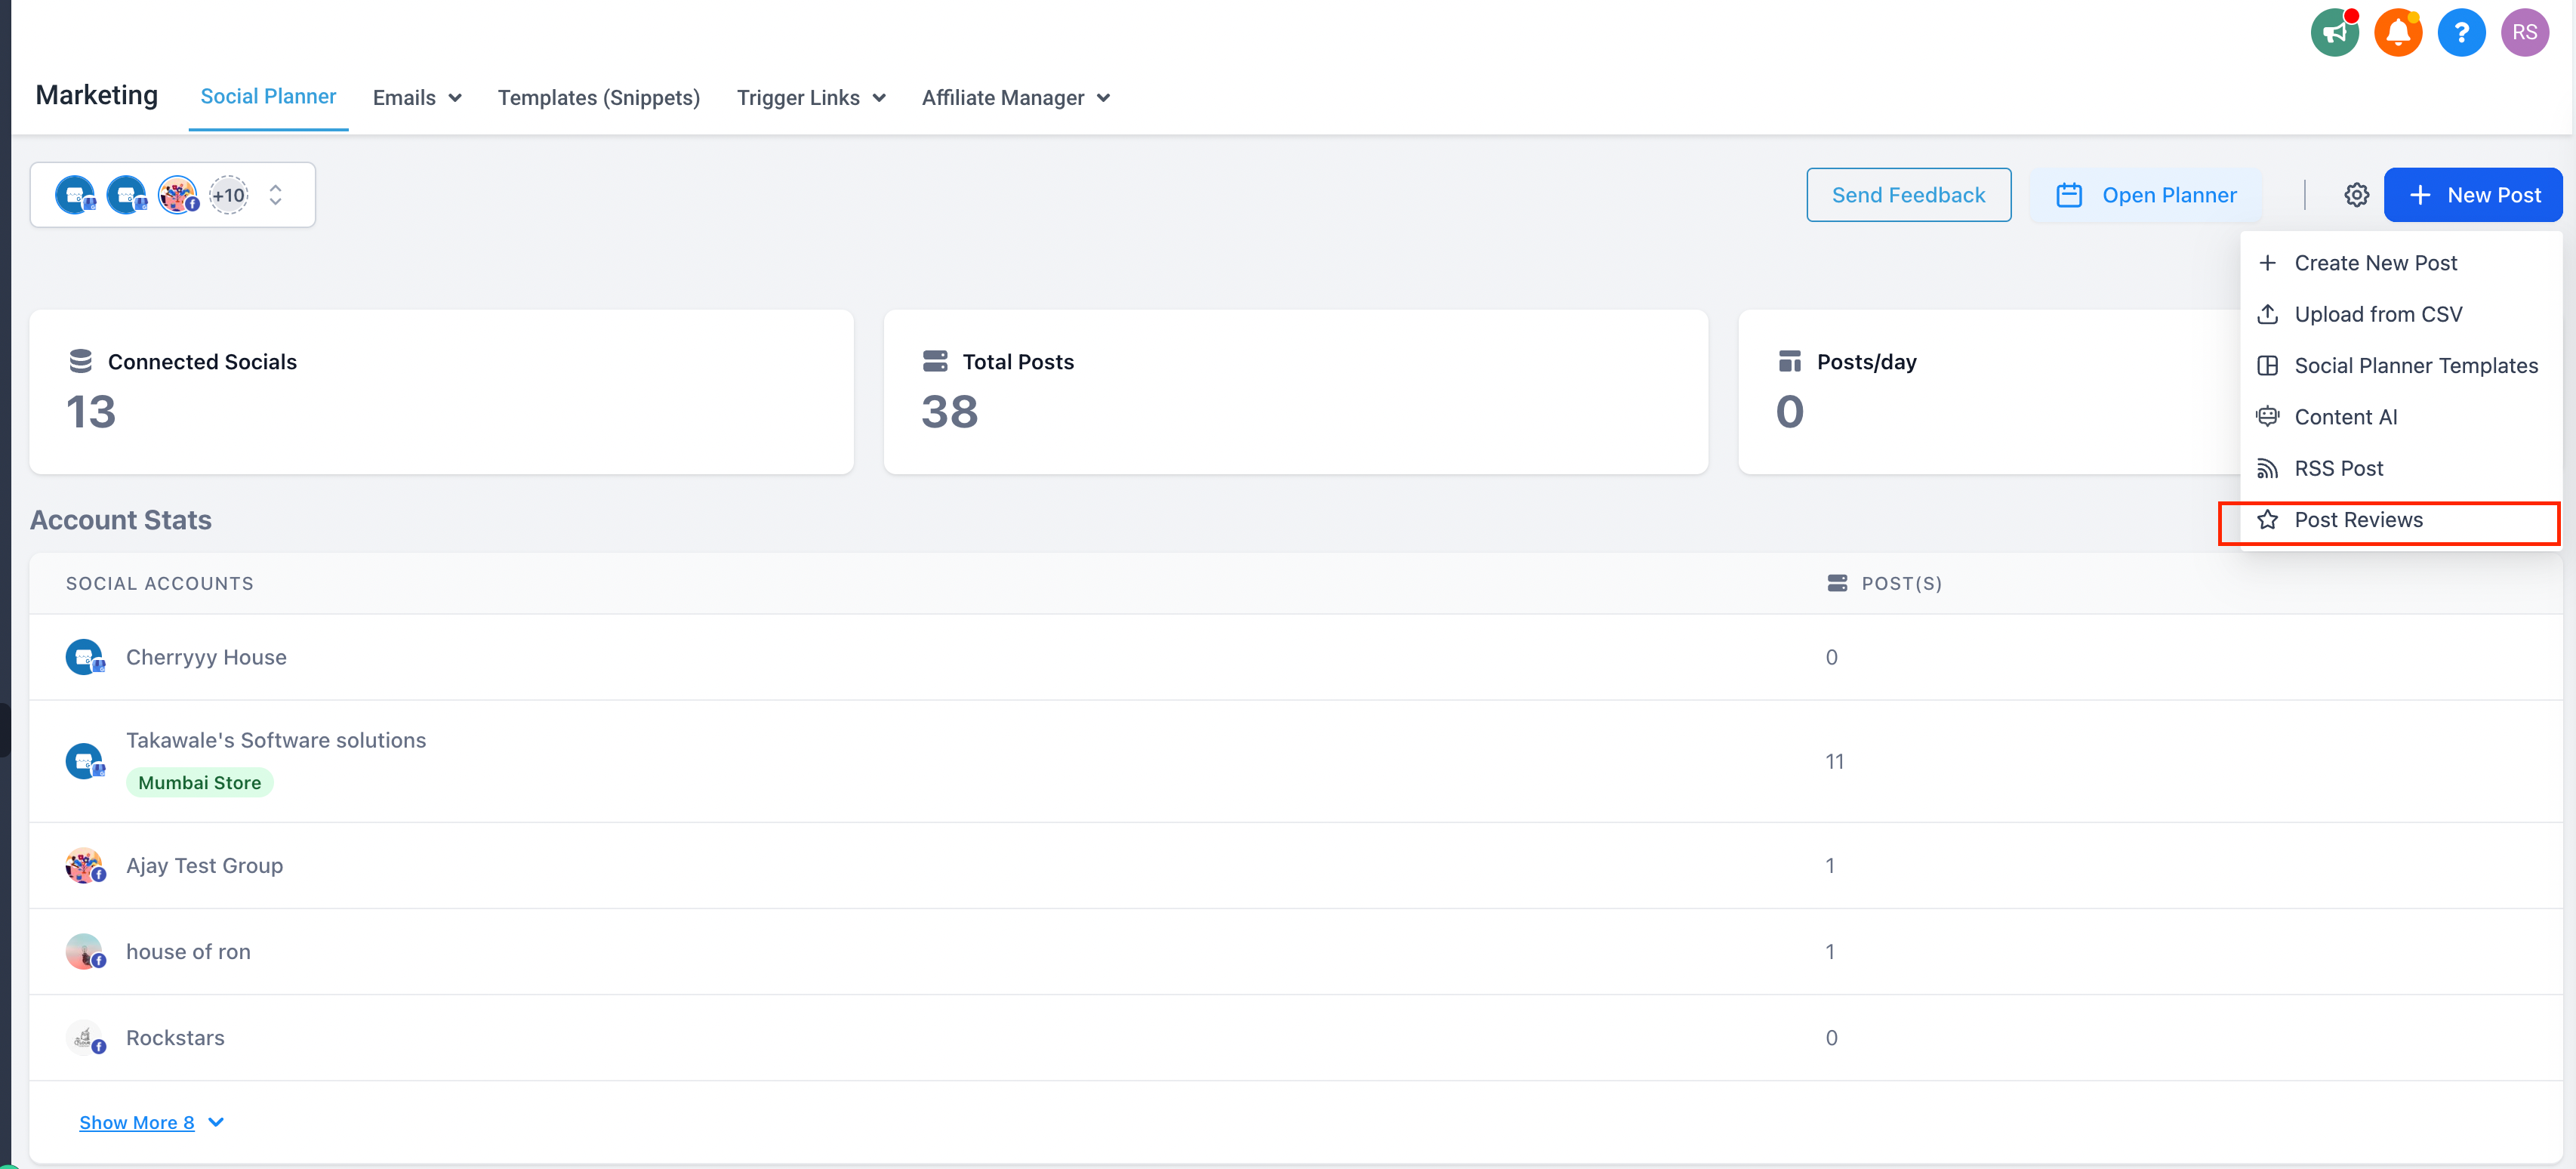
Go to Marketing > Social Planner
Click on create new post option to select the drop down of Review Post
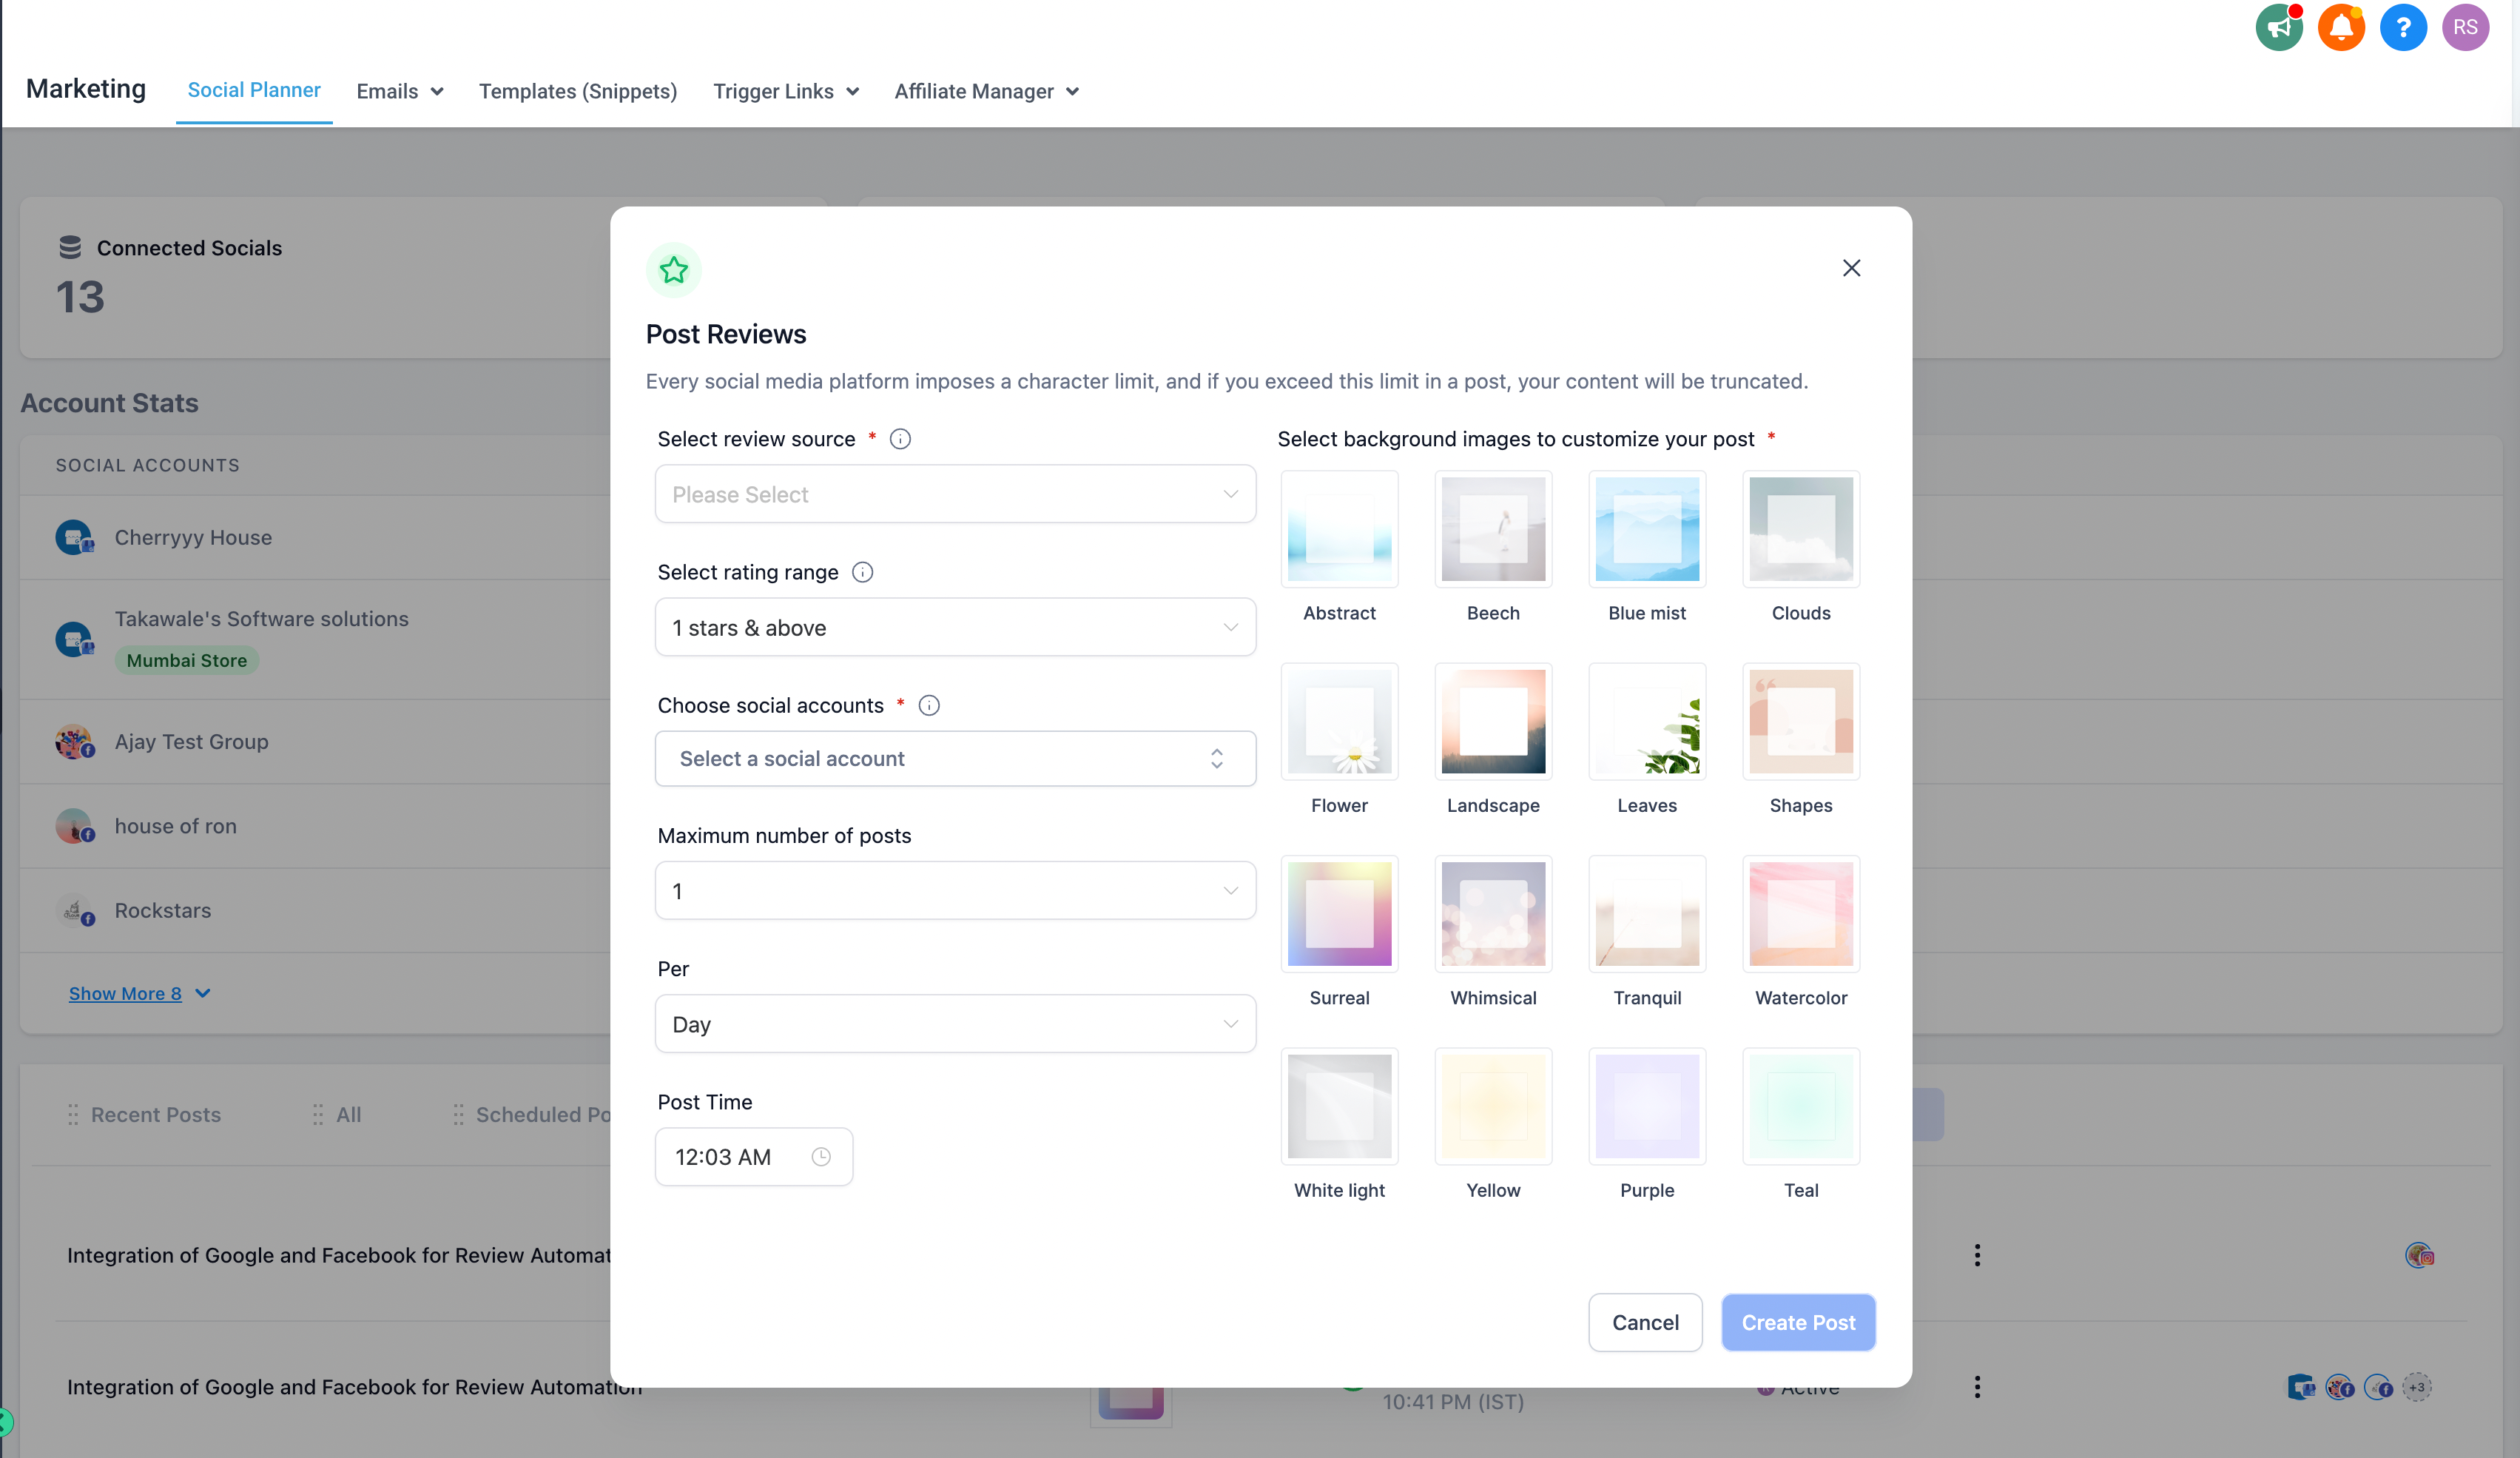
It will open a model popup with option of following
Select the reviews platform – google and facebook
Select the rating of reviews to be posted from 5 start to 1 star
Select the socials where you would like to post (this will not support reels and story)
When to post in a day/week/month as well as select the time to post?
How many posts to be done from 1-5 posts per day/week/month
Client Portal
New Dashboard
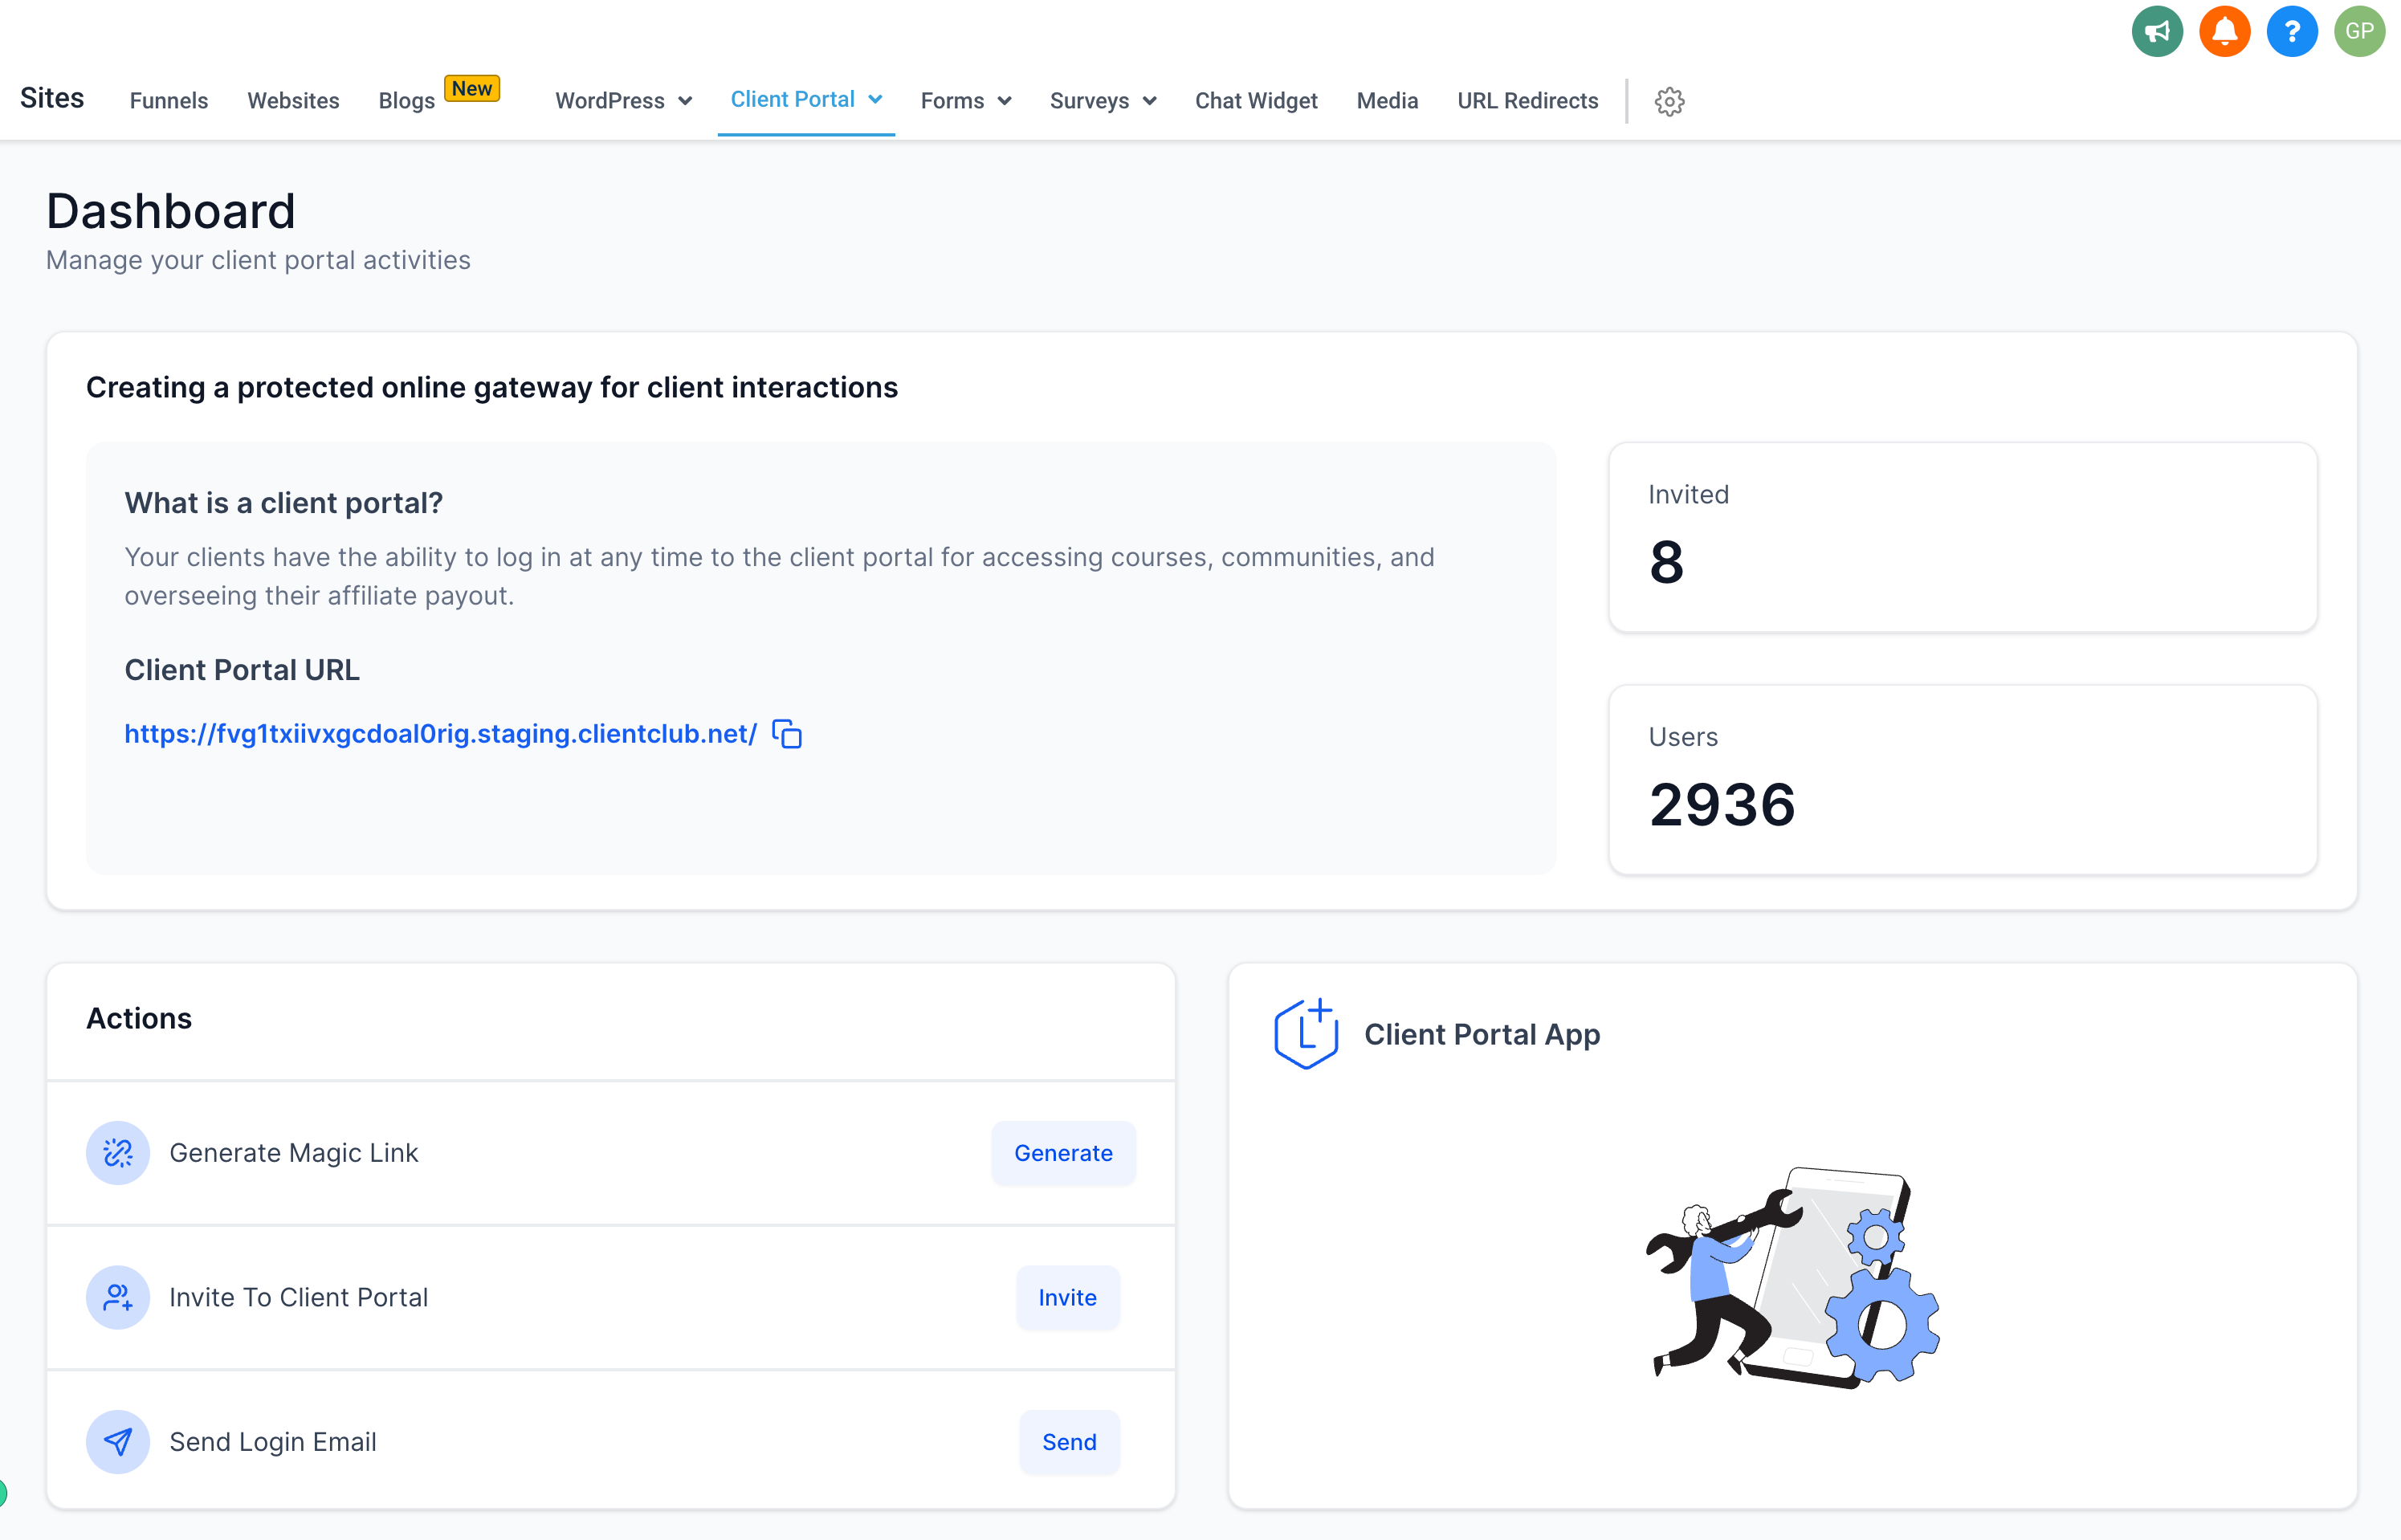
We are excited to introduce the New Client Portal Dashboard
What’s New:
Compare the number of portal joiners vs. invitations
Copy and share your client portal URL with ease
Create and send magic links to your contacts
Invite users to your client portal
How to:
From the Left Nav Bar > Go to Sites > Client Portal > Dashboard
Communities
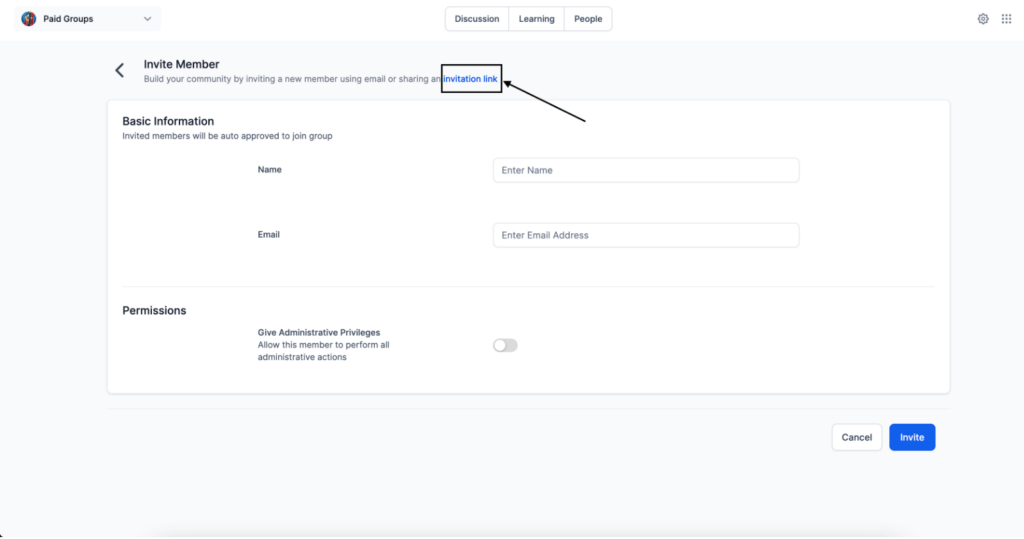
We have a new feature that simplifies the process of inviting members to your groups. With the integration of Invite Links, Admins and Owners can extend invitations with ease.
How to Invite a member via link:
Create Unique Invite Links: Admins and Owners now have the ability to generate unique invite links from the invite page (People Tab > Invite > Invitation link)
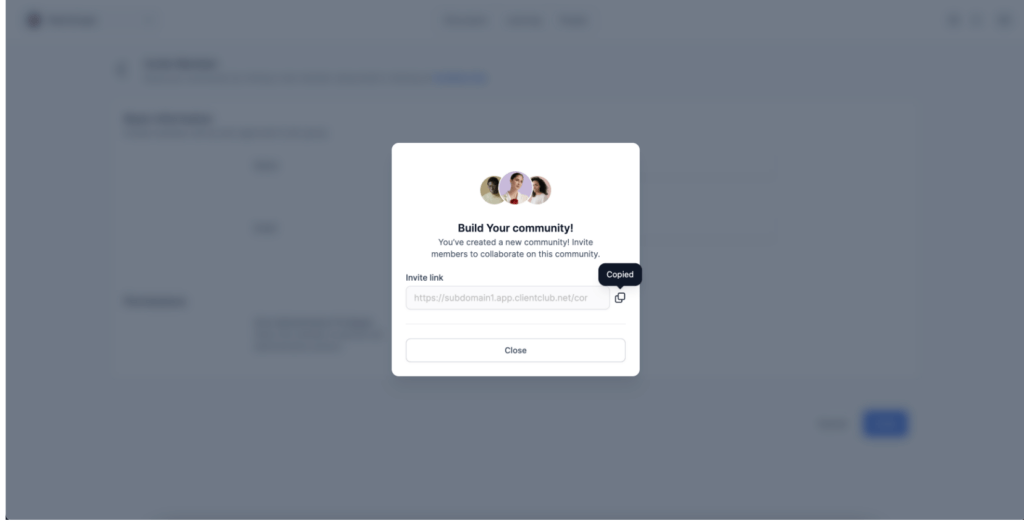
Flexible Sharing:
The generated invite link can be copied and shared through various communication channels, even outside the system
Approval Process:
It’s important to note that even when using invite links, the standard approval process still applies for private groups
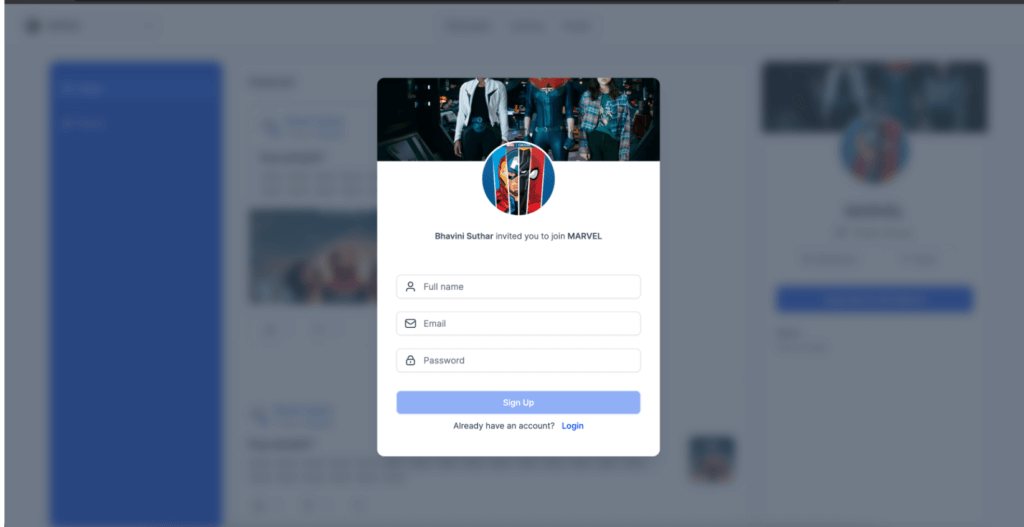
For members who are invited via link
On clicking the invite link, a personalized pop-up modal will appear. Users can sign-up for a new account or login with existing credentials, respectively.
Forms and Surveys
Forms/Surveys Easy Name Editing
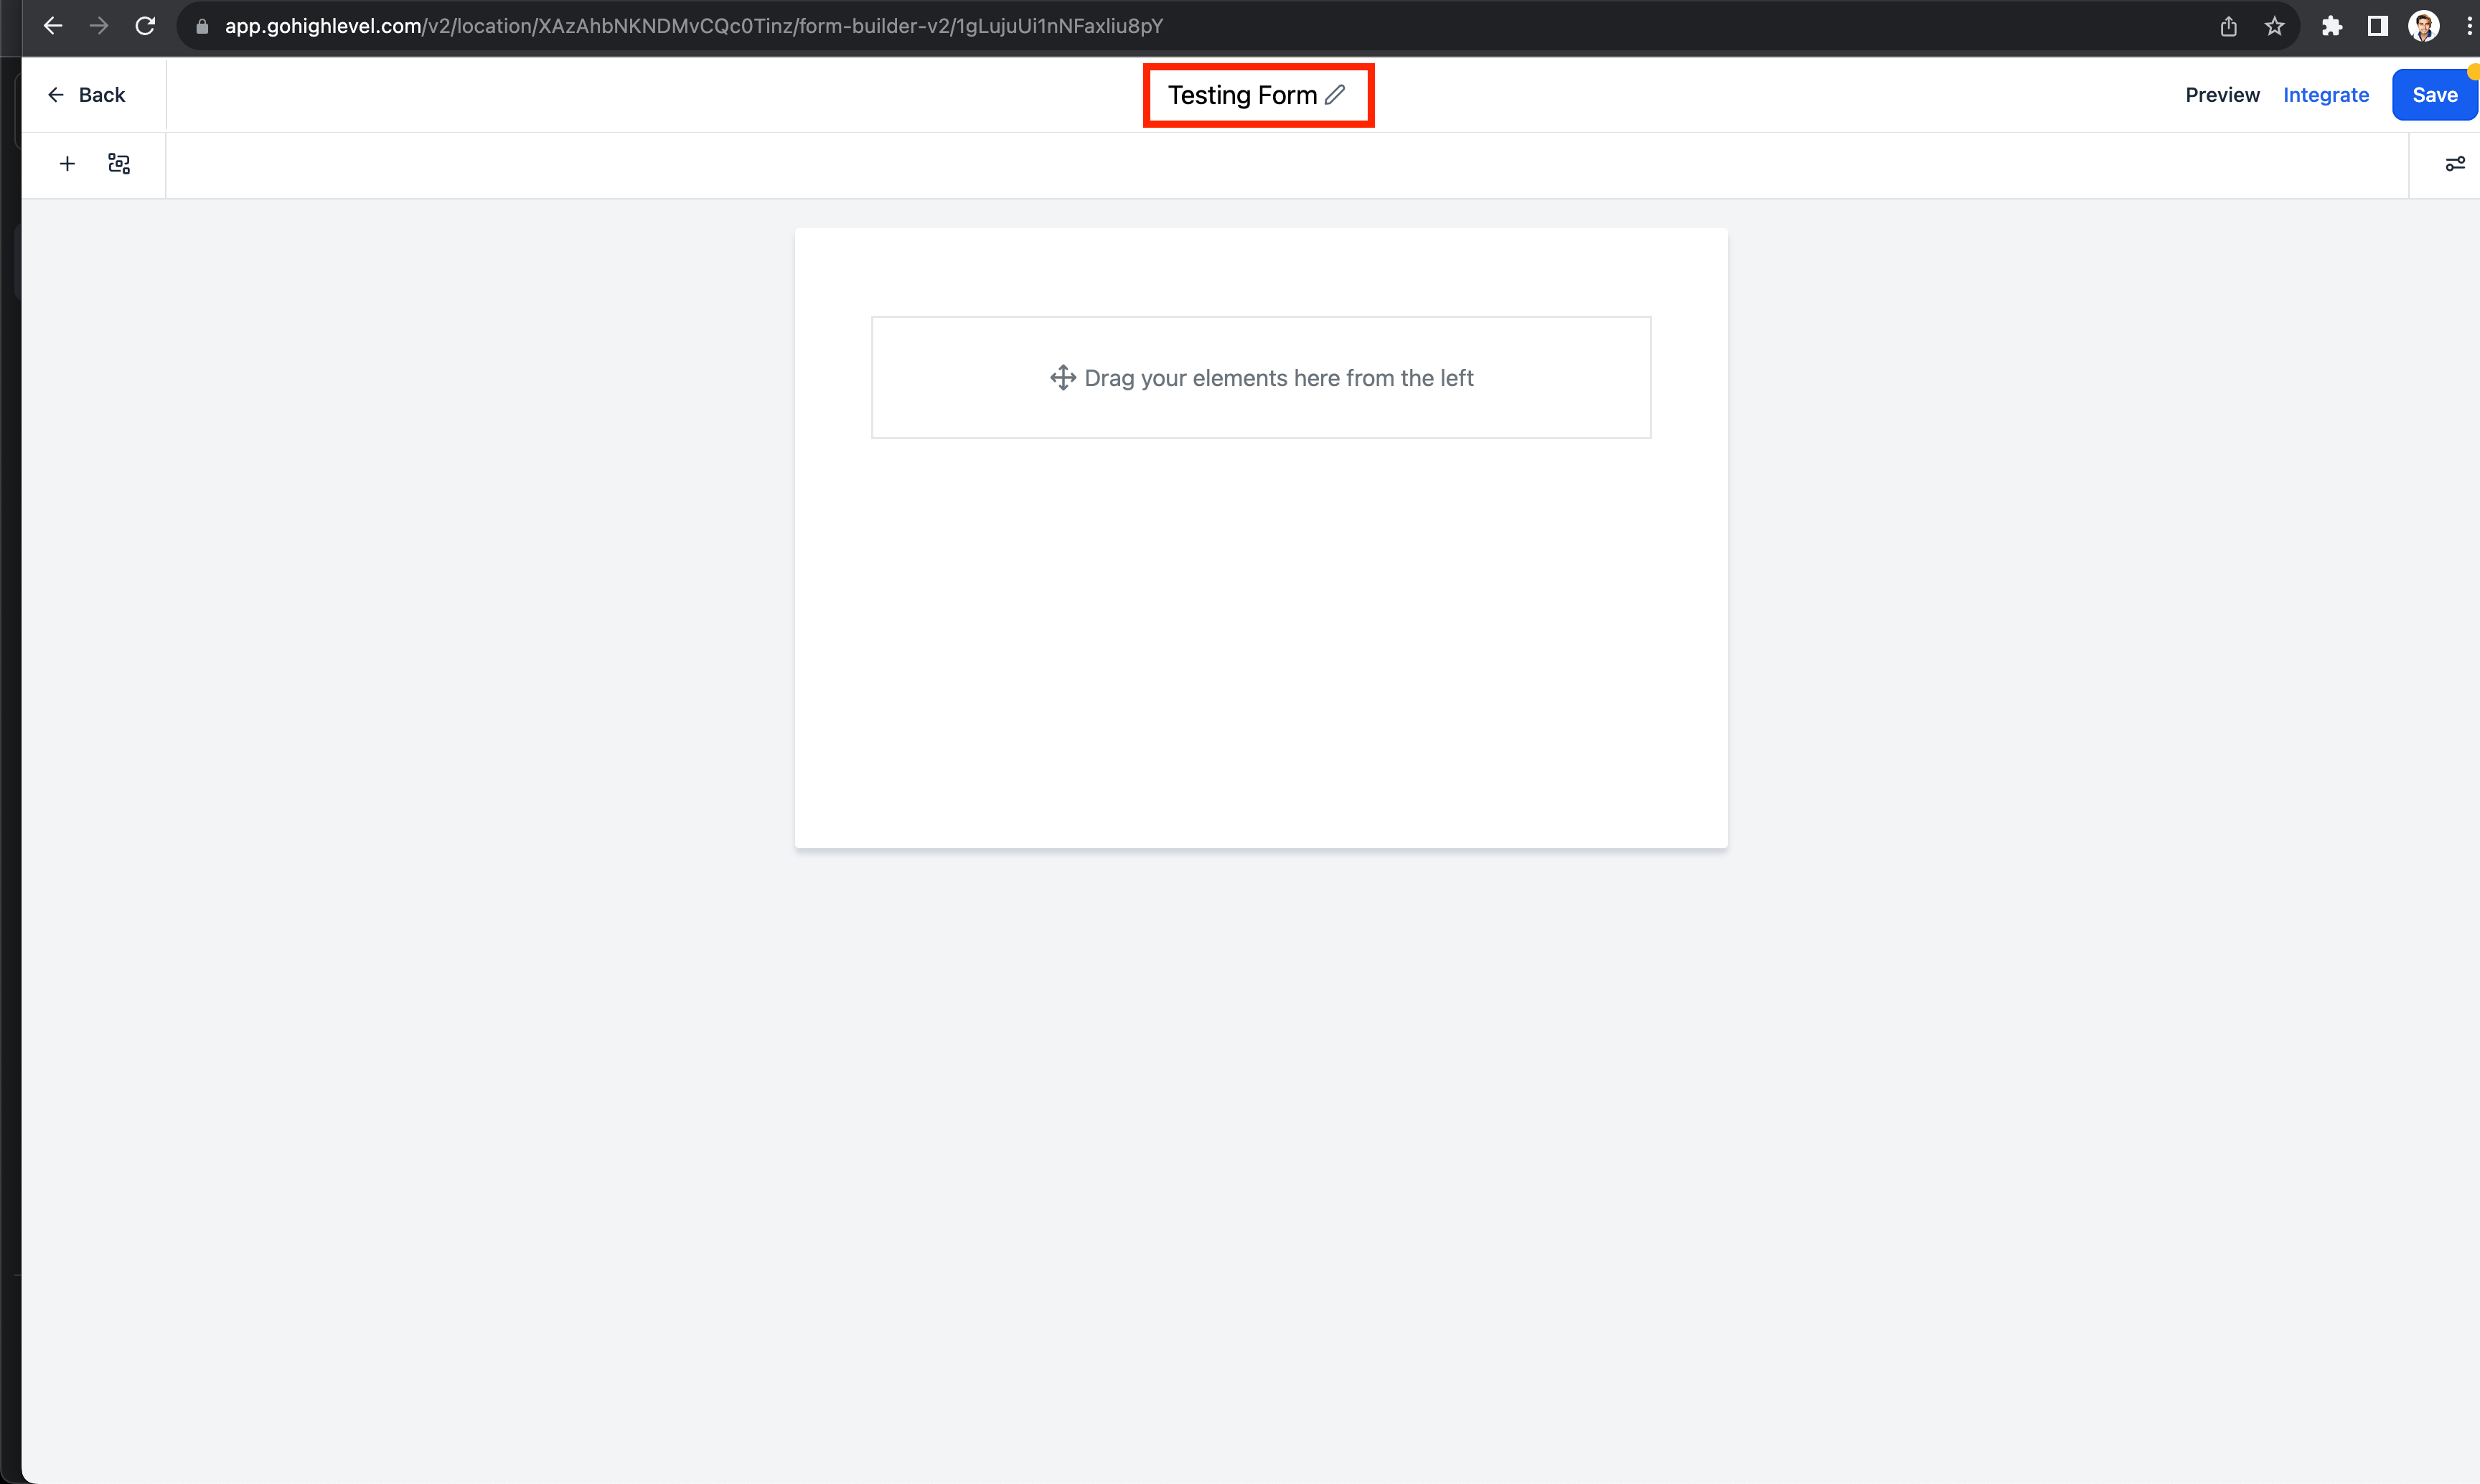
About the release
Now, you can effortlessly edit your form/survey name directly in the header.
Simply click on the edit icon or the form/survey name to make quick and easy changes.
Click on the Save button to save the name changes.
CRM
Contact Engagement Score
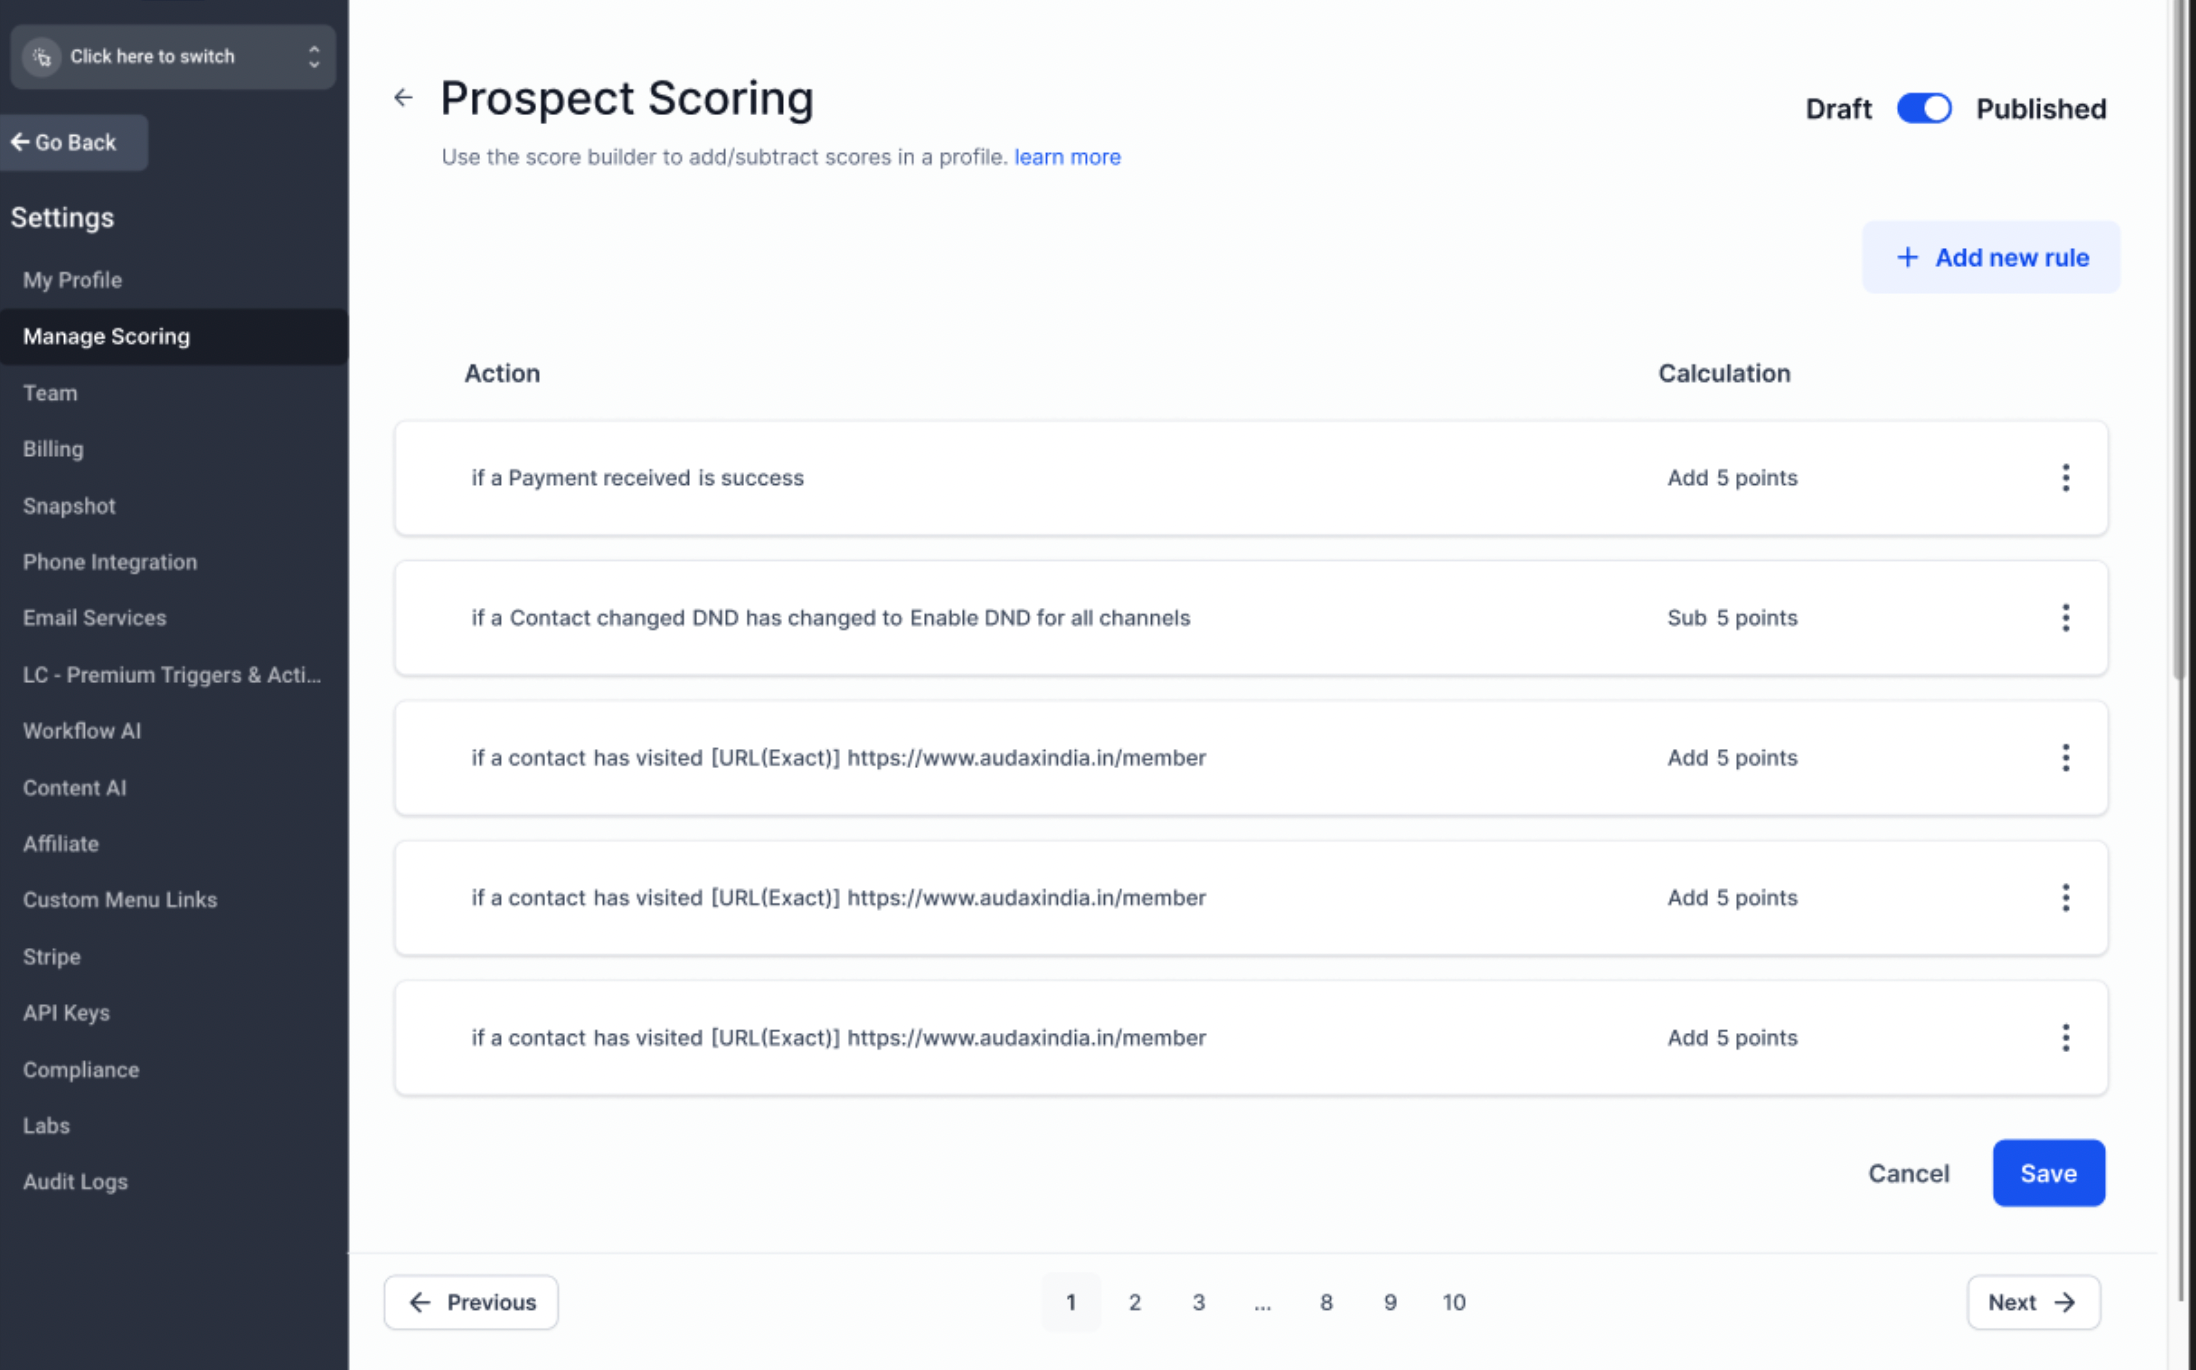
Introducing Contact Engagement scoring to assign a numerical value to each contact based on how actively and effectively a contact interacts with the platform
Edit Score Profile Name and Description : Users can easily edit the name and description of their score profiles
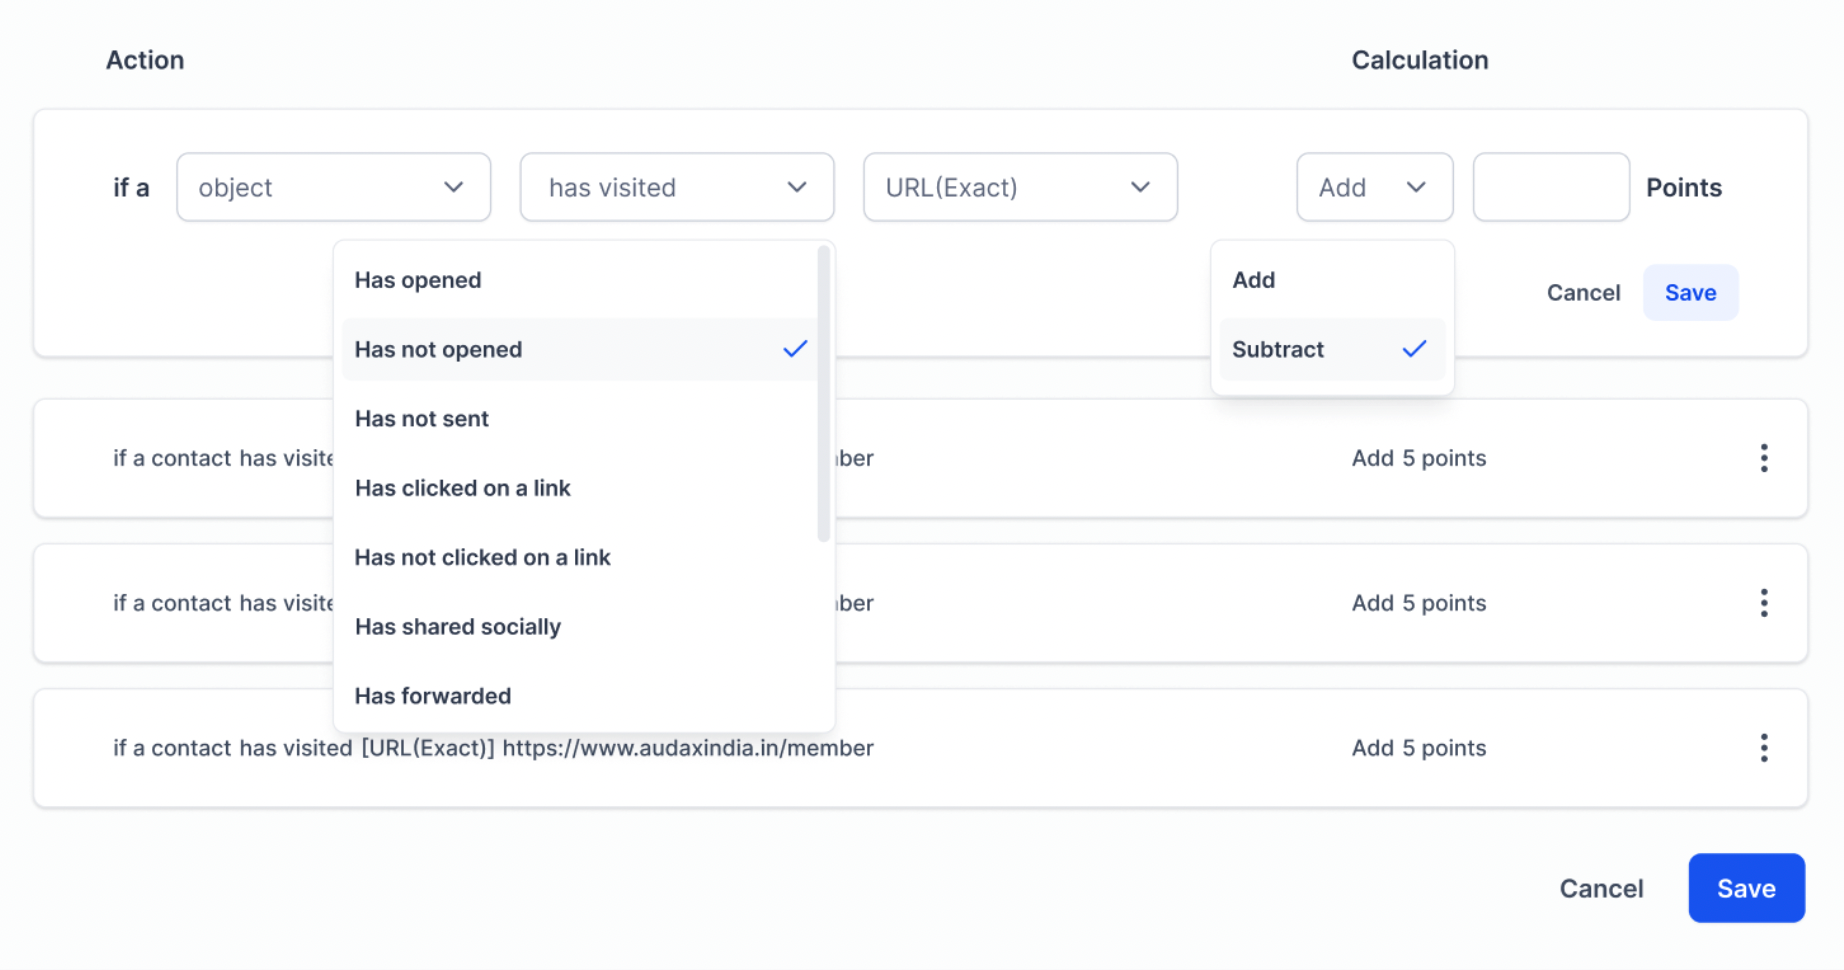
Rule Customization: Users can add new rules or edit existing ones to the profile to gauge each contact’s interaction: for ex: if a contact replies to an email, books an appointment. These rules are used to quantify the interactions between a business and its contacts. Any changes in the rules need to be saved to the score profile
Add or Subtract Points : Users can assign points to each rules. They can decide whether to add or subtract points
Draft/ Publish : By default the score profile stays in draft state. Once the profile is published, the score will be reflected for all the contacts.
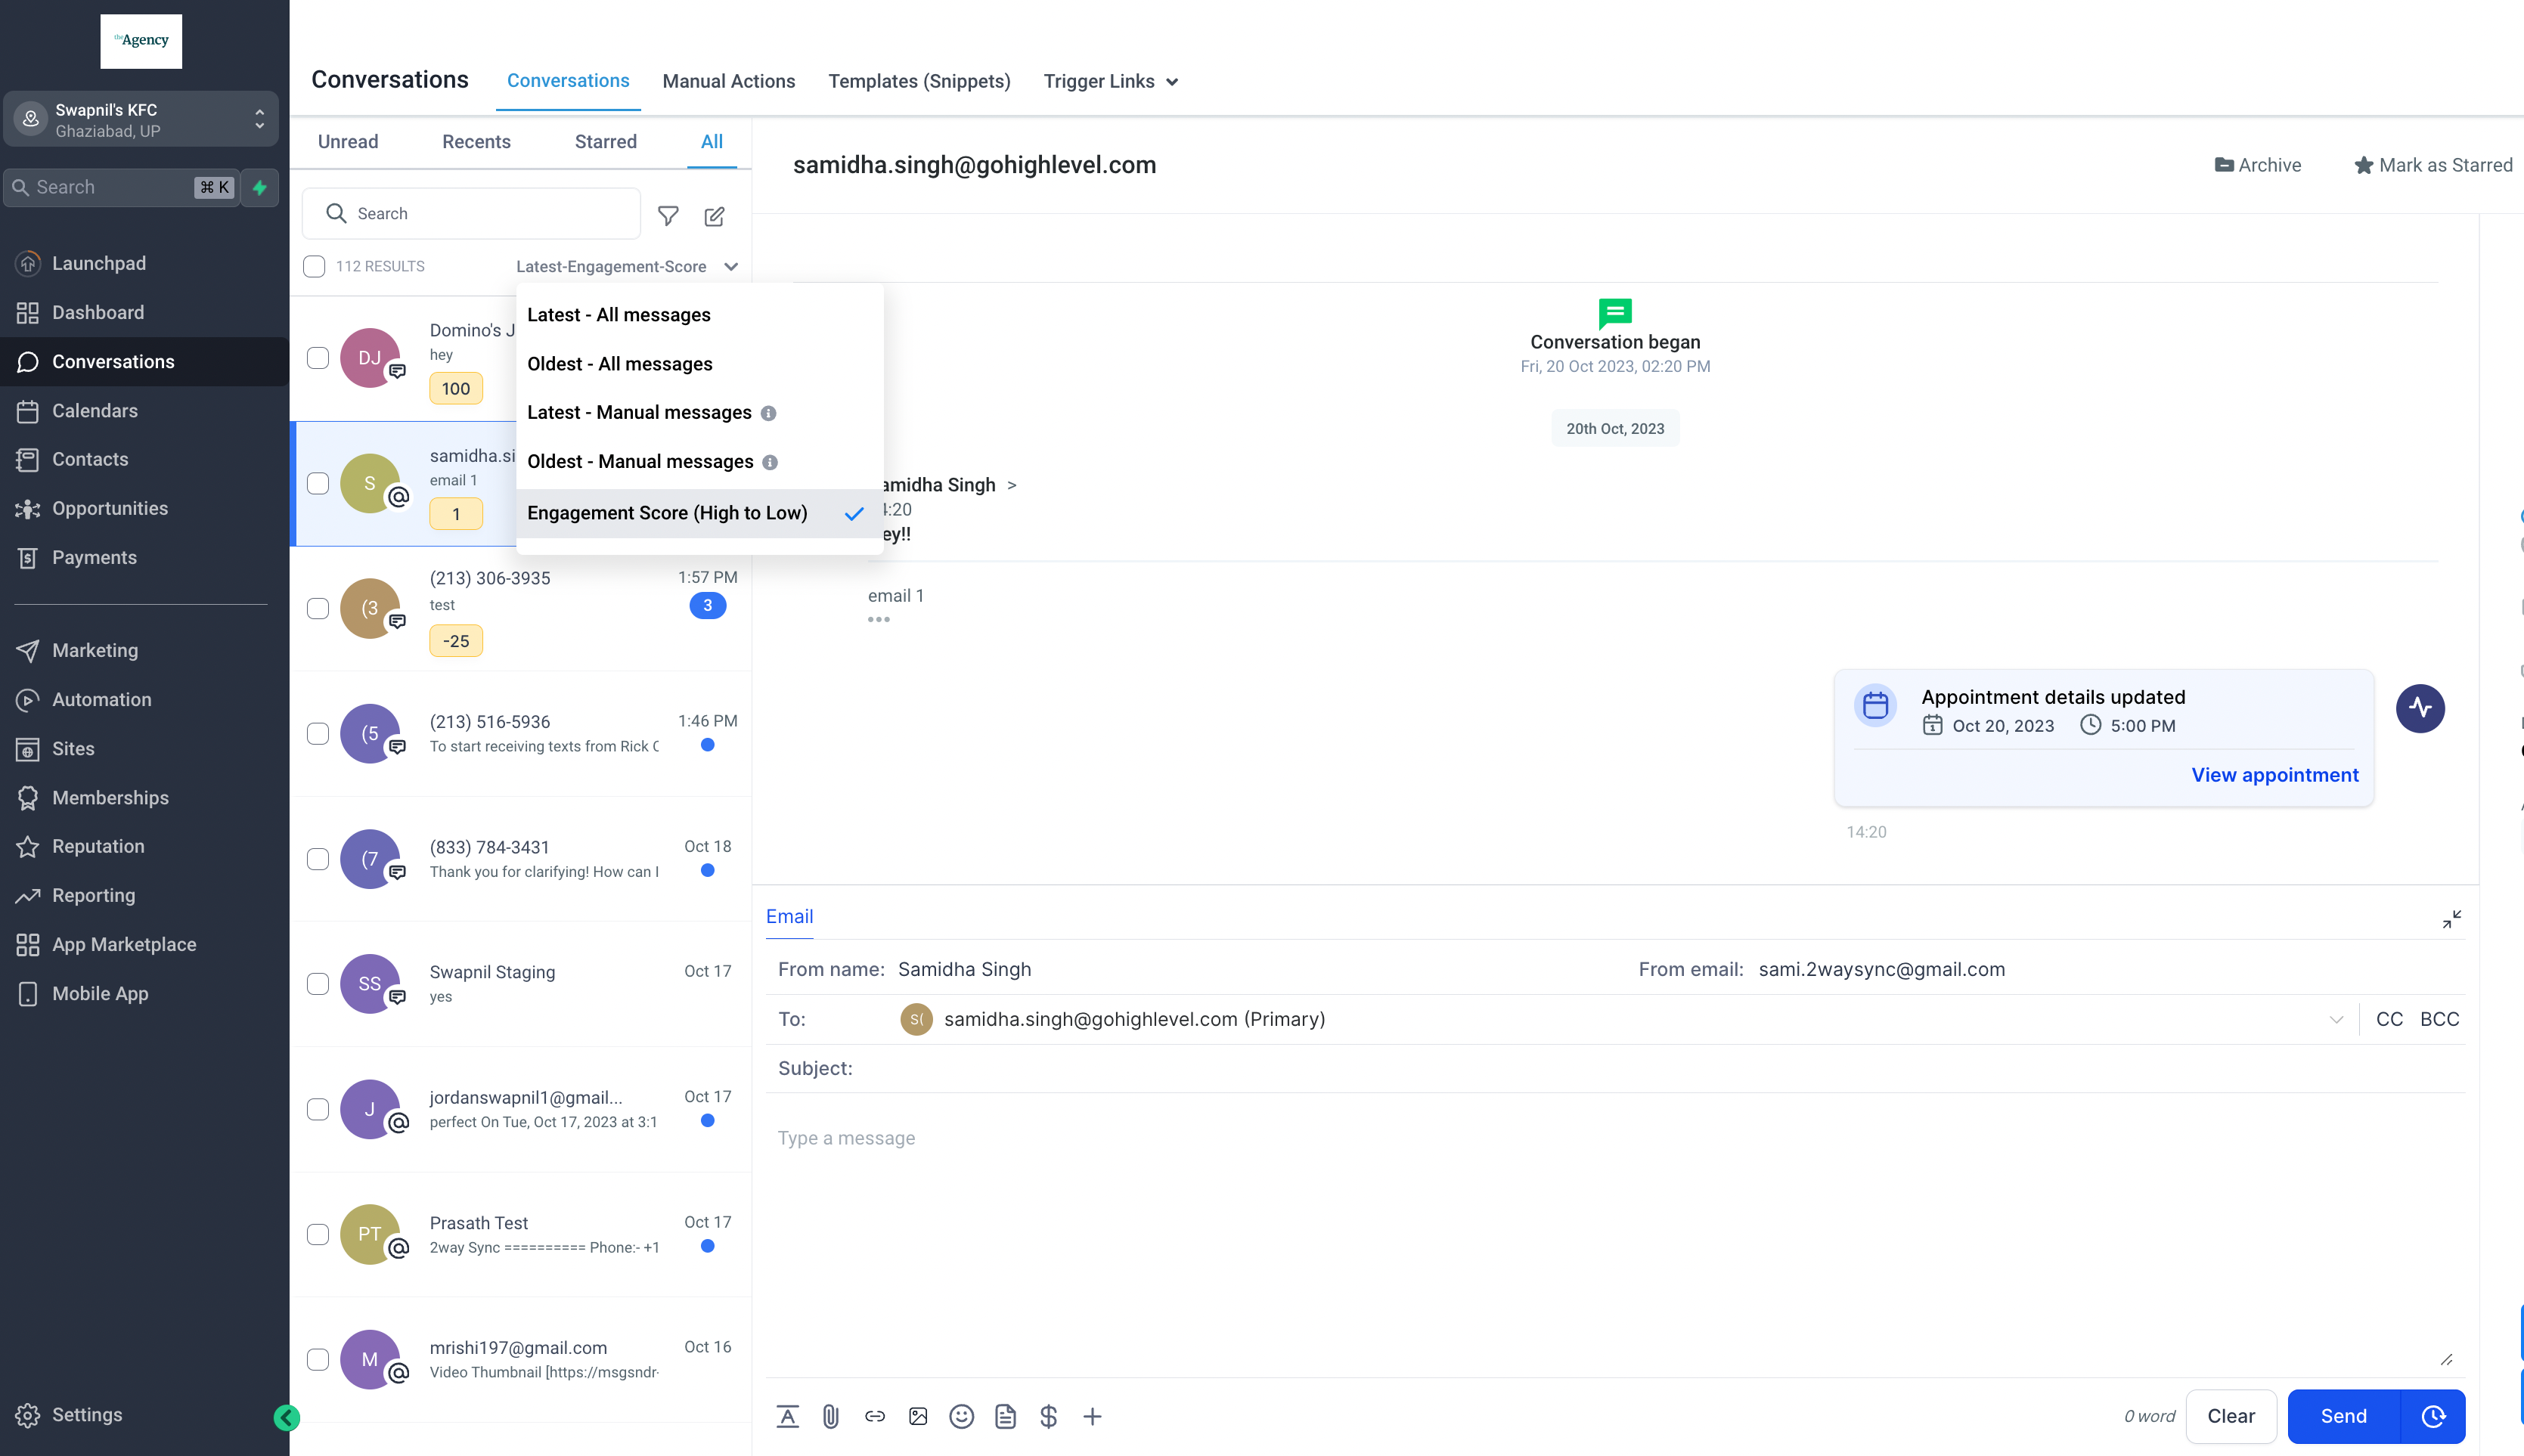
2. Sorting and filtering in Conversations
Score Display: In the conversations module, users can find scores visibly associated with each contact. This at-a-glance view helps users quickly identify and focus on contacts with the highest scores.
Sort Contacts: Users can sort contacts based on their scores, helping you quickly identify high-priority contacts and those who require more nurturing.
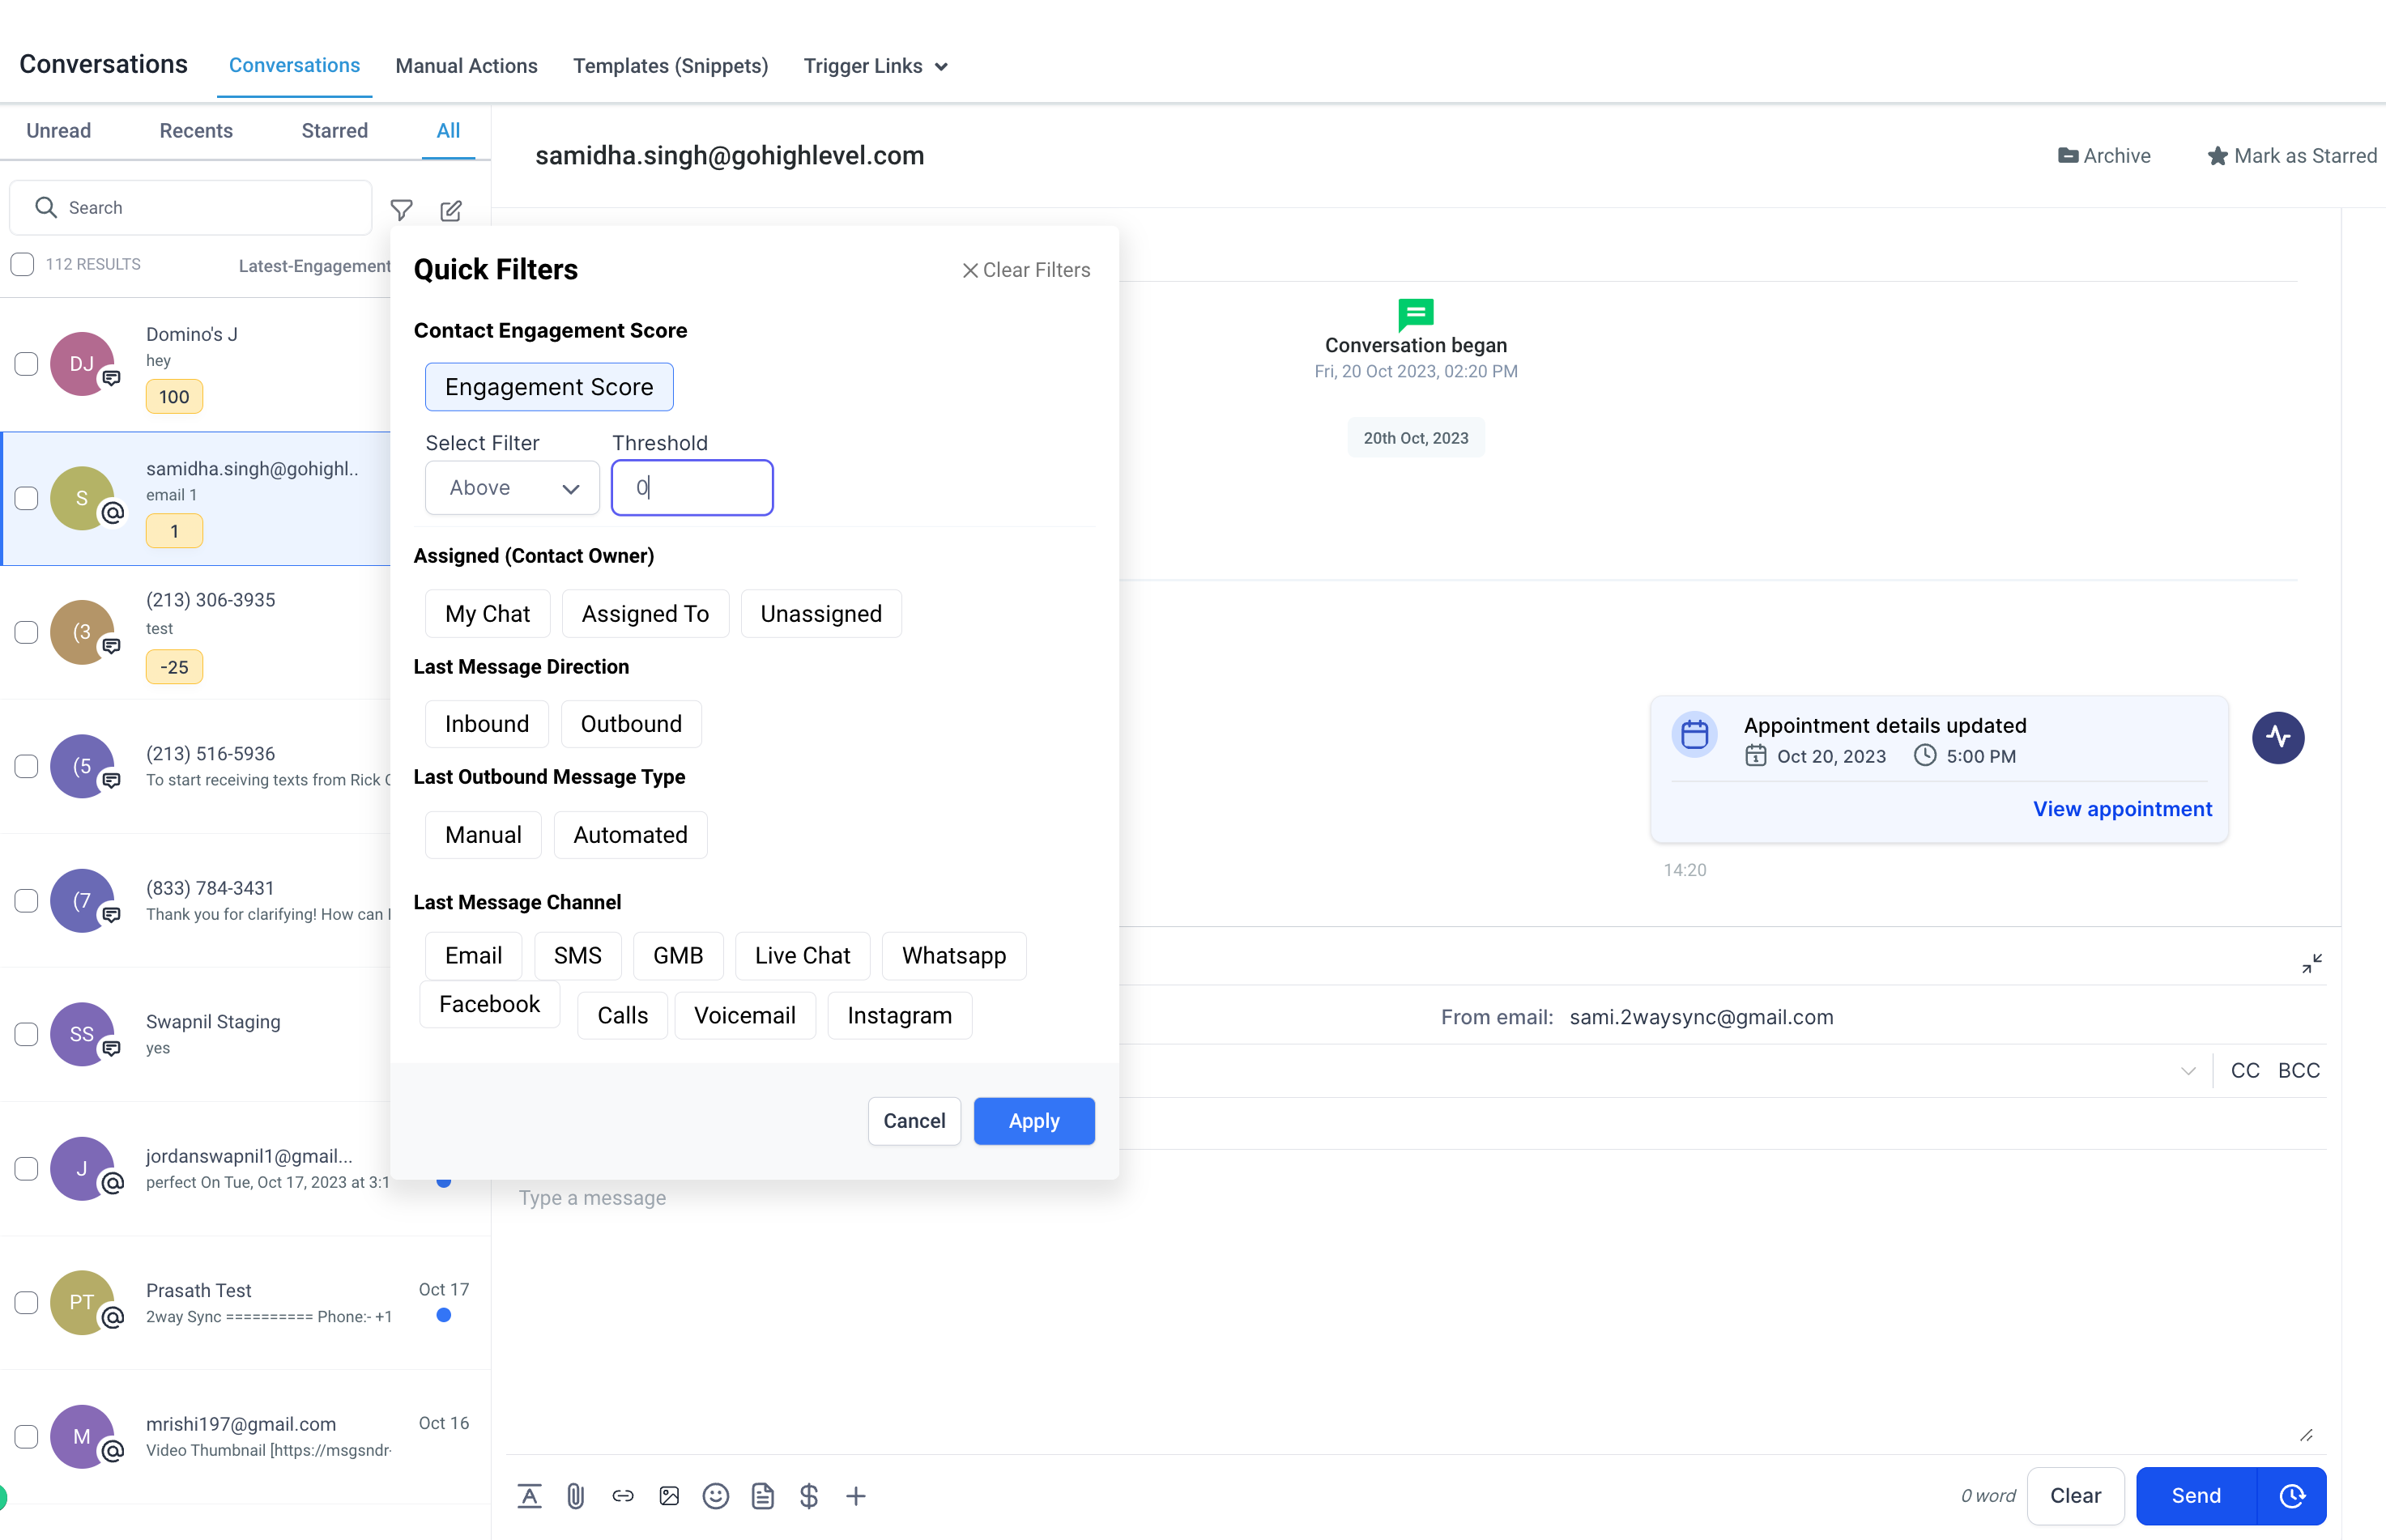
Filtering Options: Users can filter contacts based on score ranges, allowing users to segment and target contacts with similar engagement levels.
The scores assigned to contacts assist users in prioritizing their interactions. Higher scores indicate more promising leads, enabling users to focus conversations on more important contacts
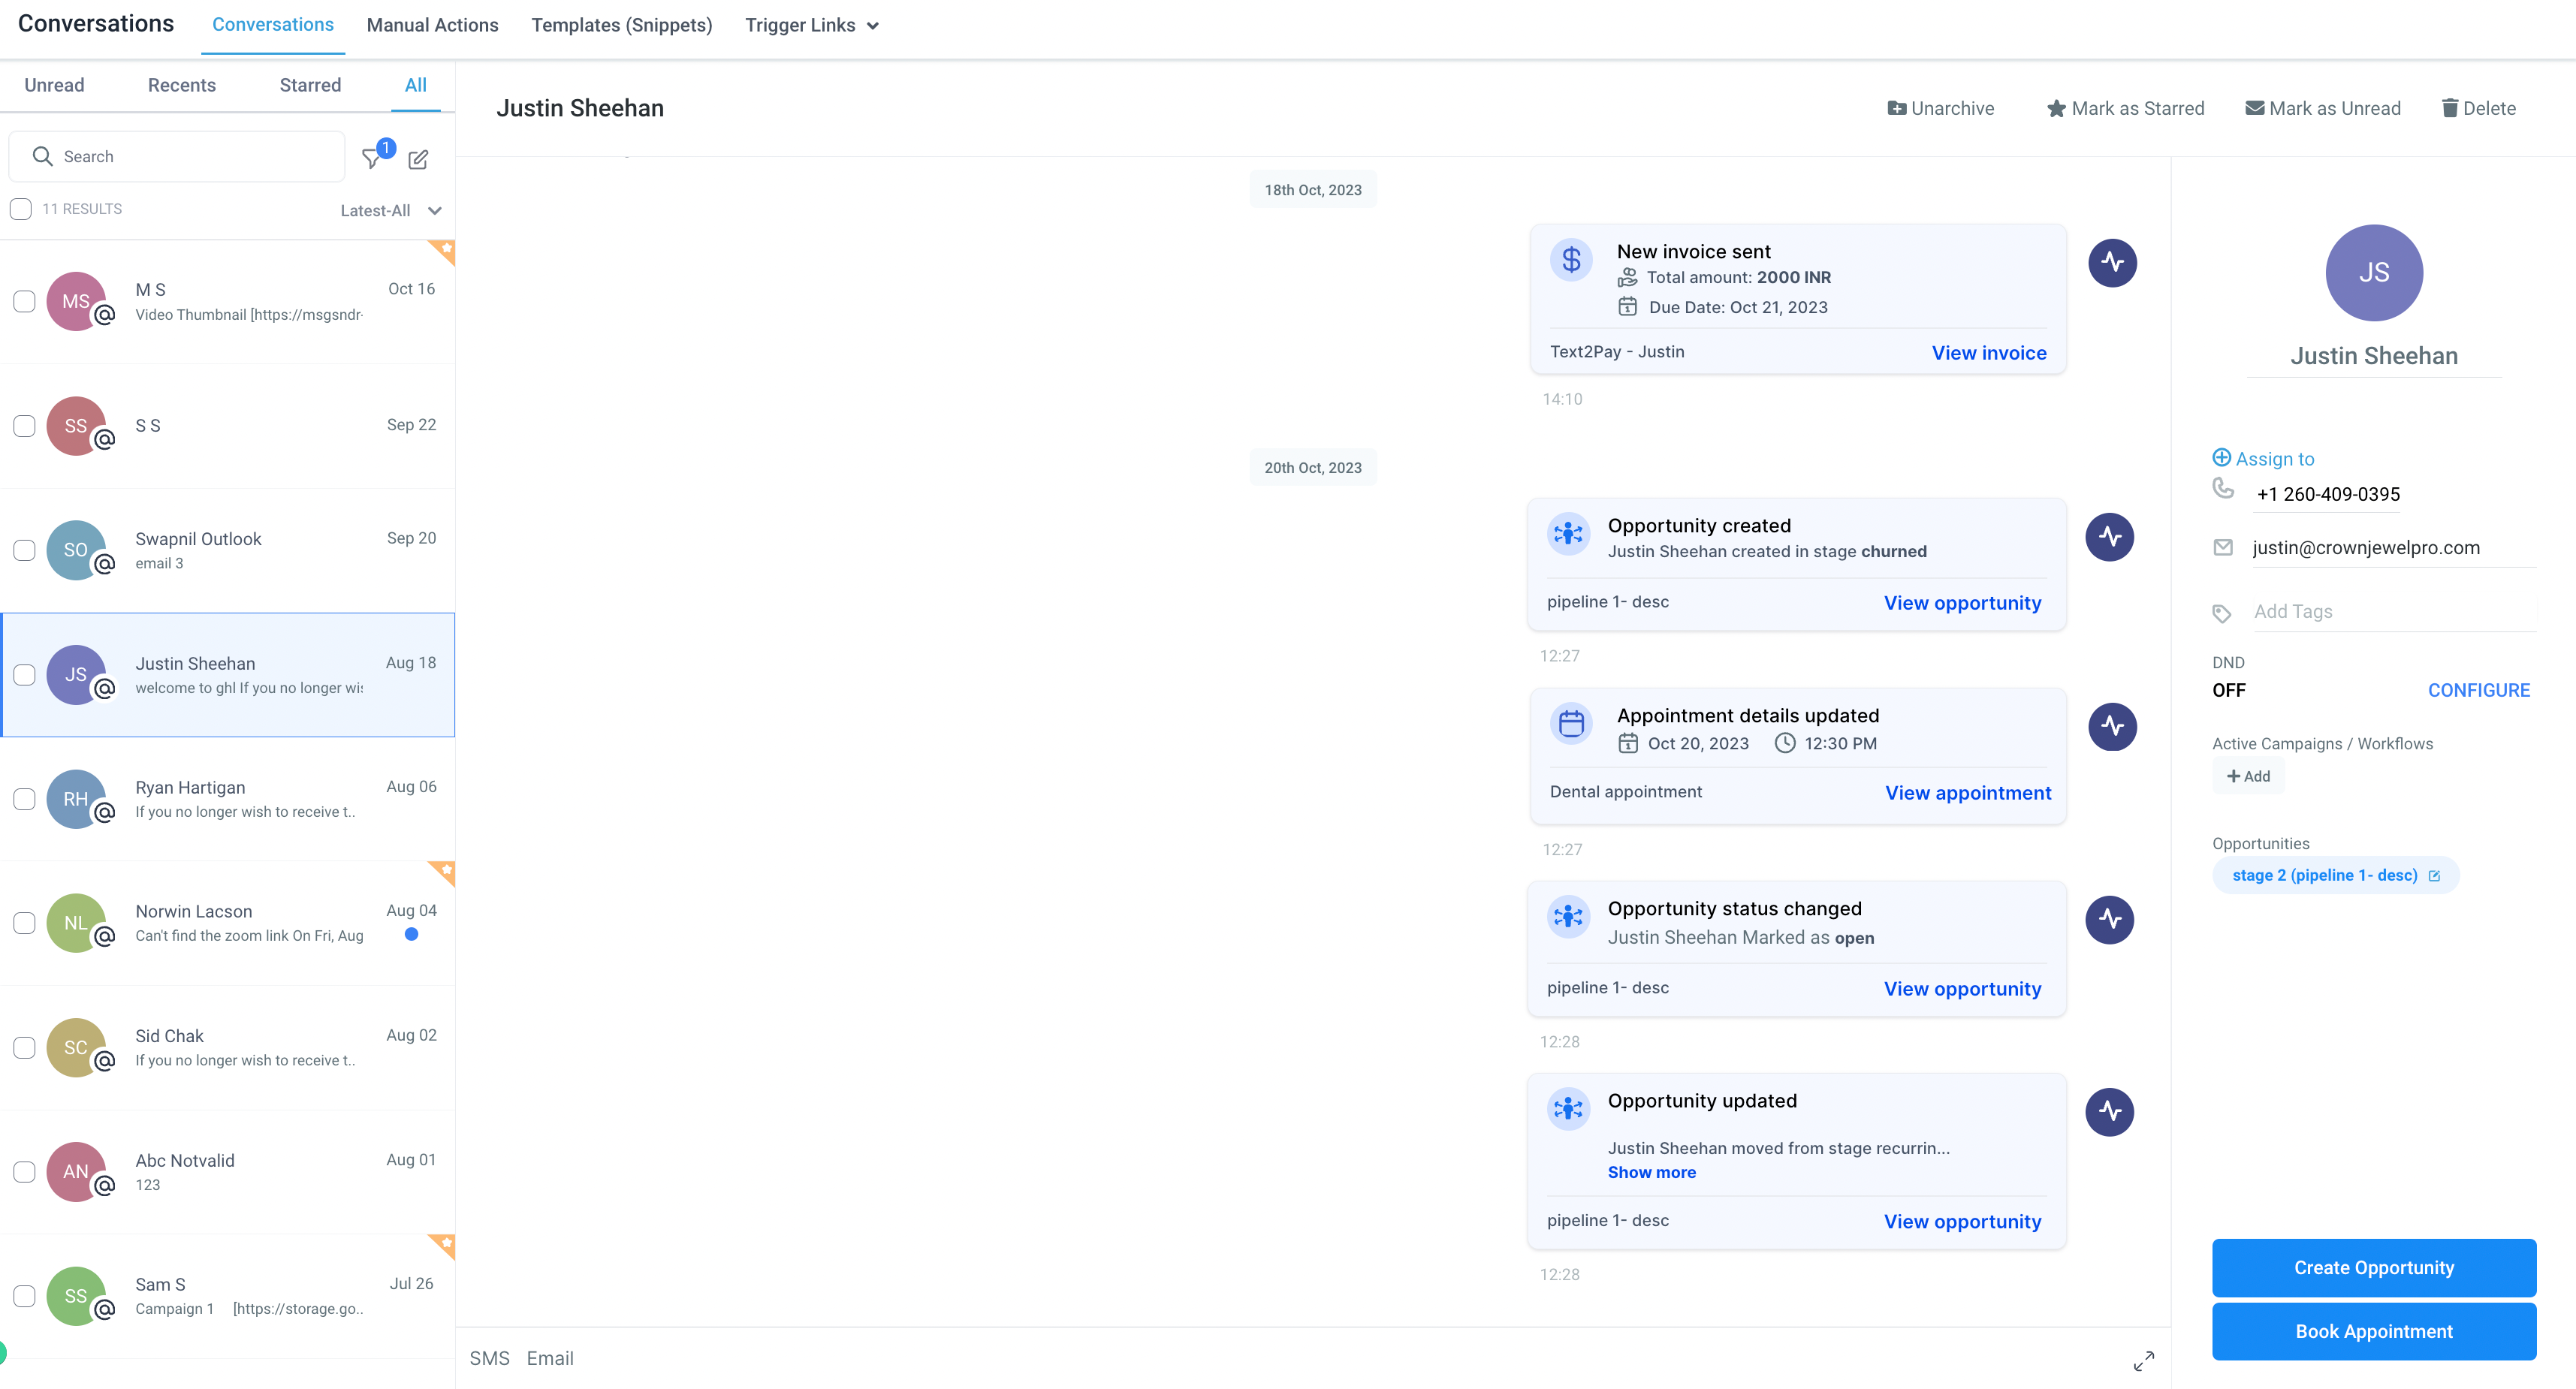
Ability to view & track activities
Introducing Activity Cards, a new feature that provides a consolidated view of essential updates, enhancing users’ experience with our platform. With Activity Cards, users can now stay up to date on all essential changes in real-time without having to navigate to other modules.
Here are the key updates covered by this feature:
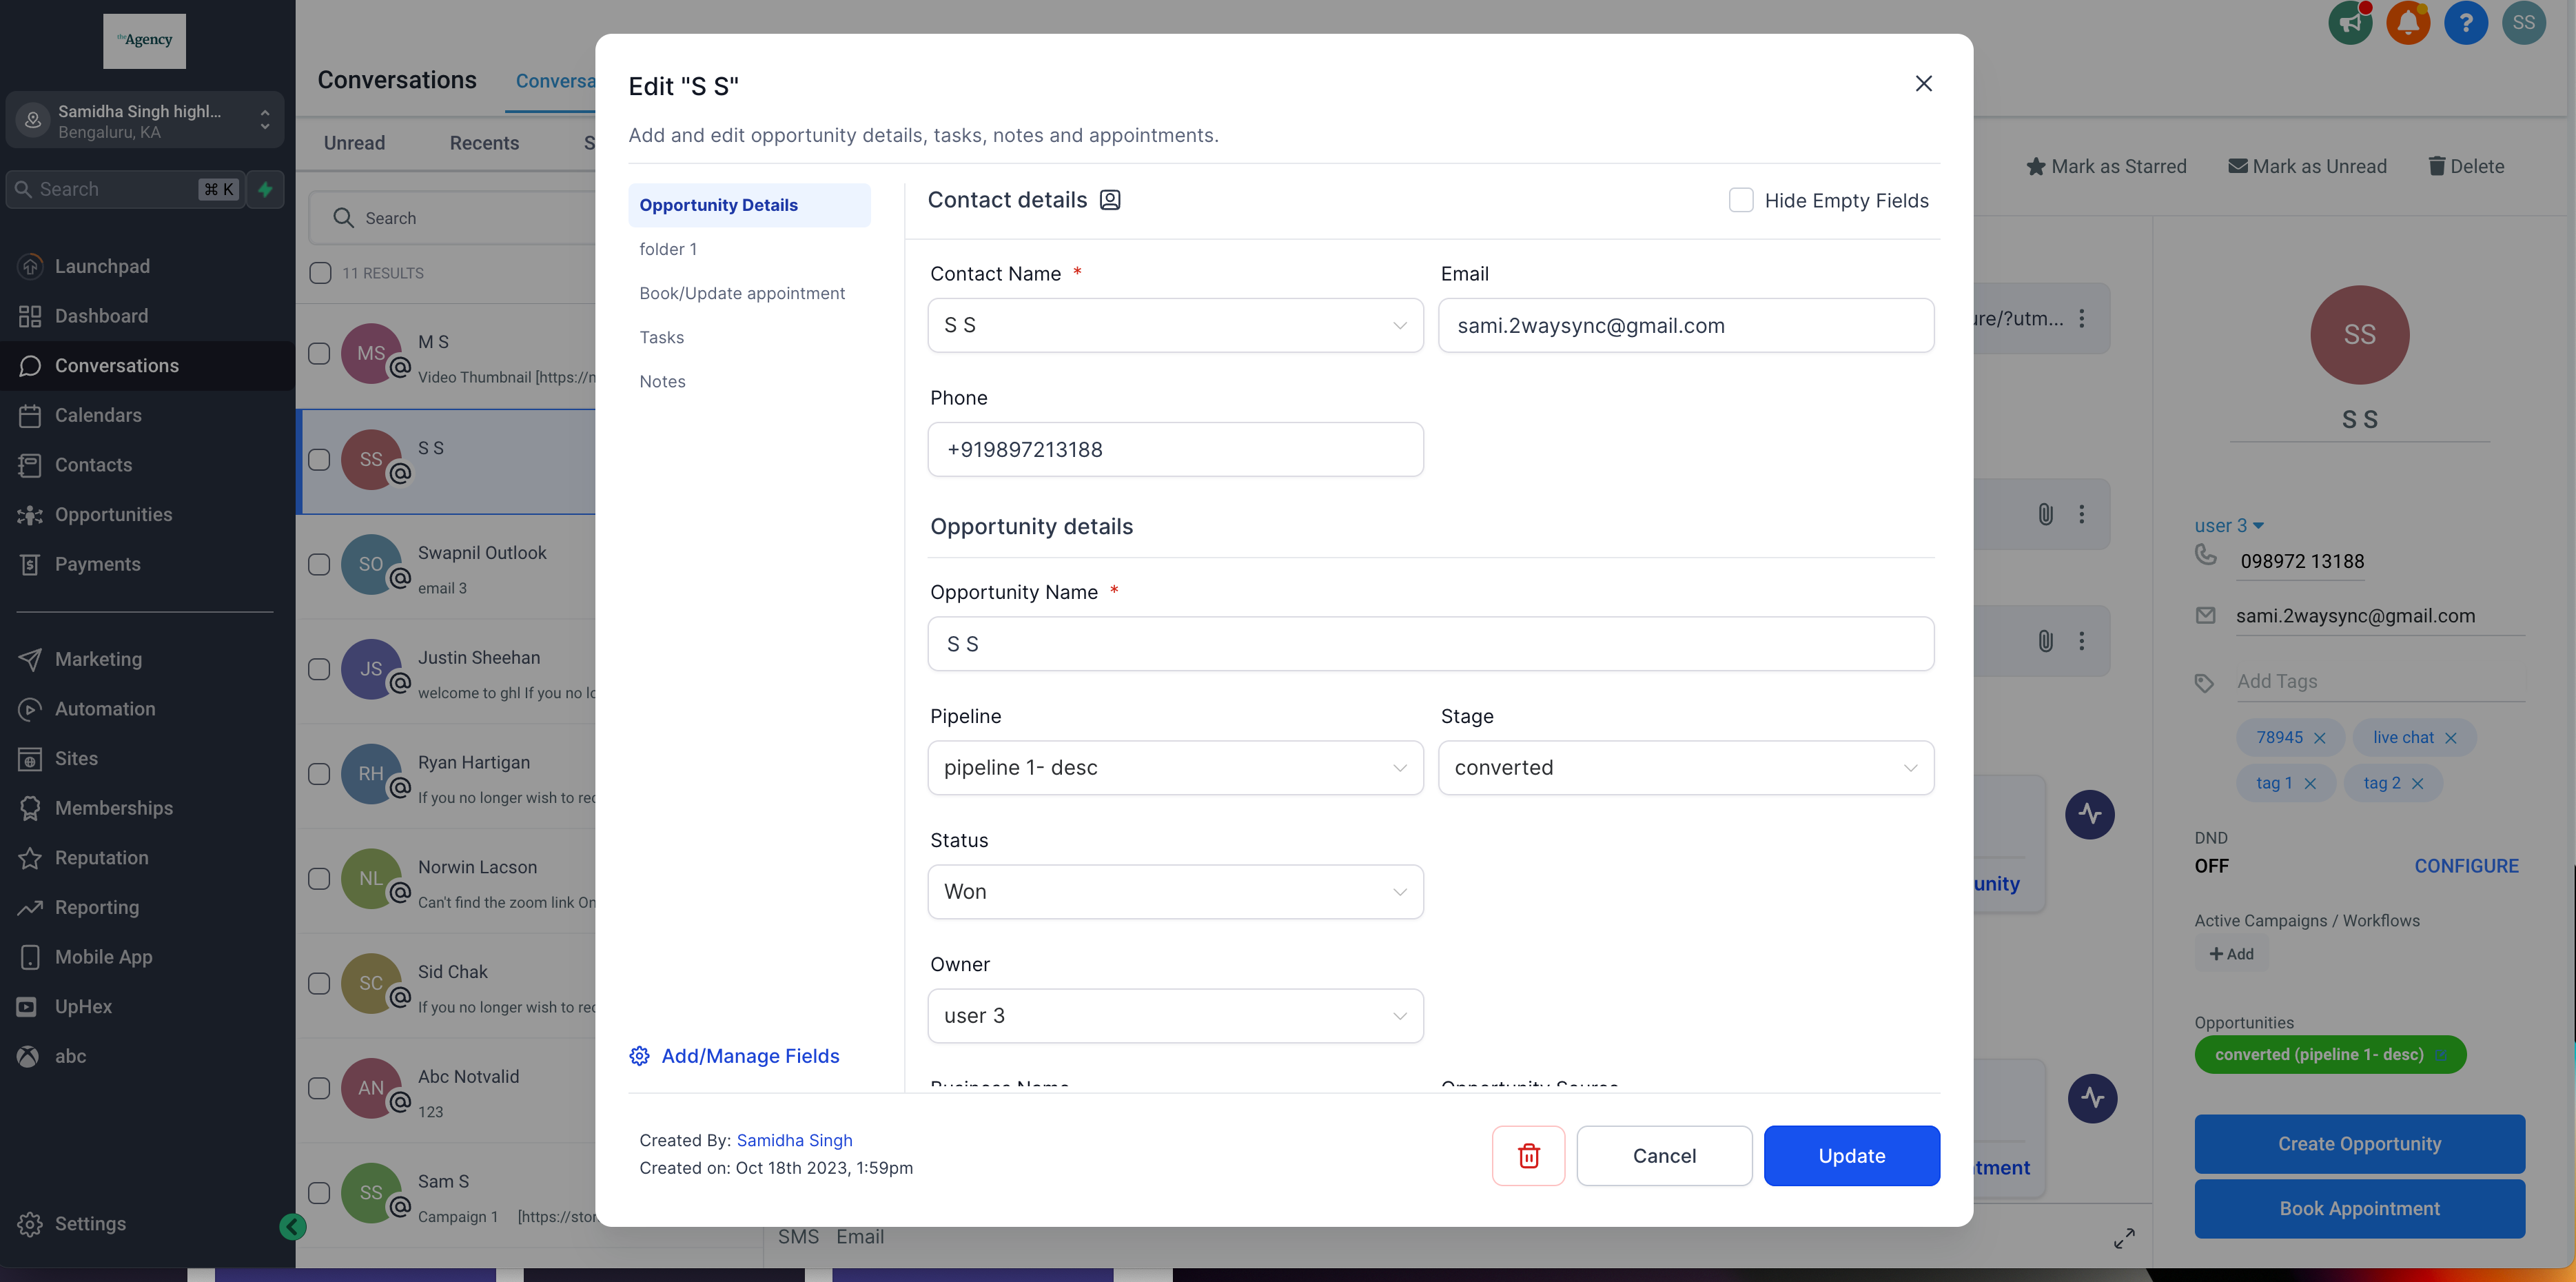
Opportunities
– Activity cards are created real time when any new opportunity is created, updated or deleted ensuring users are aware of potential leads from the start and are always in the loop. Users can click on ‘View Opportunity’ on the card and make real-time changes.
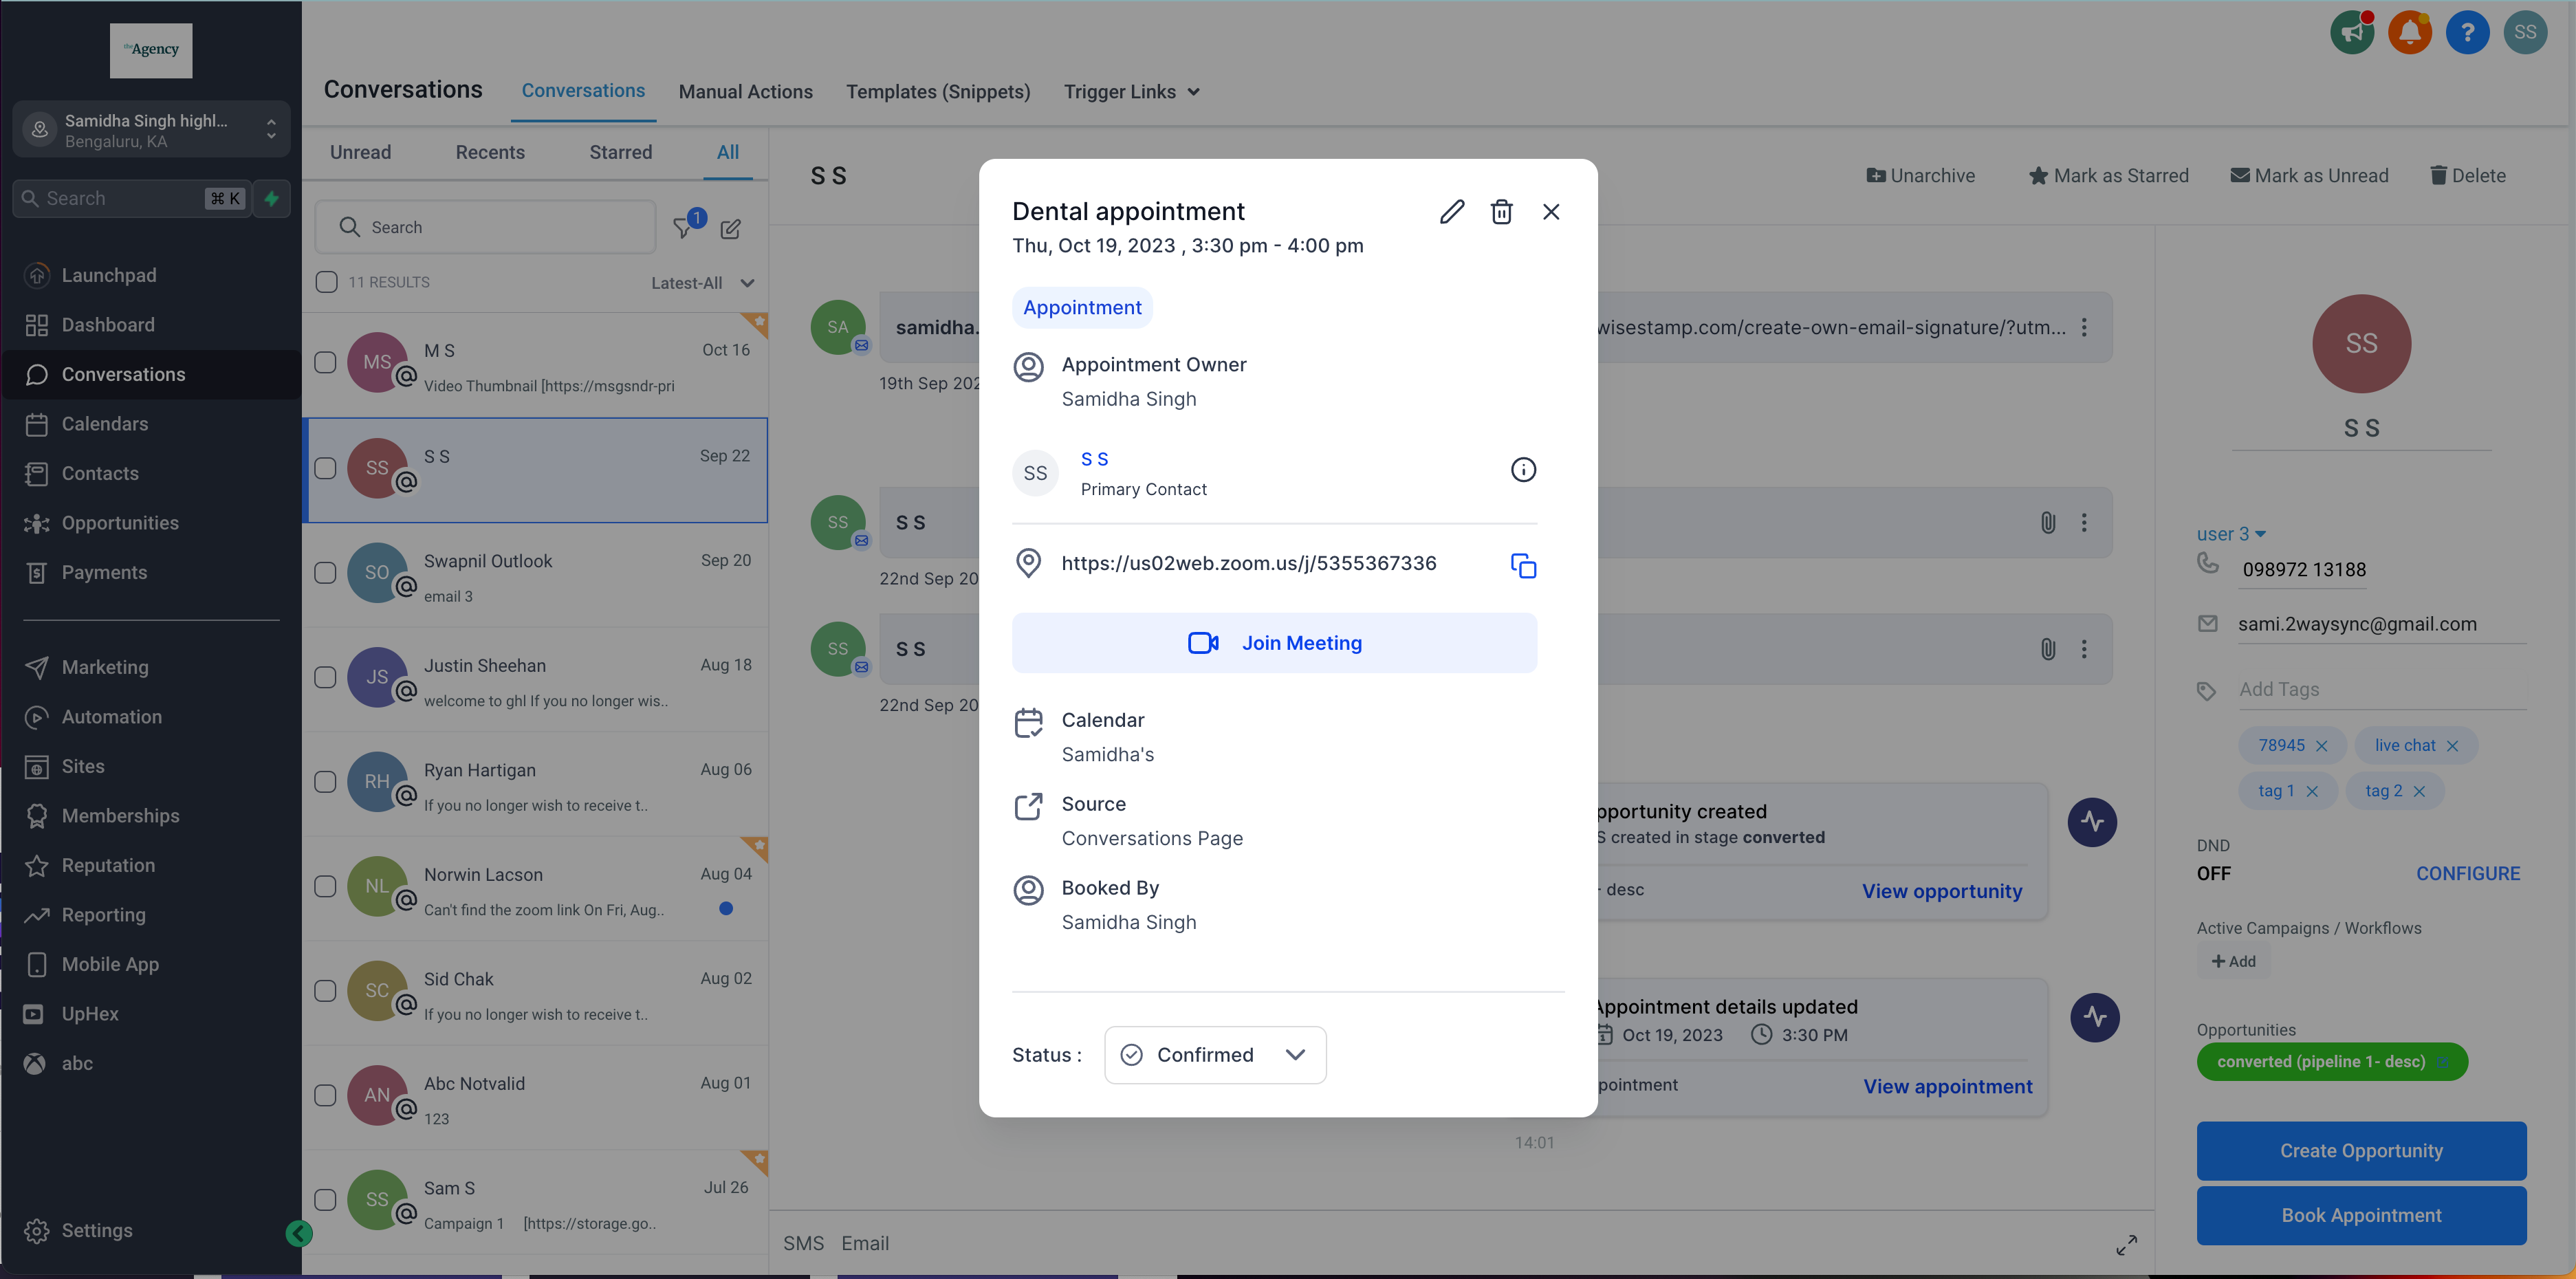
Appointments
– When any appointment is created, or rescheduled or cancelled, users will see an activity card in the conversation panel, thus keeping the users always updated. Users can click on ‘view appointment’ and edit the appointment all without having to move away from conversation panel
DND
– If a contact is marked as “Do Not Disturb,” or removed from DnD, activity cards will be populated to notify users about the current preference
Invoices
– To improve transparency activity cards will be shown when an invoice is sent to a contact or payment is received from a contact. Users can click on ‘View Invoice’ and they will be redirected to a new tab to view the detailed invoice
This feature is now available in Labs under the title : Activity cards in Conversations ( Location)
Content AI
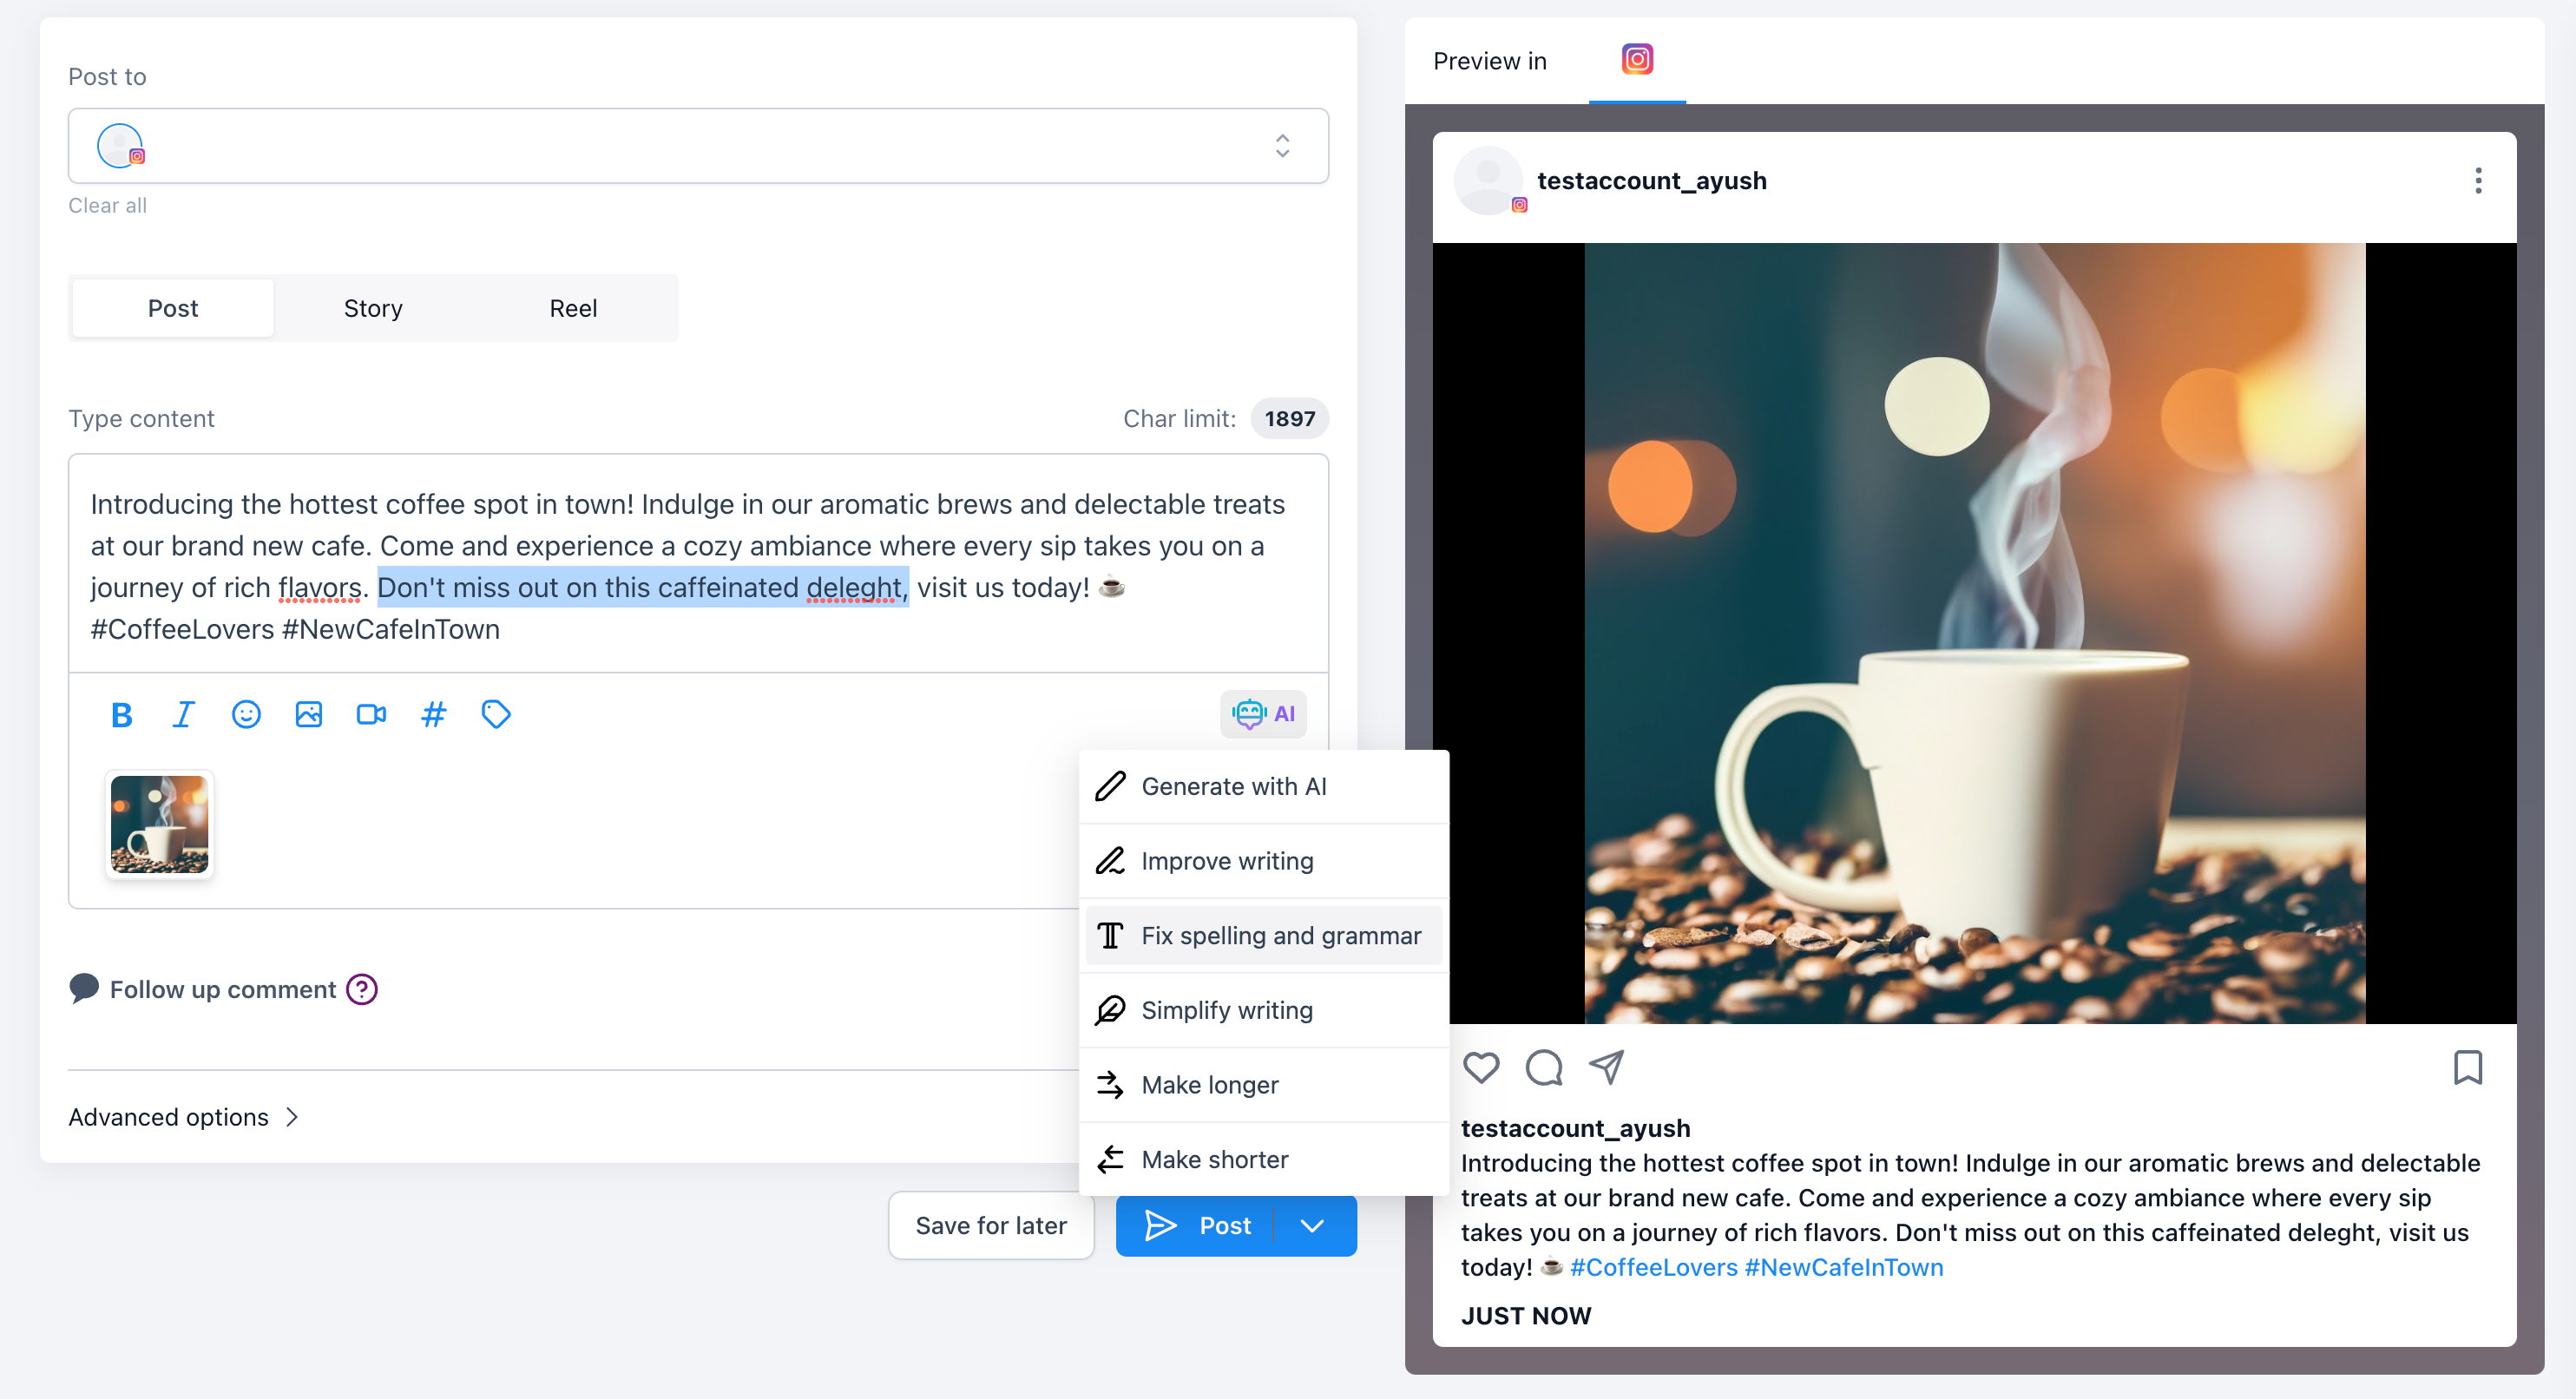
Get Support from Content AI to fix grammar, spelling, make longer content, shorter and simplify writing
Fine tune your content and strike the right tone
Craft the perfect generation with AI content that iterates based on your feedback and test content for tone, structure, and intent that wins over your audience.
Options in Content AI- Contextual Support provides option of
Improvise Writing – Elevate Your Content to New Heights!
Experience a transformation in your writing, enhancing it even when you’re unsure what needs fixing.
Unleash the potential of your content, turning it into a captivating masterpiece.
Witness the magic unfold as your words come alive with vibrancy and clarity.
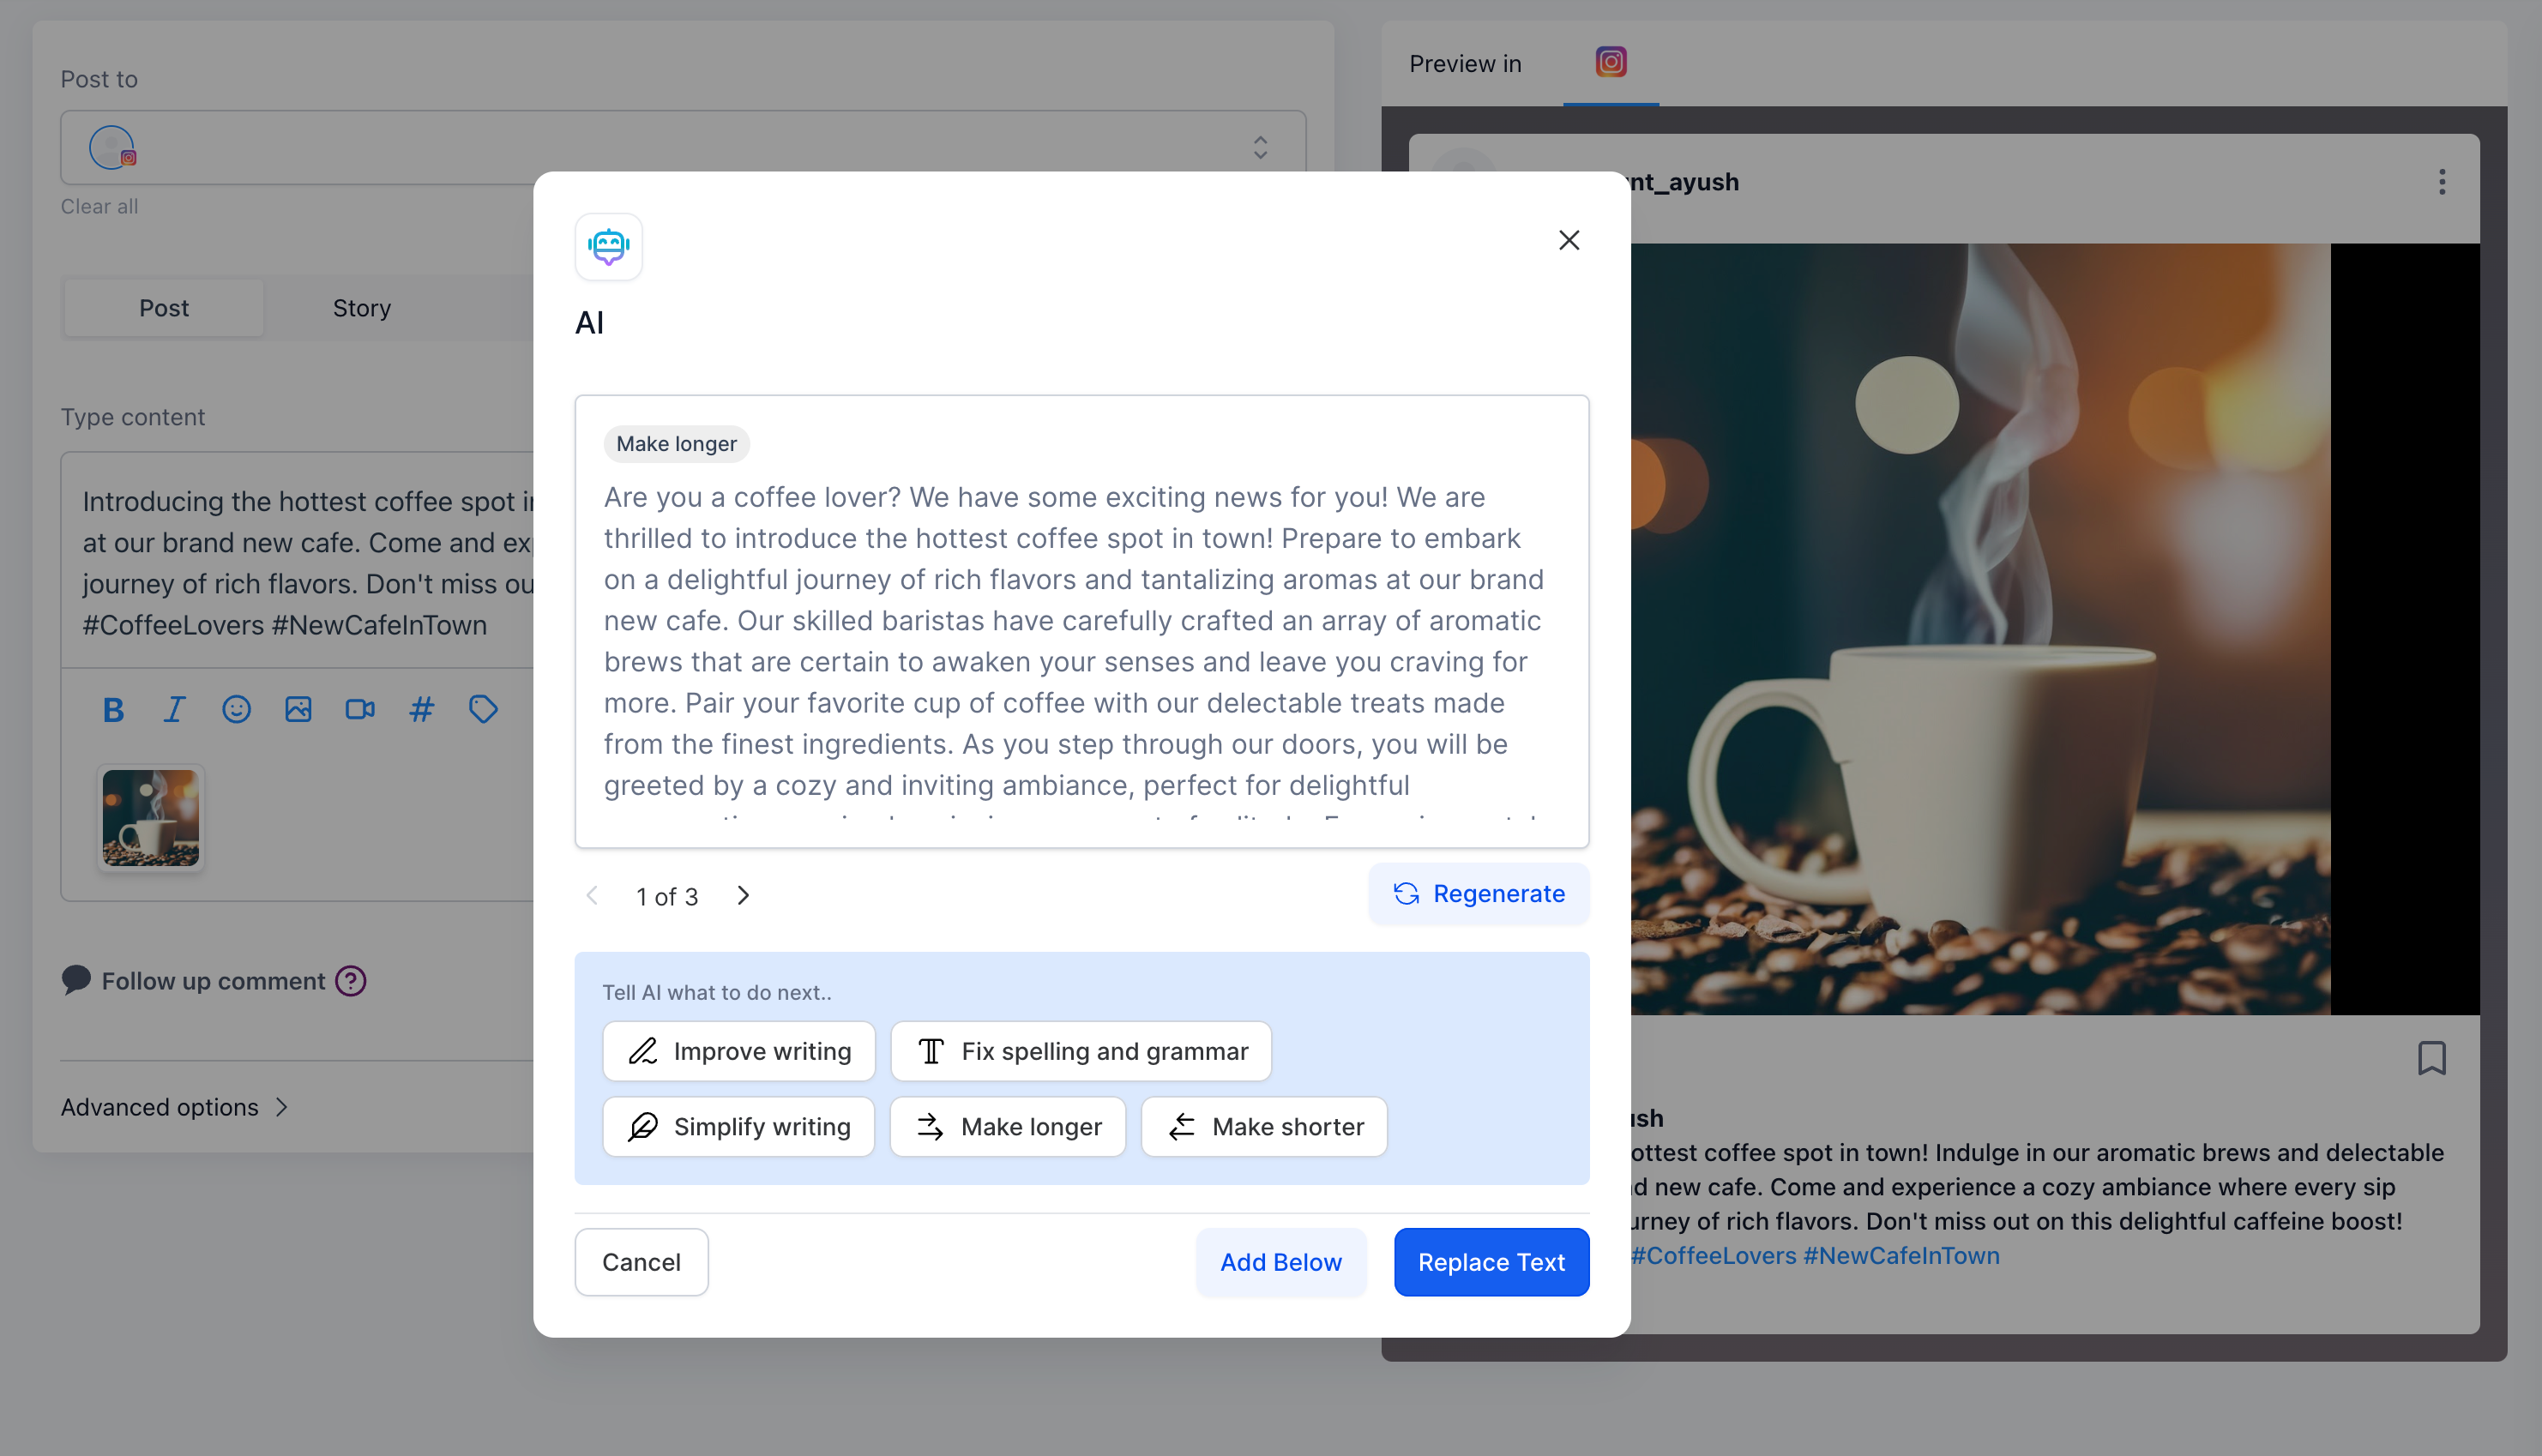
2. Make Longer – Expand Your Ideas into Flourishing Creations!
Take your initial concepts and watch them flourish into a rich tapestry of thought-provoking content.
See your ideas grow, with each sentence blossoming into a vivid, engaging narrative.
Transform your writing into an immersive experience, leaving your readers hungry for more.
3. Make Shorter – Condense Brilliance into Precise Perfection!
Trim away the excess, leaving behind only the brilliance that truly matters.
Craft a concise message that packs a powerful punch, leaving a lasting impact on your audience.
Experience the power of brevity, where every word carries weight and significance.
4. Spelling Check and Grammar – Elevate Your Writing with Flawless Precision!
Watch as your words transform into a symphony of correct spelling and impeccable grammar.
Enjoy the confidence of knowing your writing is polished to perfection, without altering your unique tone.
Experience the magic of flawlessness, where every sentence flows seamlessly.
5. Simplify Writing – Deliver Clarity with Effortless Ease!
Streamline your message, ensuring it’s effortlessly understood by readers of all backgrounds.
Watch complex ideas transform into clear, concise statements that resonate with your audience.
Experience the joy of communication made simple, where every reader feels included and valued.
Revamp your writing experience with these extraordinary capabilities, and witness your content soar to new heights of excellence and engagement!
Here are examples for each of your requests:
**1. Original: “The cat sat on the mat.”
Improved: “The sleek feline comfortably settled itself on the soft mat.”
Original: “The sun sets over the horizon, painting the sky with a myriad of vibrant hues, casting a warm, golden glow across the landscape.”
Made Longer: “As the day draws to a close, the sun gracefully descends beneath the distant horizon, orchestrating a breathtaking display of colors, which range from fiery reds to gentle purples, imbuing the entire vista with a comforting, golden radiance.”
Original: “She ran swiftly through the forest, her heart pounding, the trees a blur.”
Made Shorter: “Swiftly, heart pounding, she dashed through the forest, the trees a blur.”
Original: “He dont know if its their or there cat.”
Grammar and Spelling Checked: “He doesn’t know if it’s their or there cat.”
Original: “I am unable to comprehend the intricacies of quantum physics.”
Simplified: “I don’t understand quantum physics.”
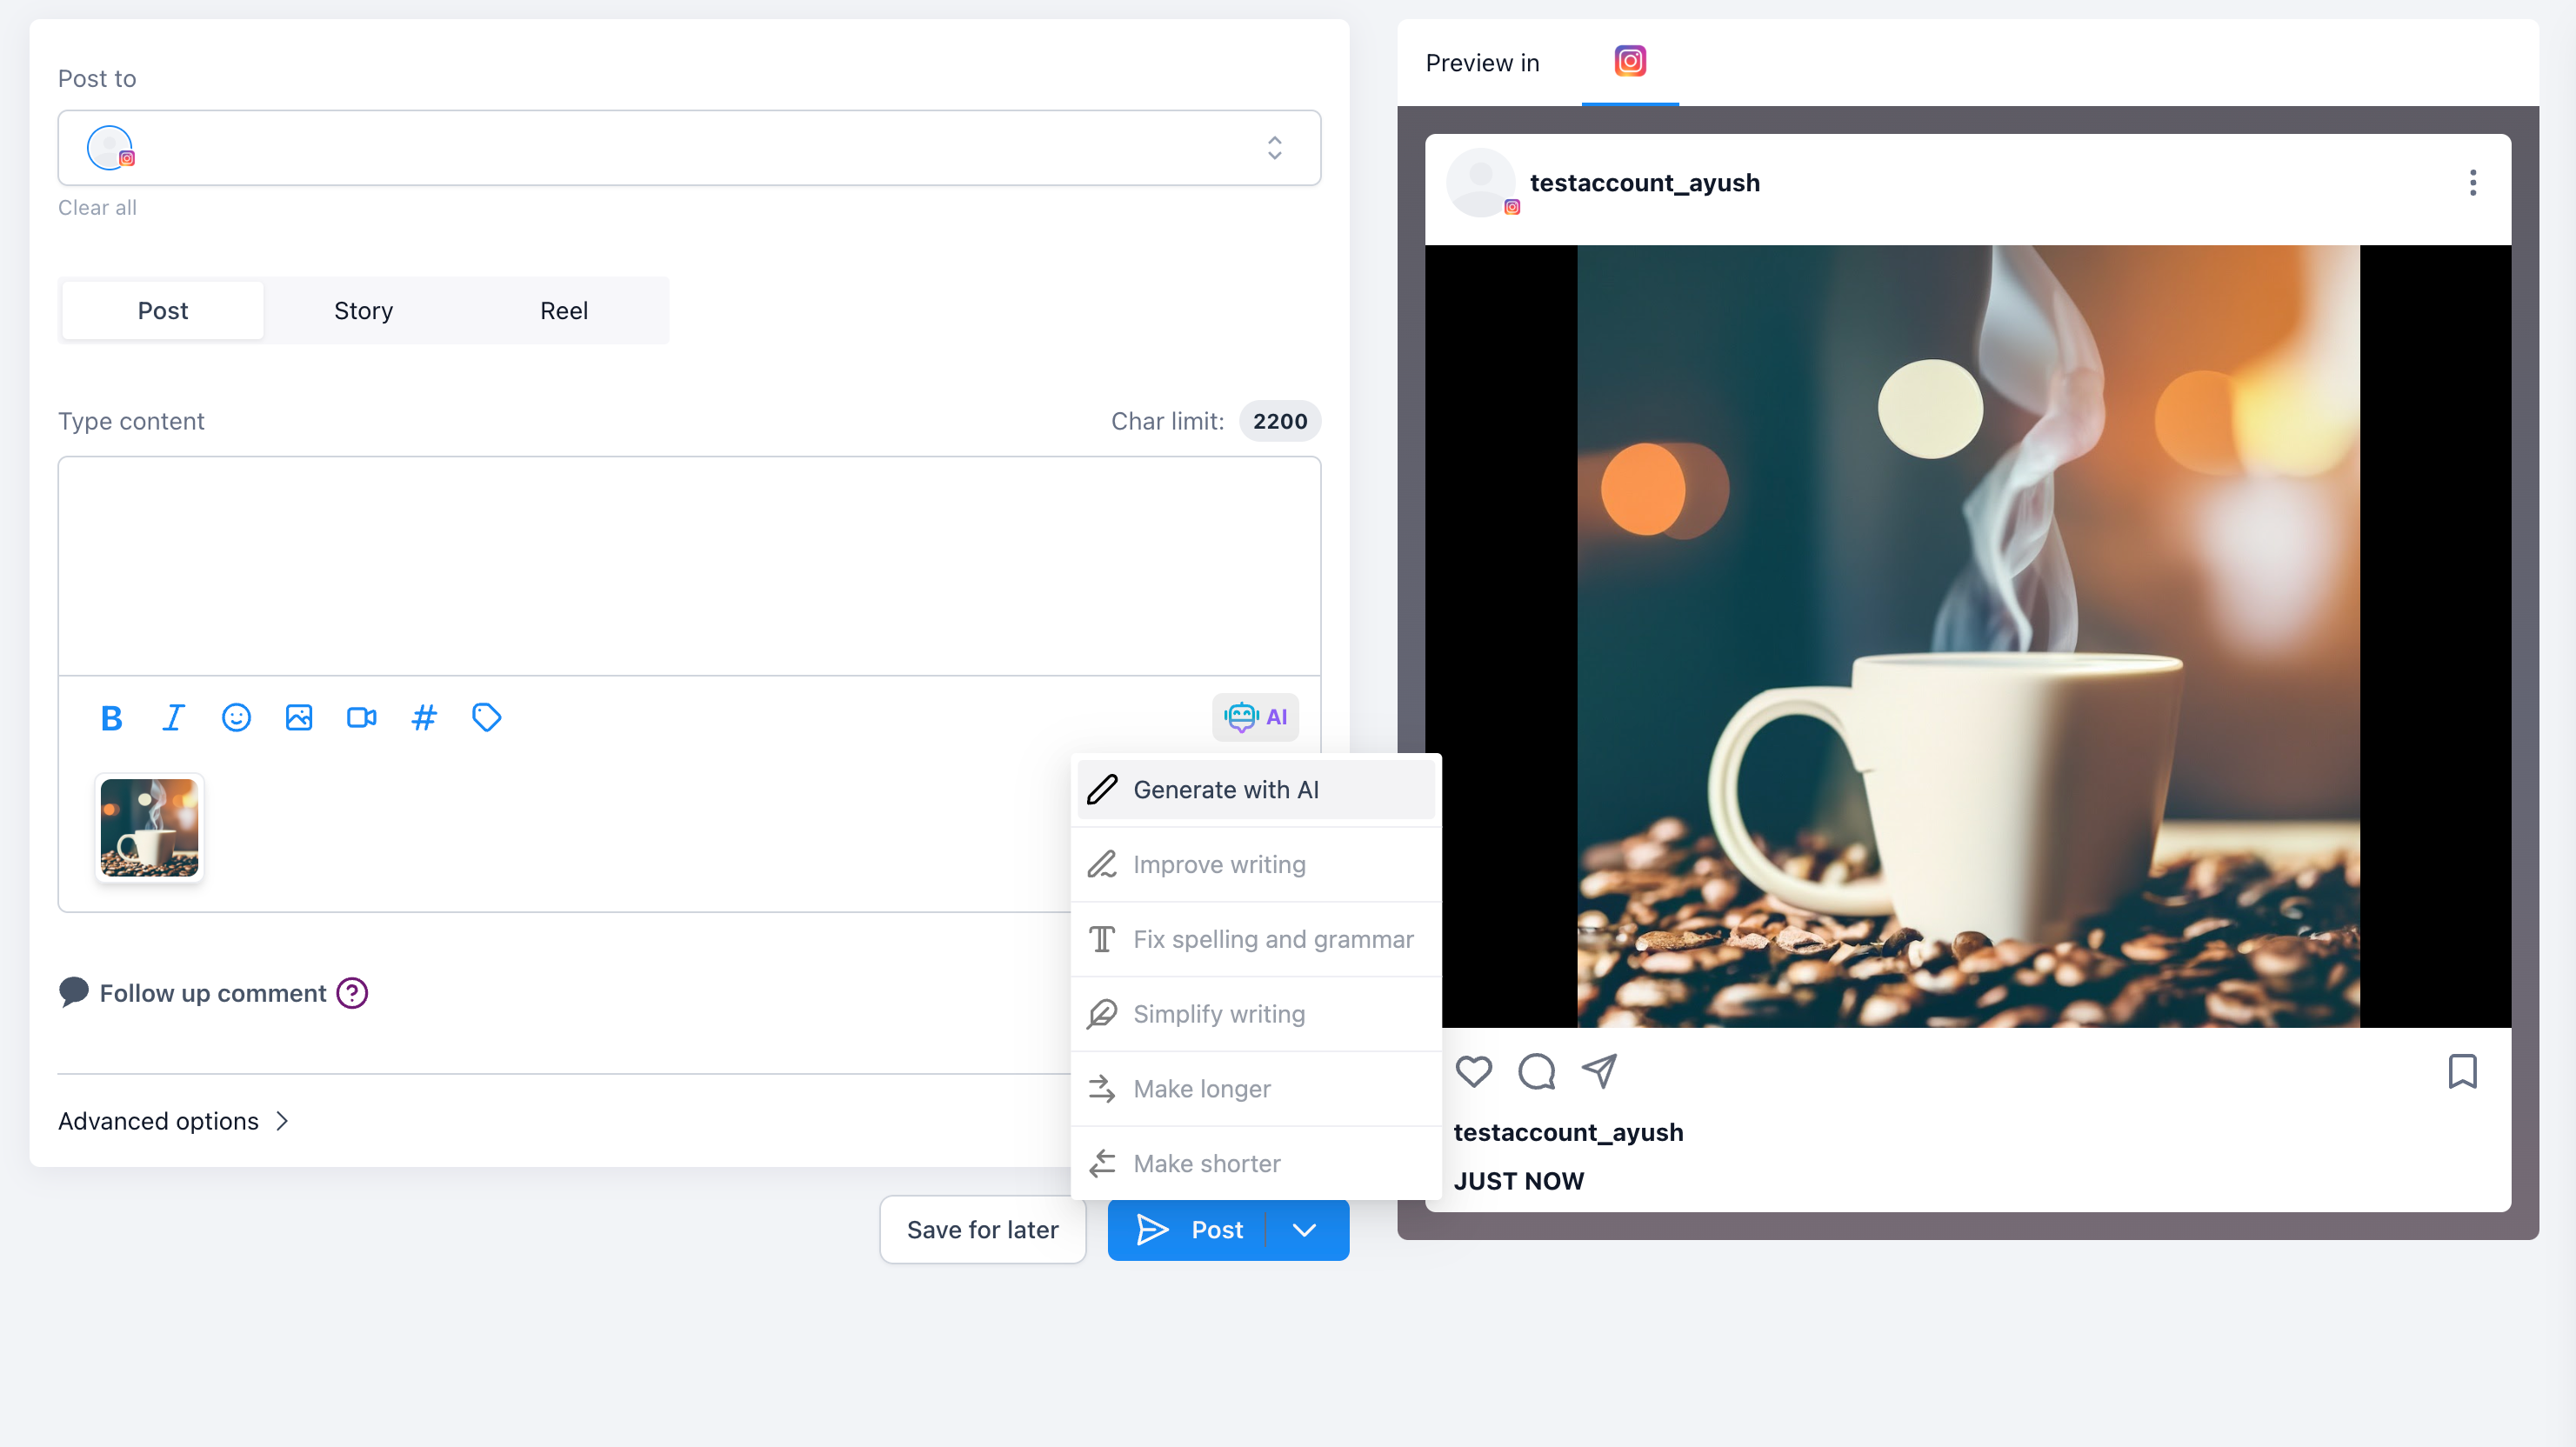
How does Quick Actions for Content AI work?
Go to Marketing > Social Planner [Future releases will be done to all the modules like Email Builder, Blogs, Funnels and Website]
Click on Create new post
When you create new post, select the social accounts.
If you would like to generate the text using AI, click on AI and go to edit with AI. If you already have text, select or click on option of AI to do the following
Improve Writing
Fix Spelling and Grammar
Make Longer
Make Shorter
Simplified Writing
Note
– The text can be selected or it will consider all the text for using the quick actions.
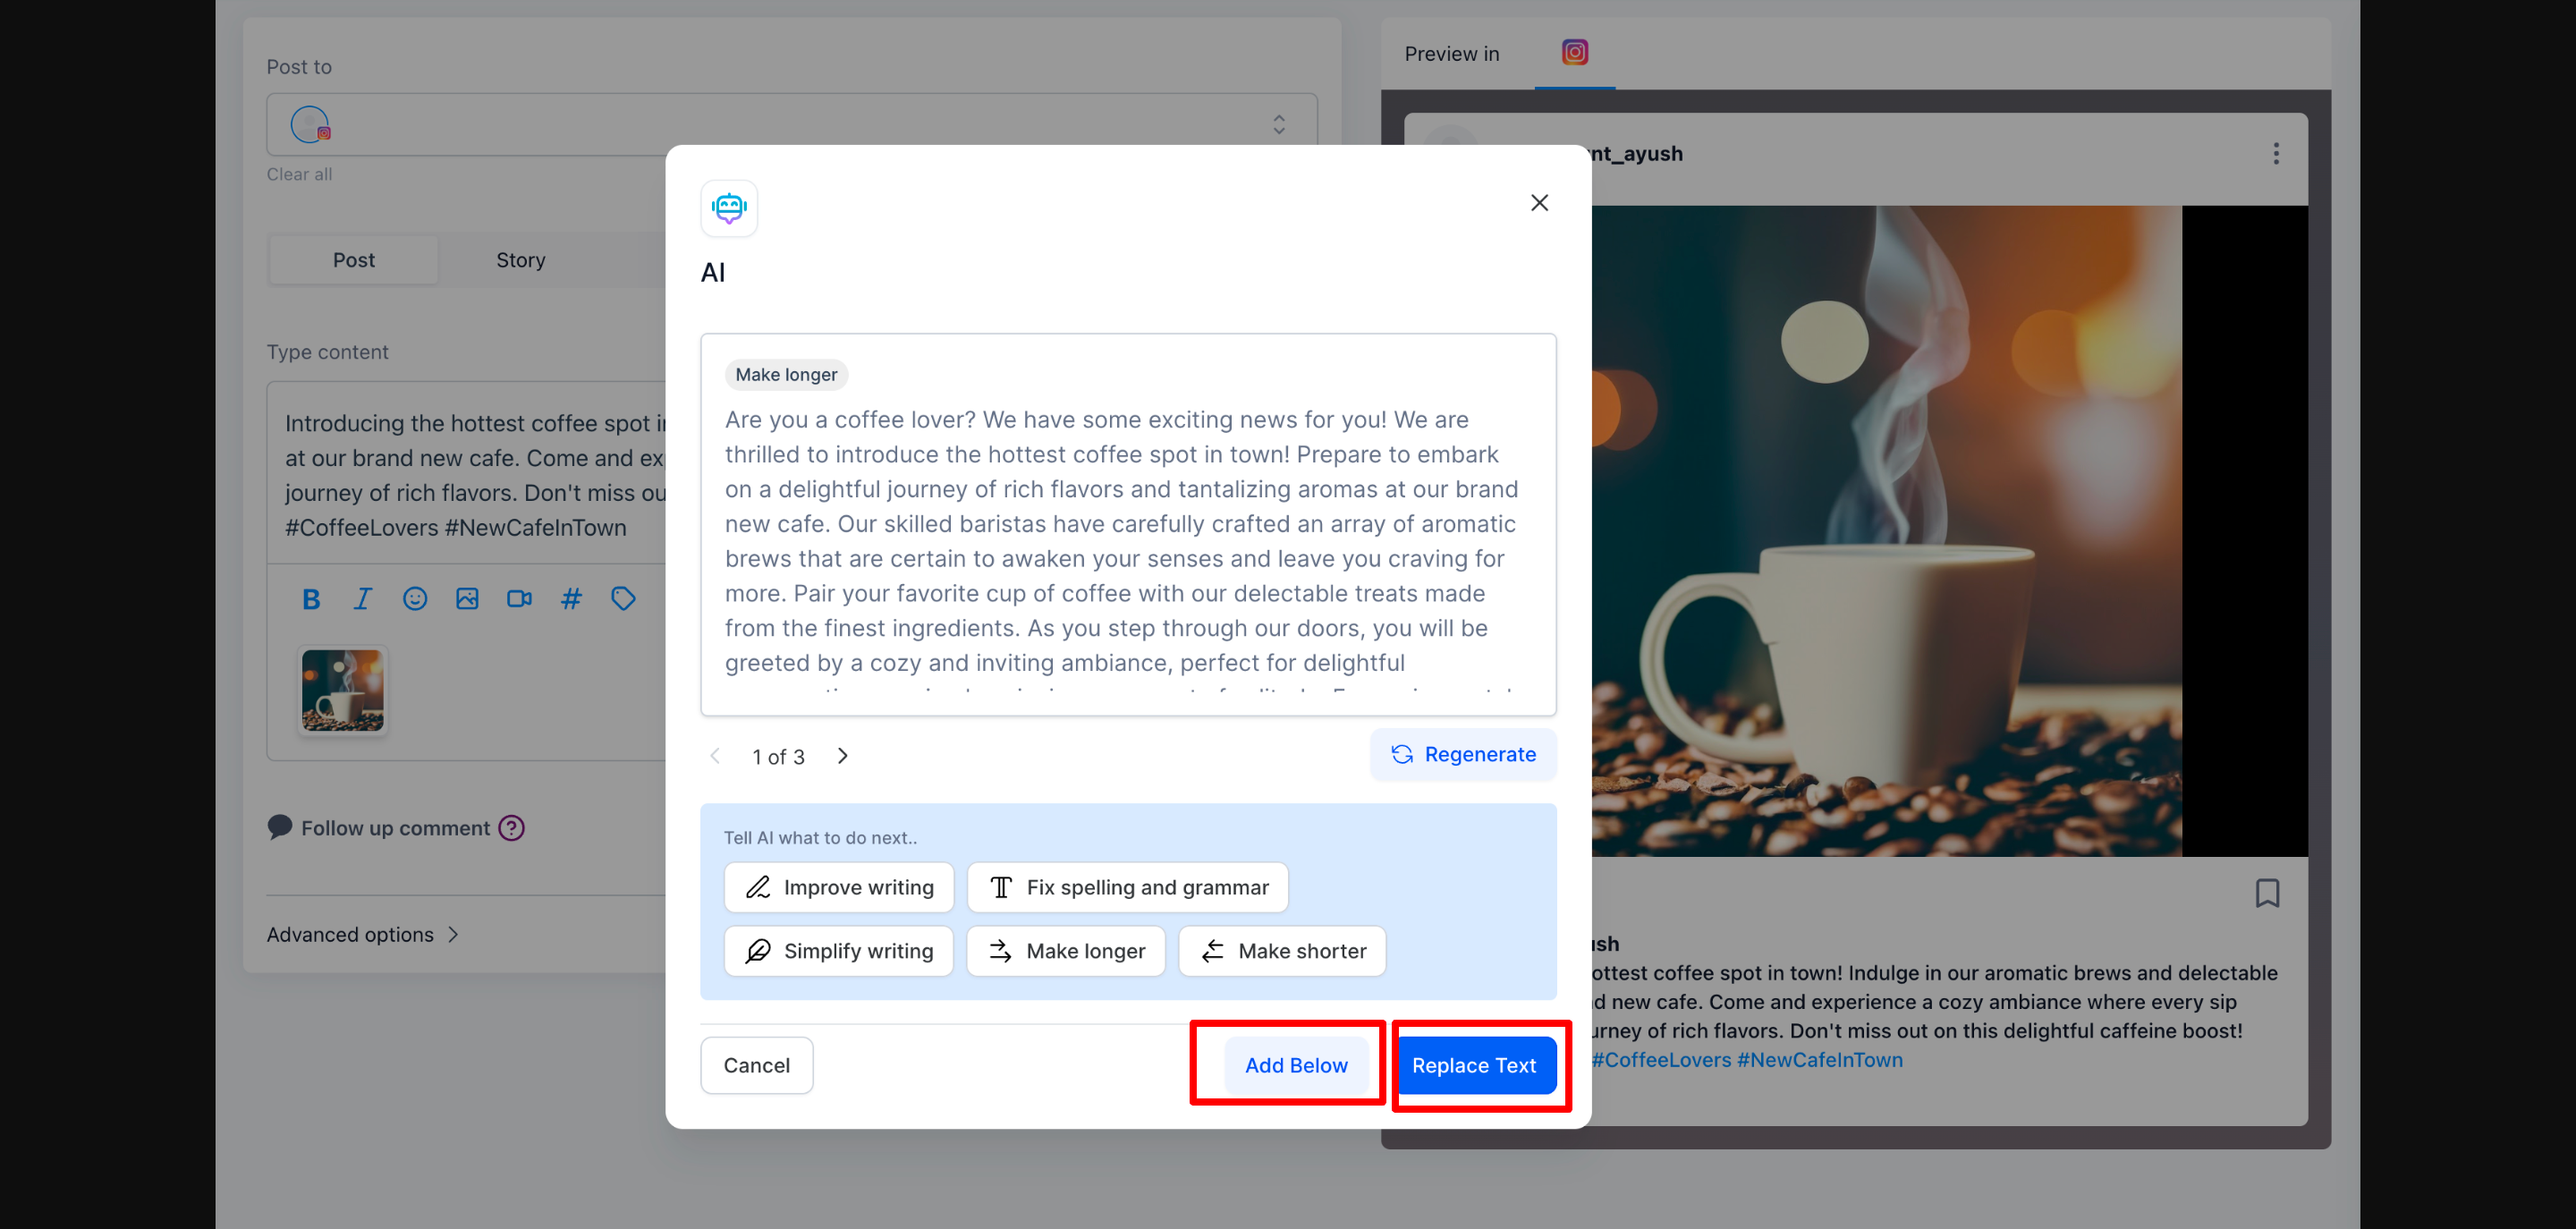
You generate or choose other option and it show in paginated data.
You can add the content below the selected or considered text for quick action or you can replace the text too.
You can view the history of text generated in Automation > Content AI.