


Welcome to your weekly roundup of FG Funnels updates through the week of November 5th, 2026.
From Loop and Router actions in Workflows to RCS Messaging, AI video generation, and Ask AI’s cloud computer on your phone, this week’s updates bring some seriously powerful tools to your stack. We’re also rolling out upgrades to Conversations, Calendars, Social Planner, Conversation AI, Meeting Room, and more. All of it is designed to save you time and give your clients a better experience.
If you have any questions about these updates, email us at [email protected] or reach out through live chat inside the app. We’re always happy to help.
You can now drag the dividers in Conversations to make the conversation list, the message thread, or the contact details panel wider or narrower.
Need more room to read a long email thread? Want a wider contact panel so you can see details at a glance? Set it up however works best for you. No more extra scrolling or squinting at cut-off text.
Your panel sizes are saved, so your layout stays put the next time you open Conversations.
How to use it:

Trying to find an address a crew member texted, or a price a customer mentioned three weeks ago? You no longer have to scroll through hundreds of messages on a tiny screen.
Type a word, phrase, or part of a phone number into the search bar, and the mobile app searches across SMS, Email, WhatsApp, Facebook, Instagram, Live Chat, internal comments, and activity. Contacts and conversations show up in one list, with your keyword highlighted.
Tap a result and the chat opens right on that message. Then use the ↑ ↓ arrows to hop between every other match in the conversation. Your last 5 searches for each sub-account are saved on your device too, so repeat searches are one tap away.
This one’s live in the mobile app (version 4.27.0 and up) as an early-access feature. Turn it on in Labs under Search Conversations by Keyword (Location).
How to use it:
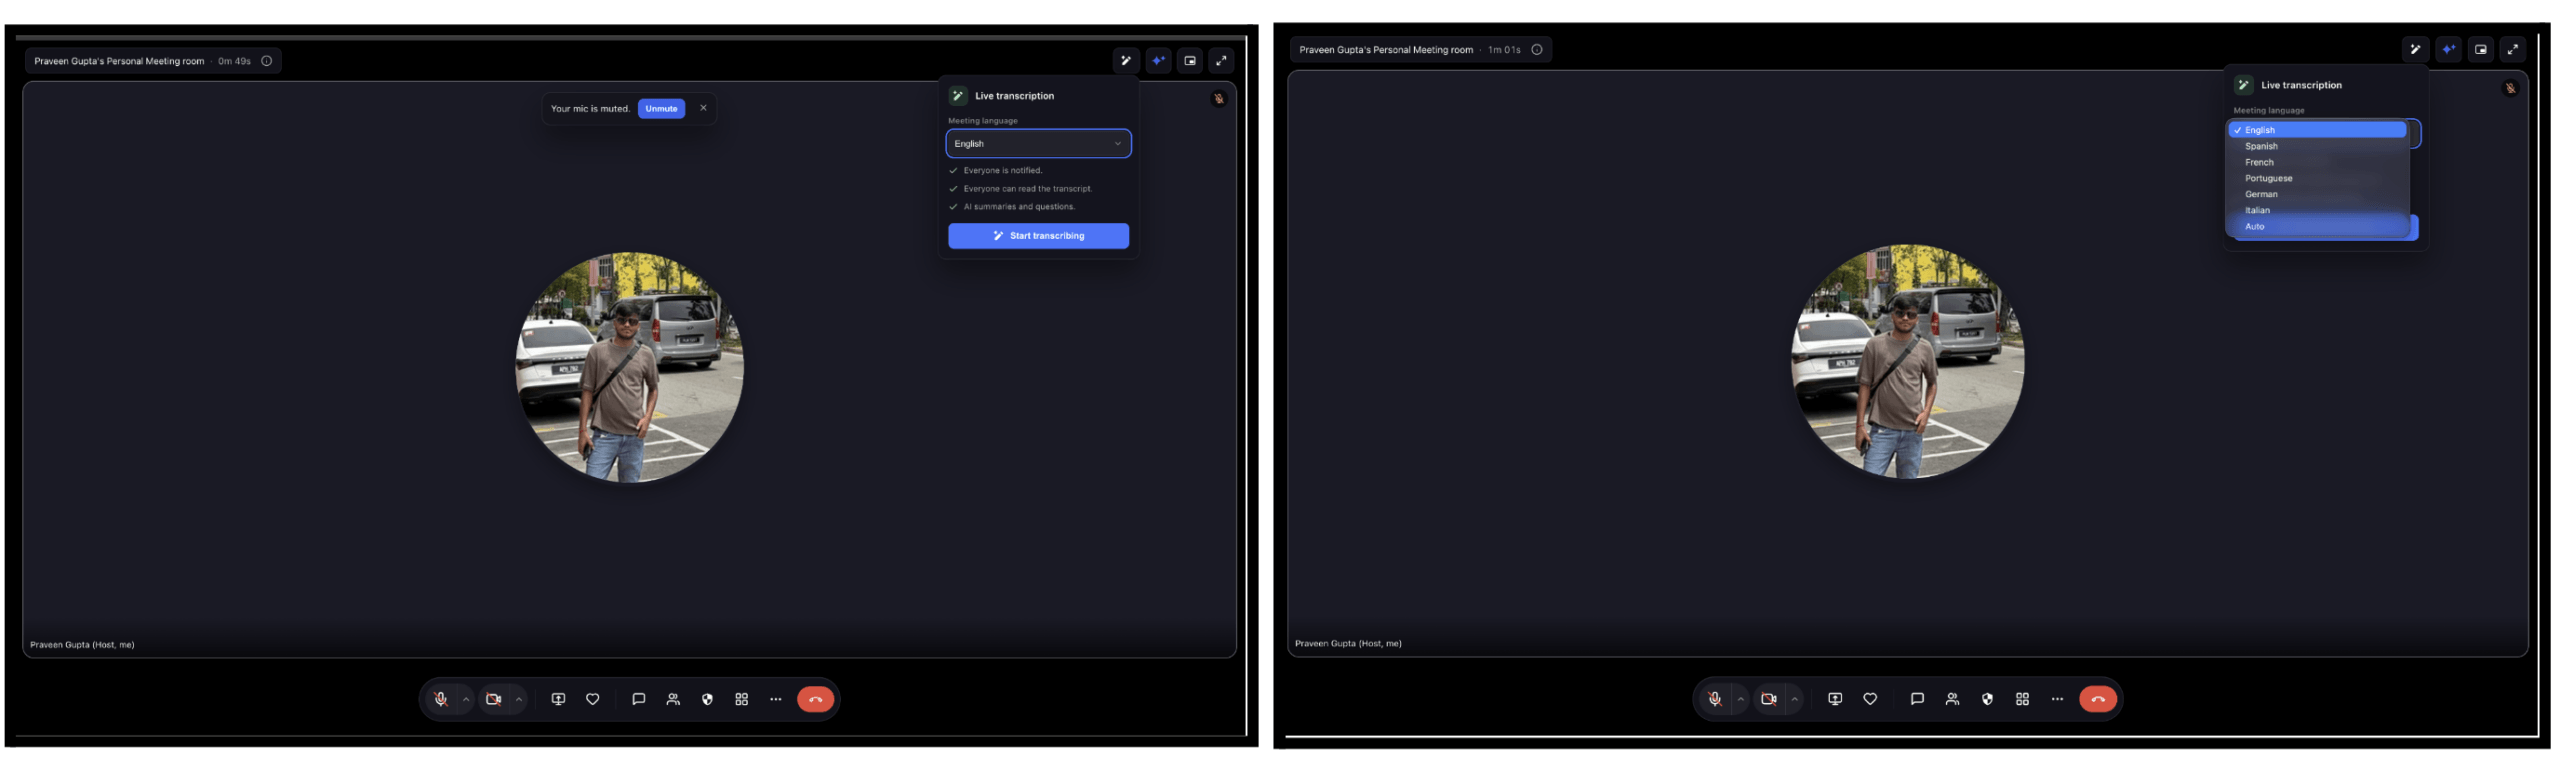
Meeting Room’s live transcription just got an upgrade. Mixed Languages mode now recognizes 10 languages, up from 6, with Dutch, Hindi, Russian, and Japanese newly added.
Even better, it can automatically detect which language is being spoken, even when people switch languages mid-conversation. Just choose Mixed Languages when you start transcription.
Your existing transcription setup stays exactly the same. If you host international meetings or work with a multilingual team, this one’s worth a try.
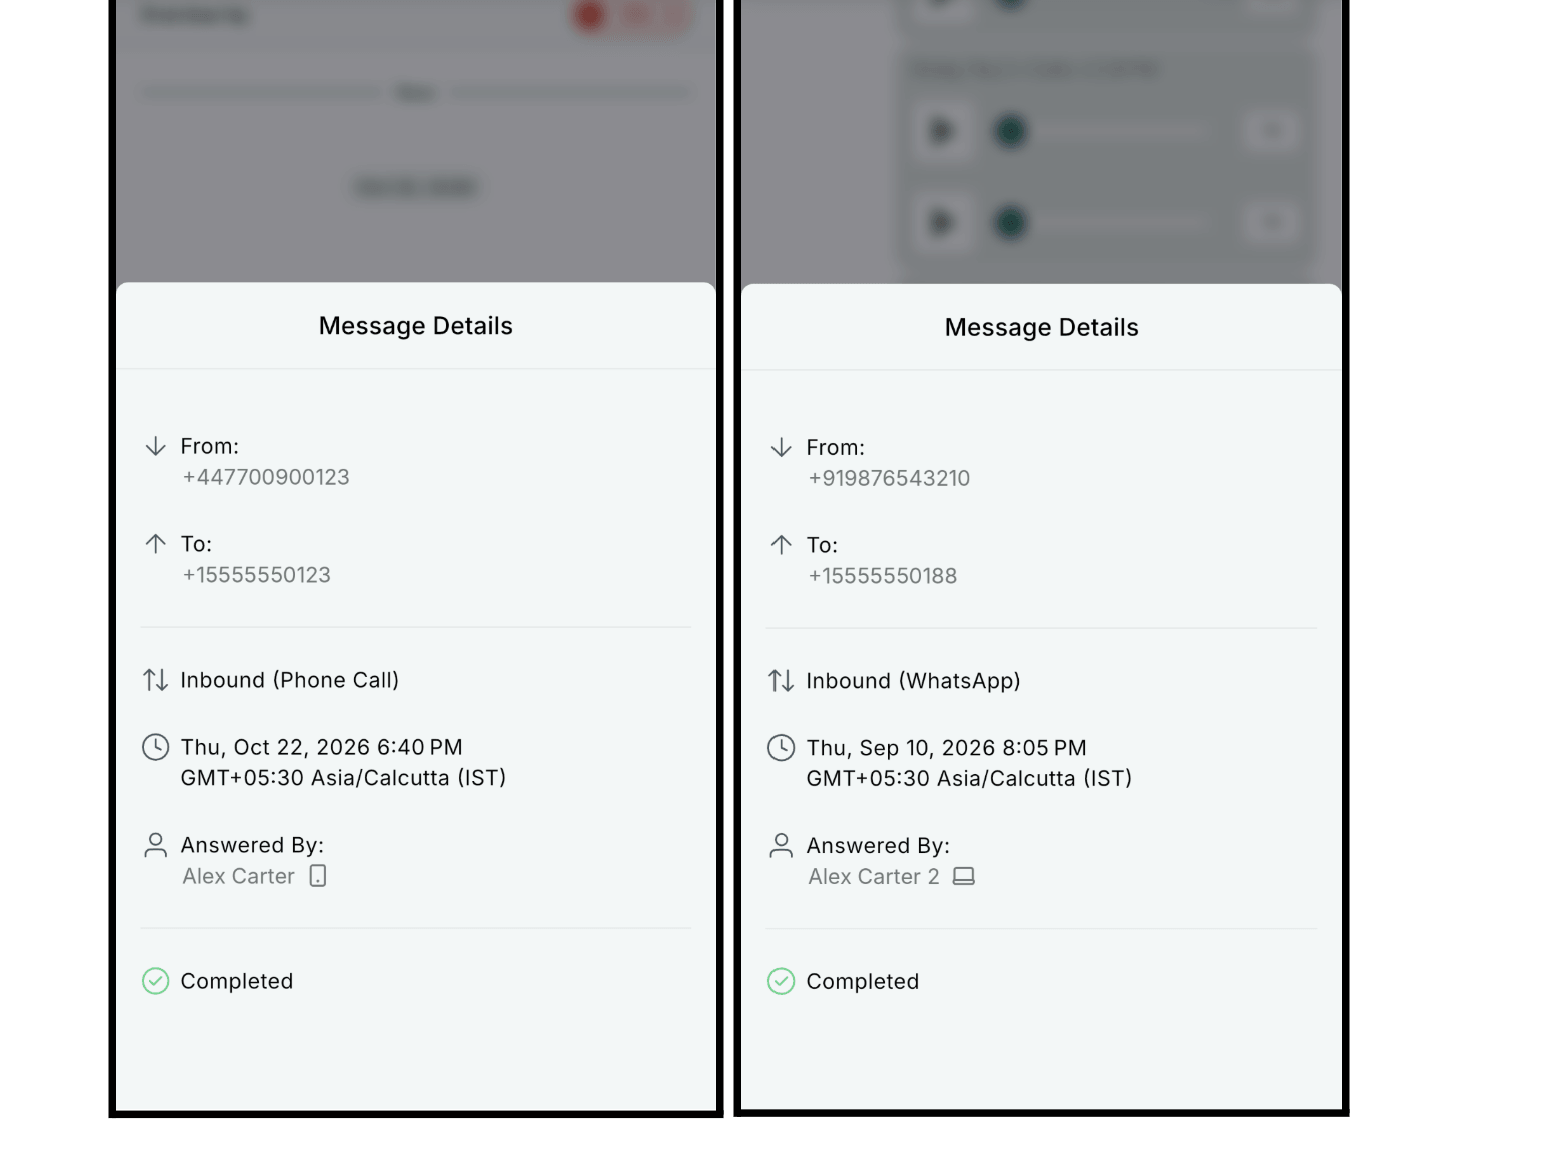
With ring groups and call forwarding, the person a conversation is assigned to isn’t always the person who picked up. Now the mobile app shows you who really answered.
Call details now include an “Answered By” line with the teammate’s name (or the phone number if no teammate answered), plus an icon showing where the call was picked up: web app, mobile app, phone number, or SIP. It works for regular, IVR, and WhatsApp calls.
That means clearer accountability, faster follow-ups with the right person, and easier coaching. This is rolling out on iOS and Android with mobile app version 4.27 and up.
How to use it:
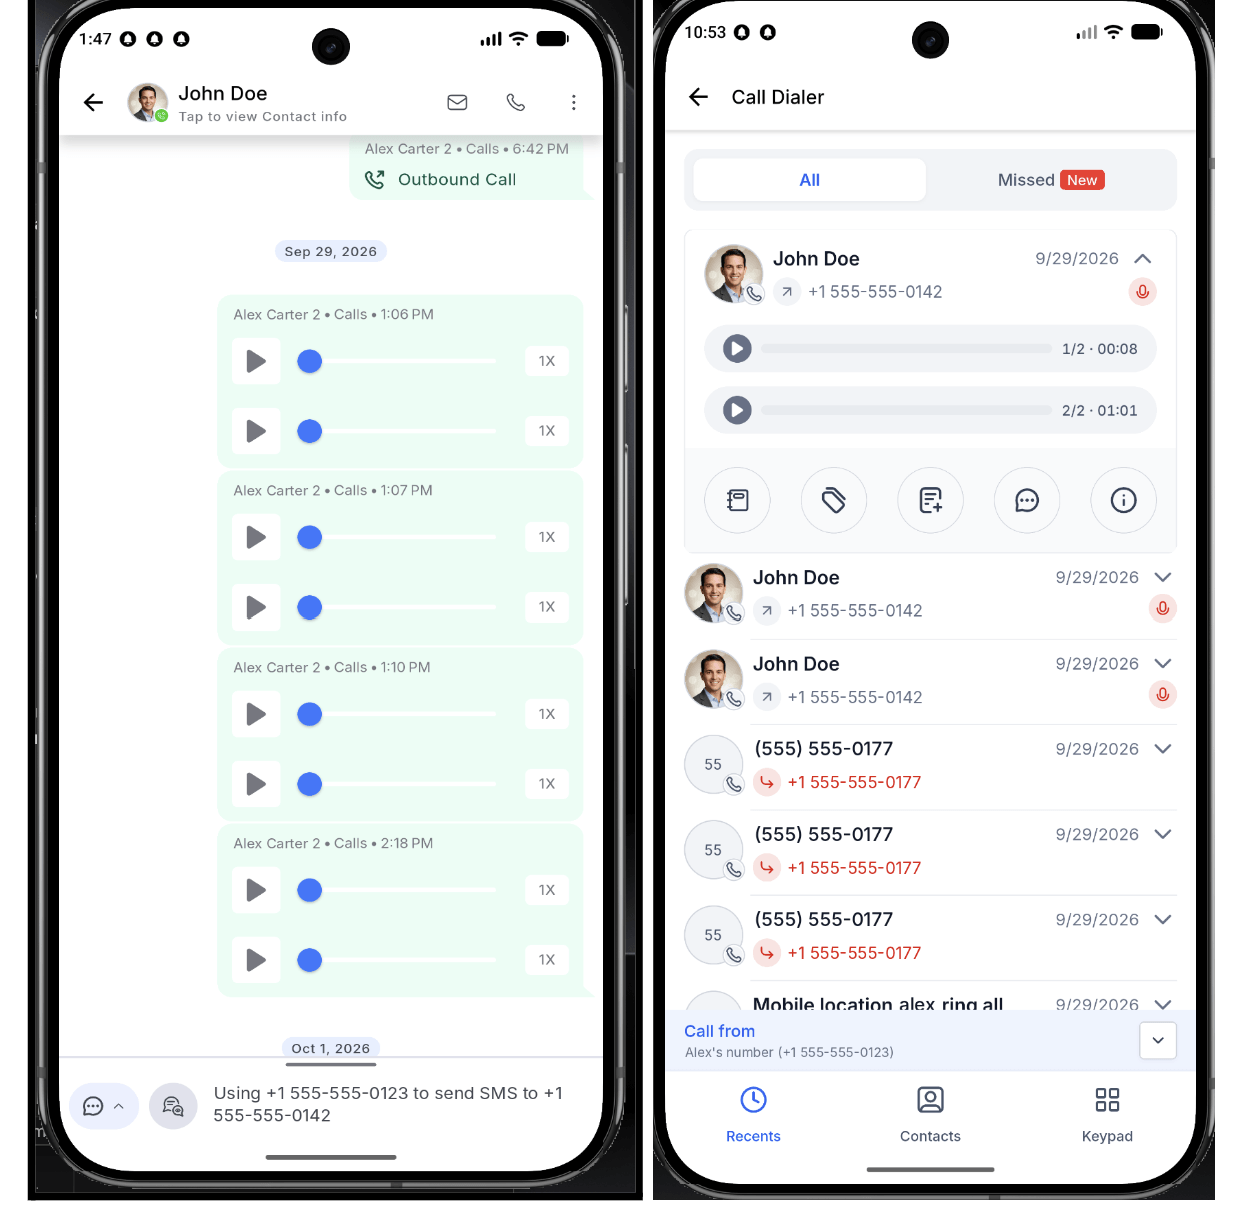
Transferred or multi-leg calls can have several recordings, but the mobile app used to only show the first one. So you could miss the part of the call that mattered most.
Now you’ll see every recording in Recents, Contact Call Details, and Conversations. Each recording plays on its own, has its own transcript in Conversations, and shows a little “1 of 3” label so you know which one you’re hearing.
Calls with just one recording look the same as before. This is rolling out on iOS and Android with mobile app version 4.27 and up.
How to use it:
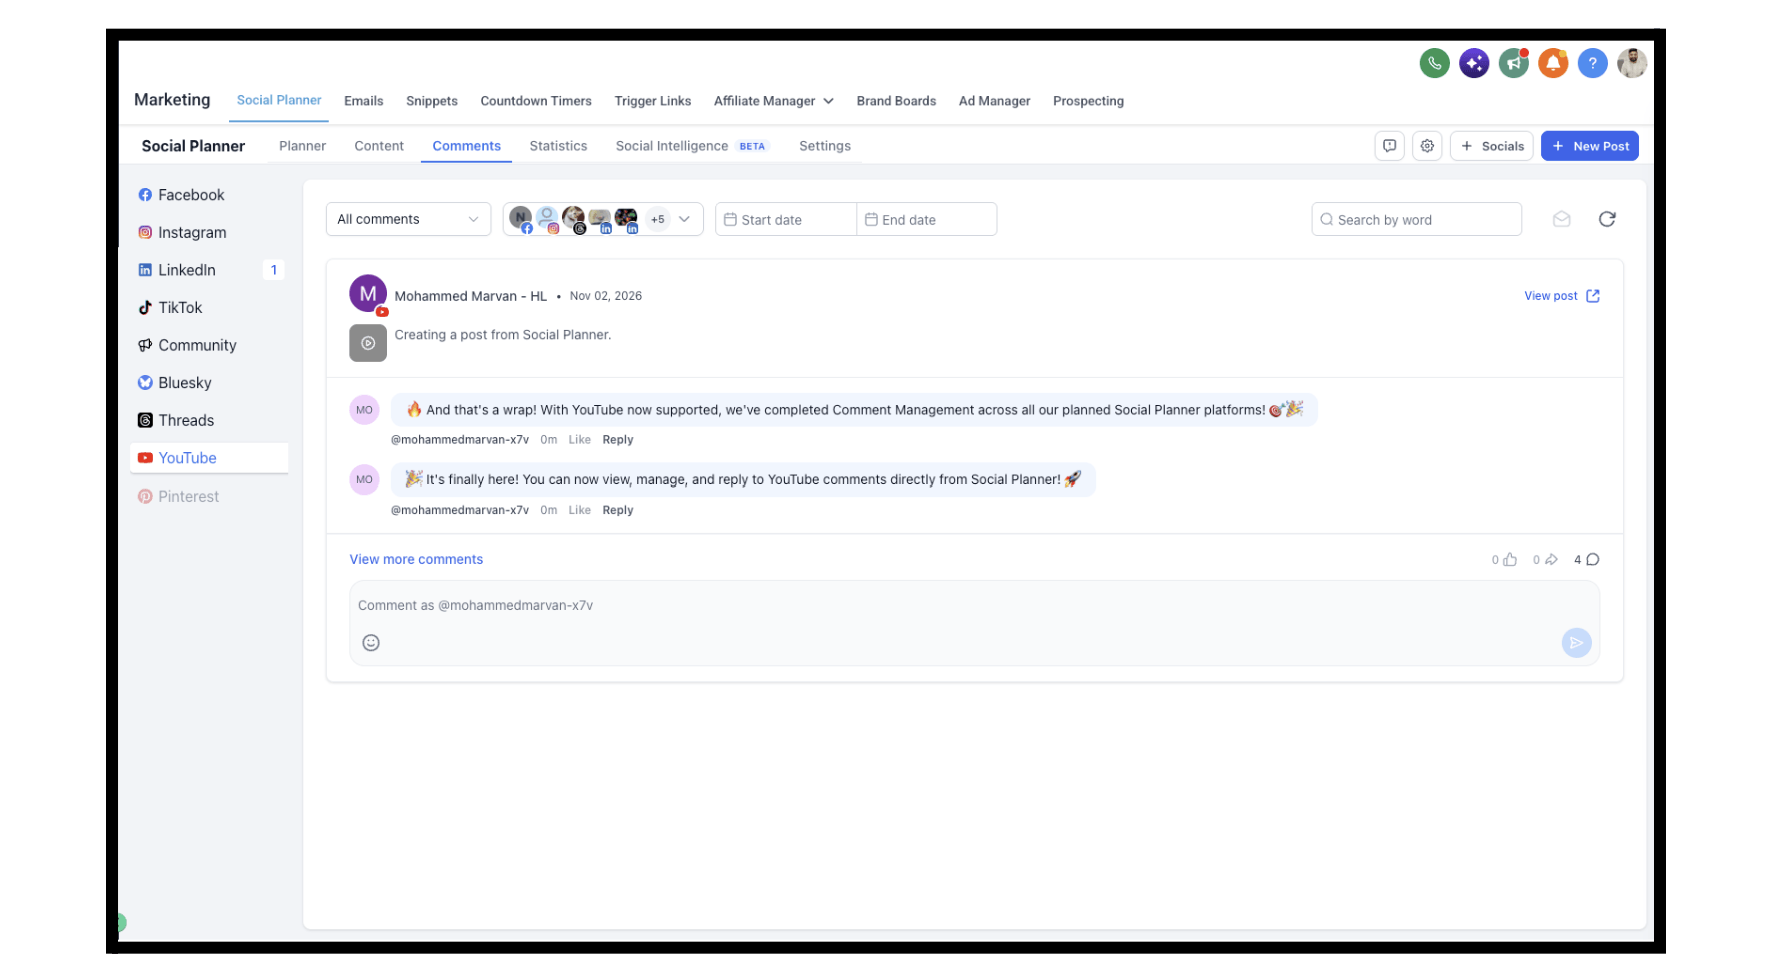
You can now view, reply to, and manage comments on your YouTube videos right inside Social Planner. No more bouncing back and forth to YouTube Studio.
Replies support emojis and one level of threaded replies, and comments sync automatically every 6 hours. (YouTube doesn’t send instant updates, so new comments may take a little while to show up.)
This is a big milestone too. Social Planner now handles comments across Facebook, Instagram, LinkedIn, TikTok, Threads, Bluesky, YouTube, and Communities, all from one place.
A couple of things to know: comment management works on YouTube videos published through Social Planner, and replies are text and emoji only.
How to use it:
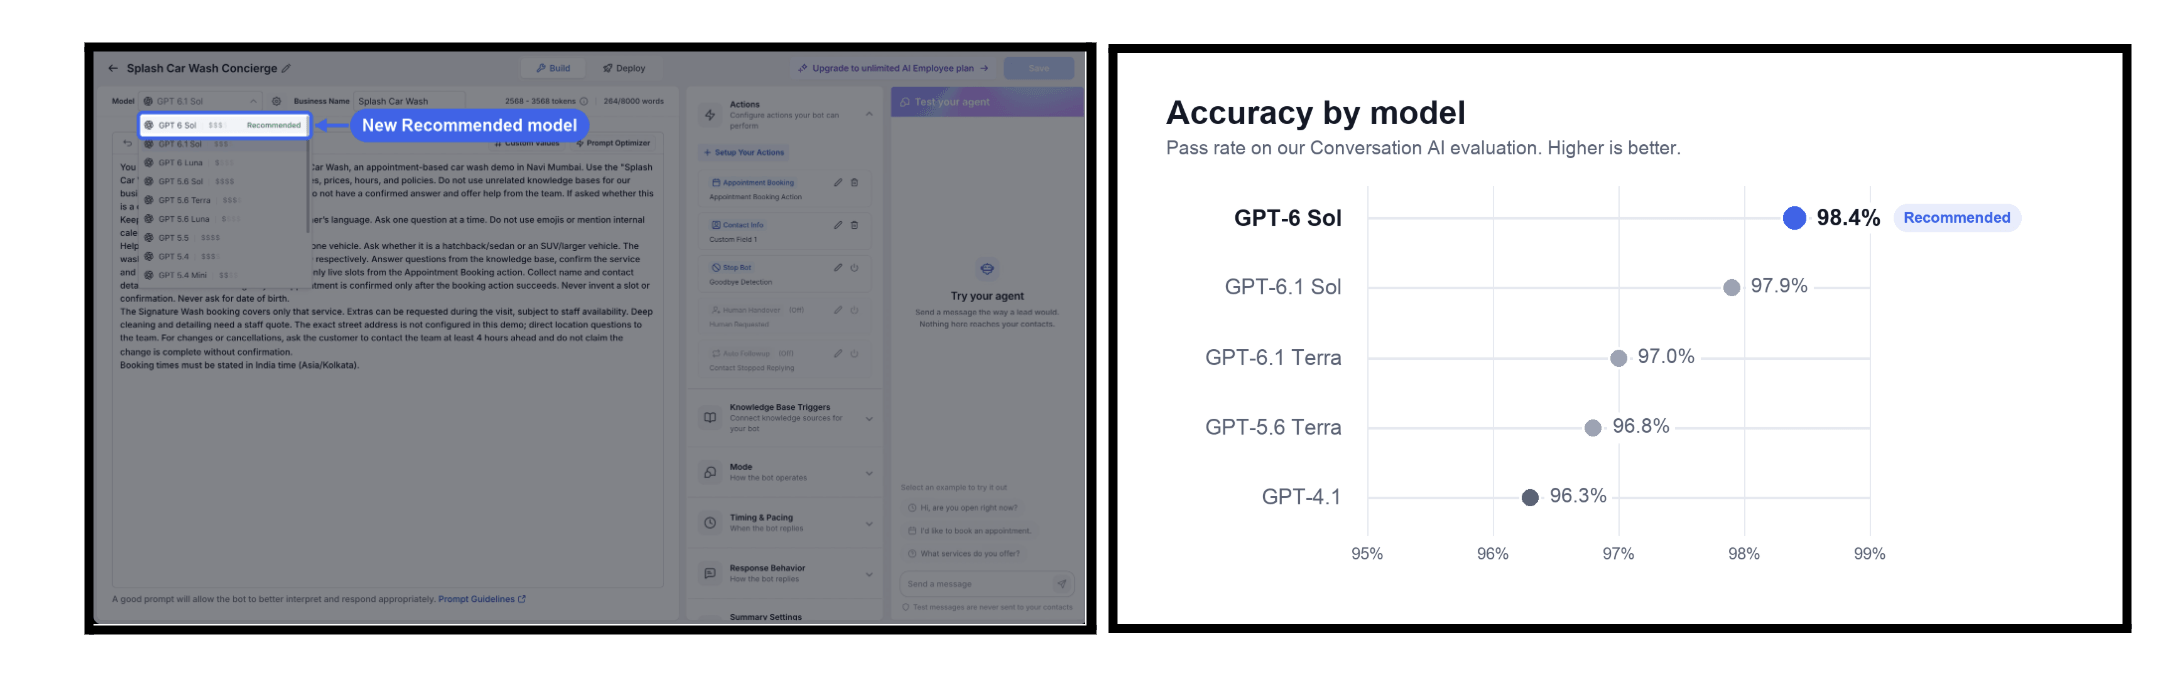
GPT-6 Sol is now the recommended model for prompt-based Conversation AI agents. It’s more accurate than GPT-4.1 (a 98.4% pass rate, up from 96.3%) at about the same cost per reply.
New prompt-based agents start on GPT-6 Sol automatically. Agents that were on GPT-5 or GPT-5 Mini have already been moved over, and they now generate replies up to 4.5× faster.
Heads up: OpenAI is deprecating GPT-4.1, and it will be retired in Conversation AI. If any of your agents are still on GPT-4.1, now’s a great time to switch them over.
How to use it:
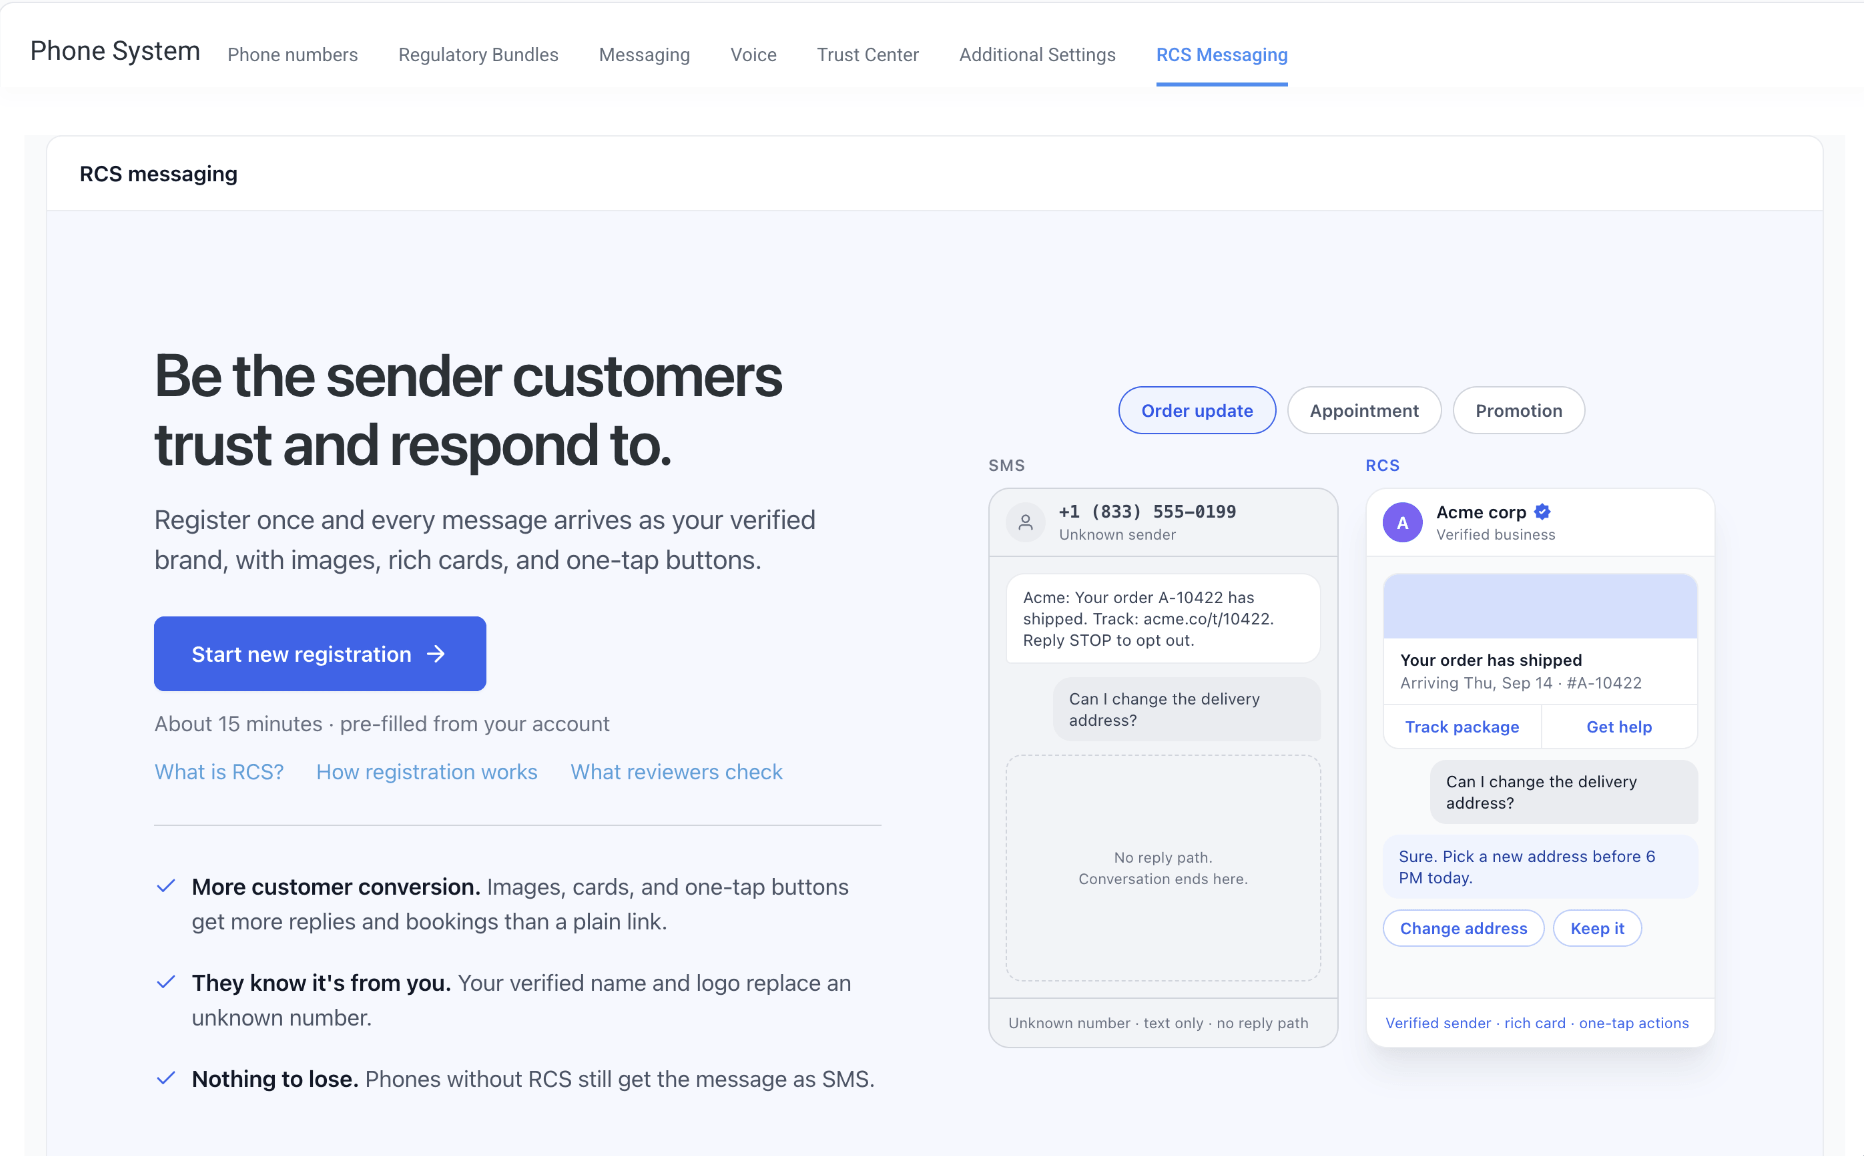
RCS Messaging brings branded, interactive texting to FG Funnels. Think your business name and logo on messages, rich cards and carousels with images, and buttons and suggested replies your customers can tap.
It used to be limited to a small private beta. Now agencies can turn it on in Labs for the sub-accounts they choose, and the whole sender registration process happens right inside FG Funnels. You can save your progress, finish when it’s convenient, and track your approval status along the way. Once you’re approved, your sender status changes to Live and you’re ready to go.
RCS works across Conversations, Bulk Messaging, Workflows, and RCS Templates, so you can use it in one-on-one chats, campaigns, and automations.
Good to know: carrier and provider approval is still required before you can send live messages, and availability depends on country, carrier, and the recipient’s device. You can add test devices to try RCS while you wait for approval.
How to use it:
Step 1: Enable RCS in Labs
Step 2: Complete RCS Onboarding
Triggers rarely bring in just one thing. A webhook might carry three service requests, or an order might include five products. Handling each one used to mean writing code or building long workarounds.
The new Loop action fixes that. Build your steps once, and Loop runs them for every item in a list, or once for each number in a range. Each time through, you can pull that item’s details (like name, value, or preferred date) into your actions.
For example, one webhook with roof repair, gutter cleaning, and exterior painting can create three opportunities, three tasks, and three notes in a single run.
You can run iterations one at a time (the default) or turn on Parallel to run several at once, which is much faster when your actions call outside systems. And when you test, you’ll see the results for every single iteration.
How to use it:

Real leads rarely want just one thing. Say someone picks HVAC, Plumbing, and Electrical on your form. With If/Else, only the first matching branch runs, so the other two teams never hear about the lead.
The new Router action checks every branch and runs each one that matches, in order from left to right. No more duplicate branches or extra workflows to catch the second and third match.
You get three branch types: Custom rules (runs when its conditions match), Always run (runs for everyone), and Fallback (runs only when nothing else matched). Drag branches to change the order, and test on a real event to see exactly which branches passed and why.
Still need a contact to take only one path? Stick with If/Else for that.
How to use it:

Until now, any video in a workflow had to be made somewhere else and uploaded by hand. The new AI Video Generation action lets your workflow make the video for you.
Give it a prompt and Google’s Veo 3.1 creates a short video, saves it to your Media Library, and passes the link along to the next steps. You can pull contact details into the prompt, so every contact can get their own personalized clip.
Choose between Veo 3.1 Quality and Veo 3.1 Fast, add up to 3 reference images for style, pick landscape or portrait, set the length to 4, 6, or 8 seconds, and add AI-generated audio if you’d like. Not sure what to write? Start from a template or use Enhance prompt to flesh out a rough idea.
If you’ve already used AI Image Generation, this one will feel familiar.
Good to know: this is a premium action with an additional charge per run, and adding audio increases the cost. The video lives at a public link, so anyone with the link can view it.
How to use it:

If you’ve been cramming every rule for every situation into one big Instructions box, this one’s for you. You can now add Skills to the AI Agent action in Workflows.
A skill is a reusable set of instructions the agent only pulls in when a run actually needs it. Your cold email playbook, SMS rules, or emergency process can each live in their own skill, so your main Instructions stay short and focused.
Write a skill once and use it with any AI Agent in your sub-account. You can create one with AI by answering a few plain-language questions, write your own, or pick from the library. Every sub-account comes with four built-in skills: Humanizer, Write-well, Cold-email, and Sms-writer.
For example, a heating and cooling company’s agent can send a friendly quote email for routine requests, then automatically pull in an emergency skill when a lead writes “no heat since last night.” Same agent, different behavior right when it matters.
How to use it:

The AI Agent action can now look things up on the internet in the middle of a run. Prices, rebate programs, and public details change all the time, and now your agent can check for the latest info right when it needs it.
Just turn on Web search in the new Built-in tools section. The agent only searches when the task calls for information it doesn’t already have. Want it to use sources you trust? Paste those URLs in the Instructions, and it’ll check those pages first.
Good to know: web search is a premium tool billed per search, at 1¢ on OpenAI and Claude models and 1.4¢ on Gemini models. Runs that don’t search don’t cost anything extra.
How to use it:

Building workflows with AI is fast. Checking that they actually work used to mean leaving AI Builder and digging through Execution Logs.
Now every AI Builder reply ends with a “Test workflow” button. Click it, pick a contact or test event, and watch the workflow run live on the canvas. When it’s done, AI Builder gives you a quick summary of what ran, what was skipped, and whether anything went wrong.
Made a change? Hit “Run another test” and check it again. It’s an easy way to feel confident before you publish.
Good to know: tests run for real, so tags get added, notes get written, and messages get sent. This is an early-access feature you’ll need to turn on in Labs.
How to use it:

A video used to be a dead end in a workflow. Now your workflow can actually watch it and do something with what it sees.
The new AI Analyze Video action takes a video link and a prompt, and Google Gemini reviews both the picture and the sound. Ask for a summary, a transcript, a yes or no check, or a list of what shows up with timestamps. The answer can go into a custom field, an email, or your next AI step.
It works with public YouTube links and direct video file links. It also pairs nicely with AI Video Generation, so you can create a clip and check it before it ever reaches a customer.
Good to know: this is a premium action with an additional charge per run. The video link has to be public, and Vimeo and TikTok page links won’t work.
How to use it:

The calendar view now gives you a lot more control over how it looks. A new Calendar view settings panel puts all your display preferences in one spot, and your choices are saved for next time.
You can pick the timezone you view appointments in, choose 15, 30, or 60 minute grid intervals, grey out hours outside each staff member’s working time, hide empty rows and columns, and show buffer time around appointments.
Admins also get a Staff colors tab to recolor appointments by team member. You can choose whether event tiles are filled with the calendar or service color or the staff color, and the color strip on each tile is wider, so it’s easier to tell at a glance who or what an event belongs to.
And when you need to share a schedule, you can export exactly what you’re looking at to PDF or CSV, with the same filters and date range.
These are display changes only. Your availability, booking rules, and booking pages stay exactly the same.
How to use it:


When a question pops into your head, you don’t want to dig through the app to ask it. Now “New Ask AI Chat” is a shortcut on your app icon, on the Quick Actions card, and in search.
Every tap opens a fresh, empty chat, so old topics don’t get mixed into new answers. This is available in mobile app version 4.27.0 and up, for accounts that have Ask AI.
How to use it:
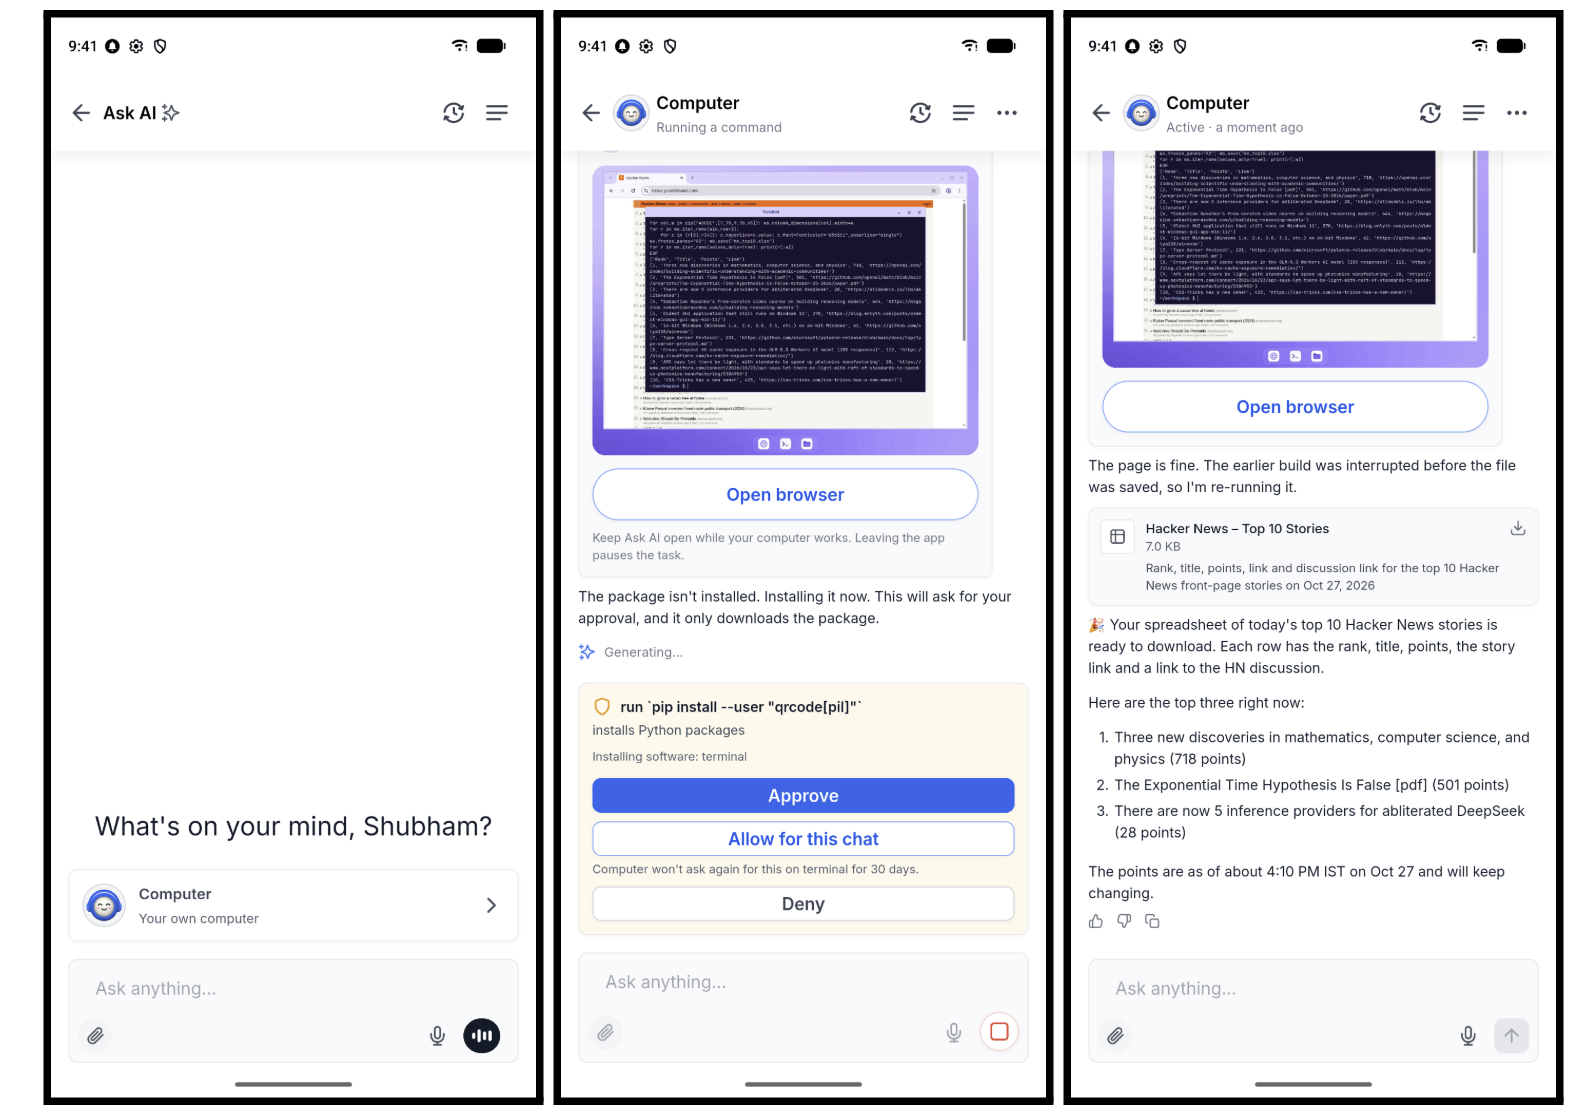
Ask AI Computer, the private cloud machine that browses, fills in forms, runs code, and works with files for you, is now in the mobile app.
Start a task from any chat and watch the screen live. Need to step in? Take over with a tap, then hand it back and it picks up right where it left off. You can keep chatting while it works, and approve or deny its requests on the spot.
Your logins stay private. Sign-ins go through a private form and Secure Store, never the chat, so Ask AI never sees your passwords. It also won’t fill a saved password on a look-alike site.
Picture this: you start pulling a bank statement on your computer, then head out. When the Computer hits a one-time code step, your phone lets you know it needs you. You type in the code and hand control back, all from your phone.
The new Ask AI home screen widget puts a chat bar, a Voice button, and a Camera button right on your phone’s home screen.
Tap the chat bar to start typing, tap Voice for a hands-free conversation, or tap Camera to snap a photo of a document, receipt, or job site and ask about it. Each one opens a fresh chat.
The widget works on iOS (16.6+) and Android with app version 4.27.0 and up, for accounts with Ask AI. It even matches your app’s language and brand colors in light and dark mode.
How to use it:
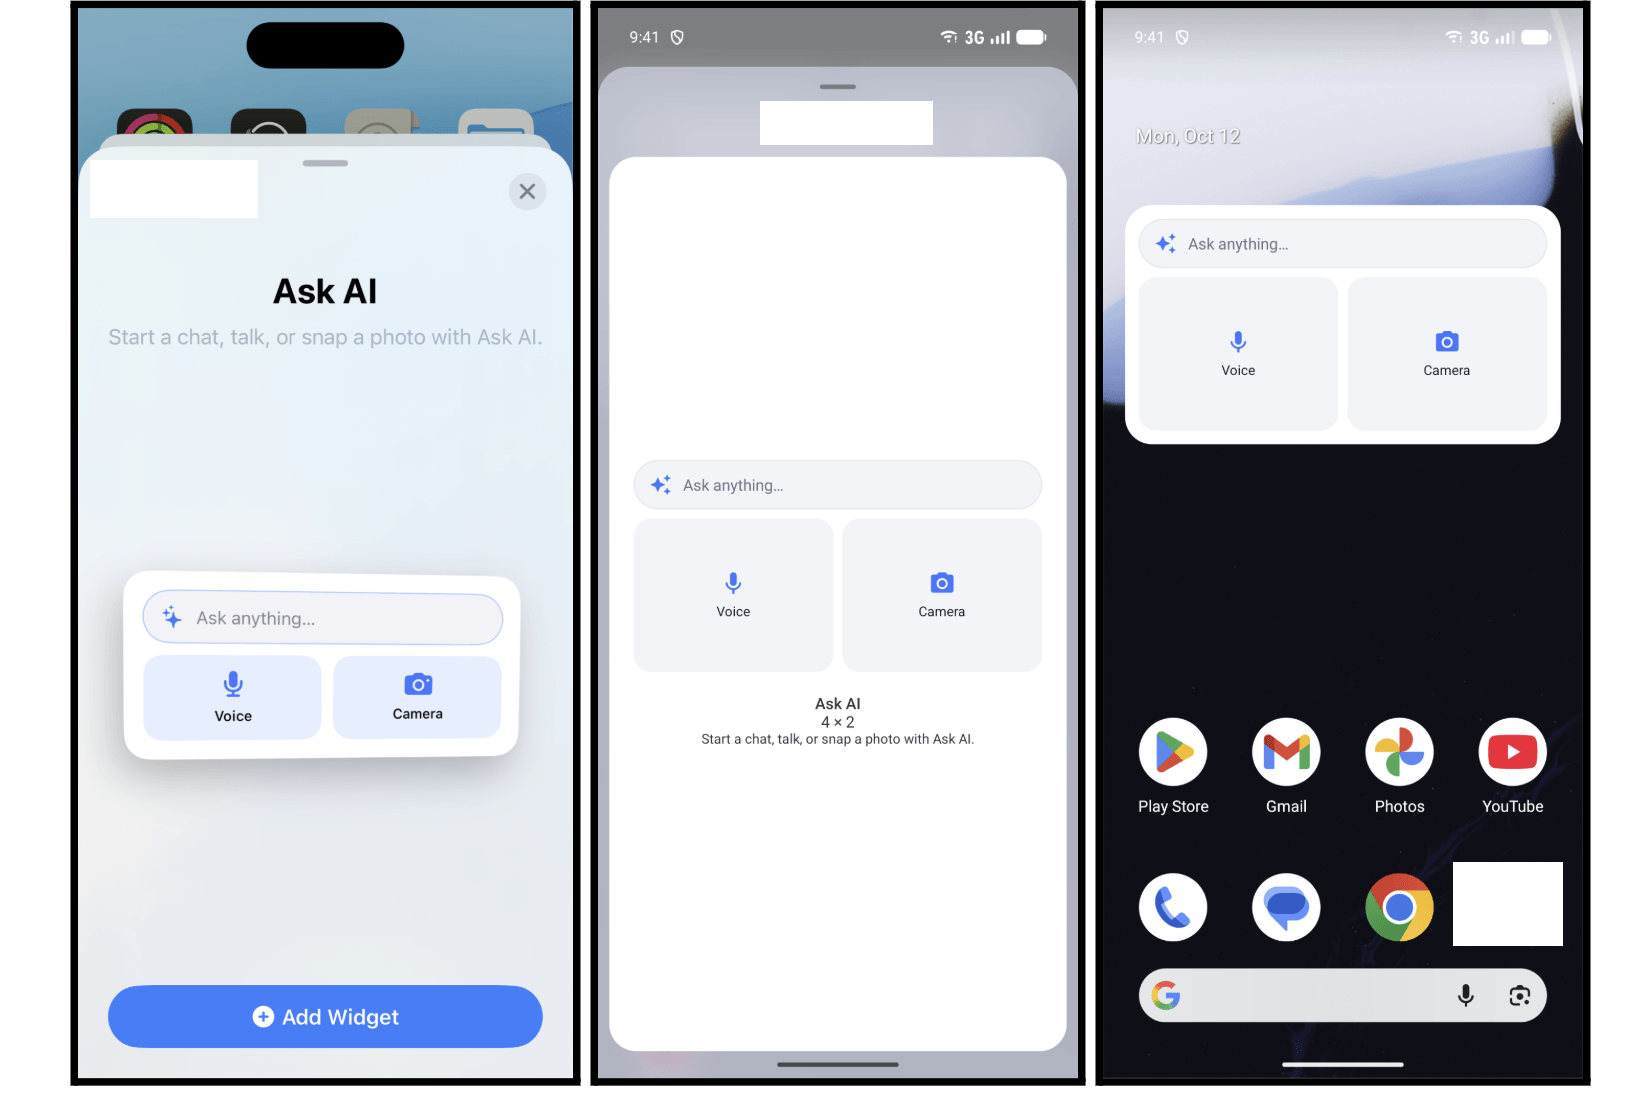
Your best ideas tend to show up when your hands are busy. Now Ask AI has three iOS shortcuts (New Chat, Dictation, and Voice Mode) that you can put on your iPhone’s Action button.
One press opens the app, starts a fresh chat, and for Dictation and Voice Mode, turns on the mic. No Action button? You can start them with Siri or find them in Spotlight instead.
The Action button needs an iPhone 15 Pro or later. Siri and Spotlight work on iOS 16.6 and up, with app version 4.27.0 or later.
How to use it:
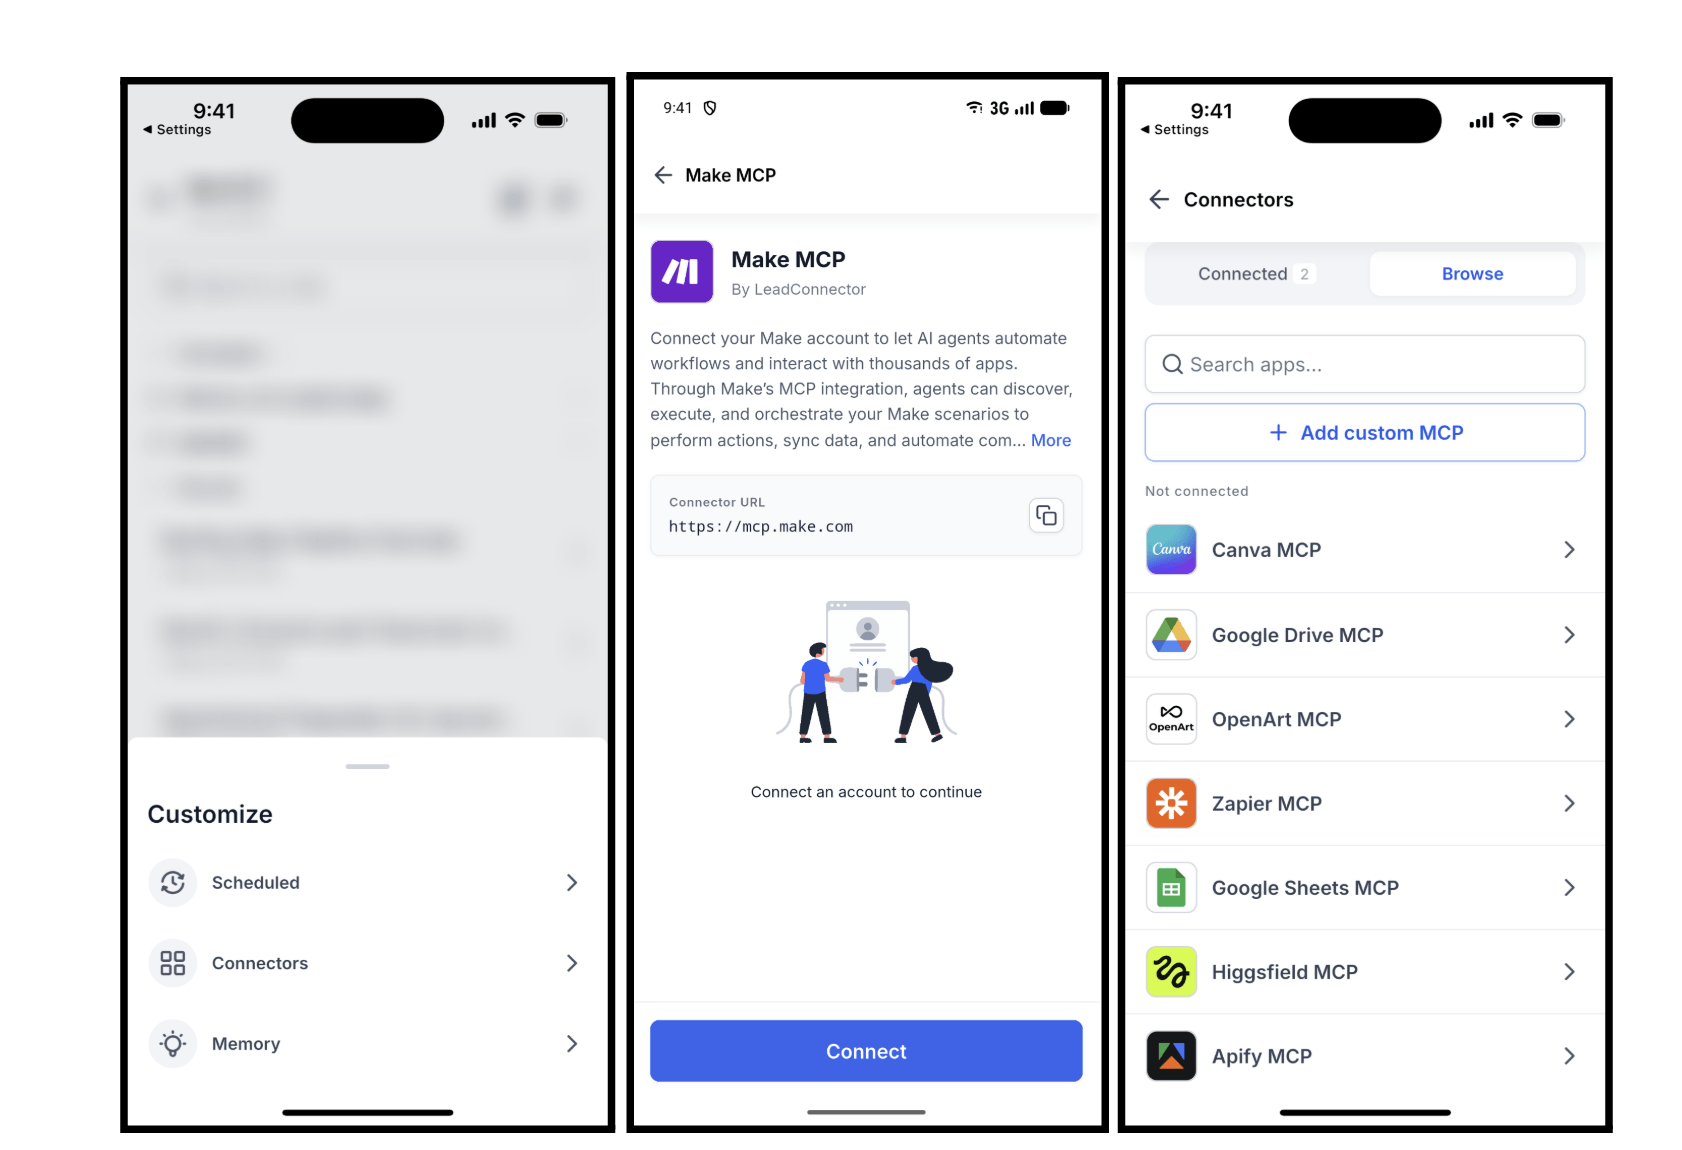
Connectors let Ask AI work with the other apps your team uses, and now you can set them up right from the mobile app. No more waiting until you’re back at your computer to add an account or fix an expired login.
Browse the app catalog, connect an account in a few taps, and choose exactly which tools Ask AI is allowed to use. You can even add your own custom MCP server. (MCP is just the standard way AI assistants talk to other apps.)
Anything you connect on the web shows up on mobile, and the other way around. And the accounts you connect are yours, so other users in the sub-account won’t see them.
How to use it:
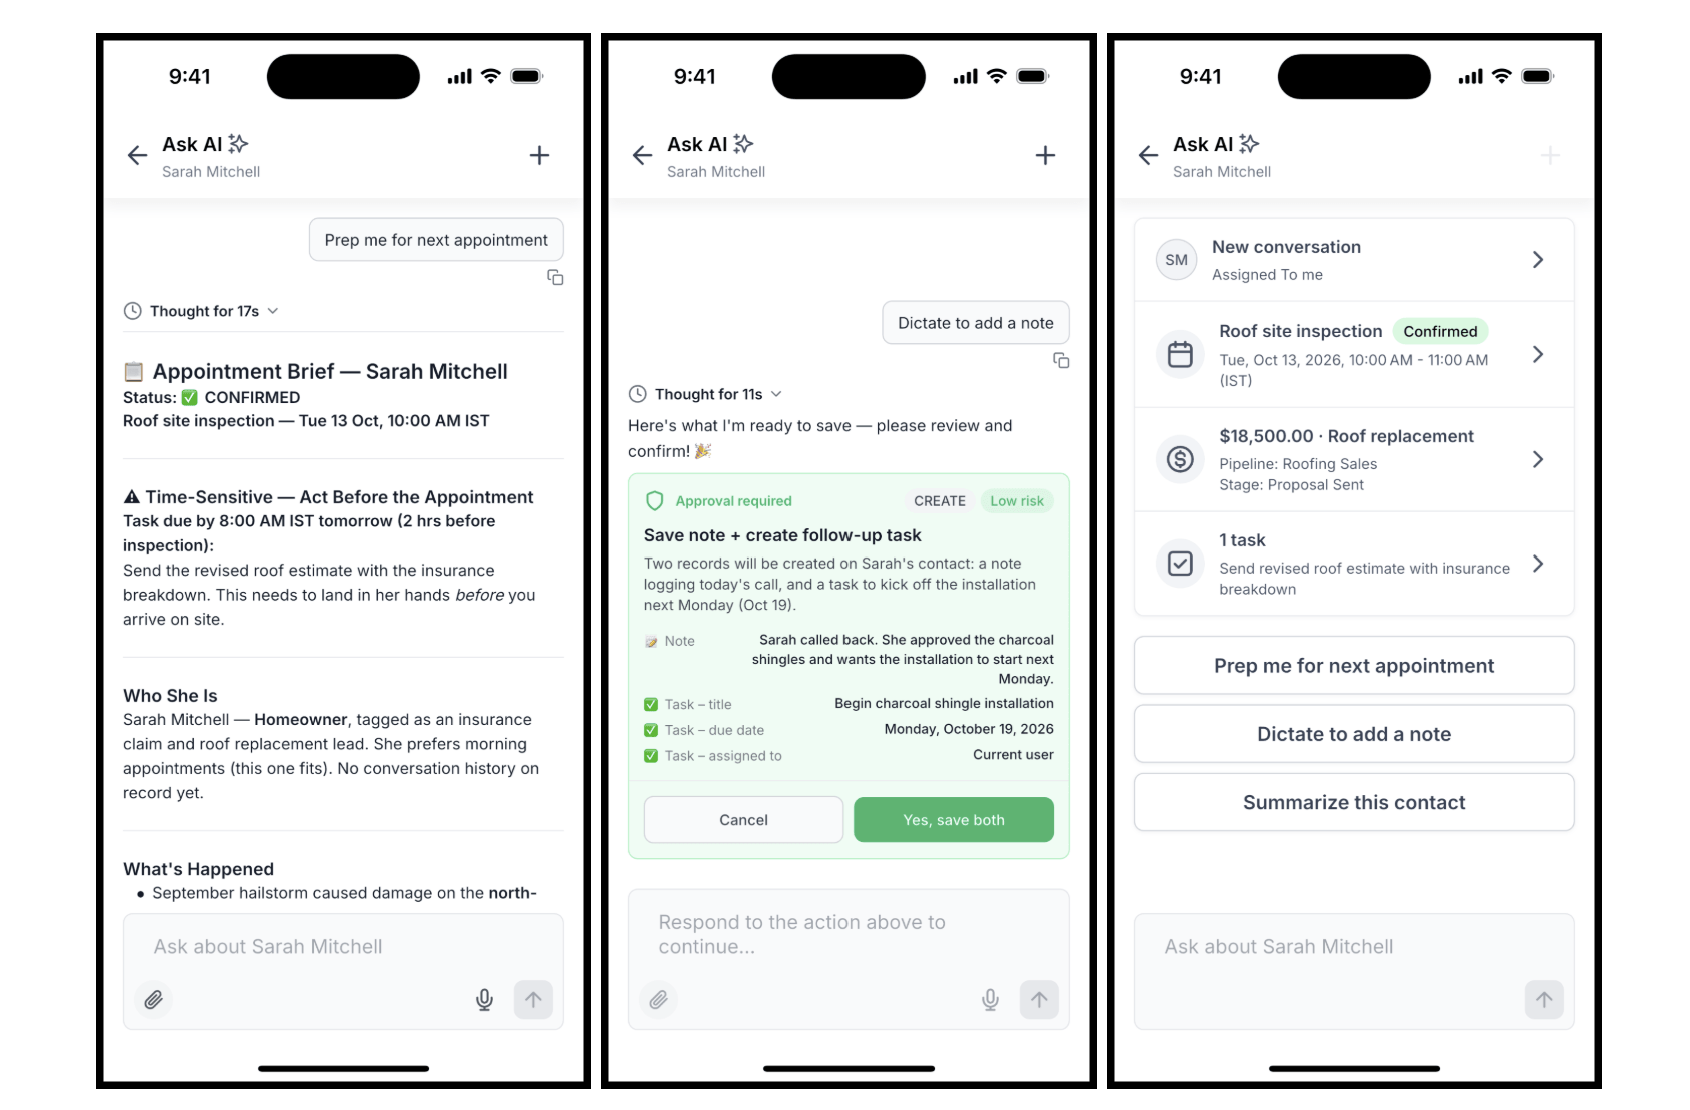
Opening a contact mid-call and digging through five different tabs to figure out where things stand? Not anymore.
Tap the new Ask AI icon at the top of any contact and you’ll see a summary card with their last message, next appointment, biggest open deal, and open tasks. The card is built from your real data, and you can tap any row to jump to that record.
Below the card, you’ll find three handy buttons: Prep me for next appointment, Summarize this contact, and Dictate to add a note. When you dictate, Ask AI turns your words into a proposed note (and a task if needed), and nothing gets saved until you approve it.
It works on iOS and Android for anyone with Ask AI access, in app version 4.27.0 and up.
How to use it:
FGF Notifications