It is time for all the latest updates in FG Funnels from the week of February 28th through March 6th, 2024. If you have questions about any of these updates, or FG Funnels in general, please reach out to [email protected] or live chat in the app and our team will be happy to help.
Courses
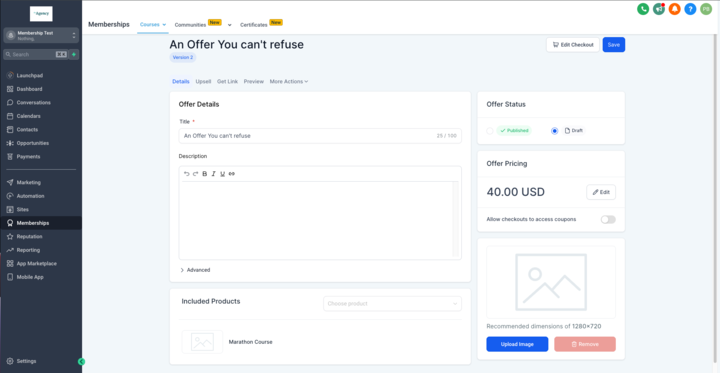
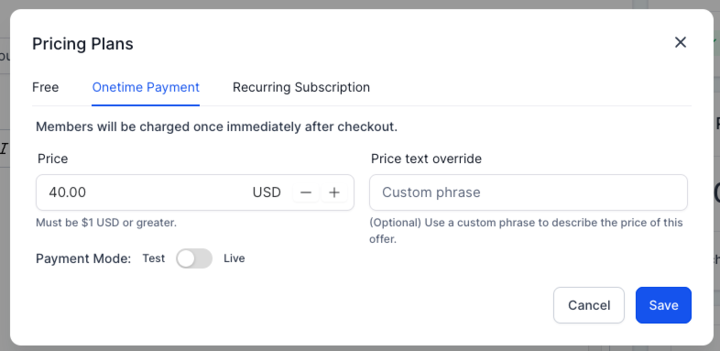
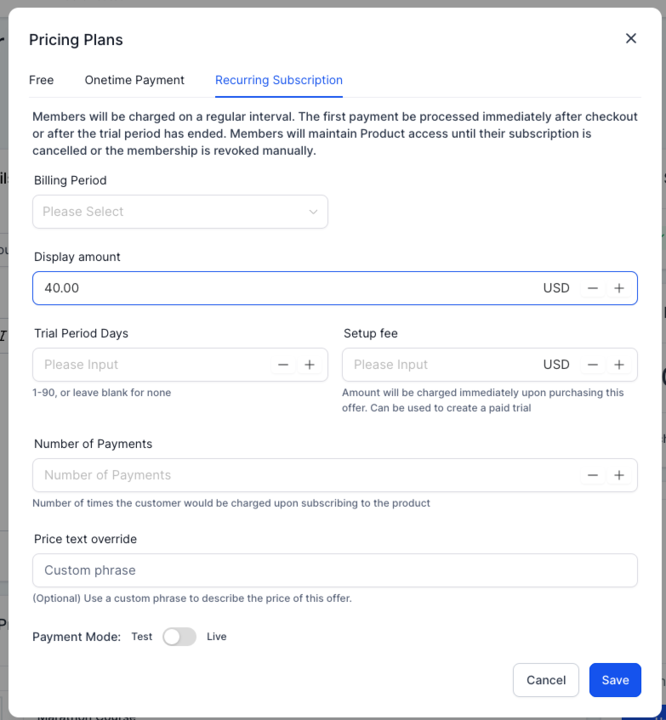
Revamping the Offer Edit Experience
The look and feel of the offer edit page has been revamped to improve the user experience and match the membership builder app’s design.
Along with the design, this also brings another page from the membership builder migrating from V2 to V3. We also have new layout support for Kajabi’s library theme.
Bug Fixes:
Login Custom Token Payload size issue resolved
Error handling for Kajabi importer
Coupons issue due to feature flag
Social Planner
Image limitations
The image size limit has been updated from 10MB to 5MB. The dimension limit has also been modified to a minimum of 720×720, with a maximum of 3000×3000.
Calendar
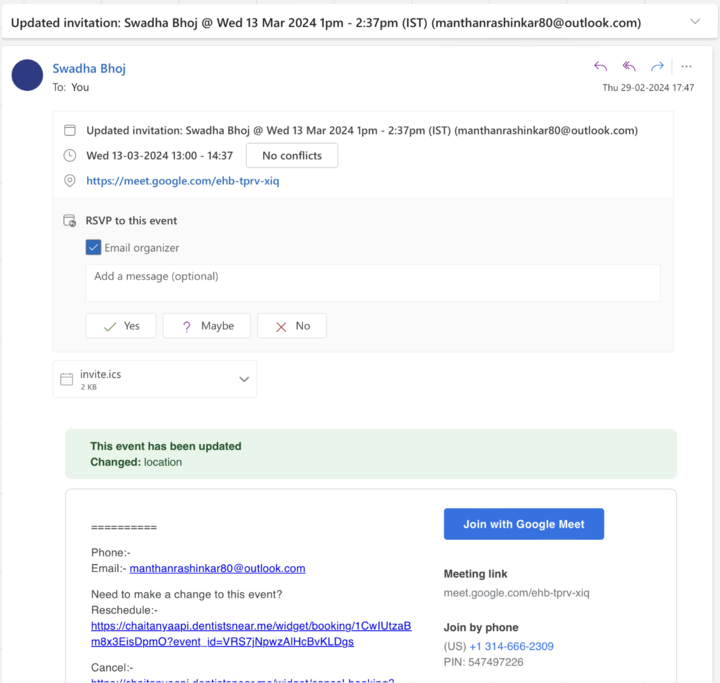
Outlook – Attendee Email
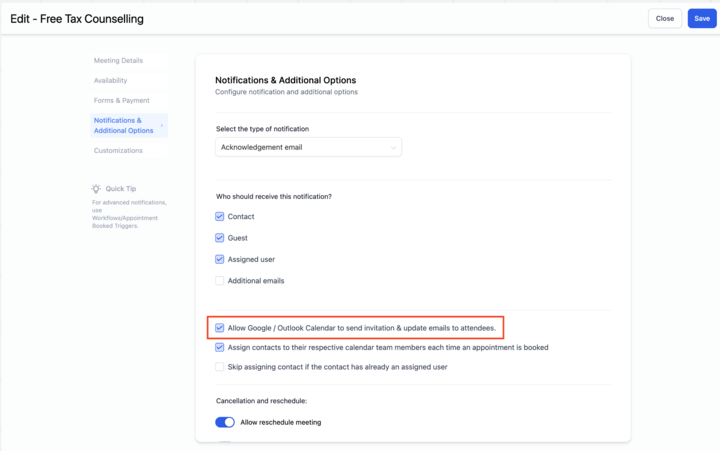
Users now have enhanced control over the communication preferences for third-party calendars (Google and Outlook) regarding sending invitation and appointment update emails. This feature empowers users to manage how they communicate with their event attendees more effectively.
Previously, users could only regulate whether Google Calendar should send appointment emails (invitations and updates) to attendees. Now, users can also control whether Outlook should send emails from its platform. This expansion provides users with additional flexibility in managing their communication preferences.
How to Use?
To utilize this feature, follow these steps:
Navigate to calendar settings.
Locate and click on “Notifications & Additional Options.“
Check the box labeled “Allow Google/Outlook to send invitation & update emails to attendees” to enable or disable notifications from the respective third-party calendars.
Mobile App
New Opportunity Filters
Enhancements:
Introduced inline Email body rendering for better readability
Added support for WhatsApp notification listing & notification to conversation navigation
Added support for the WhatsApp DND channel
Improved navigation to Email composer messages screen
Video attachment short URLs will now use a branded domain
Fixes:
Fixed an issue where contact search failed for a few contacts
Fixed an issue where a few invoices were not loading
Fixed an issue where a few notifications were missing in the notification listing
Fixed issue where email signature getting duplicated for snippets
Availability:
FG Funnels- Android, iOS
LeadConnector – Android, iOS
Forms and Surveys
Navigate Through Form Preview and Submissions Seamlessly
With this update, users can now seamlessly navigate through form preview and submissions without the need to open the builder each time. Here’s what’s new:
Redirect to Preview of Form: Instead of navigating through the builder interface, users can now directly preview their form or survey from the page list view. This enhancement significantly reduces the time required to review and finalize form designs.
Submission Preview: In addition to form preview, users can also conveniently view submissions directly from the page list view. This feature allows for quick insights into collected data without the need for additional clicks.
With these enhancements, we aim to streamline the form preview and management process, enabling users to focus more on data collection and analysis rather than navigating complex interfaces.
To Preview Form/Survey from Page List:
Click on three dots on the right of the form
Click on Preview
To Open all the submission of a particular form
Click on three dots on the right
Click on view submission
CRM
Smartlist Filters
What’s New:
Standardization of Existing Filters: We have standardized existing filter options to ensure consistency and ease of use across the platform. Added the “Is Not” option to Wildcard Name, Postal Zip Code, Type filter. Added the “Range” option to Date of birth.
Addition of Missing Options in Custom Fields: The custom fields filter now includes “is empty,” “is not,” “contains,” and “does not contain” options, providing users with greater flexibility in refining their searches.
Enhanced Date Filtering: The custom date field filter now added “this month” and “in month” options.
Resolution of UI Bug: Fixed UI glitch in tags and radio field where dropdown was not showing selected values in list.
Contacts
Sending Capabilities and New Stats Modal
We’re thrilled to announce a series of exciting updates that are sure to elevate your experience with our platform.
Enhanced Sending Capabilities
Now, all locations will start with 100k sends per hour, where the “New Bulk Email Architecture” is enabled, providing you with greater flexibility and efficiency.
These are applicable to only these two new sending options: “Send All at Once” and “Send at Scheduled Time.” Whether you prefer to blast your emails all at once or schedule them for optimal timing, we’ve got you covered.
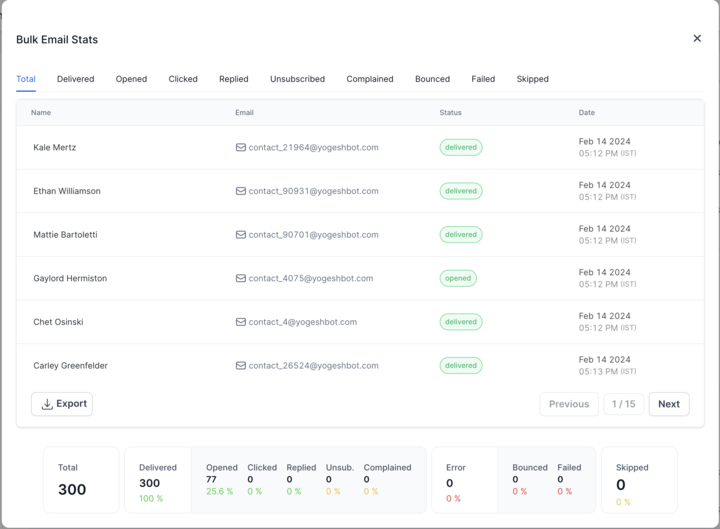
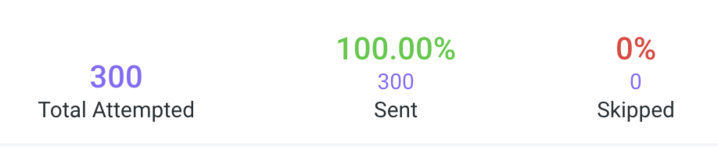
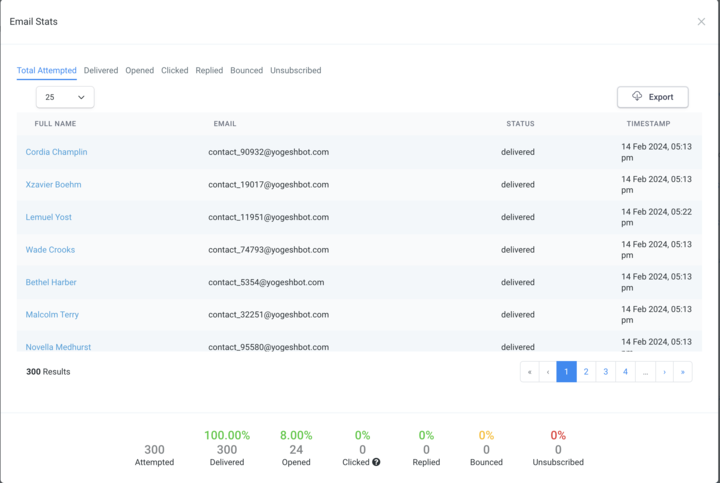
New Stats Modal
Introducing further statuses like Processed and Error states. We’ve also upgraded information about your email campaign’s sent rates
Conversations
Email collapsed view and thread view
The following bug fixes have been deployed:
Fix for page hanging, after expanded before api fetching
Subject shown instead of ‘no subject’
Fix for display of Invalid Date for email items
Fix for email collapsed view and thread view, showed ‘no subject’
Invoicing
Image in Terms And Notes
What’s New?
Users now have the capability to configure and add the Images to Terms and Notes in Invoices.
Text Editor has different configurations / options to redirect post Image click .
We’ve also added the ability to add images to already sent invoices.
Why is this Important?
Currently this is a big ask from our customers in UAE as well as Europe, with one of the prime use cases being that the client can just attach a simple static QR code image on the invoice. This also solves many regulation issues in Saudi Arabia where with an invoice a QR code is mandatory!
How to Use it?
Go to Payments Tab -> Invoices -> Settings tab -> Click on the Invoice Title and Terms
Scroll down to the text editor and you’ll also see an image icon click on it Voila you can now add images to the invoice title and terms.
Line Items Breakdown in Invoices Export
What’s New?
Users would now have a detailed breakdown of the invoice line items in a particular invoice on exporting.
The detailed breakdown for the invoice would consist of invoice line item details like item name, item description, tax on item, discount on item, itemId, currency.
How to Use it?
Go to Payments Tab -> Invoices –> Click on the Export Button and you’ll receive a mail with csv link for your export!
Order Forms
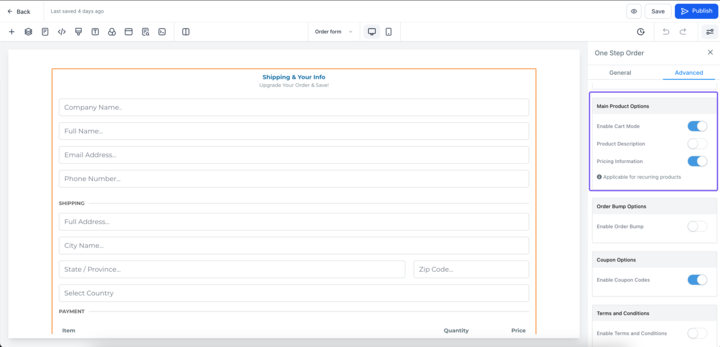
Product Description and Full Name Validation
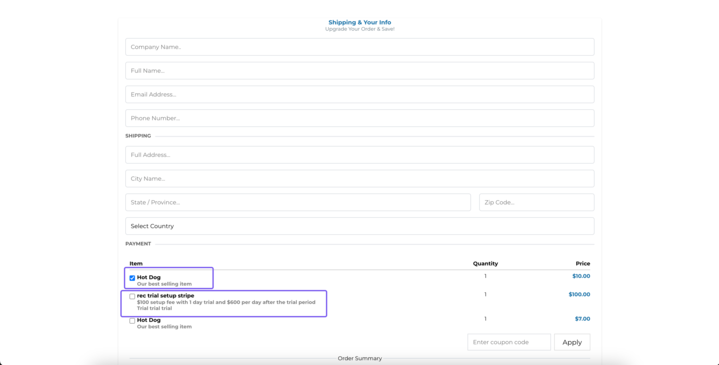
Product description in order forms:
The product description toggle will now display the product description that is added by the user in the products screen. This allows the user to show their customized description in order forms. This option is by default turned OFF in new and existing order forms.
The existing product description (Recurring and trial information) now comes under the new label of “Pricing information”. This toggle is turned ON for new funnels, and existing funnels will retain the user’s preference.
This overall improves the understanding of these toggles as we noticed customers were confused with the existing product description toggle.
Full name validation in order forms:
Order forms now have a toggle called “Full name validation” present which would enable these forms to validate names entered. Upon turning this on, names entered will now need to have at least two parts, and some other small validations such as not allowing two special characters as a name, limited special characters, etc.
Turning this option off will retain the existing behavior of the field.
New Features
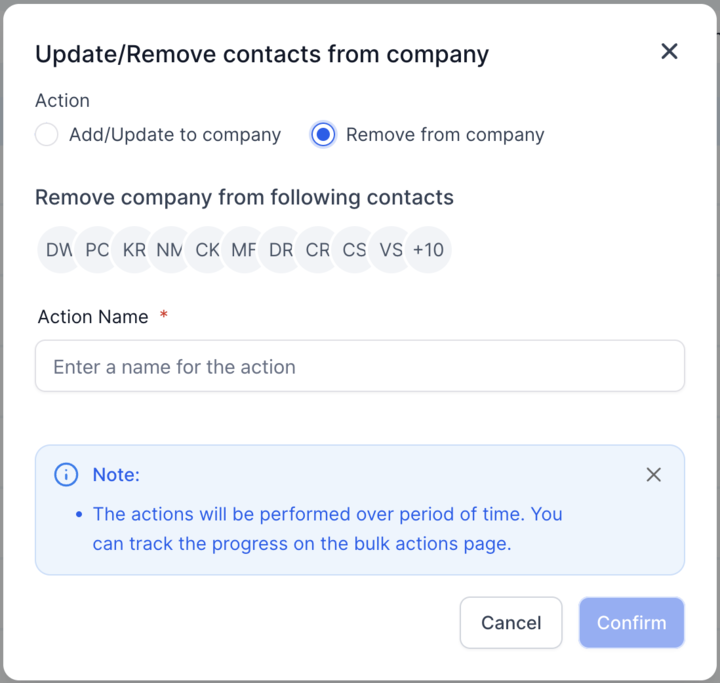
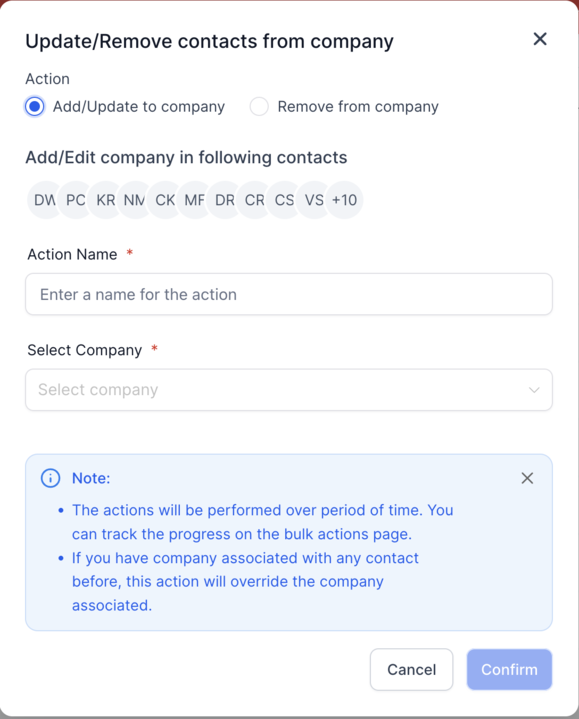
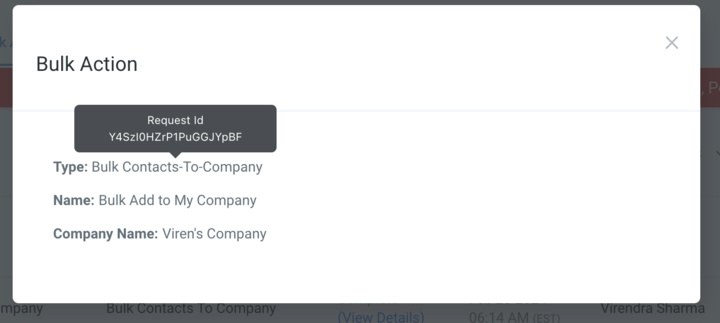
Bulk add/remove/edit contacts to companies
We’re thrilled to unveil our latest update, which empowers you to effortlessly manage multiple contacts within companies! Now, you can seamlessly add, remove, and edit contacts in one swift action, directly from the Smart-list page.
Here’s how:
Head to the Smart-list page
Select all the contacts you wish to manage
Click on “Add/Edit to company”
Input an Action Name, choose the company, and hit “Submit”
What does this mean for you?
Say goodbye to the hassle of individually managing contacts
Enjoy streamlined operations and enhanced customer engagement
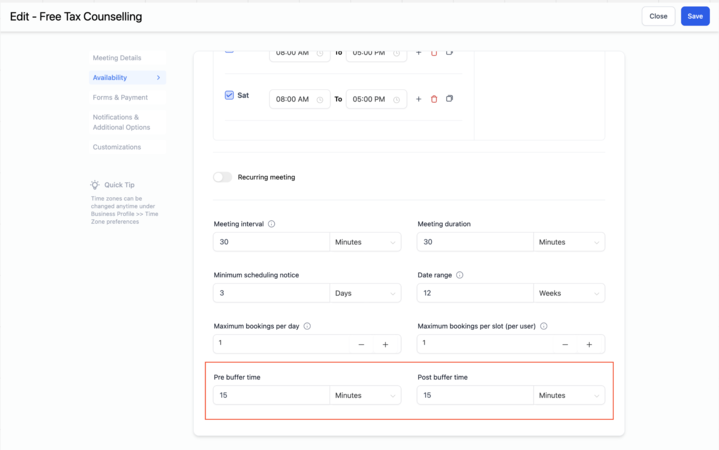
Pre Buffers in Calendars
Buffers represent additional time that can be added before and/or after an appointment. Previously, calendars only had post buffers. We are now excited to introduce pre-buffers as well, allowing users with more flexibility.
Important points to note:
Buffers only apply to events booked through the booking widget or directly from the app. However, events created outside the app (e.g., Google, Outlook, iCloud) are taken into consideration when finding a free slot while scheduling a meeting with a buffer from the widget / app. This means that buffers cannot overlap with any other existing calendar event.
If there’s a 30-minute appointment with 15-minute buffers before and after, someone else booking on the same day will see an available slot 30 minutes after the existing booking. This is due to two buffers being applied consecutively, as there will be a 15-minute post buffer for the existing appointment and a 15-minute pre-buffer for the new appointment.
How to Use?
Choose the calendar to which you want to add buffers for appointments.
Navigate to the “Availability” section.
Specify the duration you want for both the pre and post buffers and click on save.
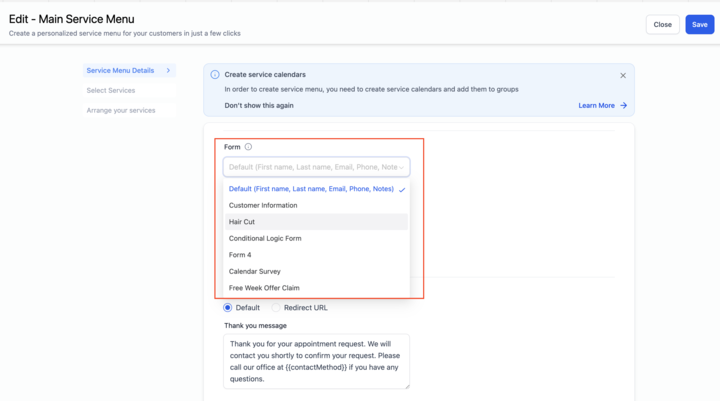
Custom Form for Service Menu in Calendars
Introducing a highly requested feature – custom form for the service menu! Now, users have the flexibility to collect specific information from their bookers according to their unique requirements. You can now add customized forms to the Service Menu and gather precisely what you need.
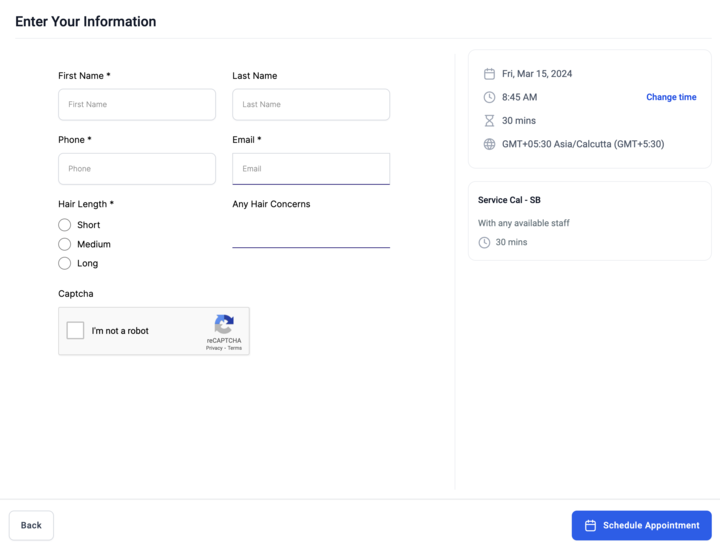
Previously, the service menu collected only default information like name, email, and phone number from bookers. With this update, you can create personalized forms with all the fields you desire. These custom forms can be seamlessly integrated into your service menu.
When a booker schedules an appointment, they’ll be prompted to fill out your tailored form. You can conveniently view the submitted details within the app under Sites > Forms > Submissions.
Note:
Custom forms selected in the service menu will supersede any form selected at the individual calendar level.
How to Use?
Begin by creating your custom form. Navigate to Sites > Forms > Builder.
Craft your form with the specific questions you wish your clients to answer.
Once your form is ready, proceed to Calendar Settings > Service Menu.
Select the desired service menu and navigate to Service Menu Details.
Under Forms, choose the custom form you’ve created and save your selection.
Create Products( or Services) inside the mobile app
We’re thrilled to announce our latest update to Payments on Mobile – Product creation! Accounts can now create Products( or Services) inside the mobile app. These Products can then be used for Invoices and for the Product Catalog inside the Point-of-Sale module. All of the products created on Mobile will be available under the Products tab inside Payments, and vice versa.
What’s New:
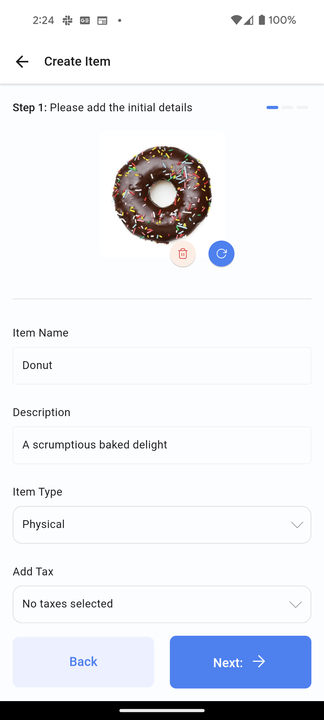
New Flow: A simple yet intuitive flow to create products/services inside the mobile app in just 3 easy steps.
Upload product pictures: Upload an image relevant to your product that gets displayed inside the POS product catalog.
Multiple pricing models: Easily define different pricing models for a single product. E.g. Standard price, Discounted price, Stock clearance price, etc.
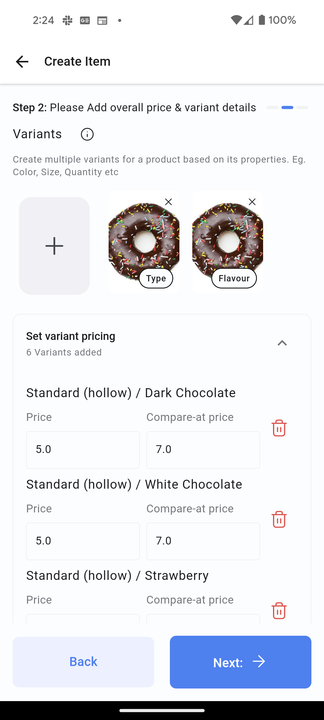
Define variants and variant pricing: Applicable only if a single price has been set for the product, this feature allows variants of the same product to be created based on the product’s properties. E.g. A jacket could have 2 variants – Size and Color.
How It Works:
Open the mobile app
Click on the Hamburger menu on the top left of the screen to reveal the left-hand navigation. Head over to Products.
To create a new product, press the floating “+” button on the bottom right of the screen.
On the first step, define all the basic details about your product – Name, Description, Image, Item Type, and Statement Descriptor (Optional step)
On the second step, define the pricing models for this product. More than one price can be defined for a single product.
In case you define a single price for your product, you will have the ability to create variants for the product based on its properties. For multiple variants, you will have the flexibility to define pricing for each Variant combination,
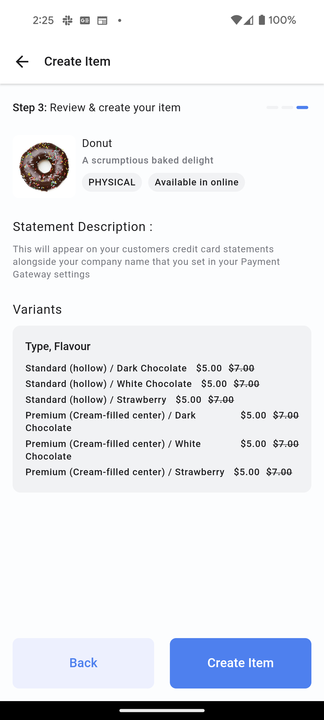
On the last step, after defining the pricing/variants, you can review all the details around your product in a glance and choose to save or cancel the process.
Once saved, the product gets added to the product list, which can be used for the POS Product Catalog or Invoices.
Product Catalog in the Mobile App
What’s New:
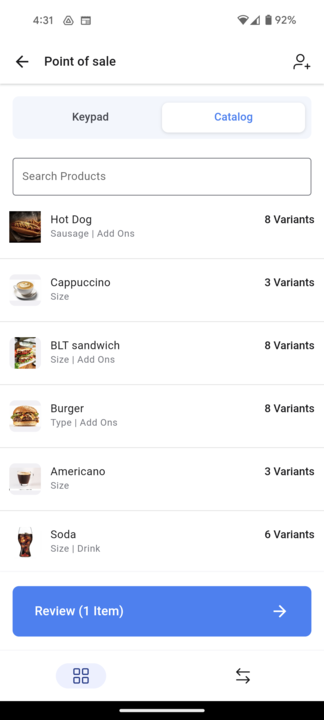
New Design: A beautifully crafted screen with all of your products available on a single page.
Variants: Created multiple variants for a Product? Use the product catalog to select the dedicated variant combination that your customer requires.
Dynamic pricing: Based on the selected variant/pricing model and the quantity selected, the final amount will automatically be updated with no manual intervention!
Cohesion with Keypad: Use the existing Keypad screen to add “Custom” items along with the items chosen from the Product Catalog to charge your customer.
How It Works:
Open the mobile app
Head over to POS by clicking the 3rd icon (middle) on the bottom navigation bar.
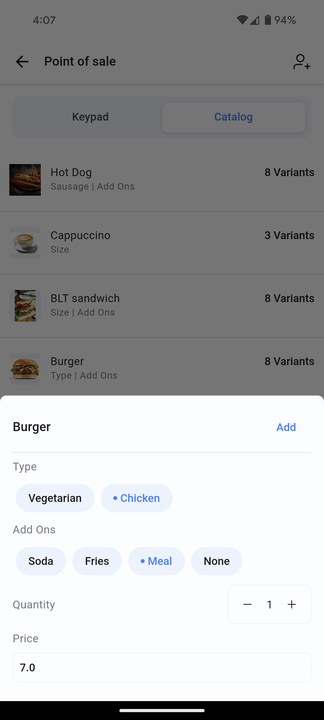
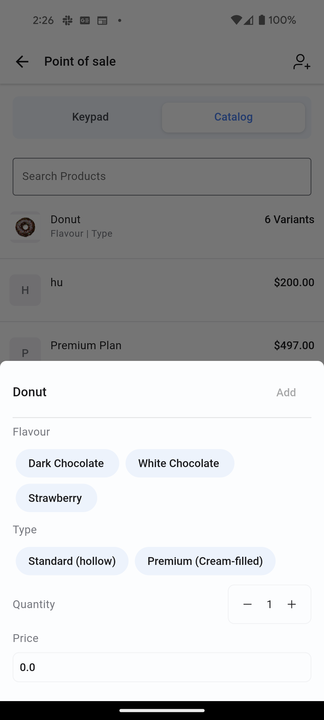
Switch from the ‘Keypad’ tab to the Catalog tab. You will now be able to see all the created products for your account.
Click on a product to reveal an intuitive interface with all the variants, pricing models, and a quantity counter.
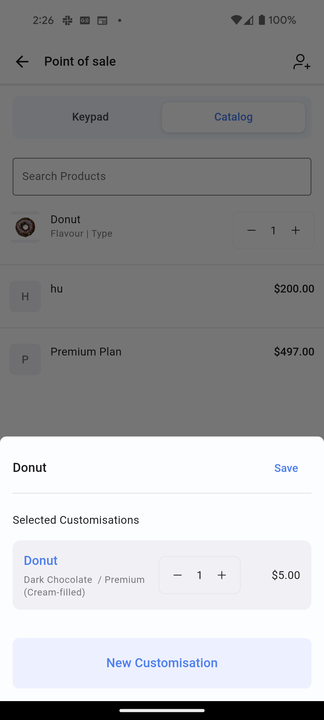
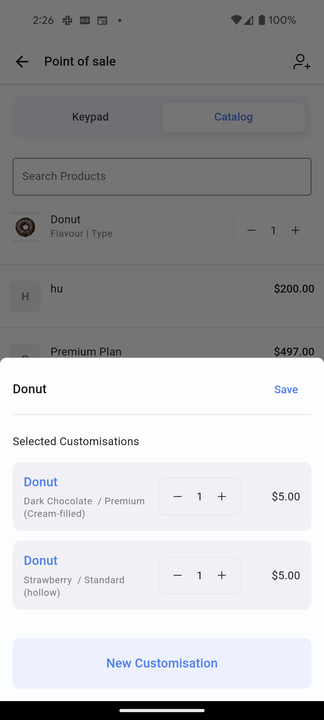
Select the relevant variant combination, choose the quantity, and click on “Add” to add the product to the checkout step. Once added, you will be able to see a quantity counter in the same line as the product name to depict the quantity of the item added to your checkout step. You can increase or decrease the quantity using this counter.
In case a different variant combination of the same product needs to be added, click on the “+” button on the quantity counter and choose “New Customization”.
Once you have added products that you want to charge your customer for, you can head over to the checkout page to accept payment via tap to pay.
Bonus tip: You can manually enter the amount from the keypad screen as well as select products from the product catalog together. The amount will automatically be updated taking both the flows into consideration.
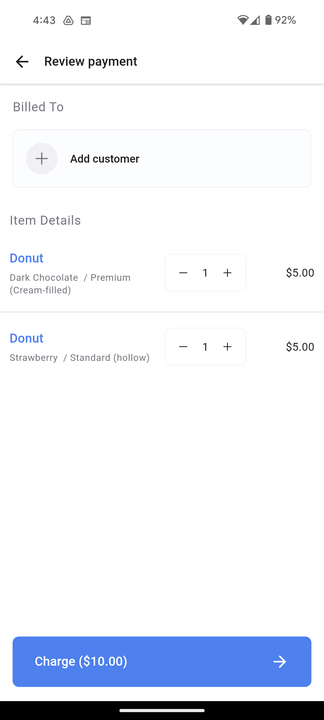
New Checkout Step to the POS module Inside The mobile app
We’re excited to announce the addition of a brand new checkout step to the POS module inside the mobile app! This checkout page will act as a source-of-truth for a POS sale made. Users will be able to see a section to link a contact with this transaction as well as see a breakdown of the items added to the cart along with their prices and quantities, which can be adjusted before charging your customer using Tap to Pay.
What’s New:
New Design: A brand new page available after the Product Catalog step.
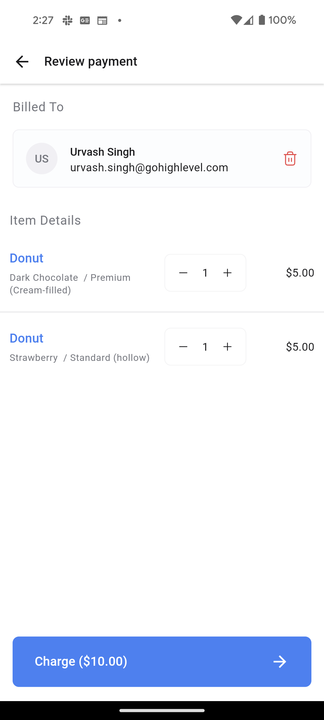
Link Contact: Link a new or existing contact to this transaction, keeping a record of all the transactions made by your customers.
Review item details: View a complete breakdown of all the added products. Adjust the quantity before completing the sale.
How It Works:
Open the mobile app
Head over to POS by clicking the 3rd icon (middle) on the bottom navigation bar.
Add products using Keypad, Product Catalog, or a combination of the two.
Click on the “Review” CTA at the bottom of the screen.
Link a contact to this transaction. This is always preferred in order to avoid for the transaction being tagged to [email protected] . In case the contact you are trying to link doesn’t exist, no worries, you do not need to exit the flow. Just enter the name of that contact in the search bar and you will see a button to create a new contact for that customer. Once you enter the details and save the contact, you will automatically be brought back to the checkout screen with the contact already linked to this transaction!
Review and manage your item list. Products that are no longer needed can be removed at this step.
Once all the details have been reviewed and a contact has been linked, click on the “Charge” CTA to add an optional tip and open up the Tap to Pay screen.
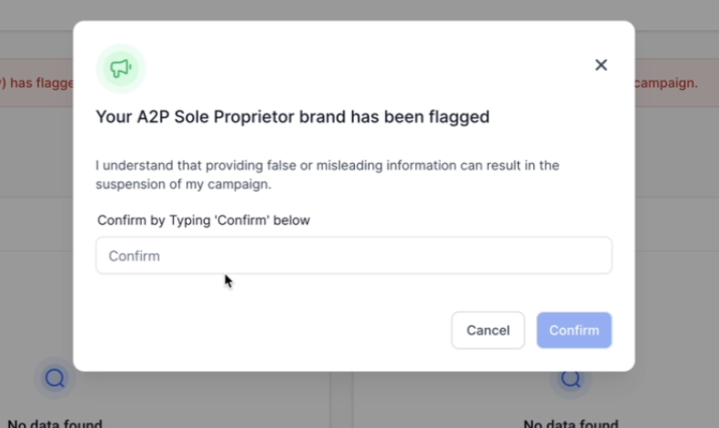
LC Phone – Sole Prop accounts need to verify
Certain Sole Prop accounts need to verify if they are actually a Sole Prop Business.
TCR have flagged around 1572 sub-accounts that they think are not Sole Prop and can have an EIN with them.
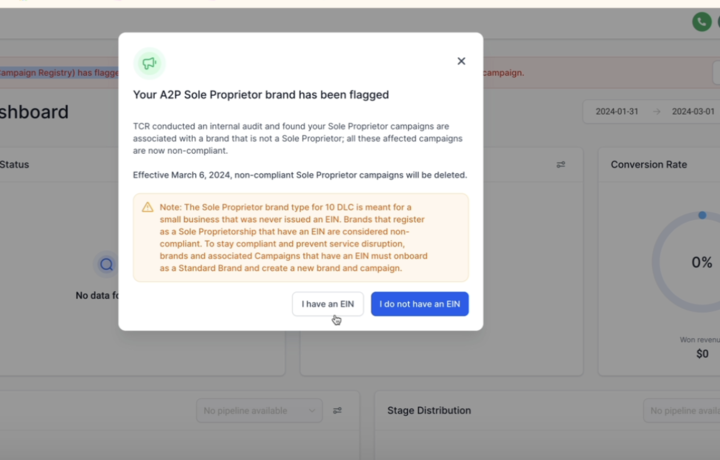
We have introduced a banner on the dashboard page that states that “TCR has flagged your brand/campaign”
Why is this Important?
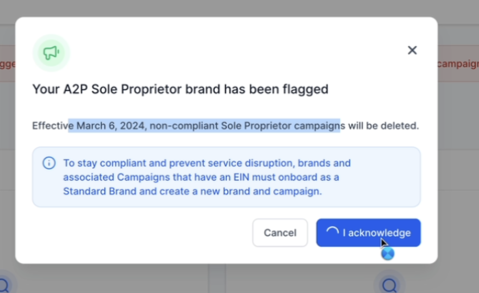
Effective March 6, 2024, non-compliant Sole Proprietor campaigns will be deleted.
The Sole Proprietor brand type for 10 DLC is meant for a small business that was never issued an EIN. Brands that register as a Sole Proprietorship that have an EIN are considered non-compliant. To stay compliant and prevent service disruption, brands and associated Campaigns that have an EIN must onboard as a Standard Brand and create a new campaign.
What do you need to do?
If you don’t have an EIN,
Click on Take Action
Click on I do not have an EIN
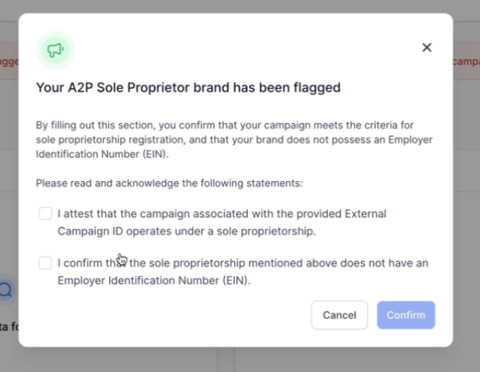
Agree to the two prompts on the next page which says that you do not have an EIN
Click Confirm and proceed
On the final page you will need to type confirm and submit
We will pass this info to TCR stating that you confirmed that your Sole Prop Brand is valid.
What if you don’t take action?
TCR will delete all the identified non-compliant 10DLC Sole Proprietor account and Campaign on March 6, 2024.
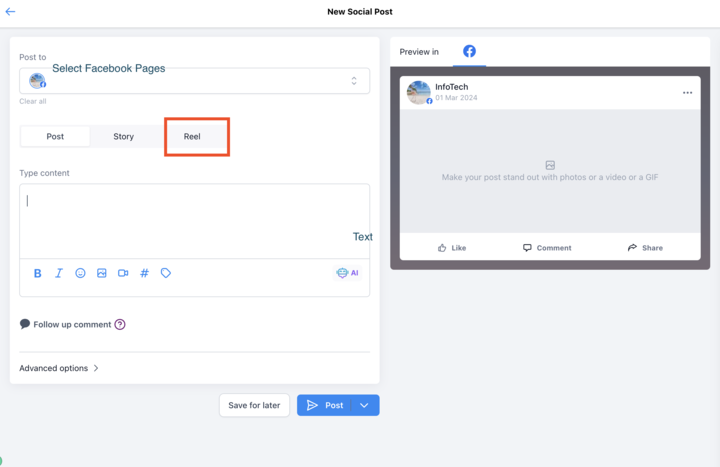
Create your first Facebook Reel in Social Planner
Short form videos are in trend with ever-growing ways in the social media marketing world. With the same, in social planner we are launching Facebook Reels.
How to create Facebook Reel?
Go to Marketing > Social Planner
Connect your Facebook account by going to Settings > integrations. Give the permissions to the Facebook account.
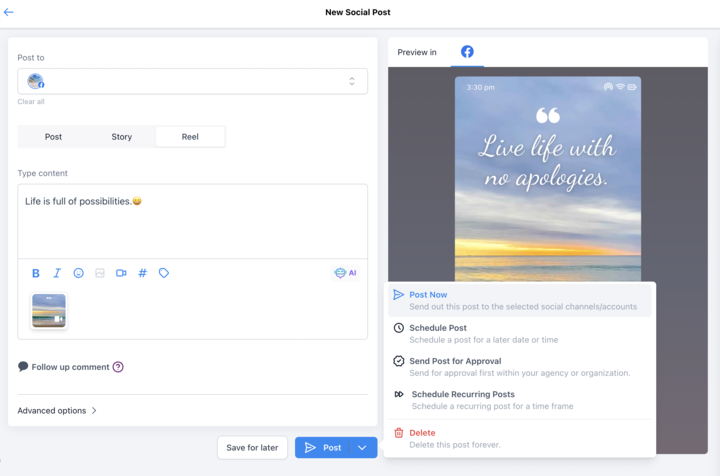
Go to Create New Post
When creating a new post, select Facebook Page for posting the Reel.
Go to Reels Tab
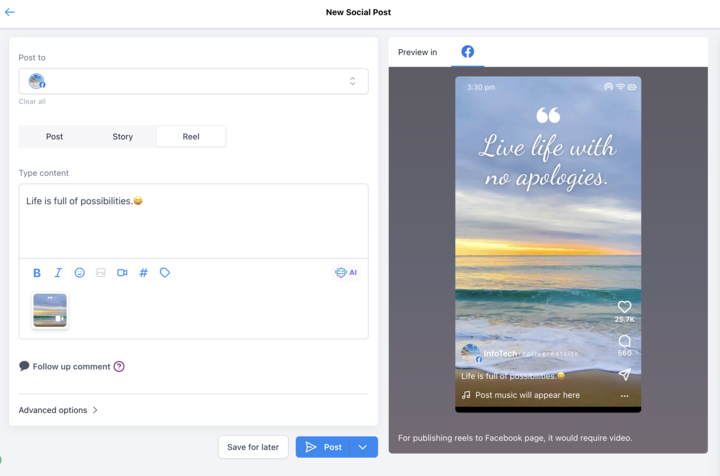
Add caption and add one video attachment
Schedule your Reel
Note – Reels are only available for pages at the moment. If you choose a group it’ll be shared as a feed post.
Forms and Surveys – Version History
We are excited to announce the Version History feature to Forms and Surveys!
This update allows for more robust management of form and survey versions, providing you with the tools to better track changes.
What’s New?
Automatic Version Creation: Every time you save changes in your form or survey, a new version is automatically created. This ensures that every edit is captured as a distinct version, allowing for detailed version tracking.
Version Preview: With the new Version History feature, you can now preview any previous version of your form or survey directly within the builder. Simply click on the Versions icon to see a list of all available versions, complete with timestamps and version numbers.
Restore Previous Versions: You can easily restore your form or survey to any previous version with just a click. This allows you to revert to an earlier version if needed.
Enhanced Version Management: Our intuitive interface makes it easy to navigate through different versions, compare changes, and select the most appropriate version for your current needs.
Opportunities
Reorder Custom Fields
We’re thrilled to introduce a highly anticipated enhancement to our platform: the ability to reorder custom fields in opportunities! Here’s what you need to know:
What’s New?
Now you can easily rearrange custom fields in opportunities to better organize your data and streamline your workflow. The updated order of fields will be reflected in the opportunity to add and edit dialog boxes.
Customization Limitation: Please note that only custom fields, not standard fields, can be reordered. The same applies to folders.
Simple Steps
Navigate to Settings.
Go to Custom Fields.
Select “Opportunity” from the dropdown.
Drag and drop fields to reorder them according to your preferences.
Document Builder
New Date Field Element
What’s New?
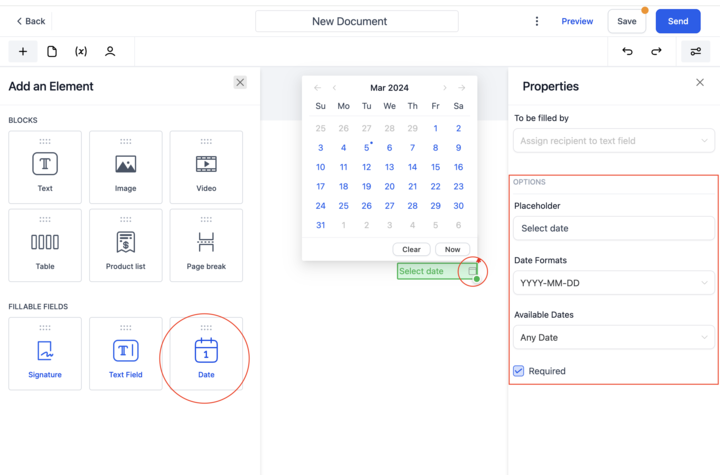
Fillable Date Field Element
Introducing a new Date Field element in the document and document template builder.
Users can now easily drag and drop a fillable date field element into uploaded PDFs or documents, streamlining the process of adding date-related information.
UI Enhancements:
Added support for moving draggable elements via keyboard.
Users can utilize Shift+Arrow keys to easily move (signature/text/date) elements, improving precision in document arrangement.
Use Shift+Arrow keys for precision
Use Ctrl+Shift+Arrow keys for moving the elements faster.
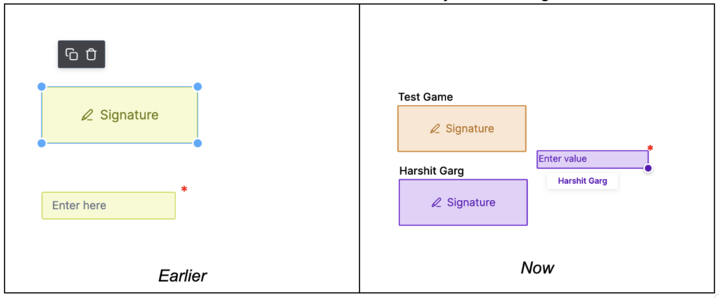
Added new tooltip over every assigned fillable elements (Date, Text)
Editors can now hover over fillable elements to view the assigned signer, making it easier to edit documents with multiple signers.
Signature Element is now resizable instead of scale .
How to Use?
Fillable Date Field Element
Drag the “Fillable Date Field” element from the toolbar(left drawer) and drop it onto the desired location in your document.
Click on the field to fill the date, customise the date format and other properties (right drawer).
Custom Values in Fillable Text Field
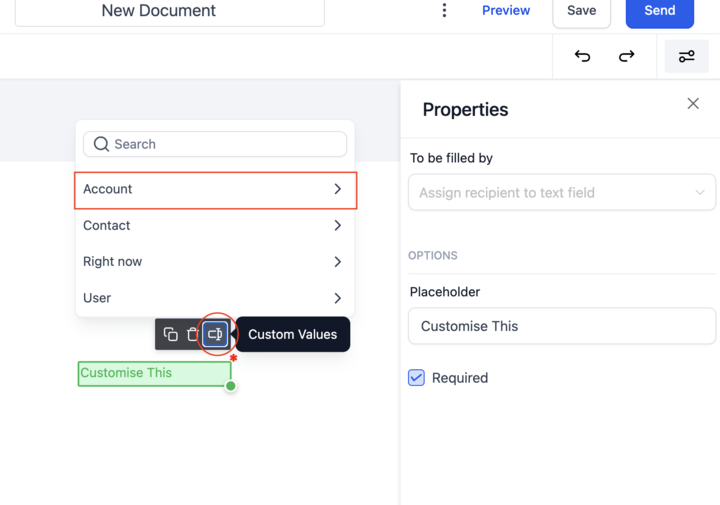
Text Field is now editable in the builder itself. We are now supporting custom values in the Text Field facilitating the dynamic customization of fields that need to be changed for each PDF sent.
Example: Custom name field on a Fixed PDF template which needed to have receiver’s name on it.
How to use it?
Drag the Fillable Text Field element from the toolbar and drop it onto the document.
Single click on the field and select Custom Value icon to input dynamic values.
New Features In Labs
New UI and Gamification in Communities
New UI
The look and feel of communities has changed. We’ve changed the default colors and improved the fonts to make it more readable.
We are introducing a Reading mode which will give more real estate while you are scrolling through the posts, which will make the transition from Discussion to Learning Tab seamless
Gamification
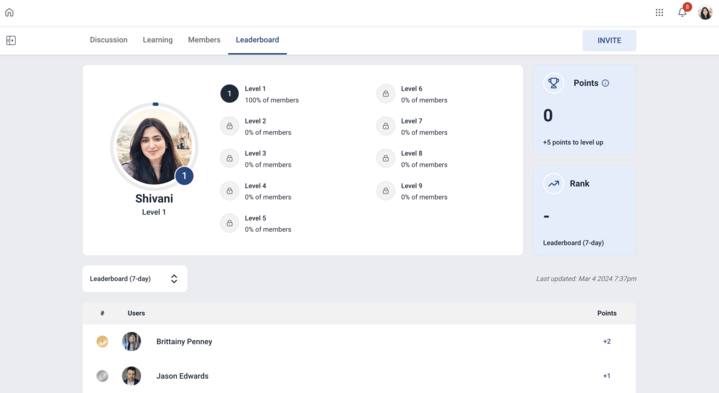
Introducing “Gamification” – Points, Levels and Leaderboards
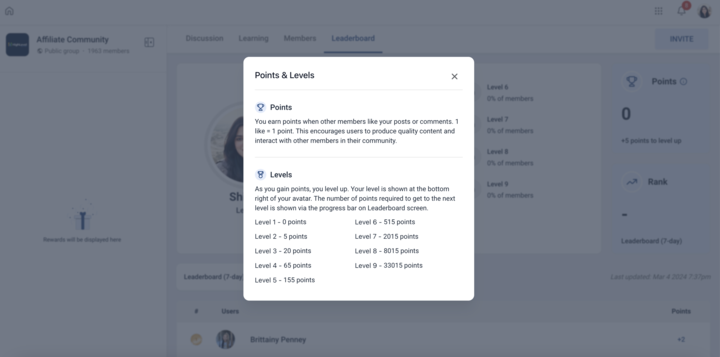
Points – You get 1-point when someone likes your post/comment
Levels – Your avatar and profile will display a blue badge with a number, indicating your level. Gain more points to move up to higher levels
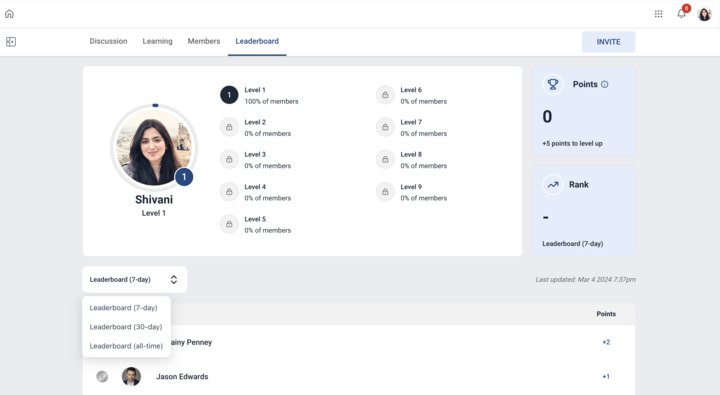
Leaderboards – You can find members who earned the highest points in the past 7 days, 30 days, and overall
Rewards – Group admins/owners can choose to add offline rewards as texts. Example- Get a chance to win $2000