It is time for all the latest updates in FG Funnels from the week of March 20th through March 27th, 2024. If you have questions about any of these updates, or FG Funnels in general, please reach out to [email protected] or live chat in the app and our team will be happy to help.
Documents & Contracts
Use of Branded Domain Name
We’re excited to introduce the utilization of account-level branded domains for enhanced flexibility and branding in Documents and Contracts. This update offers a personalized touch to the user experience across various interactions within the platform.
Enhancements Implemented:
Links for Documents and Contracts: When sending Docs & Contracts links to users, the link will now reflect the configured account-level branded domain name, ensuring a consistent and customized experience.
Preview Link Generation: When previewing a link from the application, the link will seamlessly adopt the sub account-level branded domain name if configured.
It’s important to note that these changes are contingent upon the configuration of the account-level branded domain name. In the absence of configuration, the system will use our agency domain.
Workflows
Add to Campaigns/Workflows bulk action
Under the Contacts tab, we have an Add to Campaigns/Workflows bulk action which allows contacts to be added to Campaigns/Workflows. Upon clicking that bulk action a modal opens with a dropdown which has both the active workflows and campaigns of a location fetched as a single list.
Now, this bulk action is changed to Add to Automations, and in the modal we have split the drop-down into 2 separate drop-downs.
Dropdown 1 – Automation Type, Options – Campaigns or Workflows
Dropdown 2 – If user selects Campaigns in dropdown 1 then all the Campaigns List or if user selects Workflows in dropdown 1 – Workflow List Paginated (Infinite Scroll, Search supported)
Note – For all new locations Campaigns are deprecated so they will not see dropdown 1 and will only see workflow dropdown.
E-commerce
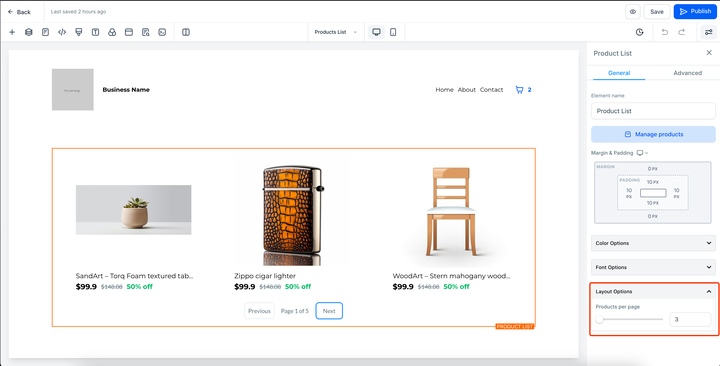
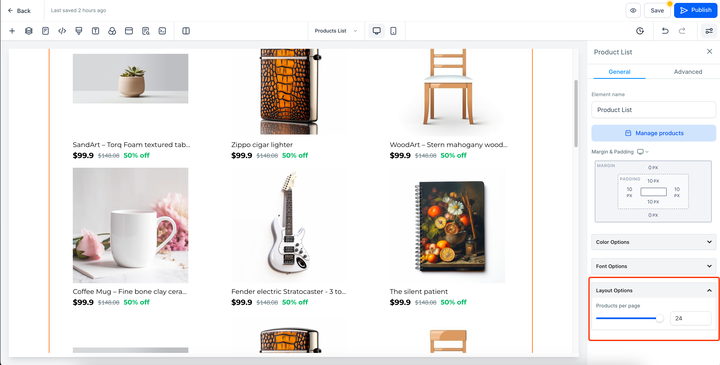
Custom layout for product list page in e-commerce stores
E-commerce store owners can now customize the number of products shown per page in the product list page. (Previously restricted to 6 products). The minimum and maximum limit for number of products that can be shown per page are restricted to 3 and 24 respectively.
This setting can be found upon selecting the product list element under “Layout options.”
Payments
Product Search capability for Invoice & Payment Link
Invoice & Payment Link users can now search for products when configuring invoice/payment-link. We’ve also added the ability to search through their entire product lists.
Chat Widget
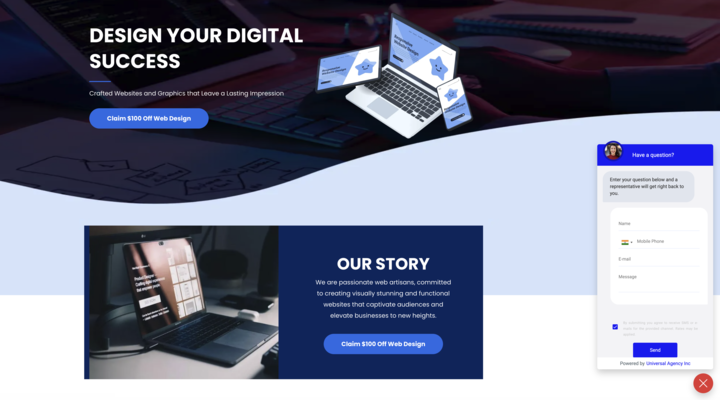
Consent Checkbox for A2P Compliance and Live Chat Welcome Message
We’re thrilled to unveil enhancements in our latest update, enriching your experience with Chat Widget – the Consent Checkbox. This new addition allows you to include a consent checkbox in your chat widget settings, which will be displayed on the chat window form when your contacts provide their phone numbers/email during filling chat widget form.
Why it matters:
Compliance: The Consent Checkbox is crucial for compliance, especially regarding A2P 10 DLC regulations. It helps you avoid compliance issues with telecom providers.
Enabling the Consent Checkbox:
When Selecting a default the chat type – SMS/Email and Live Chat option
In the Widget Window, it will allow users to add the legal message to take consent. You’ll now find an option called “show consent checkbox.“
By default, this option is enabled for your convenience. However, if needed, you can disable it.
Recommendation: We strongly recommend keeping it enabled to ensure you capture vital information such as consent and the IP address of the contact who agrees by checking the checkbox during the appointment booking process.
Additional Improvement
For Live Chat, we are providing enable/disable – show live chat message which will allow a live chat welcome message.
LeadConnector Mobile App
View Invoice and Download Receipt
Users can now view the associated invoice for every POS transaction. For successful POS transactions, there will be an option to download receipts from inside the transaction card under the Transaction section / Contact card transactions section.
What’s New?
Attach Invoice: Invoices are automatically attached to a POS transaction – no manual intervention needed.
Download digital receipts: Users will have an option to download a digital receipt for a successful POS transaction, This receipt can then be shared with the customer via their preferred channel.
Prerequisite:
To attach Receipts to a transaction, head over to the HighLevel web app, navigate to the payments section, and click on settings. Make sure that the toggle “Enable automatic sales receipts for payments” is turned on.
How It Works:
Open the mobile app
Perform a successful transaction using POS. Make sure to link a contact to this transaction.
Once the transaction has gone through successfully, head over to the transactions section from the bottom bar inside the POS module. Alternatively, head over to the contact card of your customer and open the transaction tab.
Click on the transaction that you just performed. At the bottom of the page, you will see two options – View Item Breakdown and Download Receipt.
Click on View Item Breakdown to view the attached invoice.
Click on Download receipt to download and share a PDF version of the receipt.
Whats Next:
Share receipt upon transaction completion: Users will have an option to share the receipt from the transaction success screen.
Capture customer details and share receipts directly: Users will have the ability to capture details for a new customer from the transaction success screen and share the receipt with them over email or text message (based on the details captured).
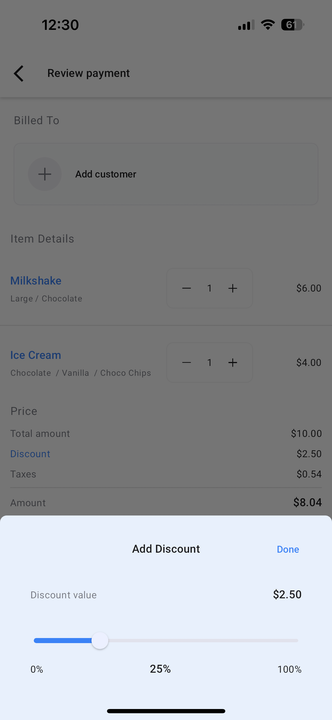
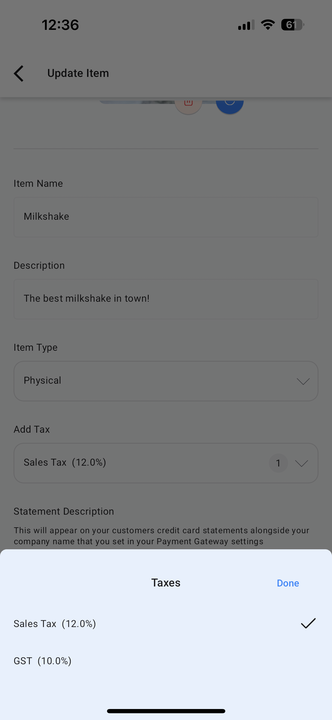
Taxes and Discounts on POS
Create taxes and attach them to Products using the Product builder feature on Mobile. Any tax linked to a product will automatically be applied on checkout if the product is added to the cart using the Product Catalog. Additionally, admins/users can also choose to add a percentage discount to the final amount on the checkout screen.
What’s New:
Add Tax: Users can link taxes to created products. Linked taxes will automatically be applied to the checkout automatically – no manual intervention needed.
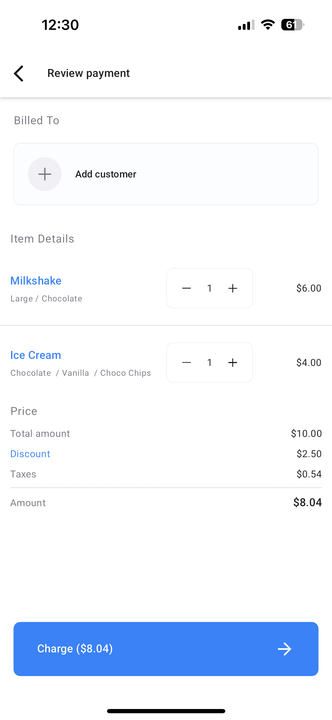
Add Discount: Users will have an option to add a discount to the final transaction amount for their customers.
Prerequisite:
To attach taxes to a product, head over to the HighLevel web app, navigate to the payments section, and click on settings. You can then create taxes. Taxes created by you will be available inside the Product builder feature inside the mobile app.
How It Works:
Open the mobile app
Using the hamburger menu from the top left of the screen, head over to the “Products” section. Make sure that you have already created taxes on the HighLevel web app.
Create / edit a product. On the first step, you will see a dropdown to link taxes, Click on it to reveal all the taxes created by you and link the ones that you want to for that particular product.
Save the changes made to the product.
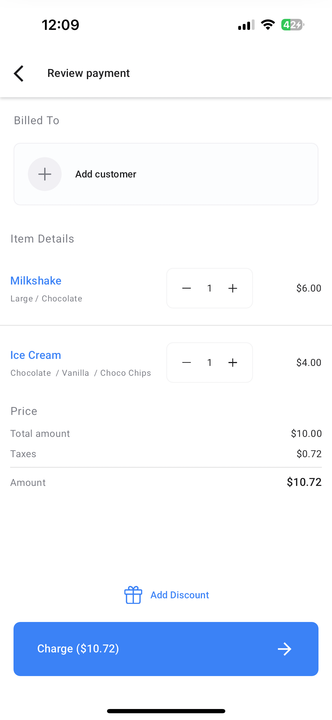
Every time you add this product to the checkout page, associated taxes will automatically be applied,
At the bottom of the checkout page, a dedicated discount button will be present. Clicking on that will open the discount slider.
Adjust the slider to the percentage you would like to apply
Whats Next:
Location based taxes: Choose from a list of taxes based on your location. No need to create tax on your own
Coupon codes for discount: Create coupons, distribute them to your customers. These coupon codes will be applicable to avail a discount on checkout.
Updates & Fixes
Enhanced Designs
Enhanced designs for email, SMS, and WhatsApp snippet listings.
Snippet listings will now include previews upfront for easy scanning.
All snippet listings will now feature a search function for effortless finding of the correct snippets.
Fixes:
Issues related to the sorting of tasks have been addressed.
All tasks will now display the correct due date.
The issue where users were unable to hold inbound calls in some cases has been fixed.
Issues causing inbound calls to be disconnected automatically on some Android devices have been fixed.
Funnel Builder
Custom Field and Value Picker
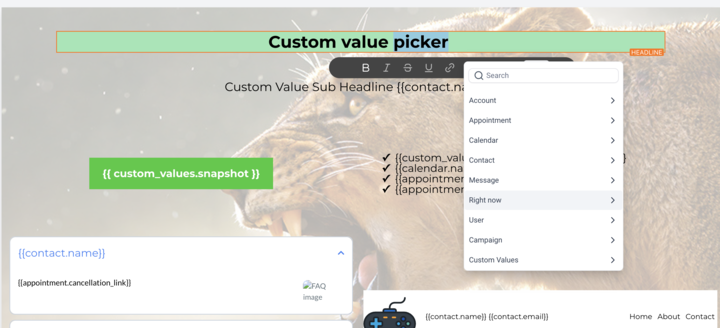
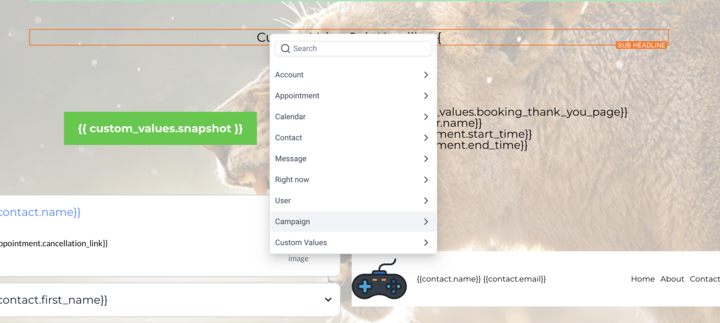
We’re excited to introduce a powerful enhancement to our Funnel Page Builder: the Custom Field and Value Picker. This new addition is designed to simplify and accelerate the page-building experience for our valued users.
Enhancements Implemented:
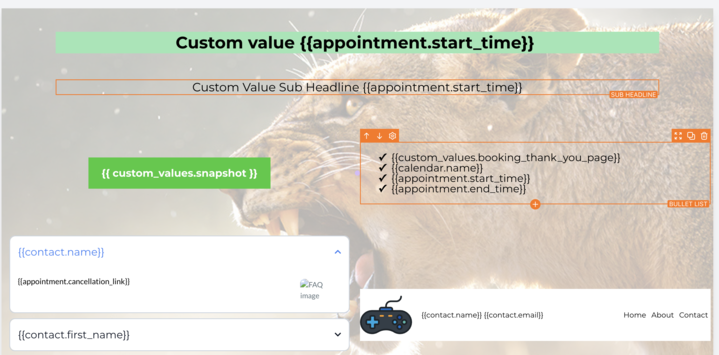
Custom Data Option Picker: We’ve integrated a Custom data option picker directly into the toolbar of our funnel page builder. Now, accessing and selecting custom fields and values is easier than ever. It can also be accessed simply by typing “{” within the text editor, and watch as the Custom Data Option Picker instantly appears, offering a comprehensive selection of data options at your fingertips.
Simplified Page Building Experience: With the Custom Field and Value Picker, we’re simplifying the way users create pages within our Funnel Builder. By automating the process of selecting and inserting custom data options, we’ve eliminated unnecessary steps and significantly reduced the time.
Increased Efficiency: The custom data option picker empowers users to quickly select a custom field/value, resulting in smoother workflows and enhanced productivity.
Domain Migration to CloudFlare
We have migrated our custom hostnames for domains to CloudFlare.
Key features & benefits:
Added security features
Funnels & Websites are now 15% faster than before with flash funnels
Easy prevention of DDoS attacks
Better caching for pages
Easy generation of SSL certificates and auto renewal from CloudFlare
How to switch to CloudFlare?
New domains: automatically added with domain connect flow
Old domains:
Navigate to settings -> Domains
Select the domain which is already connected to flash funnels/level0 -> remove
Reconnect same domain with domain connect flow
Cookie Consent Banner
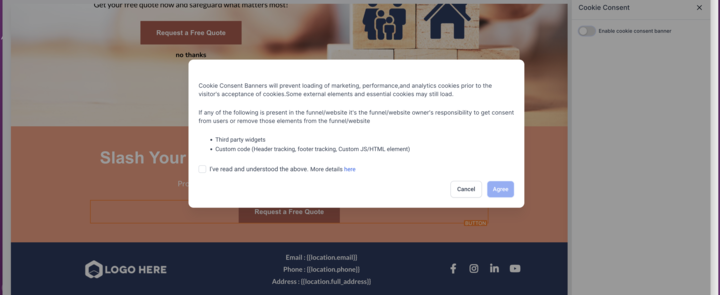
Effortlessly implement cookie consent across your entire website for a streamlined user experience and remain GDPR compliant. Choose from options to ask users to accept cookies and just show users that you use cookies.
How to use it?
Navigate to funnel/website builder interface
Click the cookie icon within the action header bar
Toggle the switch from cookie consent sidebar on the right
Accept the T&C and Click on Agree
Personalize the look and feel of cookie consent banner to match funnel/website’s branding
Finalize your changes by saving or publishing the updated settings
Form & Survey Builder
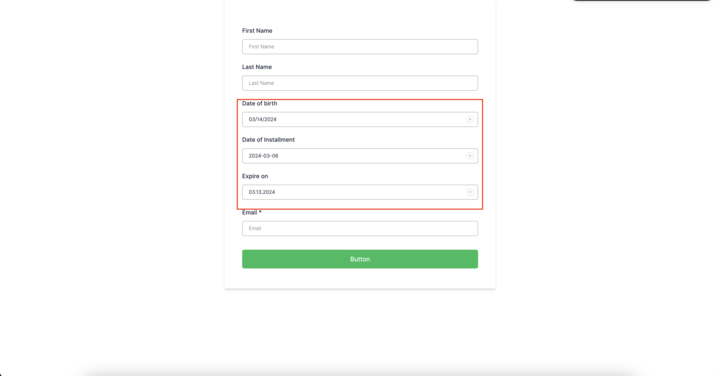
New Date Formats and Improved Date Picker
Our new date format offers improved clarity, flexibility, and usability, catering to a diverse range of preferences and international standards.
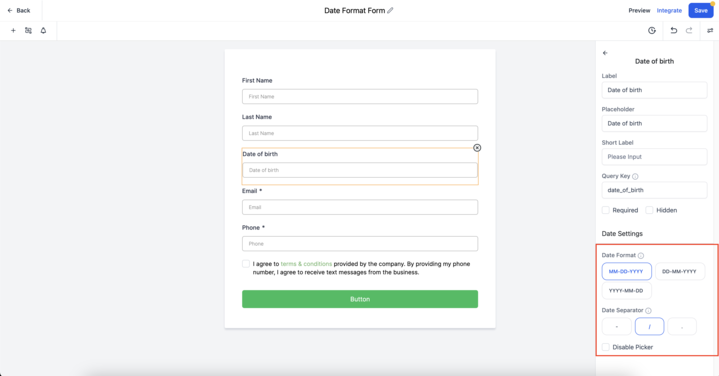
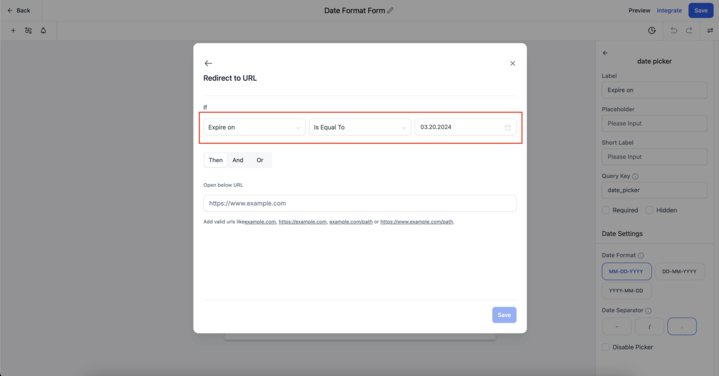
This update ensures clear representation of dates, minimizing ambiguity and confusion. With support for multiple date formats, choose the format that works best for you and your audience (DD/MM/YYYY, MM/DD/YYYY, YYYY-MM-DD, MM.DD.YYYY etc.). Built-in smart validation helps users enter the correct date format, improving your data quality and preventing submission errors with real-time feedback.
Improved date picker displays a visible month selector, and an easy way to disable the picker so the customer can write out the date.
How to Get Started:
Add a date field to your form or survey.
Click the field to open settings.
On the right side, choose your preferred format and separator.
Effect on old Forms:
Old form won’t be affected by this update
Old form will still work with default format YYYY-MM-DD
Customer can edit the old form to opt for new formats
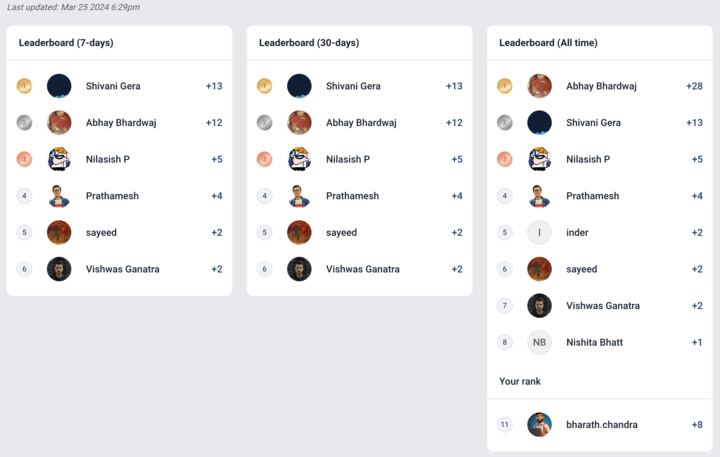
Communities
Support for Custom HTML, CSS and Js
Group admins can now add custom js, css and html code specific to each group. Admins can also preview custom css ,html and javascript before making it live for all users.
How to customize groups:
You can add custom code from Group Settings -> Branding -> Advanced
Enhancements:
We have now updated the Leaderboard web UI, making it more easy to use.
Reputation Management
Email Builder Integration
Key Features:
Seamless Integration: Access the Email Builder directly from your Reputation Settings.
Customize Your Emails: With the Email Builder, users can now design visually appealing and personalized emails for their review requests. Add your brand logo, customize colors, fonts, and layout to create eye-catching emails that reflect your brand identity.
Enhanced User Experience: Say goodbye to generic review request emails. With our Email Builder Integration, users can now craft engaging and compelling messages that resonate with their audience, increasing the likelihood of receiving positive reviews.
Effortless Setup: Setting up your email campaigns is quick and easy. Simply follow the intuitive interface of the Email Builder to design your email templates, and start sending out review requests in no time.
How to Access Email Builder in Reputation:
Go to ‘Reputation Settings’
Navigate to ‘Email Review Requests’ section
Click on ‘Open Email Builder’ to customize your emails
LC Email
SMTP Credentials For LC Dedicated Domains
Users can now generate unique SMTP credentials specifically for their dedicated sending domain. This ensures secure and authenticated access for sending emails via SMTP servers.
Setting up SMTP credentials for dedicated sending domains is straightforward and user-friendly. Our intuitive interface guides you through the process, making integration with warm-up services hassle-free.
Here’s how to access this Feature:
Navigate to Settings -> Email Service -> SMTP Service -> Dedicated Domain and IP -> SMTP Settings under the dedicated domain.
Email Builder
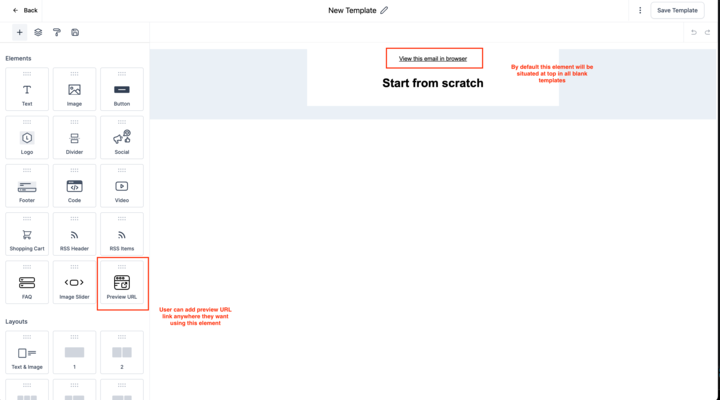
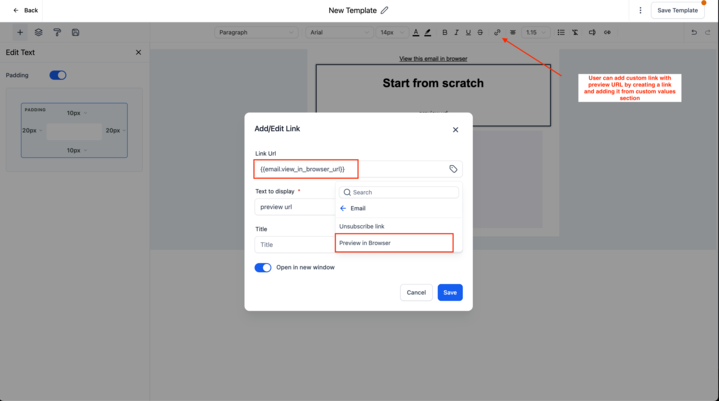
Preview in Browser
With this update, users now have the ability to include a preview link in their email campaigns, ensuring consistent rendering across various email clients.
Emails may appear differently across various email clients, leading to inconsistent user experiences and potential loss of campaign effectiveness. Users can now easily include a “Preview in Browser” link to accurately represent the email design, to their new and existing campaigns.
How to Add:
All blank email templates will now include the “Preview in Browser” link at the top by default. To manually add this feature to existing campaigns/ templates:
Navigate to email marketing and open any campaign/template.
Add the element – Preview URL.
Customize the text styling/formatting by editing or using the add link option
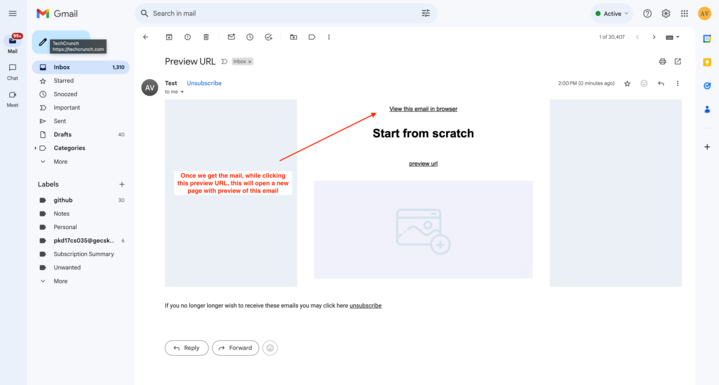
How to test it?
You can preview the email and click on the preview link to view the browser version of the document
You can also send a test email and click on the view in the browser link.
Dashboards
Expanding Dashboard Permissions
Tailor your dashboard experience by setting permissions according to your preferences. Whether you prefer privacy or collaborative sharing, our platform allows you to customize permissions seamlessly.
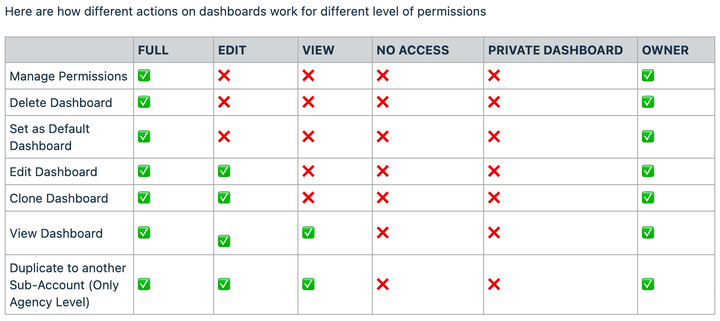
Now, not only can you set permissions for different roles, including Admins and Users, but you also have more control over who can view, edit, and manage them. Choose from four distinct levels of permissions:
FULL: Grants the ability to create, edit, share, and delete dashboards.
EDIT: Allows editing of a dashboard and its widgets, without the ability to delete it.
VIEW: Provides read-only access to a dashboard.
NO ACCESS: Restricts access to the dashboard entirely.
Setting Up Permissions:
Customize permissions while creating a new dashboard.
Toggle the Private Dashboard if required.
Managing Permissions for existing Dashboards:
Click on the three dots at the top right corner of the dashboard.
Select “Manage Permissions” to update permissions.
Updating Permissions:
Toggle the Private Dashboard if required.
Choose the desired permission level for each user or role.
Saving Changes:
Click “Save” to apply the updated permissions.
Note:
Permissions are automatically adjusted based on the role hierarchy. Lower-level roles cannot possess higher access levels compared to higher-level roles.
Default Dashboards
Introducing Default Dashboards! Set the stage for success with Default Dashboards, empowering you to curate and share vital insights seamlessly across your team. Now, you can ensure that everyone starts their day with the most critical information at their fingertips, without any hassle.
What’s New?
User-Controlled Default Dashboards: Take charge of your team’s dashboard experience by setting up default dashboards tailored to your specific needs.
Instant Visibility: The default dashboard becomes the first thing your team members see when they navigate to the dashboard section, ensuring instant access to essential insights and metrics.
How It Works:
Navigate to the desired dashboard you wish to set as the default.
Click on the three-dot menu located in the top right corner.
Select “Set as Default” to instantly establish this dashboard as the go-to for your entire team.
Note:
Permissions Required: Admin roles with FULL access to a Dashboard are eligible to set it as a default dashboard.
Viewing Permissions: All roles must have at least VIEW permission for a dashboard to set it as default.
Non-Deletable Default Dashboards: Once set as default, a dashboard cannot be deleted until another default dashboard is assigned.
Distinguishing Default and Pinned Dashboards: Default dashboards serve as the primary landing page for all users, while pinned dashboards are personal favorites that individual users can access quickly.