Welcome to your weekly roundup of FG Funnels updates through the week of March 26th, 2026.
This week’s release focuses on improving day-to-day usability, better workflow control, stronger A2P compliance support, and more powerful tools across Blogs, Opportunities, and Site Analytics. We’ve also introduced several new features designed to help you scale faster with less manual work.
If you have any questions about these updates, email us at [email protected] or reach out through live chat inside the app—we’re always happy to help.
Calendars
Enhanced Appointment Booking Experience in Opportunities
Booking and updating appointments inside Opportunities just got a major upgrade. You’ll now see the same full-featured scheduling experience used across Meetings, Services, and Rentals—right inside the opportunity.
This means:
- A consistent booking and editing experience across the platform
- Pre-filled appointment details when editing existing bookings
- The ability to view, edit, or delete appointments directly from the opportunity
This reduces friction and keeps everything tied neatly to the opportunity.
How It Works:
- Navigate to Opportunities > Open an opportunity
- Clicking Book/Update Appointment will now show the new appointment modal.
- If no appointment exists, users can create a new one.
- If an appointment already exists:
- Users can view, edit, or delete it
- Editing opens with pre-filled data for faster updates


Ask the Booker Location(Services V2)
You can now let customers enter their own service address during booking.
This is perfect for:
- Mobile services
- On-site consultations
- Home services
The address is stored with the appointment and used across notifications.
How to Use:
- Go to Calendar Settings → Services (v2) → Locations
- Create a new location or edit an existing one
- Enable Let bookers enter their own service address
- Configure the location name and other details
- Assign the location in Staff Availability as needed
- During booking, customers selecting this location will be asked to enter their service address before continuing.


LC Phone
Improved A2P Campaign Setup & Feedback
We’ve continued improving the Chat Widget-first A2P campaign flow to reduce rejections and improve submission quality.
What’s new:
- AI now detects multiple SMS opt-in methods on your website and prompts you to remove them
- Updated use-case selection order to reduce incorrect submissions
- Improved rejection feedback with clear explanations and required fixes
These updates make it easier to submit compliant campaigns and get approved faster.

Calls Go to Voicemail if No Forwarding Exists
Inbound calls will now route to voicemail if no forwarding setup is configured, instead of being rejected.
This ensures you don’t miss potential leads due to incomplete setup.
Conversations
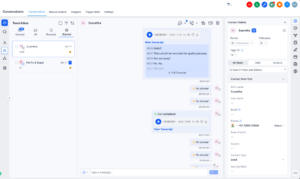
Conversations Usability Improvements
We’ve made several improvements to reduce friction during active conversations.
You can now:
- Update contact details while viewing call transcripts
- Send emails during calls without refreshing the page
- Access call functionality when starting a new conversation
We’ve also improved translations and handling of longer text for a more stable UI across languages.
Opportunities
Sort by Custom Fields
You can now sort Opportunities using custom fields like number, date, dropdowns, and more.
This helps teams prioritize deals based on business-specific data instead of default fields.
How to Use:
- Go to Opportunities
- Click on Sort
- Select any custom field from the dropdown
- Choose ascending or descending order
- View Opportunities reordered instantly


Smart Tags Limit Increased
The Smart Tags limit has been increased to 60, giving teams more flexibility when organizing and categorizing opportunities.
How to Use:
- Navigate to Opportunities
- Add or manage Smart Tags as usual
- You can now assign up to 60 Smart Tags per setup
Workflows
Advanced Builder: Set Default Path for Branches
You can now choose which branch acts as the default path in workflows with parallel branches.
This makes testing and cross-workflow entry much easier, without restructuring your workflow.
How to use it:
- Open a workflow with multiple parallel branches in Advanced Builder.
- Click the branch icon on the first action of the branch you want to use.
- Set that branch as the Default Path and run your test or enrollment.

Standard Builder: Keyboard Navigation & Shortcuts
You can now use keyboard shortcuts to build and manage workflows faster.
This includes shortcuts for:
- Copy, paste, and move nodes
- Navigation between steps
- Zoom and view controls
- Opening trigger/action panels
How to use:
- Open a workflow in the standard builder.
- Select a node when needed, then use the matching shortcut.
- Save your workflow and keep building without switching back to clicks.
List of keyboard shortcuts:
- Move Selected Node(s) — ⌘ + X / Ctrl + X
- Copy Selected Node(s) — ⌘ + C / Ctrl + C
- Paste Node(s) — ⌘ + V / Ctrl + V
- Copy All Actions From Selected Node Onward — ⌘ + Shift + C / Ctrl + Shift + C

Math Operations: Reuse Outputs
Math Operation results can now be reused directly in later steps without needing to store them in a custom field.
This simplifies calculations and reduces unnecessary steps in workflows.
How to use it:
- Add a Math Operation step and configure your calculation.
- Leave Update field empty to use the result as output only, or select a field to save it to the record too.
- In the next action, choose the Math Operation output from the custom value picker.


Media Storage Now Available in Workflows
You can now attach files directly from Media Storage inside workflows.
This eliminates the need to re-upload files or manually paste links, making asset reuse much easier.


Blogs
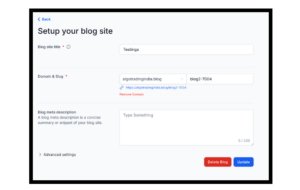
Domain Management, Custom Tags & Sitemap Improvements
We’ve made several improvements to Blogs to simplify setup and improve SEO.
What’s new:
- Create blog sites without connecting a domain
- Remove or switch domains directly in Blog Settings
- Use custom values in SEO fields like favicon and canonical URLs
- Sitemaps now update automatically when posts are created, updated, or deleted
These updates make blog management more flexible and reduce manual maintenance.
How to Use:
Navigate to Sites → Blogs
Create a blog site with or without connecting a domain
- Manage domain connections directly from Blog Settings
- Add custom values in favicon or canonical fields
- Continue creating, updating, or deleting posts, your sitemap will now update automatically
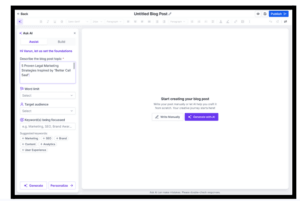
Blog Post AI for Faster Content Creation
We’ve introduced Blog Post AI, a powerful new assistant built directly into the Blog Editor.
You can now:
- Generate full blog posts from a topic or prompt
- Create outlines, SEO metadata, and images automatically
- Edit and refine content directly inside the editor
- Translate content into multiple languages
- Use web search and reference URLs for more accurate output
This makes content creation faster, easier, and fully integrated.
Reputation
Review Requests: Search and Filter
You can now search and filter review requests by:
- Contact name, email, or phone number
- Channel (Email, WhatsApp, Phone)
- Status (Sent, Opened, Failed, etc.)
This makes it much faster to find and manage review requests, especially at scale.


Contacts
Opportunities Tab in Contact Panel
Opportunities now have a dedicated tab inside the contact’s right panel.
This provides:
- Faster access to related deals
- Better visibility into pipeline activity
- A cleaner, more focused contact view

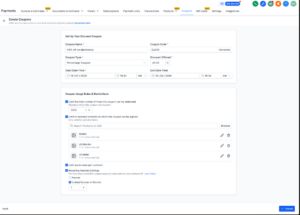
Coupons
Product Price & Variant Level Coupons
Coupons can now be applied to:
- Entire products
- Specific prices or variants
This allows for more targeted promotions and more precise automation triggers.
How this works:
- You must first select the Product
- Then, the system dynamically enables: Relevant Prices or Variants under that product
- These are dependent filters, meaning: Price/Variant filters are only available after product selection
- This allows workflows such as:
- Triggering actions only when a specific variant is purchased with a coupon
- Targeting automation based on pricing tier-level discounts


Forms & Surveys
New Image Layout Options
You now have more control over how images appear in Forms and Surveys, including:
- New layout options (Left/Right Center, Fixed, Background)
- Image spacing and corner radius controls
- Focal point selection for better image display
- Slide-level customization for surveys
How to Access These Changes:
Forms
- Go to Sites > Open Forms
- Create or edit a form
- In the builder, open the Styles tab from the right panel
- Under Layout, turn on Show Image
- Upload or select your image
- Choose an option under Image Layout
- Based on the selected layout:
- Use Image Corner Radius and Image-Field Spacing for Left Center and Right Center
- Use Focal Point for Left Fixed and Right Fixed
Surveys
- Go to Sites > Surveys
- Create or edit a survey
- To add an image, use the same image layout settings available in forms
- To apply a different image or layout to a specific slide, open that slide’s Settings
- Under Image Layout Settings, choose Independent


Companies
Associations Between Companies, Opportunities & Custom Objects
You can now create flexible relationships between:
- Companies and Opportunities
- Companies and Custom Objects
This helps you model real-world relationships and see everything in one place.
How to Use:
1. Create an Association
- Go to Settings → Objects → [Object] → Associations
- Click Create Association
- Select Companies, Custom Object or Opportunities
- Define label(s) and relationship type
- (Optional) Set limits → Save
2. Link Records
- From Opportunities: Use Associated Objects → + Associate to link Companies
- From Companies: Use Associations / Related Objects to link Opportunities or Custom Objects
- From Custom Objects: Add linked Companies
3. View Associations
- In Record Details: See all linked records in the side panel
- In Kanban View: Add association labels to cards
- In List View: Add association columns for filtering/export


Site Analytics
Advanced Filters
You can now apply advanced filters to analytics across Funnels, Websites, and Webinars.
This allows you to analyze performance by:
- Country
- Traffic source
- Page
- Channel
Giving you deeper insights without exporting data.
How to access:
- Go to Sites > Analytics.
- From there, choose whether you want to view Funnels, Websites, or Webinars, select the asset you want to analyze, then click Advanced filter to add one or more filters.

That wraps up this week’s FG Funnels updates 🎉