
Here are our release notes for FG Funnels from January 24th, 2024 through January 31st, 2024. If you have any questions about these updates, or other questions about FG Funnels, please reach out to [email protected] or live chat in the app and our team will be happy to help.
We’re thrilled to announce the release of the Show/Hide Field Conditional Logic in our Form Builder – a feature that has been eagerly awaited and highly requested by our community.
The Show/Hide Field conditional logic feature enables you to show or hide fields in your forms based on the conditions you set.This functionality brings a new level of interactivity and customization to your form-building process, making it more intuitive and user-friendly.
How It Works:
Important Notes:
With this new enhancement, you can now create more sophisticated and responsive forms, enhancing the way you gather information and interact with your users.
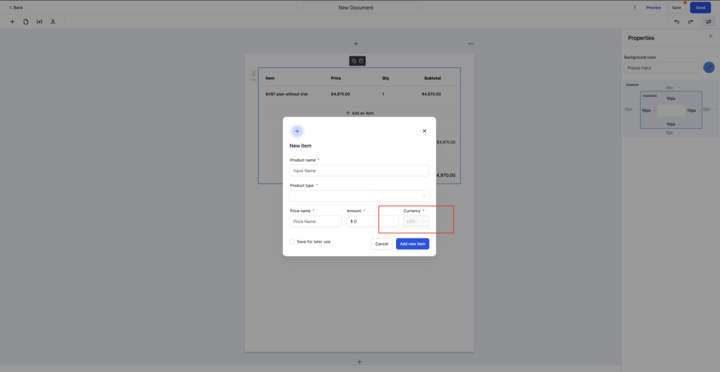
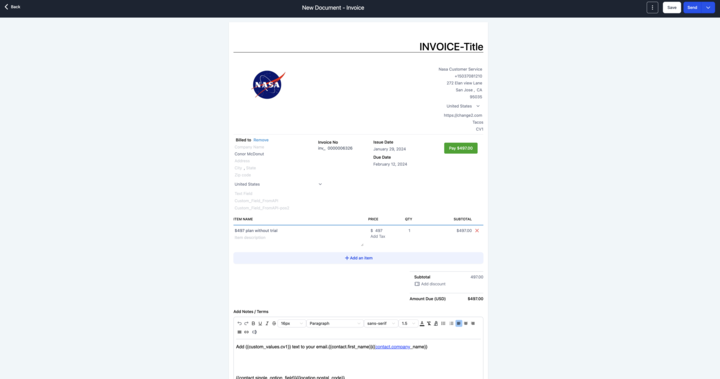
Users will now be able to send documents and contracts in their preferred choice of currency and accept payments using an invoice after document completion.
This means that the business country would no longer define the currency of the products added to the document’s products list. Businesses will be able to send contracts in any preferred currency irrespective of the account’s country settings.

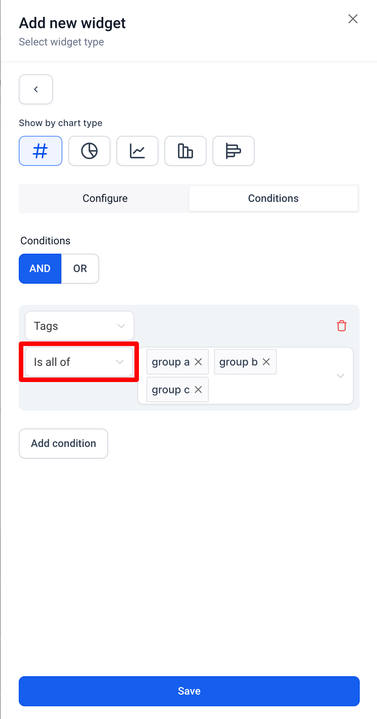
Introducing the powerful “IS ALL OF” operator in dashboard widgets to elevate your insights and reporting capabilities.
How It Works:
Imagine you want to filter contacts with tags A, B, and C (AND condition). Now, with the new “IS ALL OF” operator, simply choose the filter “Tags IS ALL OF A, B, C.” The widget will smartly display all contacts that possess all three tags, streamlining your data for precise insights.
By empowering you to select multiple parameters with the new operator, we’ve made it easier than ever to refine and tailor your data. Whether you’re tracking sales, analyzing user behavior, or monitoring specific criteria, the “IS ALL OF” operator ensures your dashboard delivers exactly what you need.
Important Notes:
Users with tags A, B, C, and D will still be displayed under the mentioned condition since they satisfy the criteria of having tags A, B, and C.
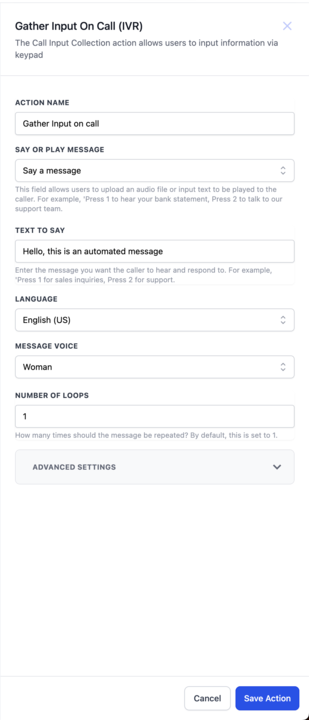
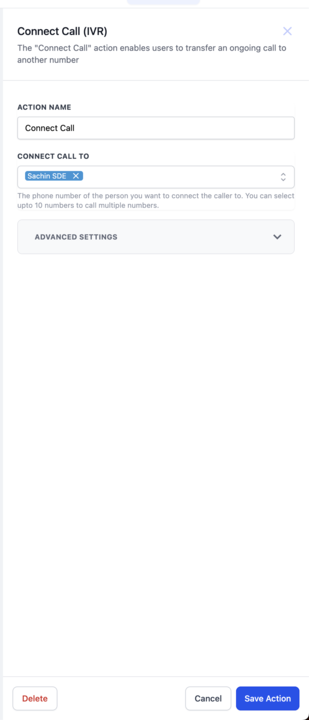
We have added an advanced settings option in IVR Connect call and IVR Gather action. This will make the UI simpler to use and the customer will need to change the advanced settings only if needed to overwrite the defaults.

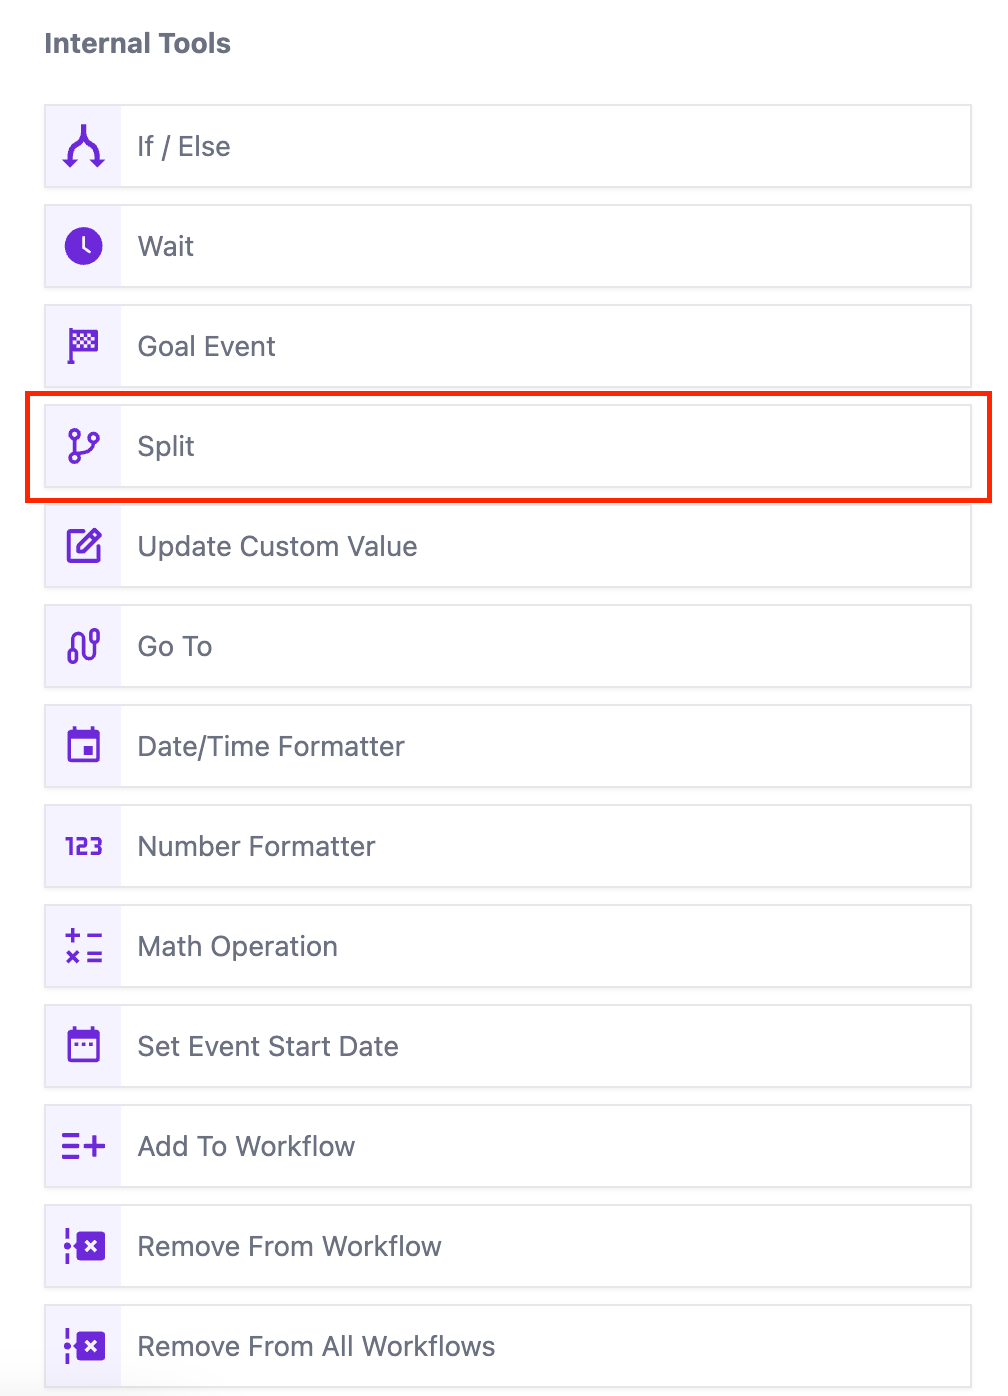
Now you can seamlessly replicate your workflows with marketplace actions and triggers, allowing for greater flexibility and efficiency.
Amplify your automation capabilities by duplicating internally created actions and triggers effortlessly.
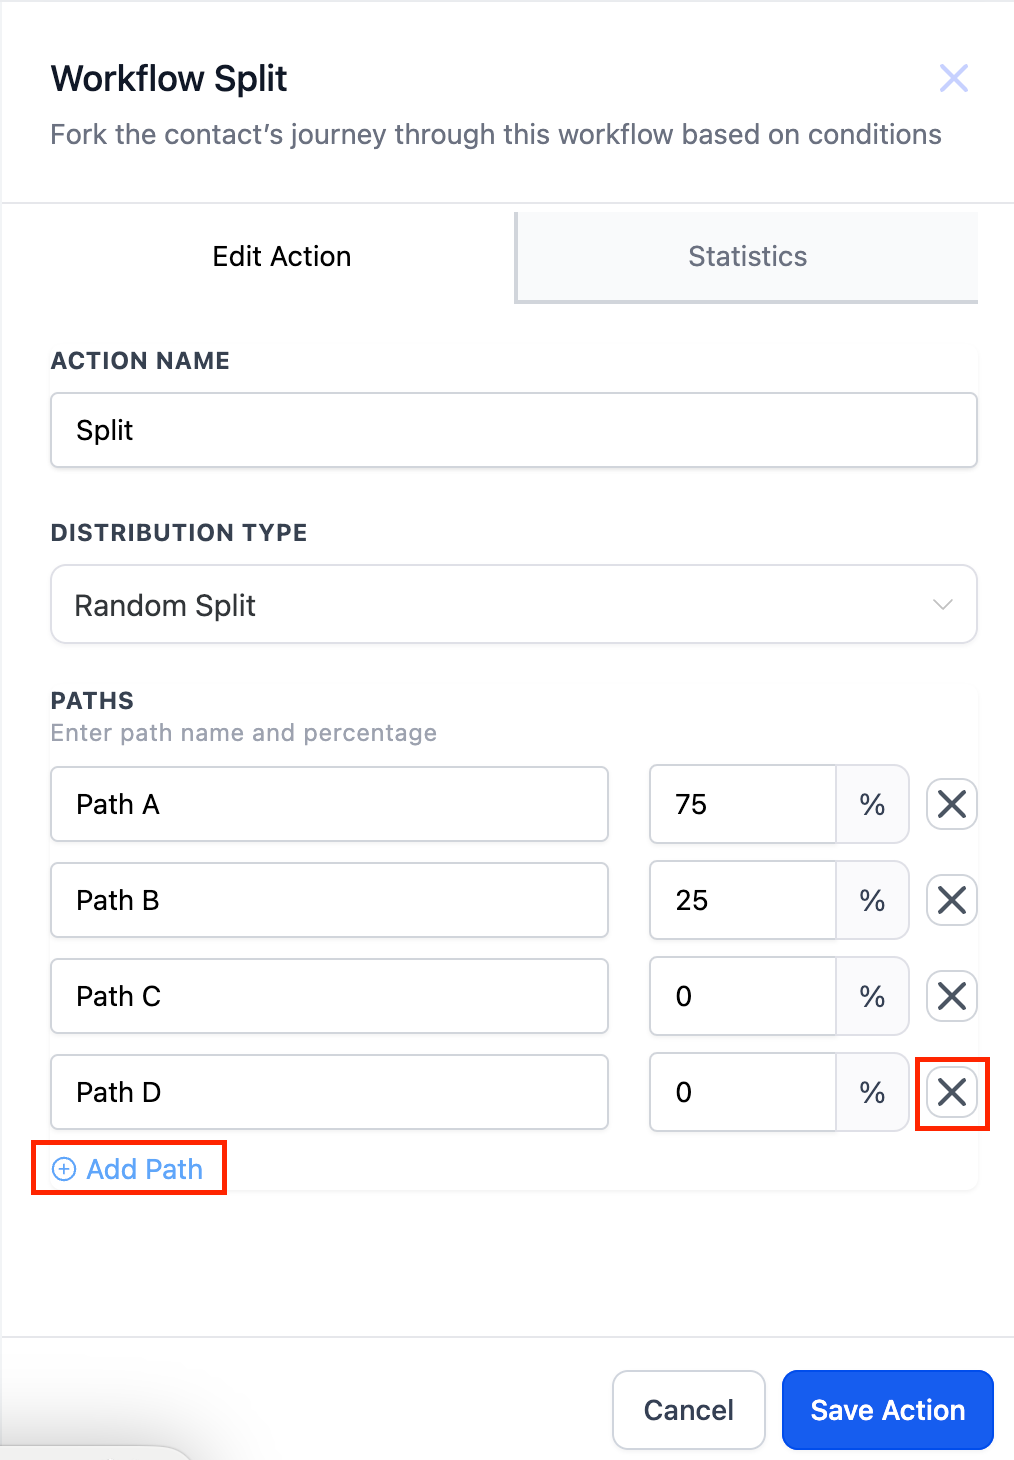
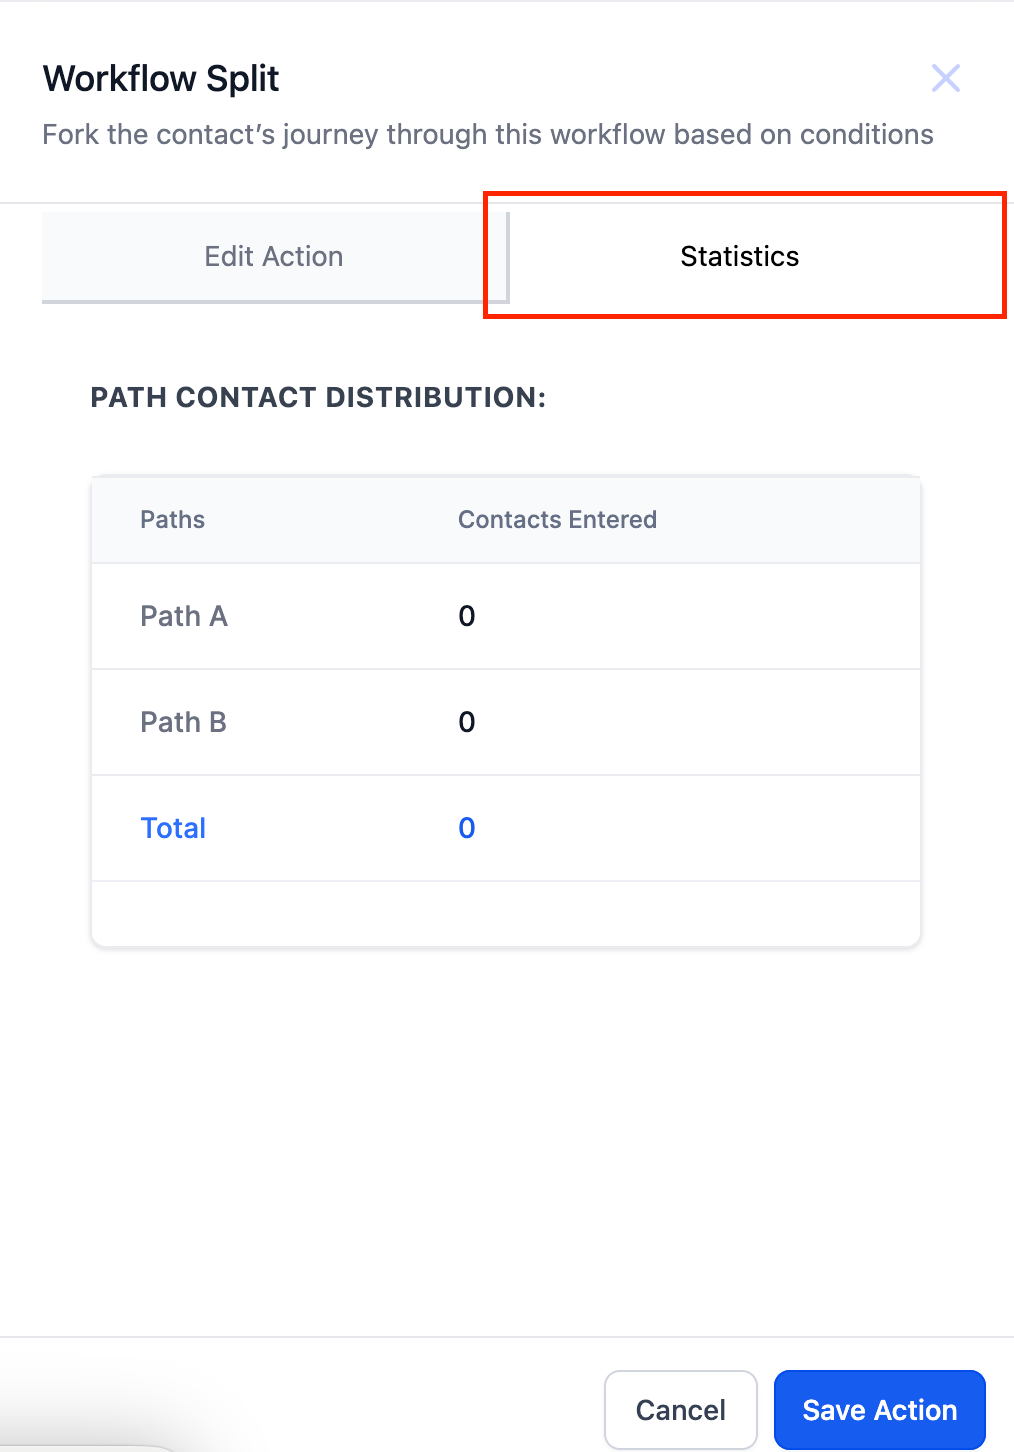
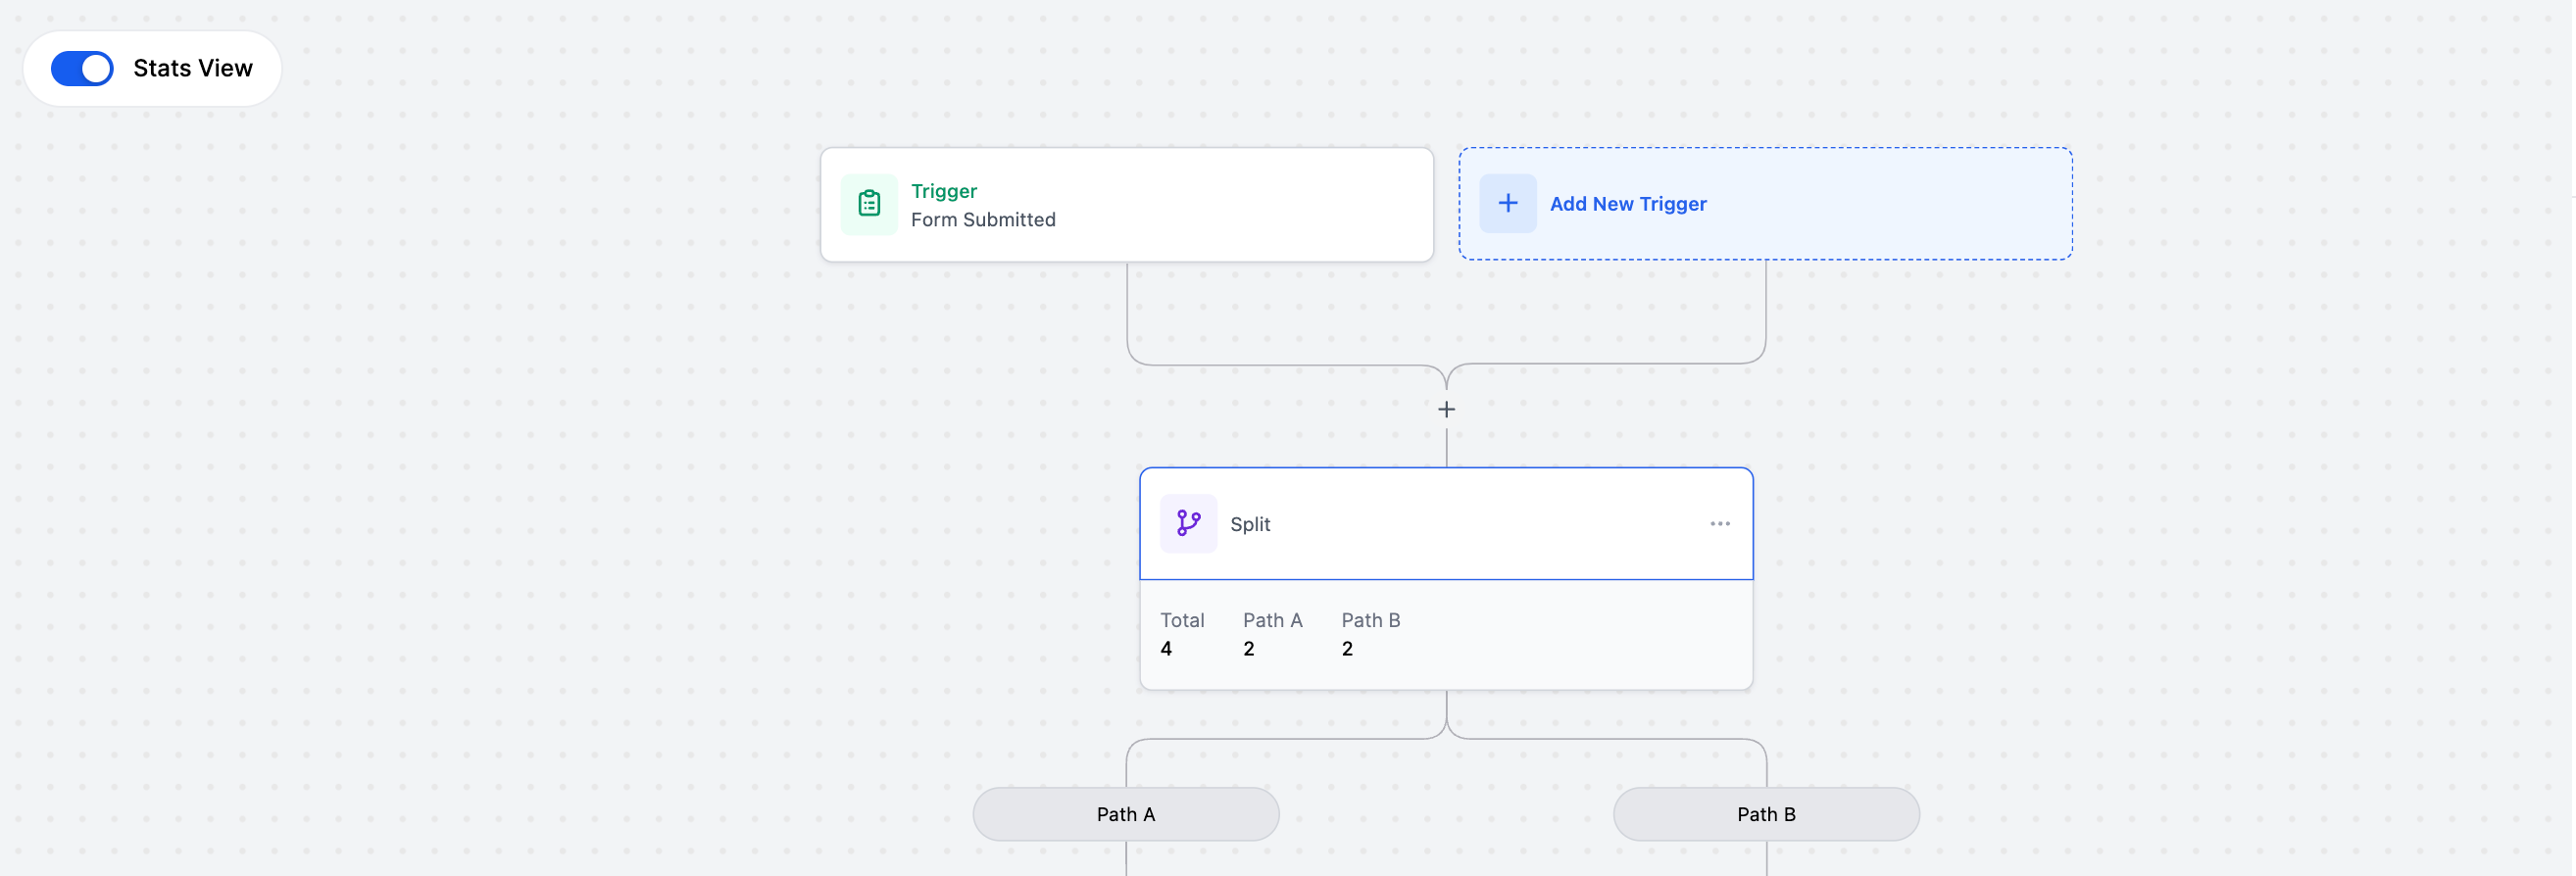
Welcome to the Split action—a powerful tool designed to empower your marketing and sales automation strategies. With Split, you can explore diverse routes in your workflows, analyze performance, and optimize your engagement strategies.
Divide your contacts into multiple paths based on a random percentage distribution, allowing you to test different variations of your workflow and identify the best performing one.
Features:
Getting Started:

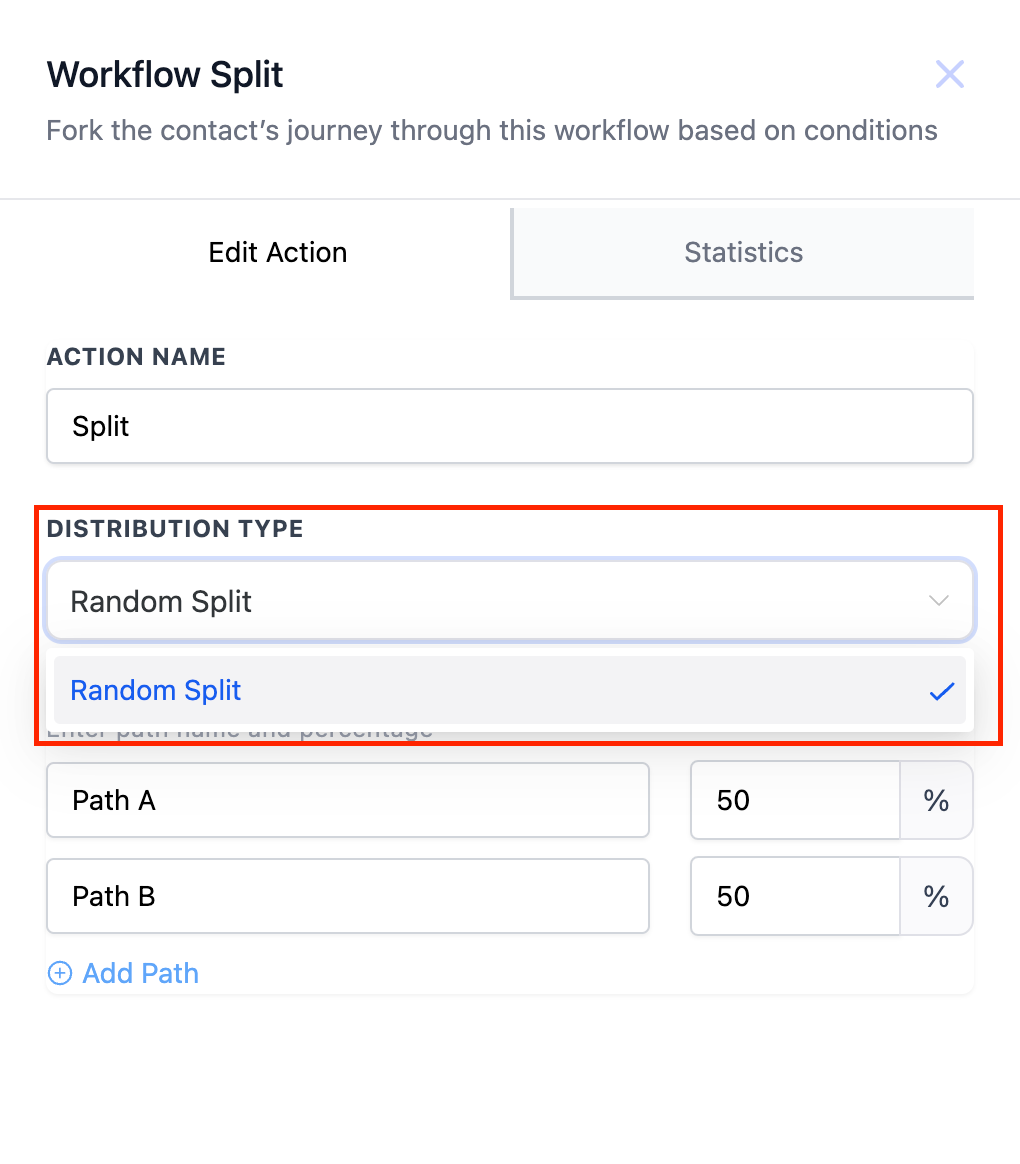
Example for Random Split
The distribution in random split is totally random just like rolling a dice is random.
Imagine you have 100 customers entering a workflow. You’ve set up a Random Split with two paths: Path A and Path B, each with a 50% chance of receiving a customer. This split is like flipping a coin: each path has an equal chance of being chosen for each customer.
Here’s how the distribution might look:
Customer 1: Flips heads, goes to Path A.
Customer 2: Flips tails, goes to Path A (again).
Customer 3: Flips heads, goes to Path B.
Customer 4: Flips tails, goes to Path B (again).
Customer 5: Flips tails, goes to Path B (again).
Customer 6: Flips tails, goes to Path A.
This pattern continues randomly, with each customer having a chance of going to either path, regardless of previous choices.
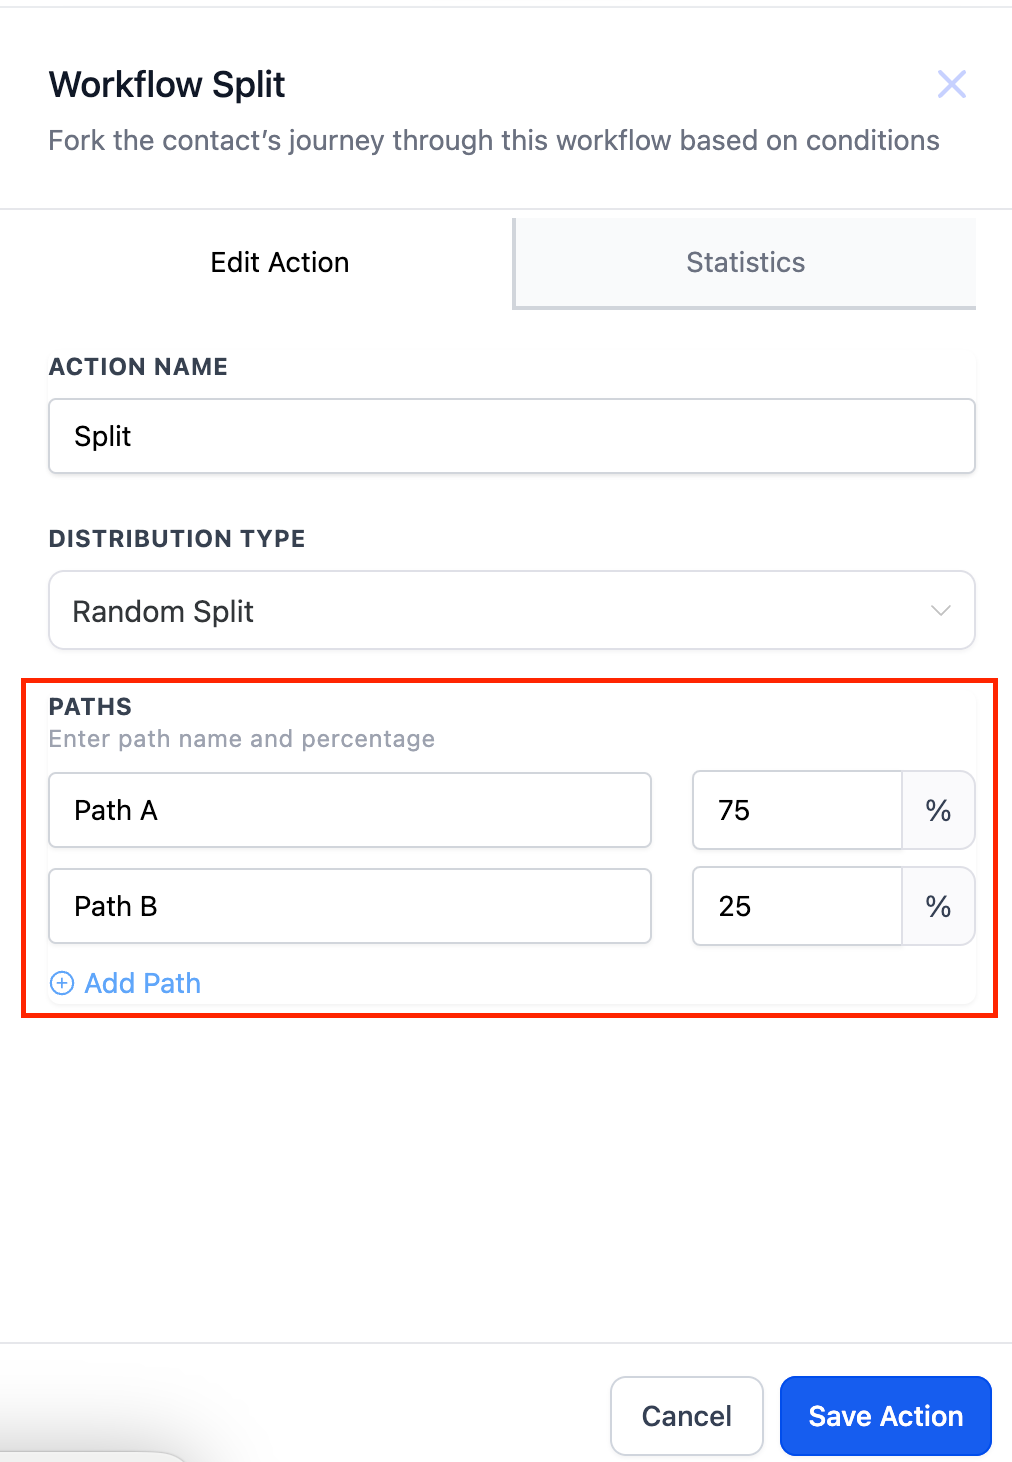
Scenario
You’re an e-commerce store owner selling new running shoes. You have two email subject lines in mind: “Fuel Your Run with the Ultimate Shoe” and “Unleash Your Speed: Our Game-Changing Shoes.”
Solution
Use the Random Split action to divide your mailing list randomly (e.g., 75/25). Send 75% of the list the “Fuel Your Run” email and the other 25% to the “Unleash Your Speed” email. Track website visits, purchase rates, and other key metrics for each path.
Outcome
After a set period, analyze the results and see which subject line led to higher engagement and sales. Now, you have data-driven proof of the best performing message, which you can confidently apply to future campaigns.
Points to be noted
Once a contact heads down one path, that is their only path. If they re-enter they will not proceed down the other path they will always head down the original path.
Conversations
Tasks
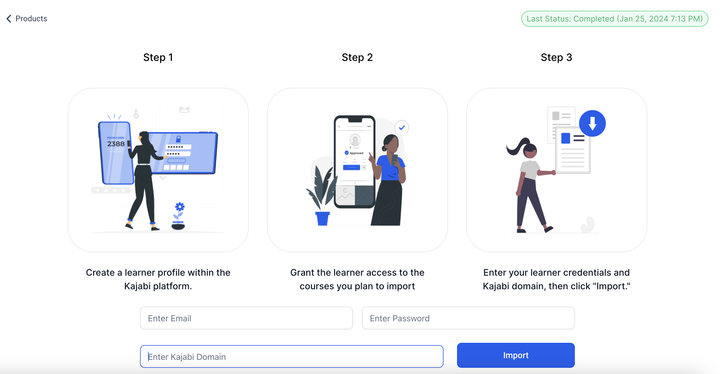
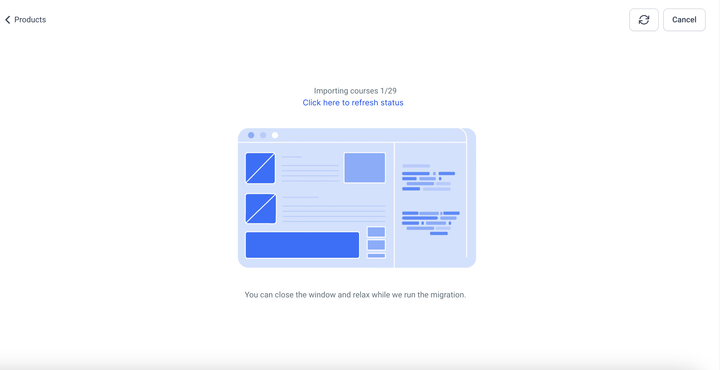
We are excited to introduce a powerful new feature that simplifies the migration process for your courses from competitive (Kajabi) platforms to FG Funnels. This enhancement aims to provide you with a seamless transition, ensuring a smooth and efficient experience.
Where to access Kajabi Migrator:
How to import a course
Step 1: Create a Learner profile
Step 2: Importing process
Step 3: Successful importation
Once the courses are successfully imported, they will appear under the Products section.
Last update will appear under the Import section, stating when the last process took place.
Note: The import will only bring in lessons that have been published, and will not include videos or sub-categories within the courses. Additionally, the assignments, quizzes, and assessments will not be included in the import process.

With this update, you can use Payment Links to sell online without a website. Create full payment pages in just a few clicks and share the link with your customers—no code required.
Payment Links allows your customers to securely save and reuse payment details for a faster checkout at hundreds of thousands of Link-enabled online businesses.
No matter what you’re selling, where you sell it or the audiences you cater to, Payment Links offer an agile tool for your business. If you don’t have a website – or don’t have one that supports e-commerce – but you’re interested in selling your goods, services or subscriptions to customers online, creating online payment links might be a good fit for you.
Easier payment experience for customers: Payment links can be sent via email and text message or shared on social media and configurable within seconds!
Key Features :
How can I use it ?
What’s New?
What Next?
Now you have the capability to receive notifications on both the web and mobile applications for any new WhatsApp messages. This enhancement ensures that you stay instantly informed about incoming messages, allowing for quicker responses and improved communication.
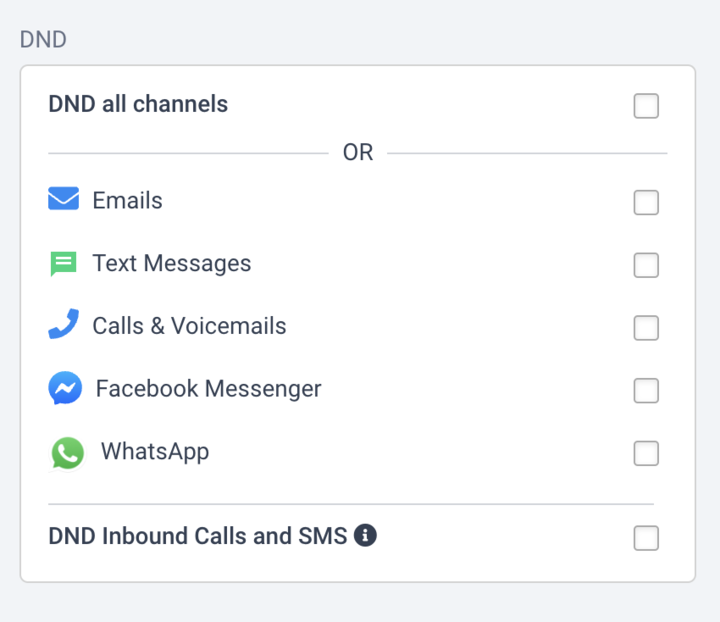
In this release, we are excited to introduce WhatsApp’s Do Not Disturb (DND) within our CRM. This feature allows you to enable DND on unsubscribed contacts or selectively disable external messages on specific phone numbers.
With the introduction of the Valid_WhatsApp field at a contact level, we offer an enhanced filtering mechanism for WhatsApp contacts. Additionally, a new column and filter named “Valid WhatsApp” has been added, making it easier for you to manage WhatsApp-related contacts. Here’s a quick reference:
How Fields Are Updated: Understanding how these fields are updated is crucial. The values are set based on various scenarios:
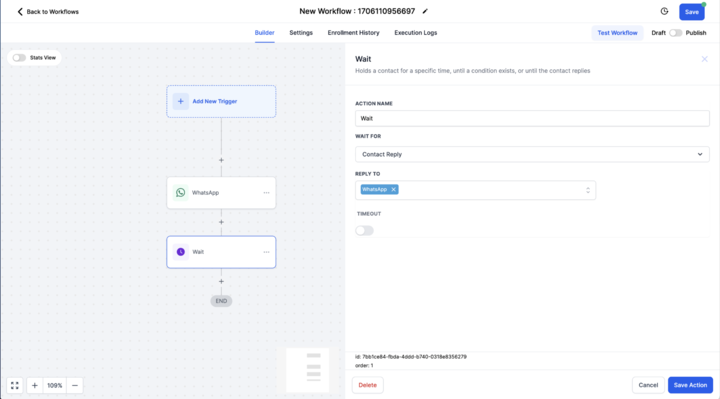
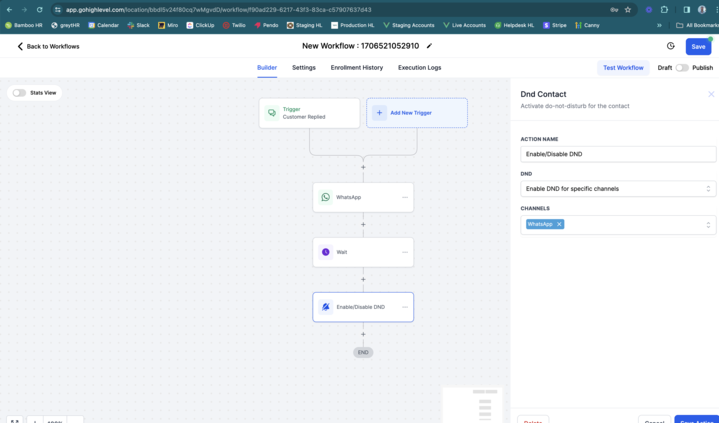
Expanding the functionality of workflows, two new actions related to WhatsApp have been introduced:
Adding Affiliates Made Seamless
Now, within the new affiliate creation flow, you can seamlessly assign new affiliates to existing Affiliate Campaigns. This capability was not available before, ensuring a more tailored and efficient experience.
Additional Info Page for Extra Details:
Introducing the Additional Info page, where you can provide extra information for your affiliates. Upload W-8 and W-9 forms if applicable, all in one place.
Customize Referral IDs:
A game-changing feature! Customize the unique referral IDs for your affiliate’s Referral Link, tailoring them to different campaigns. Your affiliate management just got a whole lot more flexible.
How these updates help you:
Efficiency Boost:
The new flow streamlines the affiliate addition process, making it quicker and more intuitive for you.
Campaign Precision:
Assigning affiliates to campaigns during creation ensures precision in your affiliate management strategy.
Centralized Information Hub:
The Additional Info page acts as a hub for extra details, including the ability to upload necessary forms, making affiliate management more organized.
Flexibility in Referral IDs:
Customize referral IDs for different campaigns, giving you unprecedented flexibility and control over your affiliate program.
How It Works:
What’s Next:
This is just the first step in completely revamping the Affiliate Manager. Exciting features like automated payments through paypal, improved Campaign creation flow, multi-tier commissions and much more are on the way. Stay tuned for an even more powerful and user-friendly experience!
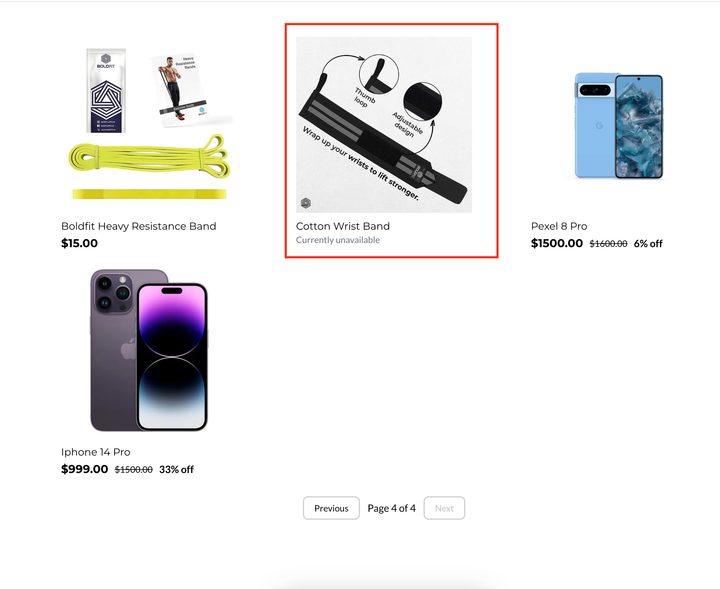
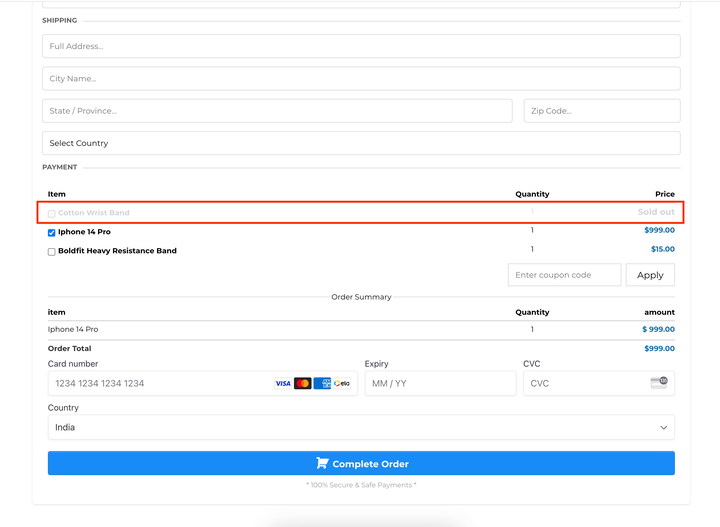
Users will now be able to limit the number of units sold for products on online stores as well as order forms. This is available under the products creation page while creating a new product as well as for any existing products
This solves a major pain point of limiting the inventory of a particular product sold on order forms or online stores. This is also helpful for businesses in the ticketing and event industries.
Businesses also have the option to continue selling when out of Stock, which means that even if the product inventory becomes 0, they can keep the sales on. However, another option also exists, to stop selling as soon as the last ticket to the event is sold, for example.
Users will be able to make any additions or deductions to the inventory count of the product or only a particular variant at any point in time. The adjustment history will be available for all products and variants on the same page.

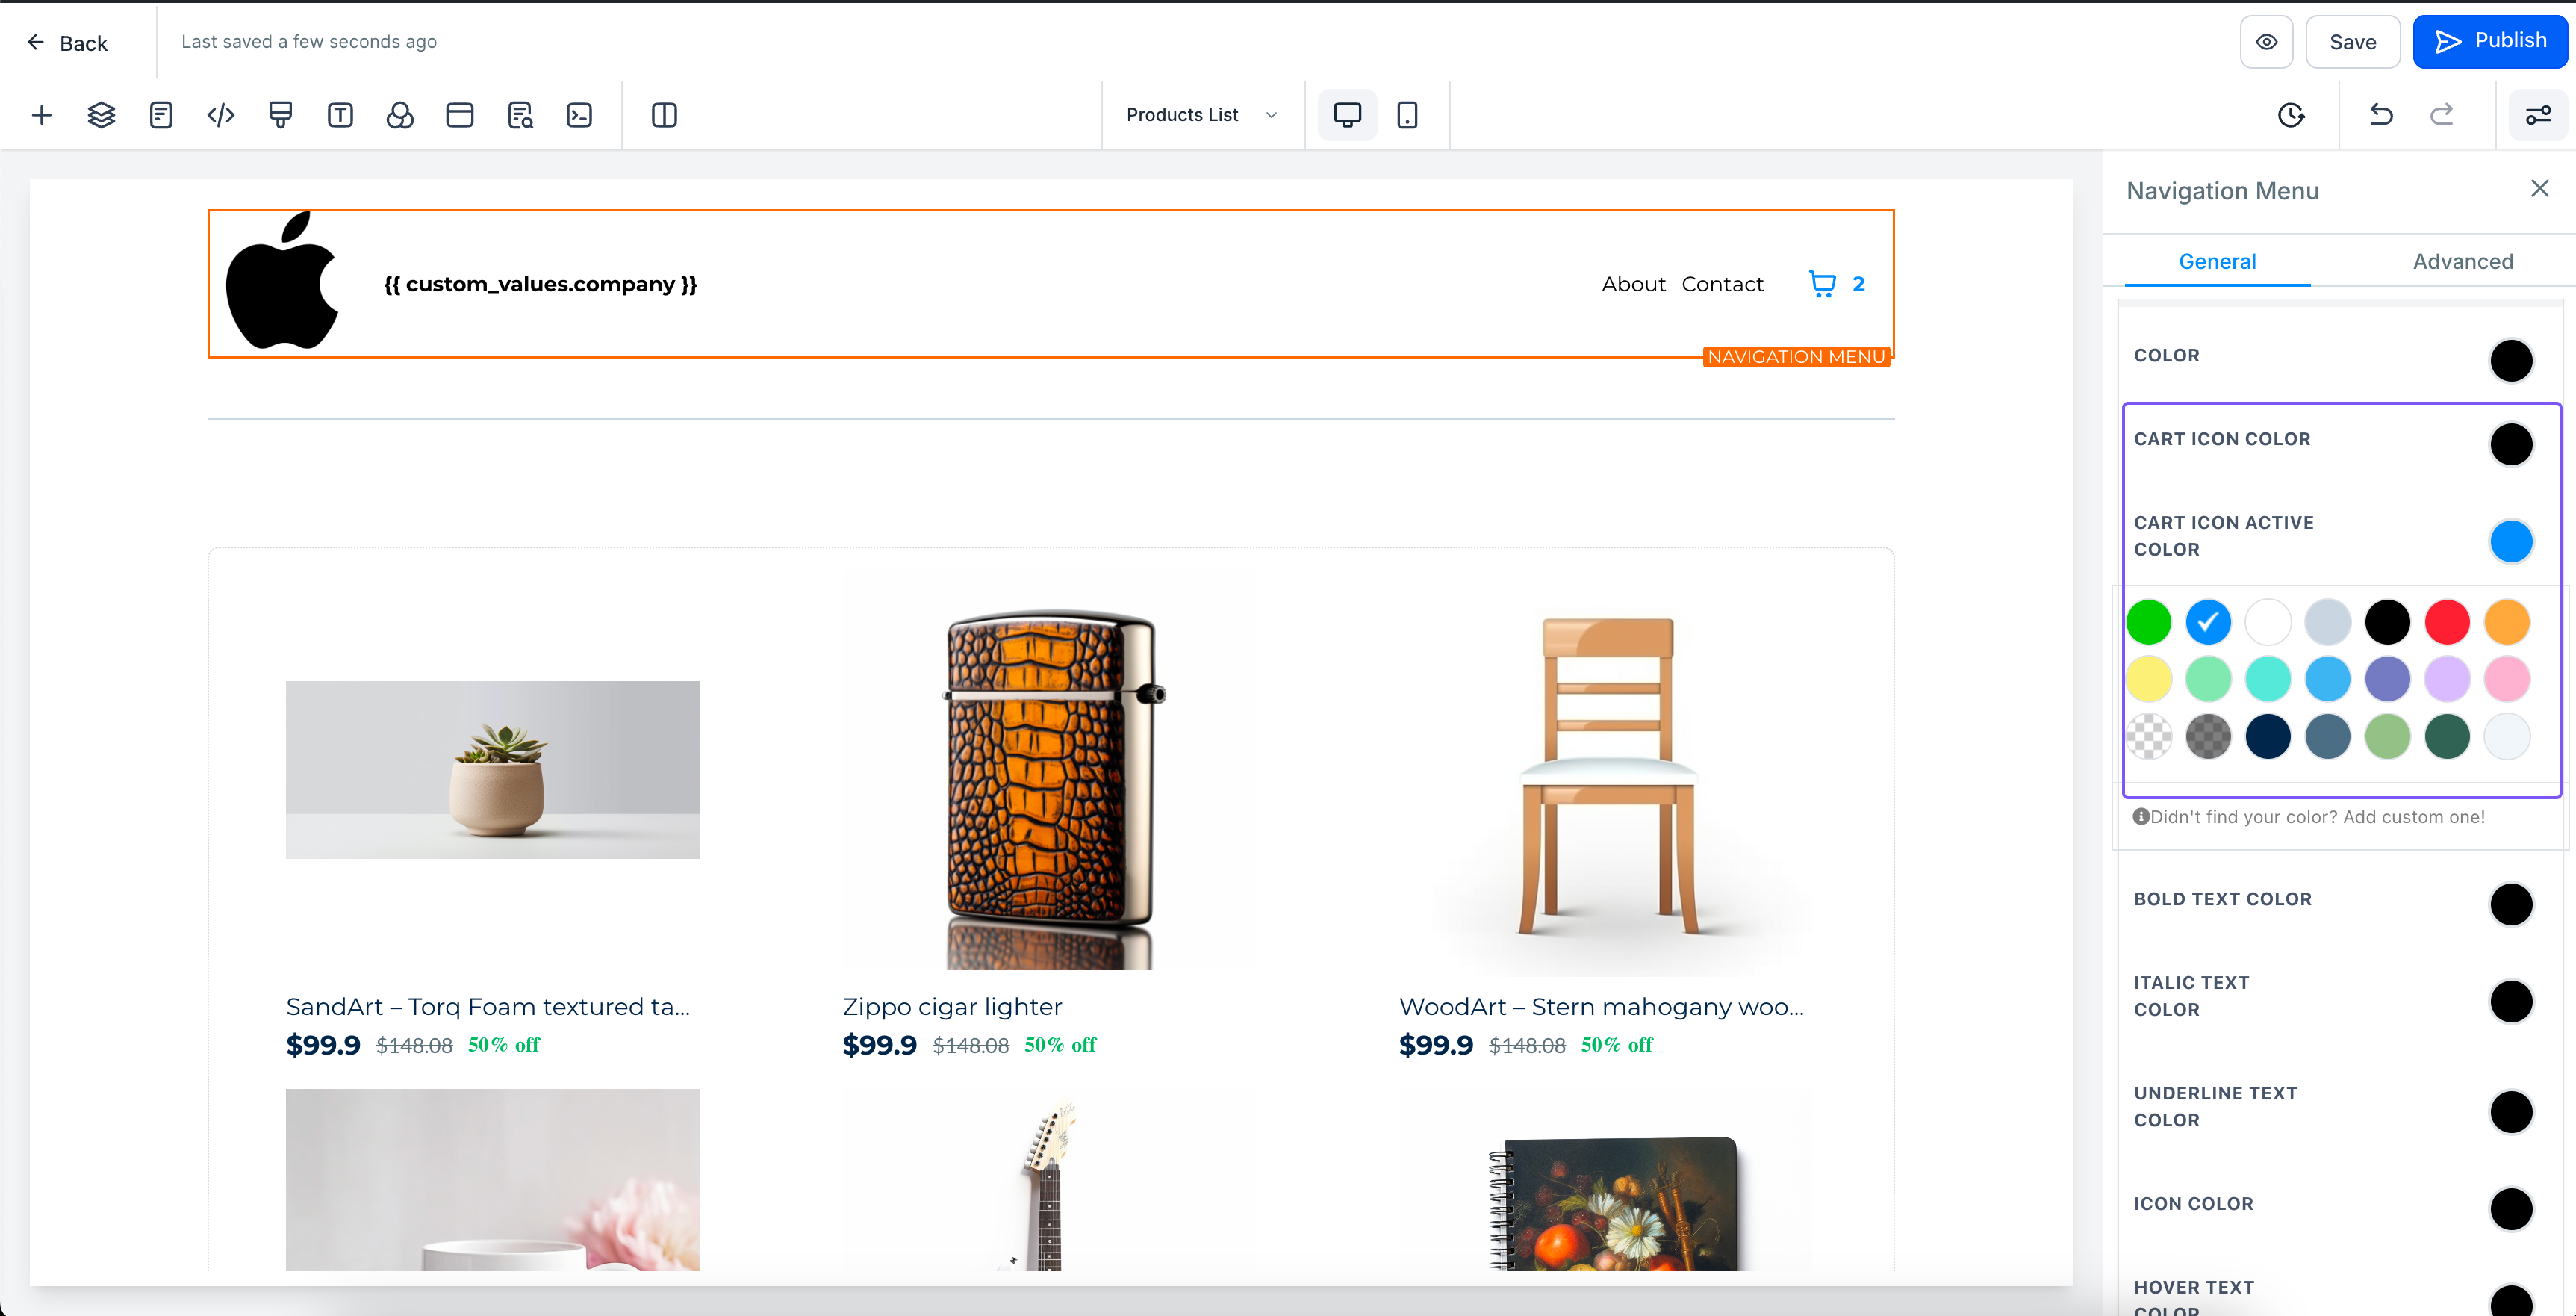
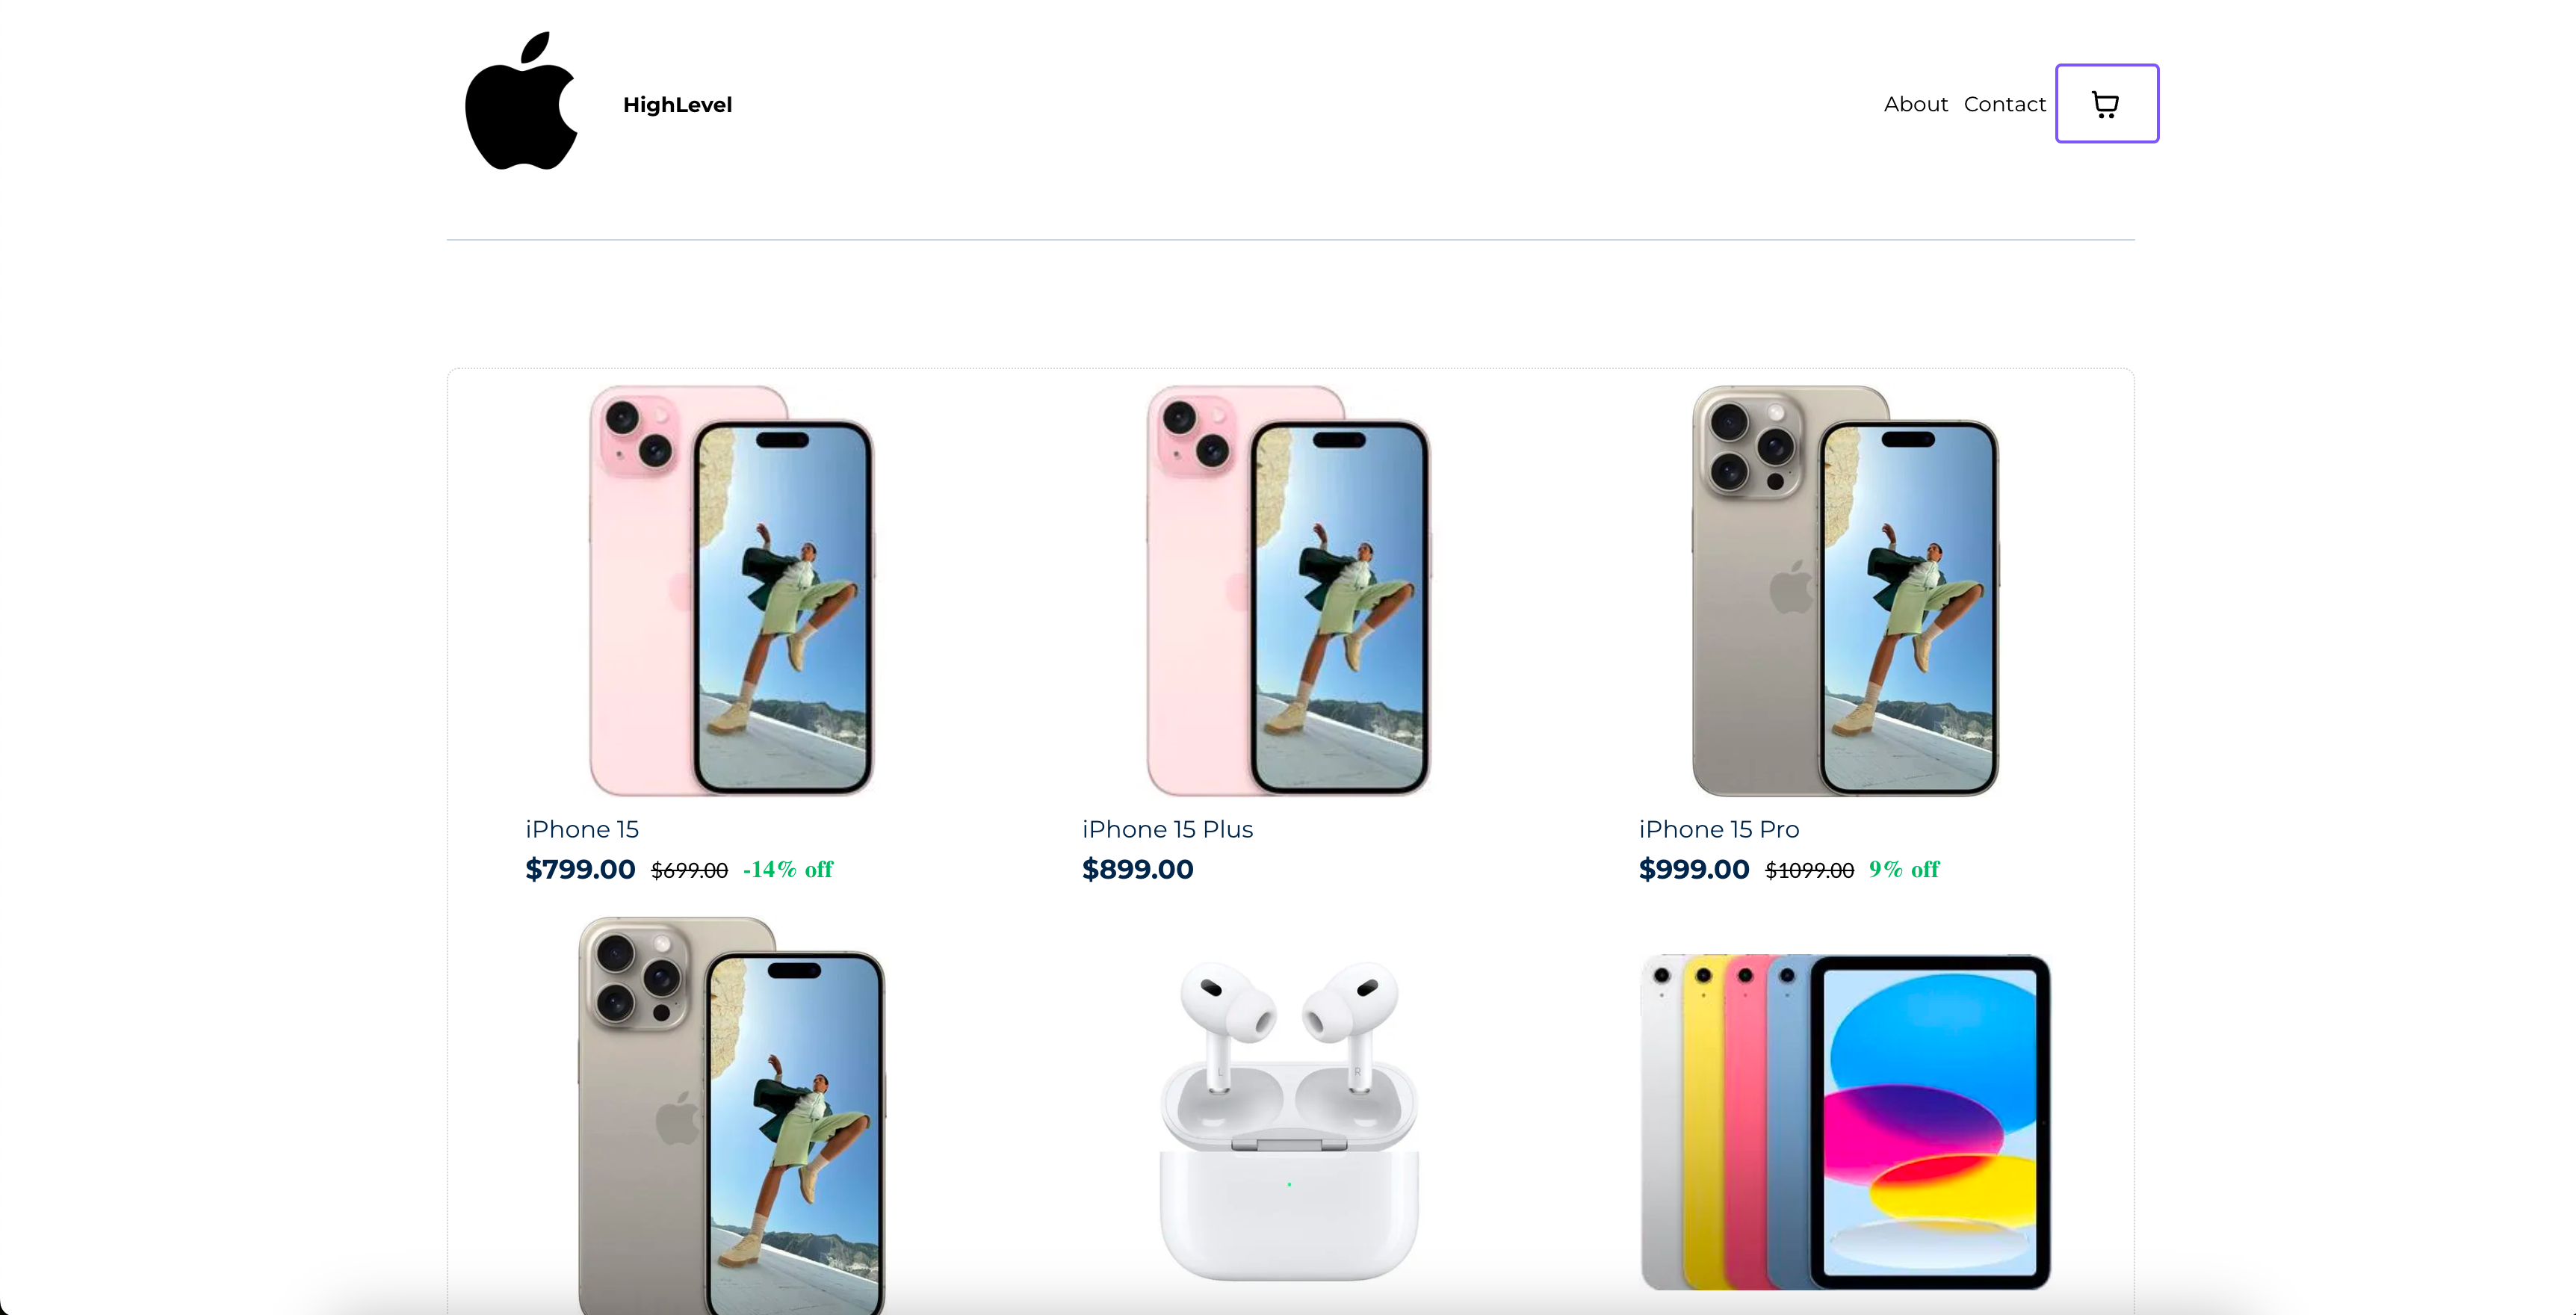
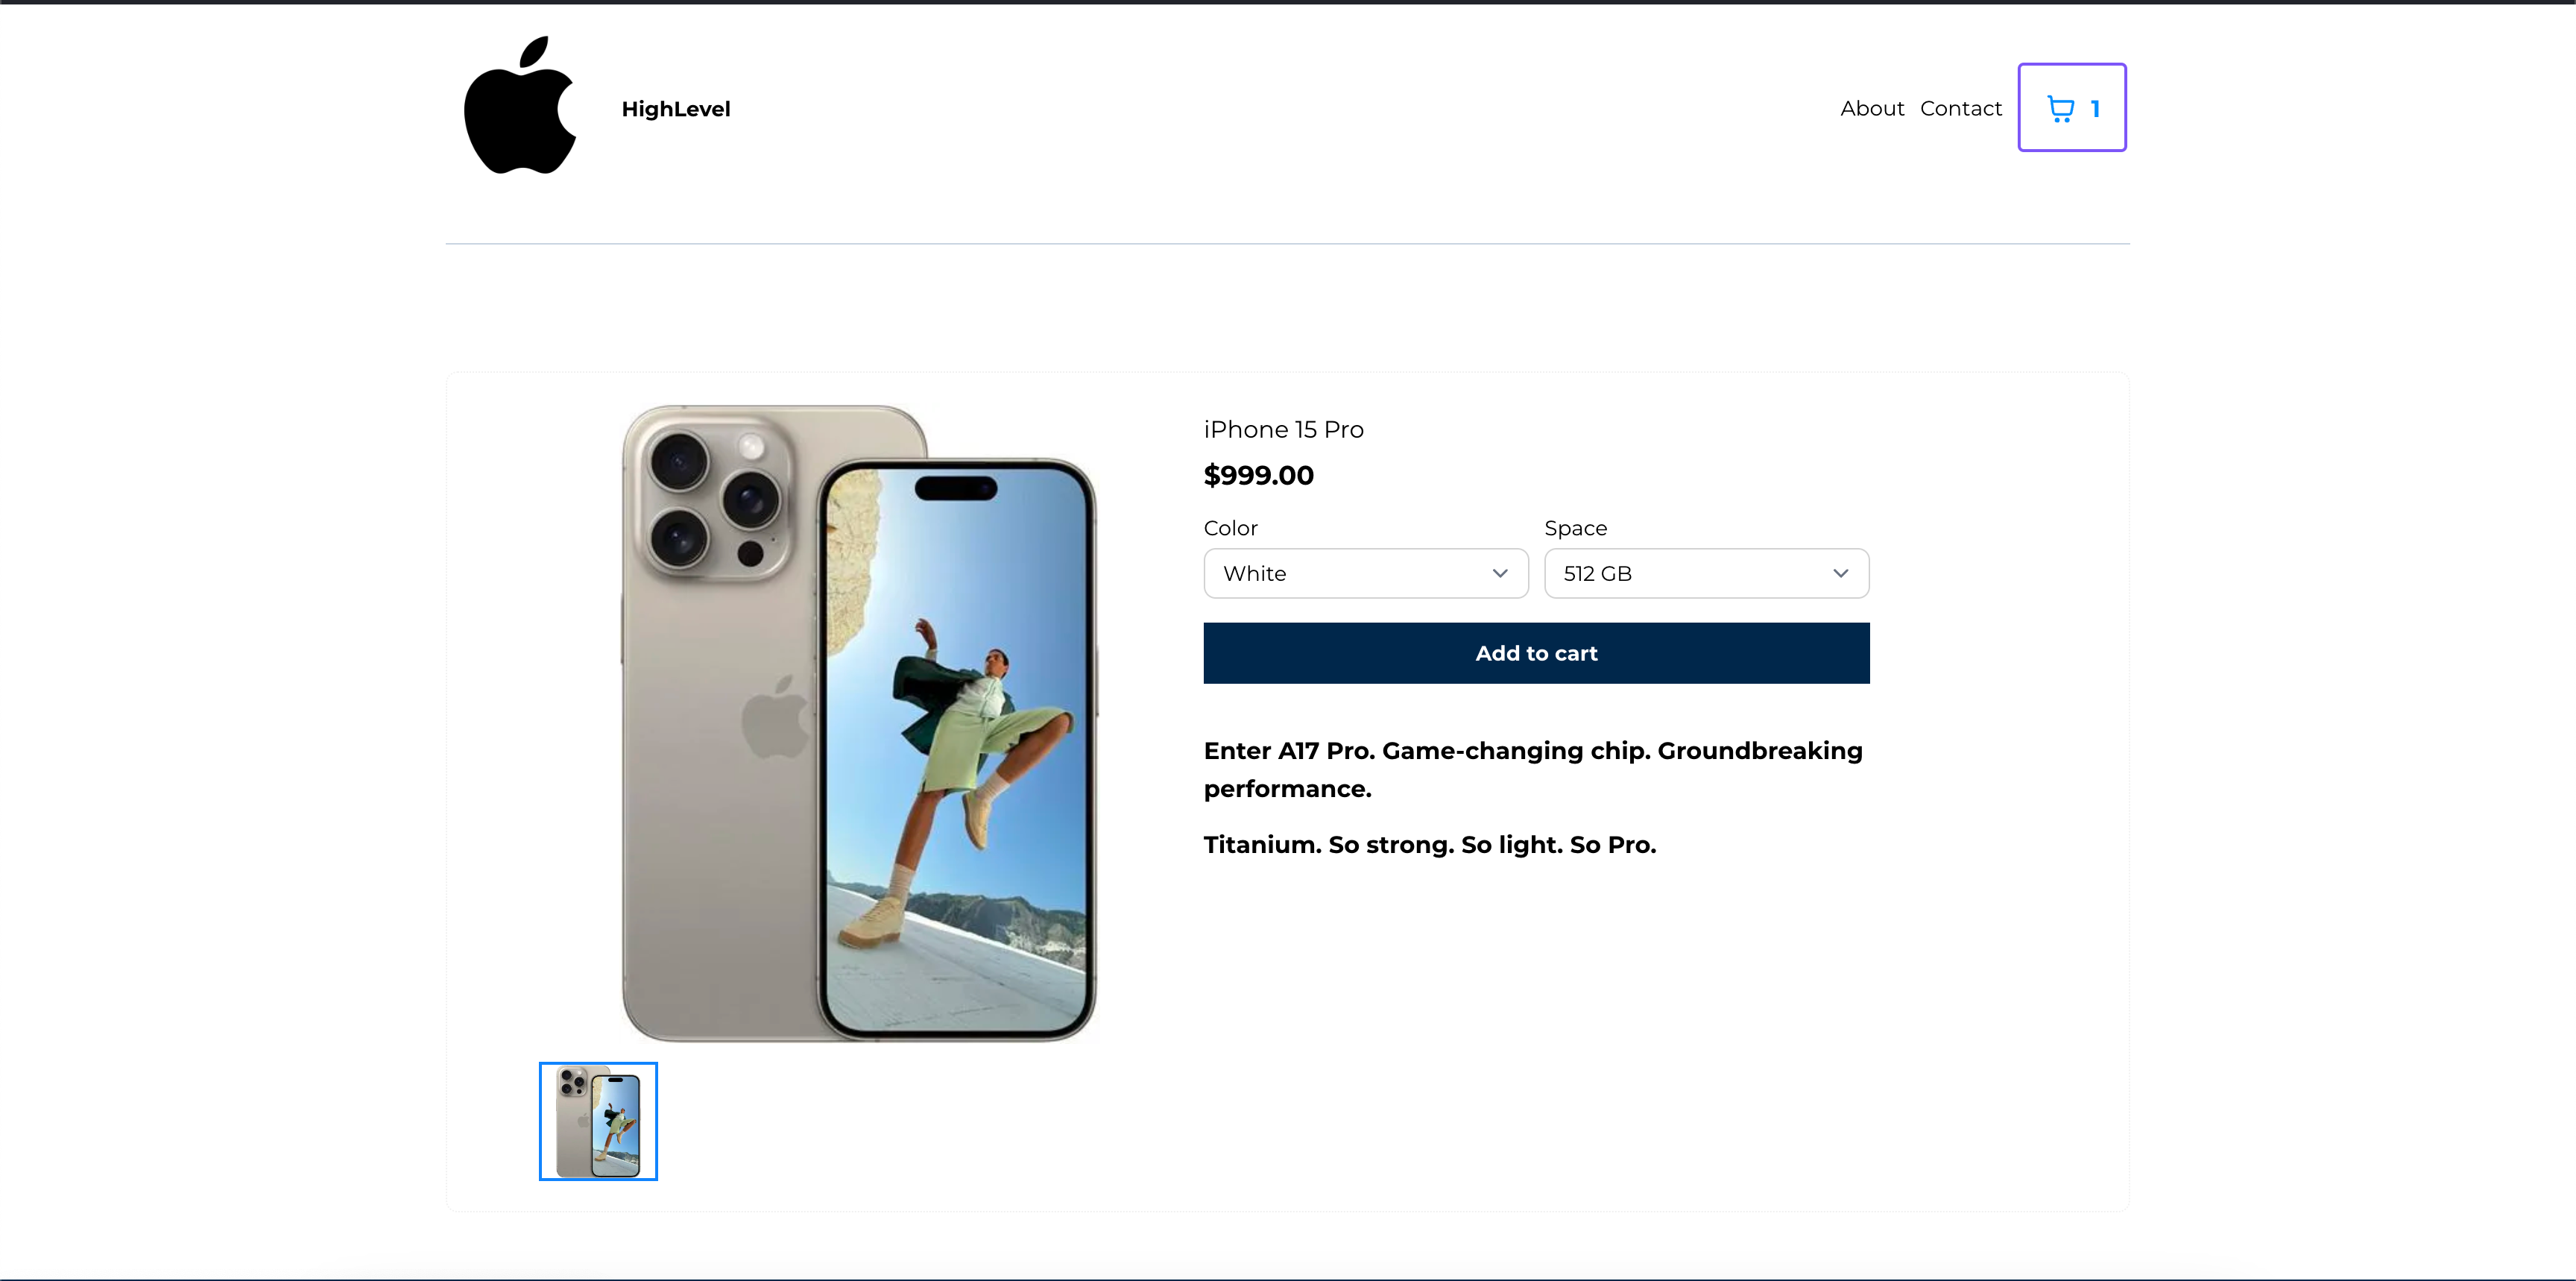
Newly created e-commerce stores will now have a “Cart icon” that is added to the Navigation menu. The menu will be automatically added to all the e-commerce pages except the “Checkout page”. Users can also add a cart icon independently anywhere in the store. This allows users to navigate to the cart page with a single click.
The cart icon also shows the number of products present in the cart.
How to use it?
FGF Notifications

![]()
![]()
![]()
![]()