
Here are our release notes for FG Funnels from November 29th, 2023 through December 6th, 2023. If you have any questions about these updates, or other questions about FG Funnels, please reach out to [email protected] or live chat in the app and our team will be happy to help.
Users are now able to insert partial quantities for products and items inside invoices. This helps many businesses that need to not have only whole quantities but partial quantities for accepting payments. Users are able to insert quantities up to 2 decimal places.

Automatic sales receipts will be by default turned on for all new accounts created from now on. This means that users are not required perform any additional steps to send order/payment confirmations after a purchase has been made. The system will by default send a receipt as an attachment to the customer. Users will still be able to edit the receipt number prefixes, number sequencing, and templates used to send the attachments at any given point of time.

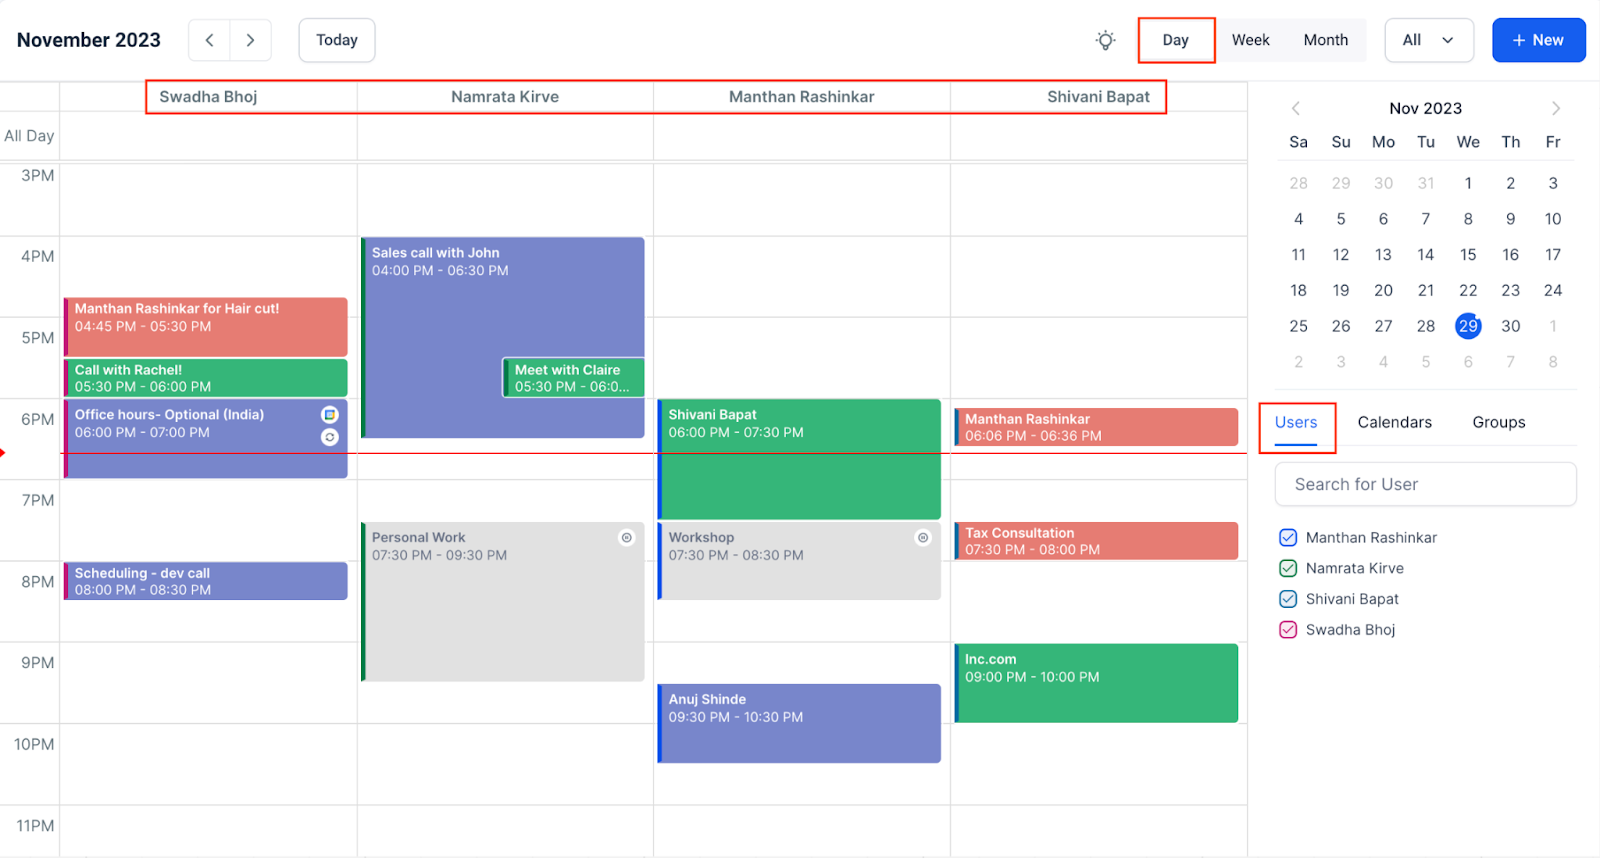
We’re thrilled to announce the rollout of our latest feature— Resource View (Side by Side Layout)! This innovative addition is designed to improve the booking management experience.
With Side-by-Side view, Users, Calendars, and Groups can now be seamlessly displayed in a convenient side-by-side format within the Day View. For example, in the User’s Day View, a horizontal list of users will be presented, each accompanied by their individual day calendar below their respective names.
By choosing the Day view, users can effortlessly compare schedules. This intuitive layout facilitates users in making quick and well-informed decisions, enhancing their overall scheduling experience.
A One-Time Link is a unique, single-use scheduling link to your calendar. It’s designed to automatically expire after a booking is made, ensuring heightened privacy and control over your availability.
This can be beneficial in instances where you wish to temporarily share your calendar for specific events or appointments, without providing continuous access to your entire calendar. It also prevents attendees from sharing your availability with others.
Note: You can now access your Calendar linksScheduling Link, Permanent Link, One Time Link and Embed Code from the “<> Share” option in calendar settings.


This feature allows you to customize the look and feel of your widget. You can personalize colors, button text, and more, making your calendar uniquely yours.
What you can customize:
Please Note: This works only with Neo Widget.


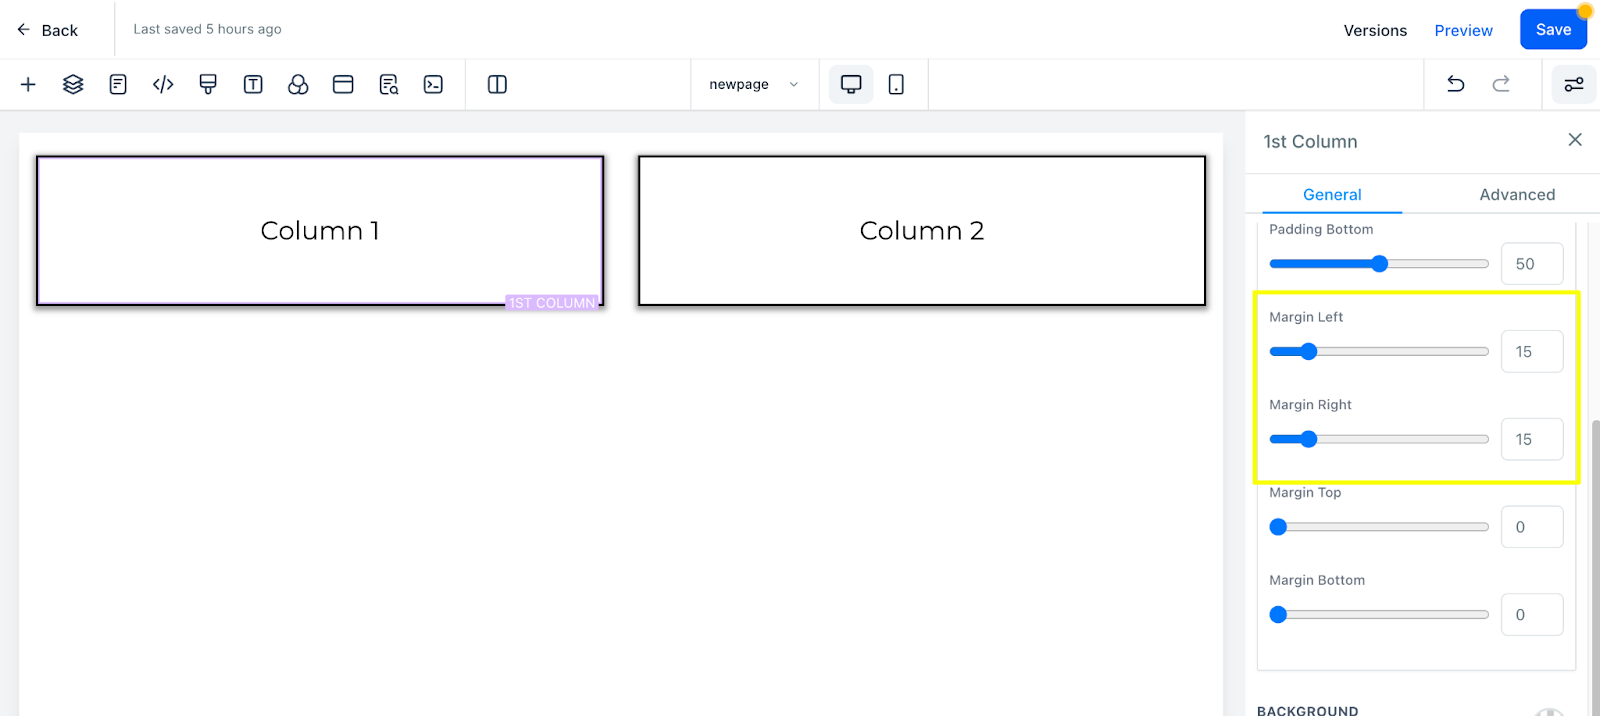
Due to the recent changes with column spacing where the default padding for columns were removed, we have introduced Margin left and right option for the column element if the user wishes to add spacing in between the columns.
This solves a major issue for adding column spacing after the recent update where we removed the default column spacing.
The margin left and right is applicable only for the desktop layout, with mobile layout support to be released soon.
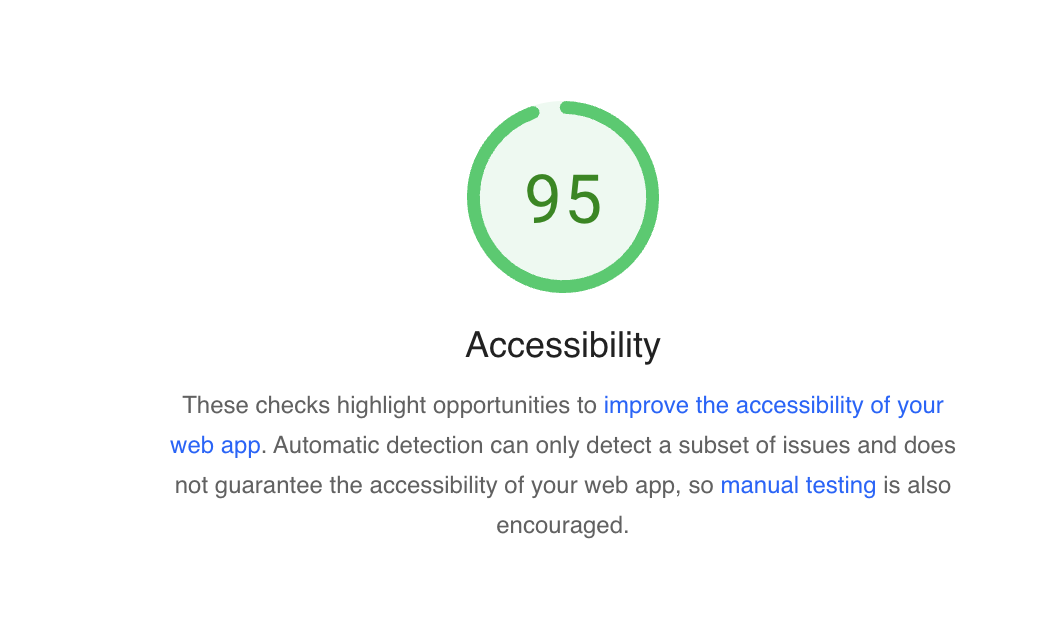
Duplicate Element IDs Resolved
We have addressed and rectified instances of duplicate element IDs across our funnel elements. This ensures a more seamless navigation experience for users relying on assistive technologies, as it eliminates confusion and enhances screen reader compatibility.
ARIA-Labels for Buttons and Anchor Tags
In this update, we’ve expanded the use of ARIA labels for buttons and anchor tags, providing more descriptive and meaningful information to assistive technology users. This not only improves the overall user experience but also ensures that interactive elements are correctly interpreted by screen readers.
Due to the above fixes and improvements, there is a significant increase in accessibility scores in page speed and lighthouse tests. We will continue to collect feedback and improve accessibility in our funnels and websites.
We’re thrilled to introduce a new enhancement to alignment settings of all the elements. Now with advanced customization options, you can set different text alignments, button alignment, Image alignment etc for mobile and desktop views, ensuring optimal readability and design across all devices.
Hierarchical Alignment Settings
Users can now set separate font sizes for desktop and mobile views, ensuring optimal readability and visual consistency across various screen sizes.
Improved Mobile Editor
The mobile editor has been updated to include options for adjusting text alignment settings specifically for mobile responsiveness, making it easier for users to customize their designs for smaller screens. Now there is no need to create multiple sections and keep different alignment in multiple devices and hide from one device.
This feature can be used for the following:
How to Use:


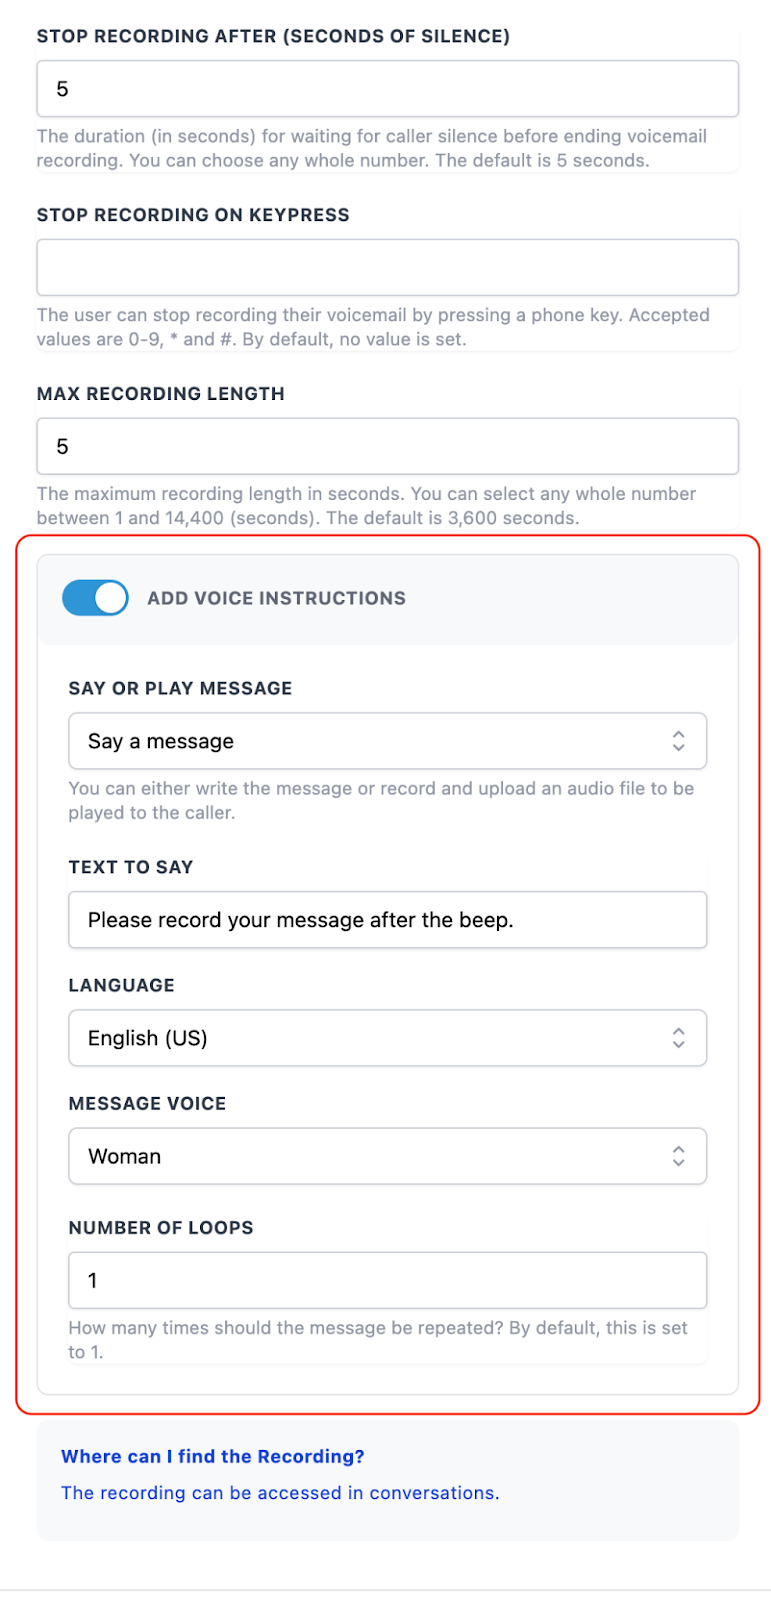
We have added Play Beep and Add Voice Instructions to the Record Voicemail action
Play Beep – option allows users to enable playing a beep sound just before the recording, indicating that the recording has been started and users can start saying their message.
Add Voice Instructions – By enabling this, users can configure their message by simply writing it or uploading an audio file to play just before the recording, to convey their instruction. (eg. Please record your message after the beep.)
This will reduce the extra step of adding separate say/play action to convey the recording related message, and will avoid the delay between the say/play and voicemail action.

Users now have the ability to effortlessly undo and redo while editing images.
The Undo action reverts to the previous state and correct any errors, and experiment with various changes without the fear of irreversible consequences.
Users can navigate through multiple editing steps more efficiently by undoing or redoing actions, helping them find the desired outcome without starting the editing process over again.

We are thrilled to introduce a significant enhancement to our email builder’s preview screen – the Preview Feature for Custom Field Rendering of contact information. With this new functionality, users can now preview precisely how custom fields will appear for their respective clients before sending out any emails. This feature also simplifies the testing process and eliminates the need to create fake test cases, allowing for a more efficient and cost-effective approach to email campaign management.
How to use:


Multiple Dashboards are here! Previously, you were limited to just one dashboard, but with this update, you can now create and manage multiple dashboards tailored to your needs.
Key Highlights:
Create Dashboards: Design your dashboards to reflect your unique needs and insights.
Clone Dashboards: Effortlessly create duplicates, saving time and enabling quick modifications.
Manage Permissions: Tailor access for individual dashboards, ensuring precise control over who sees what.
Delete Dashboards: Clear the clutter with the ability to remove dashboards you no longer need.
Pin Dashboards: Prioritize your most critical insights by pinning your favorite dashboards for instant access.
Getting Started:
Coming up in future releases:


Revolutionize your affiliate sales management with our latest trigger designed to capture all successful sales by affiliates. From one-time purchases to recurring transactions and manual sales, this trigger serves as a centralized mechanism for efficient affiliate sales management.
How it Works:
Some Use Cases:
Congratulatory Email/SMS to the Affiliate: Boost affiliate morale and engagement, fostering a positive experience and increasing loyalty.
Notification Email/SMS to the Customer: Acknowledge customer purchases promptly, enhancing satisfaction and potentially increasing retention.
Add Customer Tag for Segmentation: Enable targeted marketing efforts by automatically categorizing customers based on their purchase behavior.
Add Notes and Tasks for Customer: Enhance customer relationship management with centralize
FGF Notifications

![]()
![]()
![]()
![]()