Welcome to your weekly round up of updates through the week of December 4th, 2025.
This week brings powerful upgrades across Forms, Knowledge Base scaling, Communities, Reporting, Social Planner, Calendars, Page Builder, Courses, Voice AI, and Chat Widgets. If you have any questions regarding these updates, email us at [email protected] or in live chat inside the app.
Forms
Button Icons for Form Builder
This update gives your form buttons a visual boost. You can now add Material Symbol icons with a clean toggle, a searchable picker, and instant preview. Whether you want clearer intent or just a more polished look, the experience is now simple and flexible.
How It Works
- Add a Button Element to your forms and toggle the “Show Icon” option to enable icons on a button.
- Use the search-friendly icon picker to find the perfect symbol.
- Choose where the icon appears — left or right of the label.
- Watch changes reflect immediately in the preview pane for a seamless design experience.

Users
Audit Logs Date Range Picker
The Audit Logs page now has an intuitive calendar-based picker with smart defaults and built-in validation. It also adds URL parameters, making it easy to share filtered log views with your team.
How It Works
- Navigate to the Audit Logs page and locate the date filter in the header section.
- Click on the date picker to open the calendar interface showing the current month.
- Select your desired start date from the calendar – dates older than 60 days and future dates are disabled.
- Select your end date – the picker ensures it falls within the valid range.
- Click the confirmation button to apply your date range selection and filter the audit logs.
- The selected dates are automatically added to the URL query parameters (startDate and endDate).
- When you share the URL, recipients will see the same date-filtered audit logs you were viewing.
Knowledge Base
Table Source Limits Increased
Large datasets are now handled with dramatically improved scale and speed. You can import up to 50,000 rows, up to 500 columns, and files up to 50 MB (with the system designed to handle up to 250 MB). Processing is non-blocking with asynchronous chunking and instant summaries.
Communities
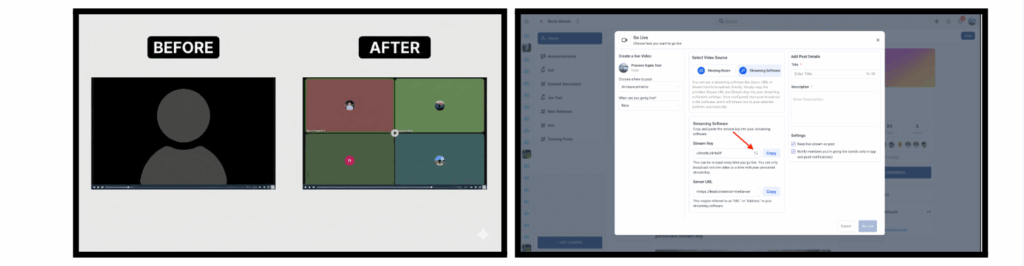
Go Live — More Reliable, Cleaner Recording Output
Recordings now mirror the live session experience with no layout distortions, missing names, or black screens. Stream keys also persist, making frequent live sessions easier and more predictable.
Reporting
Bulk Export Permissions
Admins can now define who is allowed to export dashboard and report data. This gives teams cleaner governance around downloads while keeping access flexible for analysts.
Social Planner
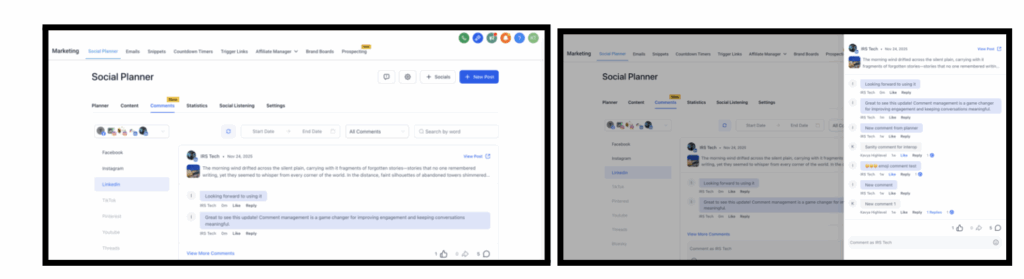
Comment Management Now Supports LinkedIn
You can now view, reply, like, and manage LinkedIn Page comments directly inside Social Planner—completing the triad of Facebook, Instagram, and LinkedIn engagement in one place.
How to Use
- Navigate to Marketing → Social Planner → Comment Management
- Select any published LinkedIn Page post from the list
- Open the Comments tab to view all incoming comments
- Reply, like, or mention users, all from the unified inbox
- Filter, track, and manage engagement just like Facebook & Instagram
Important Notes
- Comment Management currently supports LinkedIn Pages only
- Personal LinkedIn profiles are not supported due to API restrictions
- Users can reply to one level of threaded comments
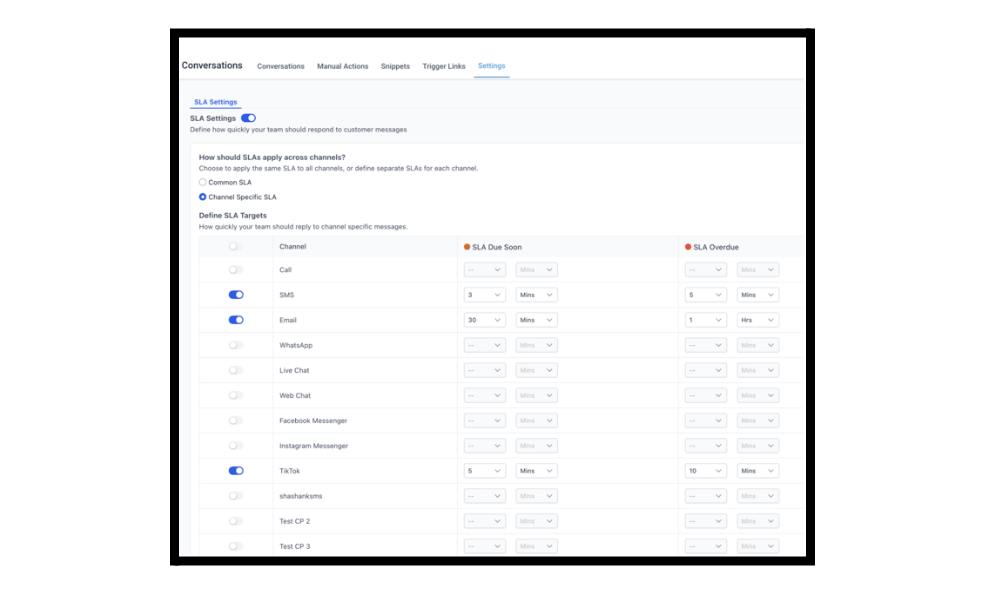
Conversations
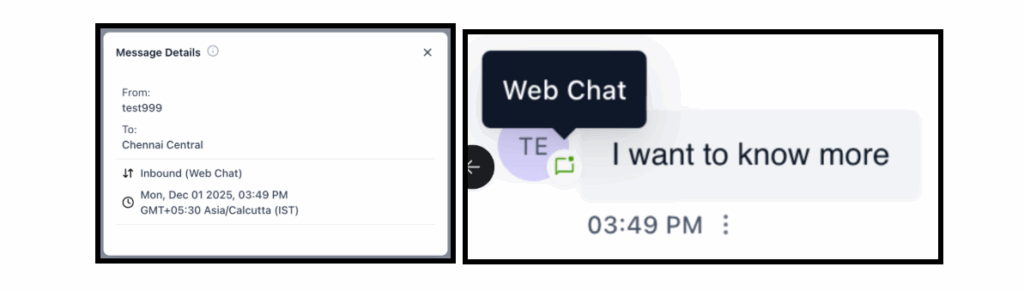
Web Chat Labeling Consistency
Web Chat is now consistently labeled throughout the platform, reducing confusion with Live Chat.
TikTok Now Supported in SLA Settings
You can set SLA targets and timers for TikTok conversations just like your other channels.
Calendars
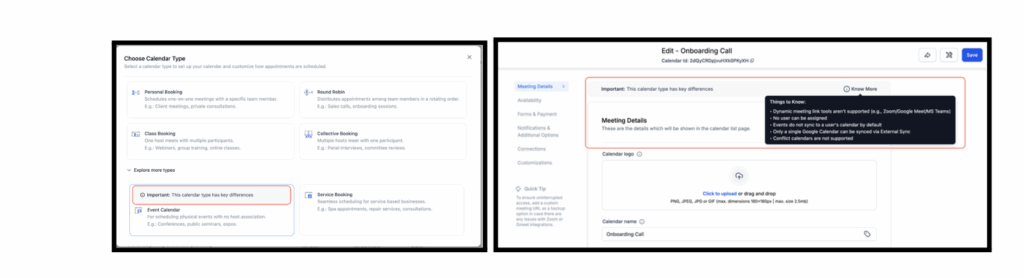
Event Calendar Behavior Clarification
A new helper message explains how Event Calendars differ from standard calendars. This prevents confusion during setup and reduces incorrect expectations around integrations and syncing.
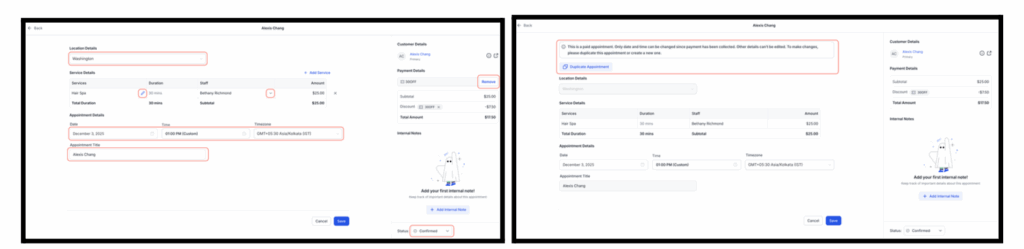
Service Appointments Can Now Be Edited
Unpaid service appointments can now be modified without rebooking. For paid appointments, users can duplicate the appointment and update the new version.
How to Use It
- Go to Calendars > Calendar View/Appointment List View > Services > Select the Appointment you want to Edit
- Click the pencil icon to Edit
- Save the appointment after making the changes

Forms
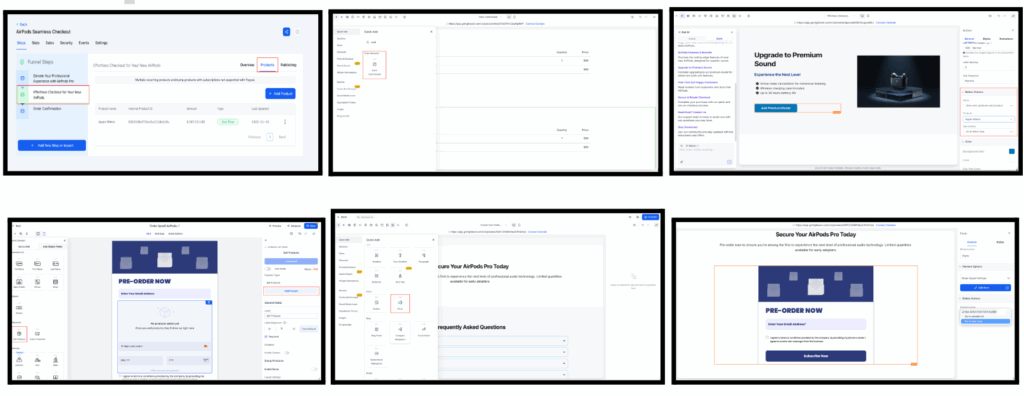
Order Upsell Support in Funnel Forms
You can now add one-click upsells directly within your funnel forms. No need for extra pages or repeated data entry, giving customers a smoother buying experience and boosting AOV.
How It Works
- Build the Form – Create a form, add a Sell Product element, set product details, and save it.
- Funnel Integration – Open or create a Funnel. Add the saved form as a Native Form element in your chosen funnel step.
- Add Upsell Button – In the next funnel step, add a button, set its action to Upsell Product, and select the upsell item.
- Order Summary – Include an Order Summary element to show both the main and upsell products.
Page Builder
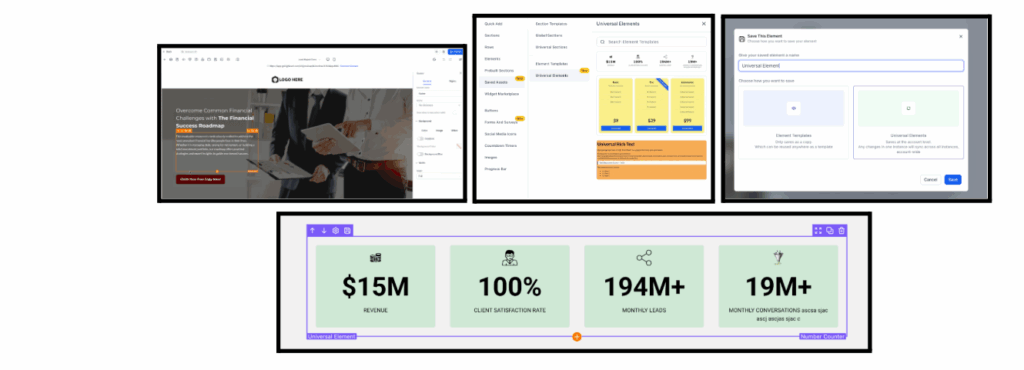
Universal Elements
You can now save any element as a Universal Element and reuse it across funnels, websites, and blog pages. Editing it once updates every instance automatically—huge time savings for branding consistency.
How It Works
Step 1: Add or customize any element in the builder.
Step 2: Save it as a Universal Element via either:
- the orange outline toolbar → Save icon
- the Layers panel → 3-dot menu → Save as Universal Element
Step 3: Give it a name and confirm.
Step 4: Access your saved items under Add Elements → Saved Assets → Universal Elements.
Step 5: Drag Universal Elements onto any page — they stay synced automatically.
Courses
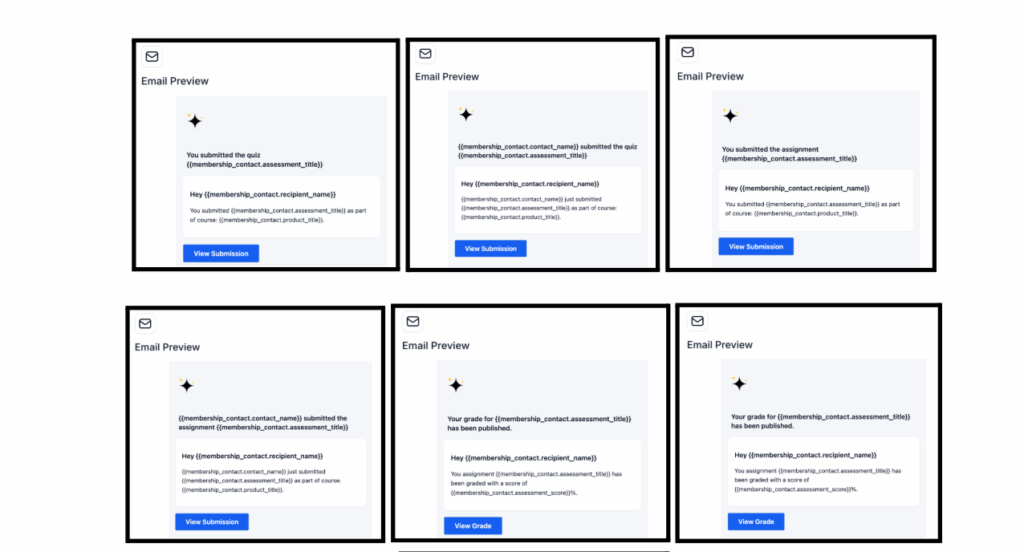
Course Assessment Emails
We’ve added six new automated email notifications that keep both learners and instructors up to date on assessment progress:
Quiz Emails
- Quiz Submitted (User): Sent to learners upon quiz submission.
- Quiz Submitted (Admin): Sent to instructors when a learner submits a quiz.
Assignment Emails
- Assignment Submitted (User): Sent to learners confirming successful assignment submission.
- Assignment Submitted (Admin): Sent to instructors notifying them of a new submission.
- Assignment Graded (User): Sent to learners when their assignment is graded.
- Assignment Graded (Admin): Sent to instructors confirming grading completion.
Comment Emails
- Course Comments (Admin): Sent when learners comments on courses.
Each of these uses a default, customizable email template accessible via the eye icon under Settings → Email Settings -> Courses.
How It Works
- All six notifications are enabled by default for new courses.
- Creators can customize the email templates to align with their brand voice and message.
- Templates automatically include assessment details like course name, title, and grading status with new custom values as well.

Chat Widget
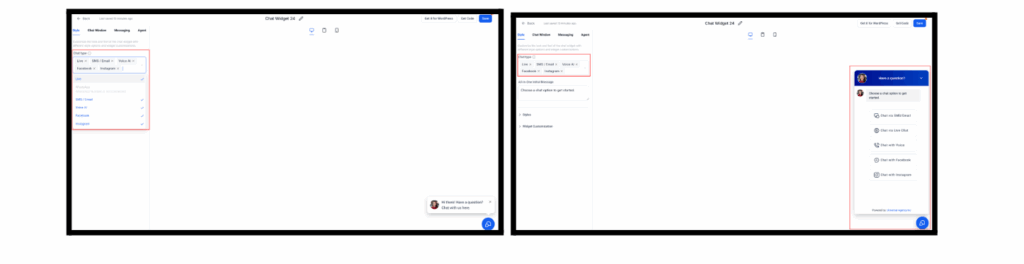
Facebook and Instagram Chat Widget Types
Visitors can now be routed directly to Messenger or Instagram DM via dedicated widget types. These appear in the “Select the type of chat” screen with updated sub-text and illustrations.
Facebook Chat Setup in Widget Builder
- A new Facebook Chat Setup accordion is added under the Chat Window tab.
- Users can select a connected Facebook Page from a dropdown.
- If no connected pages exist, users can click Connect a linked Facebook page button to open the updated connection modal.
No changes were made to the Style or Messaging tabs.
Instagram Chat Setup in Widget Builder
- A new Instagram Chat Setup accordion appears on the Chat Window tab.
- Users can choose from their connected Instagram accounts.
- If no accounts are linked, Connect a linked Instagram account button opens the Meta integration connection modal.
Again, no changes were made to the Style or Messaging tabs.
Updated Meta Page/Account Connection Modal
When users click “Connect a linked Facebook page” or “Connect a linked Instagram account”, the system opens an enhanced modal that:
- Lists all available Facebook Pages or Instagram-connected Pages
- Indicates which pages/accounts are already connected
- Allows users to connect additional pages without leaving the widget flow
- Syncs integration settings automatically upon connection
This prevents redirection to a new window and keeps the experience fully aligned with the chat widget expected behaviour.
How to Use
- Go to Sites > Chat Widgets > New.
- Select Facebook Chat or Instagram Chat from the chat type modal.
- Navigate to the Chat Window tab.
- Choose a connected Facebook Page or Instagram Account.
- If needed, click Connect a linked Facebook/Instagram account button to open the new connection modal and add more pages/accounts.
- Save the widget and embed it using Get Code on your website/funnel.
- Visitors interacting with the widget will be redirected to Messenger or Instagram DM automatically.
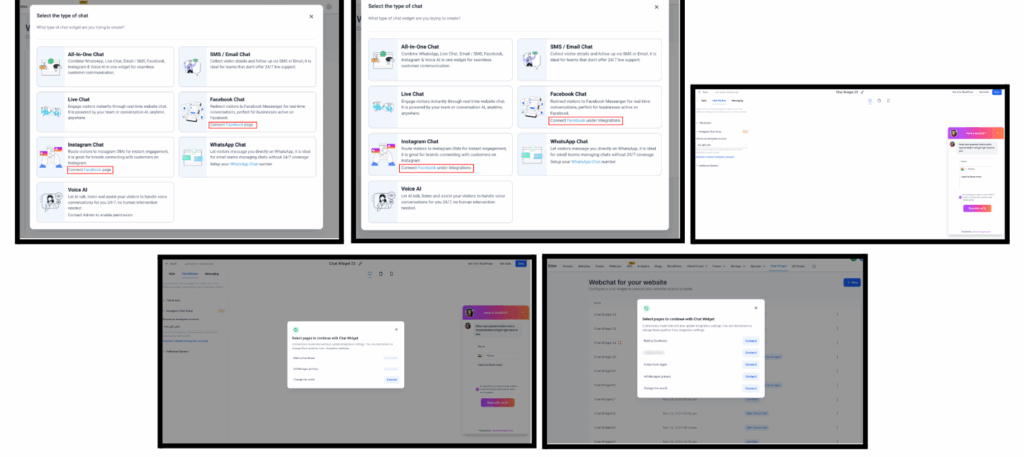
All-in-One Widget Expanded
The unified widget now supports Facebook, Instagram, and Voice AI as selectable channels.