Here are our release notes for FG Funnels from August 16th, 2023 through August 23th, 2023. If you have any questions about these updates, or other questions about FG Funnels, please reach out to [email protected] or live chat in the app and our team will be happy to help.
Communities
Private Groups
What are Private Groups?
Private groups are specialized communities designed for restricted access. Only authorized members can view and participate in the discussions and content shared within these groups.
Creating and Managing Private Groups:
Administrators and owners can convert regular groups to private by adjusting the group settings. Private groups are perfect for confidential discussions and focused collaboration.
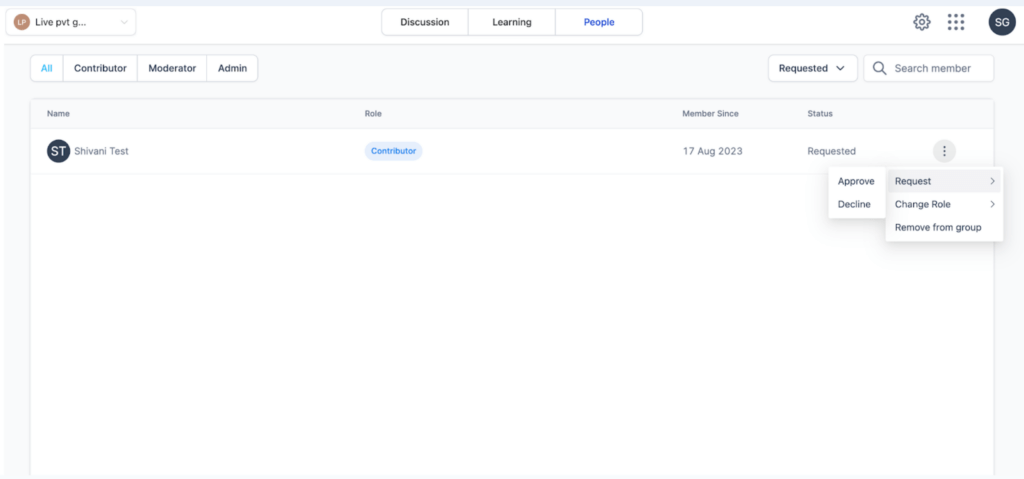
Membership Request and Approval:
Interested members can request to join private groups. Admins and owners review and accept these requests from the peoples section. Accepted members receive an email confirmation along with magic links for seamless access.
Transitioning Visibility:
Public groups converted to private ,content becomes restricted to future members. This ensures that only current members have access to previously shared content.
Public/Private Group Switching:
Changing a private group back to public status automatically accepts all pending membership requests.
Approval Emails with Magic Links for Auto Logins and Group Exploration
Approval emails now contain magic links for swift auto-logins and easy exploration of groups.
Accessible from Group Switcher
Enhance your navigation experience with the Group Switcher feature, allowing you to move between different groups effortlessly.
Leave Group
Members can now leave groups as needed, granting greater control over their group participation.
Magic Links
Approval Emails with Magic Links for Auto Logins and Group Exploration
Approval emails now contain magic links for swift auto-logins and easy exploration of groups.
Auto Login via Magic Link for Admins & Users
Admins and users can now seamlessly access the platform directly from the builder using magic links, streamlining the login process.
Welcome Email with Magic Links
Welcome your users with an email that contains magic links for a hassle-free onboarding experience.
What’s Coming Next:
Invite Members
Show Post Likes on Hover and Click
Course Integration
Paid Private Groups
Email Notifications for:
Request Rejections for Private Groups
New Request Notifications for Admin and Owner
Welcome Emails for Users Joining Public Groups
Review Request Status Email for Private Groups
Memberships
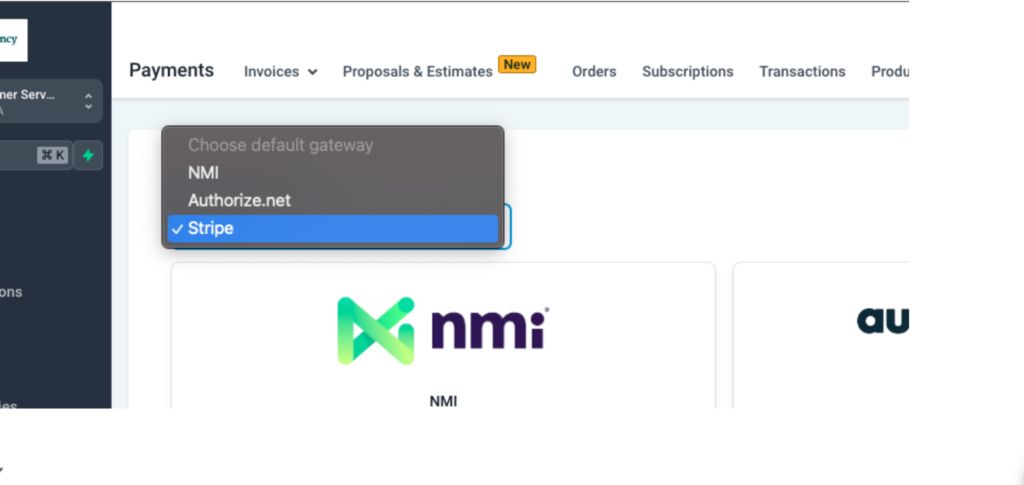
Payment Plugin Integration
We now have 3 payment gateways in Memberships
Stripe
NMI
Authorize.net
Open payments tab -> Integrations -> and integrate all your favorite payment gateways
Points to keeps in mind:
We are supporting all the older Offers with existing stripe integration they had
All new offers will be tagged as Version 2 .
No more Version 1 offers can be created
Track membership transactions within Payments
All transactions done within the memberships section will now be available under Payments -> Transactions. Users will be able to filter these transactions using the Memberships filter as well.
Above payments include both one-time and recurring transactions. Any subscription created will be available under Payments -> Subscriptions
Any offer created within the Memberships section will create a corresponding product/price under Payments -> Products. This helps with a consolidated view of all products and the ability to track all payments at a single place
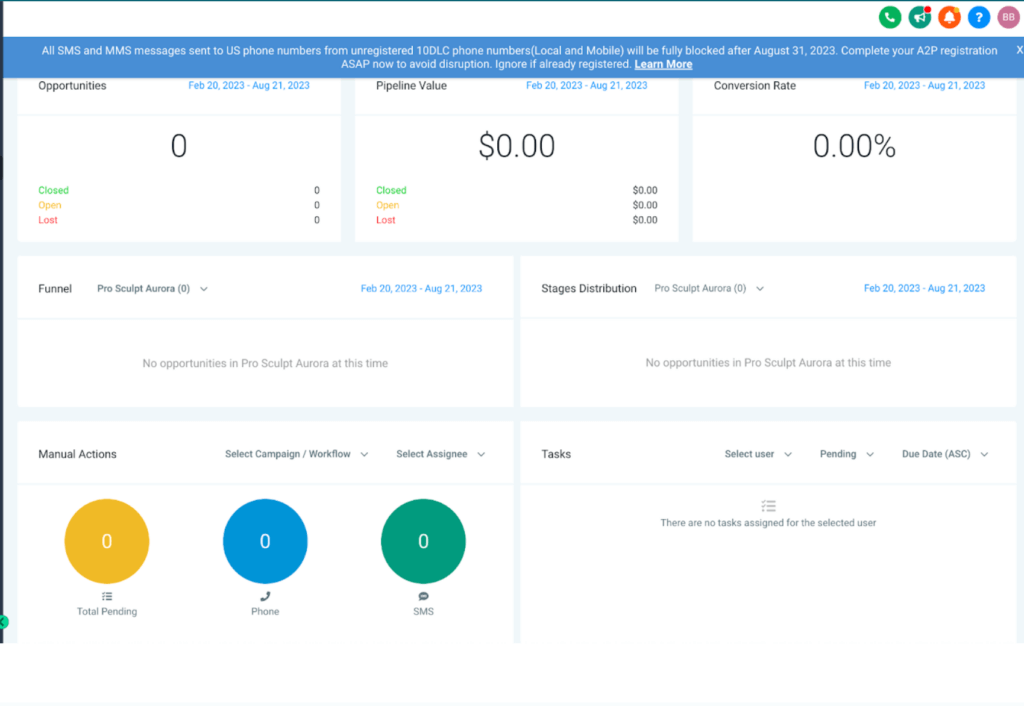
Opportunities
Custom Fields
Key Features:
File Upload Custom Fields: Now you have the ability to create File Upload Custom Fields for opportunities. This empowers you to gather and organize documents, images, and files that are integral to your opportunities’ progression.
Max limit for file size limit: Each file size can can be upto 5MB.
How to Use:
Navigate to the Custom Fields section.
Select “File Upload” as the field type.
Define the maximum number of files that can be uploaded and specify the accepted file types.
Save your custom field configuration.
Start uploading files directly from the Opportunity Modal and keep everything related to your opportunities in one place.
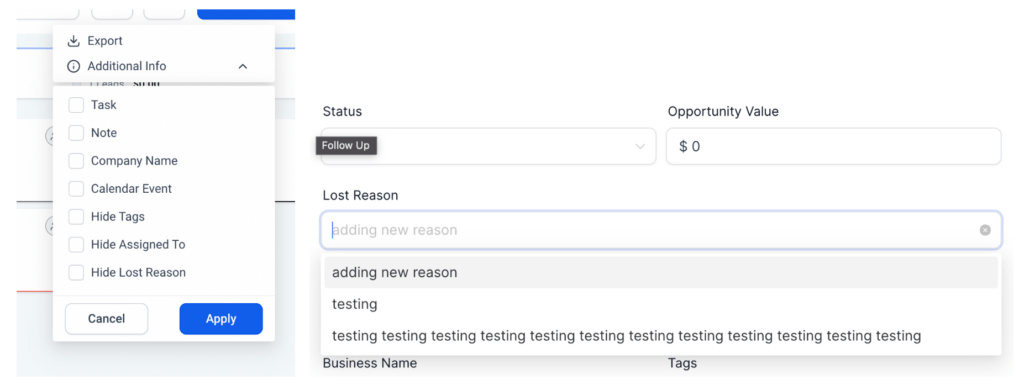
Lost Reason for Lost Opportunities
We have implemented the ability to capture lost reason for lost opportunities
There are two ways to move any opportunity to lost
Dragging it to lost status
In the opportunity modal select the status as lost
Old Behavior
User would drag the card to move the opportunities to move them to lost status
Open the edit opportunity modal and select the status as lost from the dropdown
New Behaviour
User can select a lost reason from the list of reasons available in the dropdown after changing the status to lost
User can create new lost reason if it does not exist
This can be done via both the ways of moving the opportunity to lost
If the status is updated by dragging then clicking on
update button will update the opportunity as lost with selected lost reason
cancel button will update the opportunity as lost without any lost reason
User can also see the captured lost reason on the opportunity card
User can also hide/show the lost reason on the card from the additional fields filter
What will capturing the lost reason for opportunities help the business with
Users will be able to track and analyze the reason for losing a lead
This will allow them to improve in the loss reasons that depend on them
Upcoming features
Add filter for lost reasons
A2P Registration
We have recently introduced a notification banner in the web-platform to inform you about [A2P 10DLC requirements] to send messages in the USA.
SMS Carriers like AT&T, Verizon, T-Mobile, ClearSky, etc. will stop delivering messages August 31, 2023 if registration is not completed.
This only applies if you use local or mobile numbers to send SMS in the USA.
This does not apply to Toll-Free numbers
Registration for Toll Free numbers is simpler when compared to A2P 10DLC and also free.
If you do not want to go through the hassles of registering for A2P 10DLC, switching to Toll-Free numbers may be a good interim strategy.
Calendars
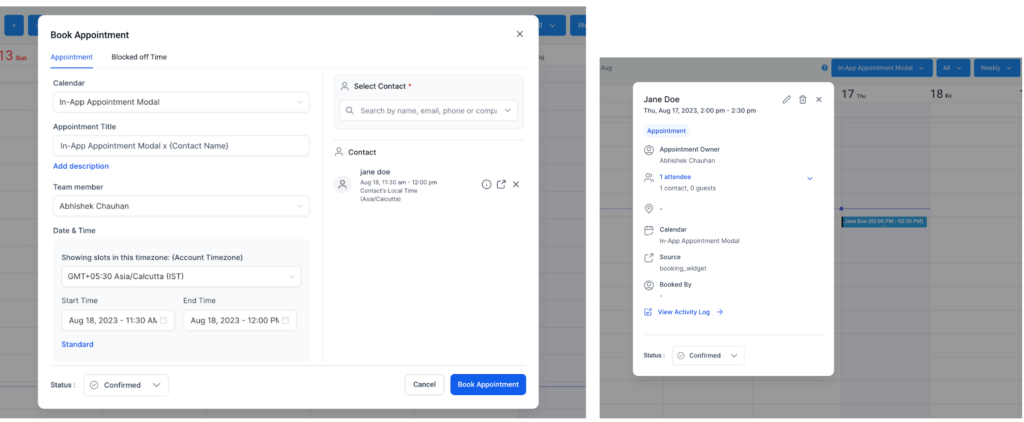
New Appointment Modal UI
We are excited to introduce a comprehensive revamp of the In-App Appointment Modal, designed to elevate performance, usability, and overall user experience. This enhancement encompasses a complete transformation of the in-app booking appointment module, including improved View Appointments, streamlined Booking, and enhanced Editing functionalities.
What does it mean for our users
Apart from the performance improvements this revamped In-App Appointment Modal brings several user-centric benefits, enhancing the way appointments are managed within the app:
Performance Improvements: We made significant performance improvements by reducing the load time for the modals.
Efficient Booking Process: The newly redesigned “Book Appointment” feature enables users to directly schedule appointments for existing contacts or new ones. This streamlines the booking process, saving time and effort.
Simplified Booking Flow: By eliminating the initial step of selecting a contact, users can now seamlessly add contacts within the booking details, enhancing efficiency and user-friendliness.
Enhanced Appointment View: The new appointment view provides a cleaner layout, showcasing both attendee and guest information, along with an expandable attendee section for in-depth details. Users can conveniently update appointment statuses and perform quick actions directly from the view.
Streamlined Editing: Editing appointments is now more intuitive. Users can easily modify appointment details by clicking on the “Edit” icon within the appointment view modal, leading to the dedicated “Edit Appointment” modal.
Comprehensive Display: The revamped View Appointments feature presents all events for the selected calendar or user, including events synced from third-party platforms like Google and Outlook.
Consent Checkbox for A2P Compliance
This release introduces an important update to ensure compliance with A2P (Application-to-Person) regulations in the United States. To meet the upcoming requirements, we have added a new Consent checkbox for the default forms in the Calendar settings. This allows users to include consent when collecting phone information.
What’s new
The consent checkbox has been added in the Calendar settings, and would automatically appear when the user selects the default form to collect contact’s information.
This is because the default form in Calendars has the Phone number field and to be compliant we had to do this.
The inclusion of the consent checkbox in calendar default form submissions ensures compliance with A2P regulations.
Benefits
Compliance: This release ensures adherence to upcoming A2P regulations by providing an easy way to include consent for phone information collection.
Customizability: Users have the flexibility to add, modify, or remove the Terms and Conditions element as required, tailoring it to their specific needs.
LC Phone
Revamped UI for Managing Phone Numbers
We’ve upgraded the interface with Vue3 Design Language, ensuring a consistent appearance across our system’s new features and modules. The fresh UI boasts streamlined and intuitive icons, enhancing navigation and user-friendliness within the web app.
Enhanced Number Organization: To simplify access, we’ve categorized different numbers under distinct tabs. Plus, we’ve introduced a singular Call to Action (CTA) for adding numbers.
Introducing Number Type Field: For enhanced identification, all numbers now include a “Number Type” field, aiding easy recognition of their respective purposes.
Visibility of Purchase Dates: You can now view the purchase date for each number, providing additional information at a glance.
Buy Number Flow
Buy Number Flow Improvements: We’ve introduced Number Type and Capabilities within search results to streamline the process of purchasing numbers. Filters based on Number Type, Capabilities, and Number Strings have also been implemented for refining search results.
Refresh Results Feature: Now you can easily reload new numbers with the “Refresh Results” feature, facilitating smoother acquisition of your desired number.
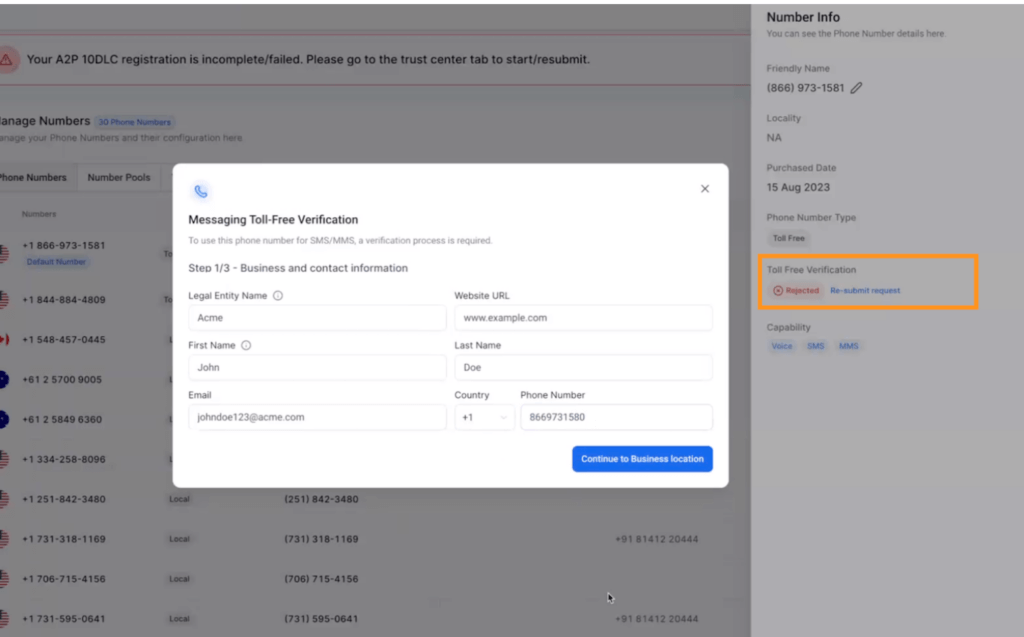
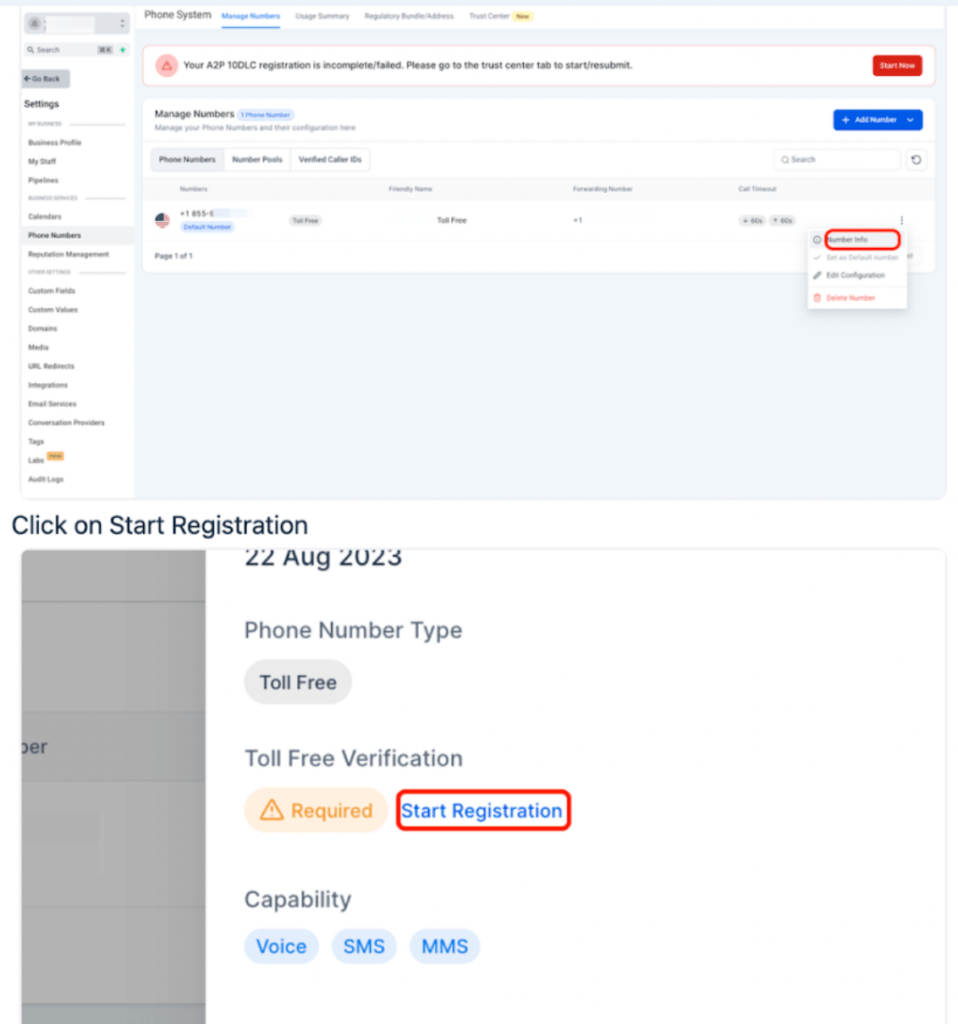
Toll Free Registration v2 – [LC Phone only]
Toll-free registration is now extended to location users, with the registration flow integrated at the phone number level.
Clicking on “Number Info Settings” for a Toll-Free Number reveals its verification status.
This eliminates the need to manually track tickets, ensuring real-time review without delays or errors.
Messaging Status and Error Insights on Conversations Page
Ensuring clarity and transparency, we’ve revamped the way you understand message statuses and errors.
Highlights
Accurate Messaging Statuses: We’ve optimized our systems to provide up-to-date final status updates, minimizing billing and reporting discrepancies.
Clearer Error Descriptions: Dive deeper into issues with refined terminologies for common message errors, ensuring you and your customers always know what’s happening.
Error Breakdown
Error 11751 – “Media Size Limit”
Media exceeds messaging provider size limit. Maximum size limit depends on the messaging channel. For an MMS message, the size limit is 5MB.
Error 30001 – “Queue OverFlow”
You tried to send too many messages too quickly and your message queue overflowed. Best practice is to send 1 message segment per second.
Error 30002 – “SMS Capabilities Suspended”
Your SMS sending capabilities were restricted because of a violation, please contact agency.
Error 30003 – “Unreachable destination handset”
The destination handset you are trying to reach is switched off or otherwise unavailable.
Error 30005 – “Unknown destination handset”
The destination number you are trying to reach is unknown and may no longer exist.
Error 30006 – “Landline or Unreachable Carrier”
Your message was sent to a landline, or an unreachable carrier for this phone number type. Enabling Number Validation can help to avoid sending messages to these numbers.
Error 30007 – “Carrier Violation”
The destination carrier is filtering out your messages for delivery. The content of your message was flagged as going against carrier guidelines. A2P/Toll Free Registration might help.
Error 30008 – ” Unknown Error”
If a message you sent is not delivered to the end device and returns a 30008 error code, this means that delivery of your message failed for unknown reasons and carrier partners had no further details about it.
Error 30011 – “MMS Error”
The destination handset either doesn’t support MMS, or MMS is not currently enabled on the device.
Error 30019 – “SMS Size Limit”
Recommended SMS messages to a length of 320 characters or less is recommended to avoid any failures from Carriers. We do support length upto 1600 characters though.
You have sent the maximum allowable daily messages for your Brand to the carrier.
Error 30032 – “Toll Free Registration Pending”
Your toll-free number has not been Verified to allow sending of traffic in USA and Canada. Register your Toll Free Number to avoid message failures.
Error 30034 – “A2P Registration Pending”
You are sending messages to the US using a US 10DLC number that is not associated with an approved A2P 10DLC Campaign. Register your A2P brand to avoid message failures.
Funnels and Websites
Domain Connect Integration with Funnels And Website
We are thrilled to announce the latest release of Domain Connect, the highly anticipated and time-saving solution for customers. In this update, we are excited to expand our support to three top providers:
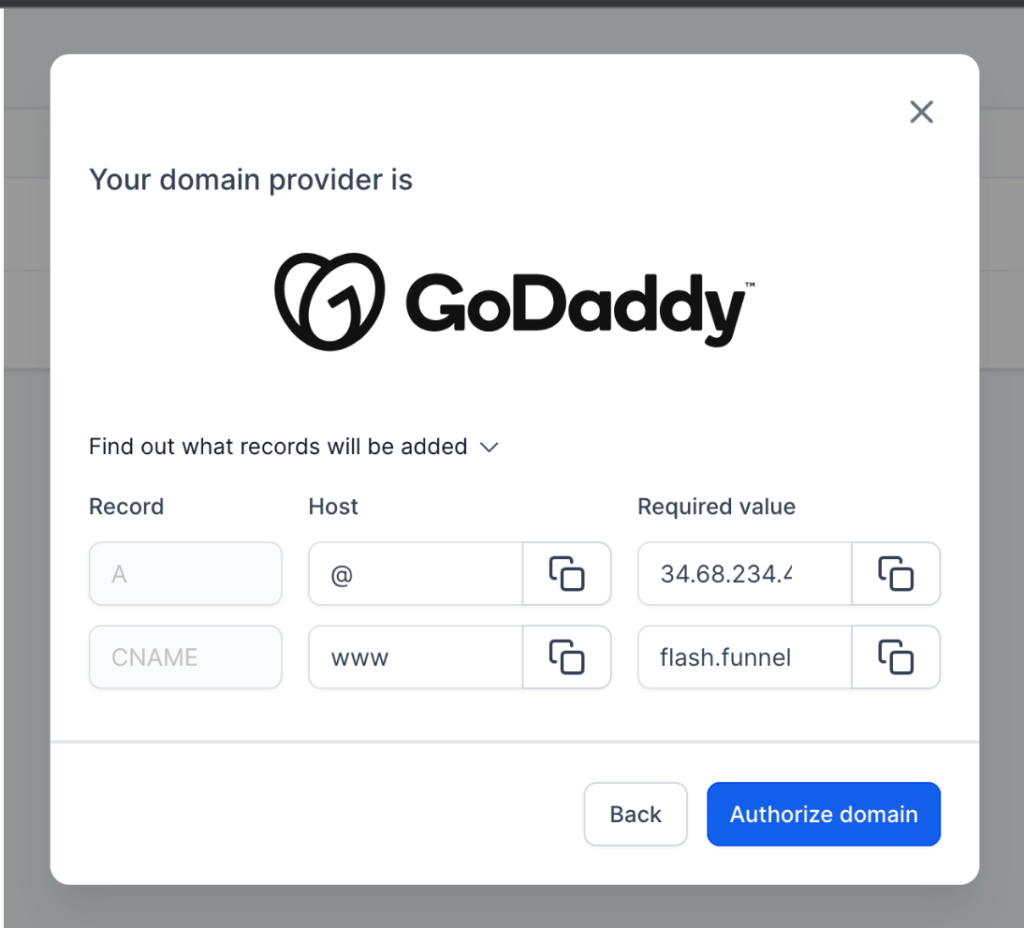
Go Daddy
Cloudflare
Google Domains
What’s New?
Seamless Integration: Domain Connect now supports seamless integration with Google, Go Daddy, and Cloudflare. Users can easily connect their domains from these providers to various services and applications without the need for manual configuration.
Benefits of Domain Connect:
Simplified Setup: Domain Connect provides an automated and standardized process for connecting domains to services, eliminating the need for manual configuration.
Time-saving: Users can quickly set up their domains with supported providers, saving valuable time and effort.
Enhanced Security: Leveraging the secure infrastructure of Google, Go Daddy, and Cloudflare, Domain Connect ensures a safe and reliable connection between domains and services.
Flexibility: Users can seamlessly connect their domains to a wide range of services and applications, expanding their online presence and capabilities.
How It Works:
To take advantage of Domain Connect with Google, Go Daddy, or Cloudflare, follow these simple steps:
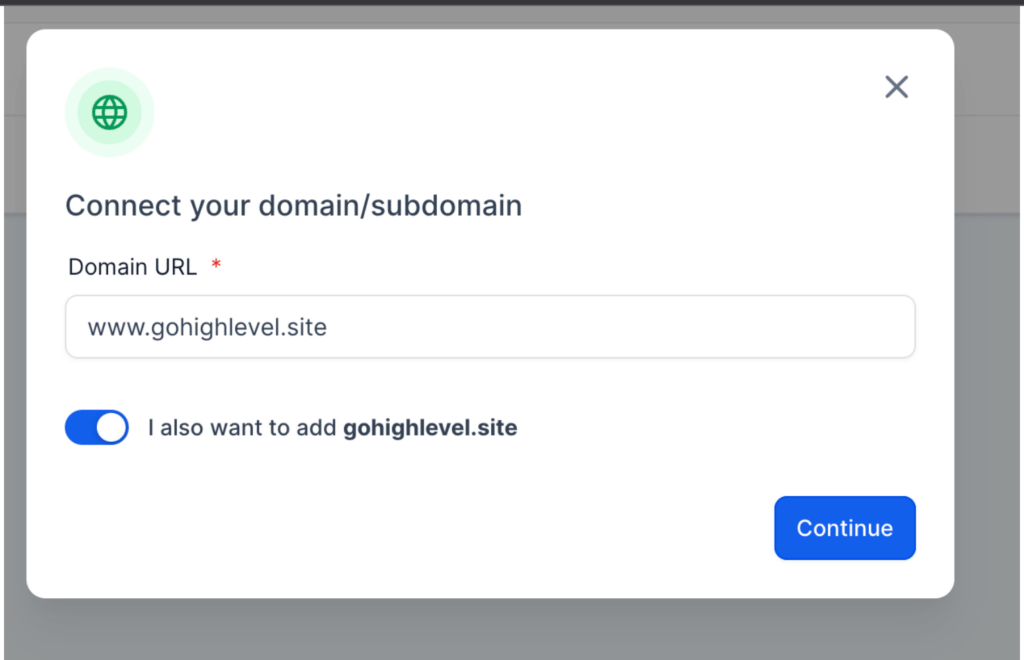
Go to the “Domain” tab and click on “Add Domain”.
Enter your root domain or subdomain in the provided field.
If you are adding the “www” subdomain as well, you will see a toggle option to add the root domain with it. Select if you want to add the root domain along with “www” or vice versa. Click on the “Next” button.
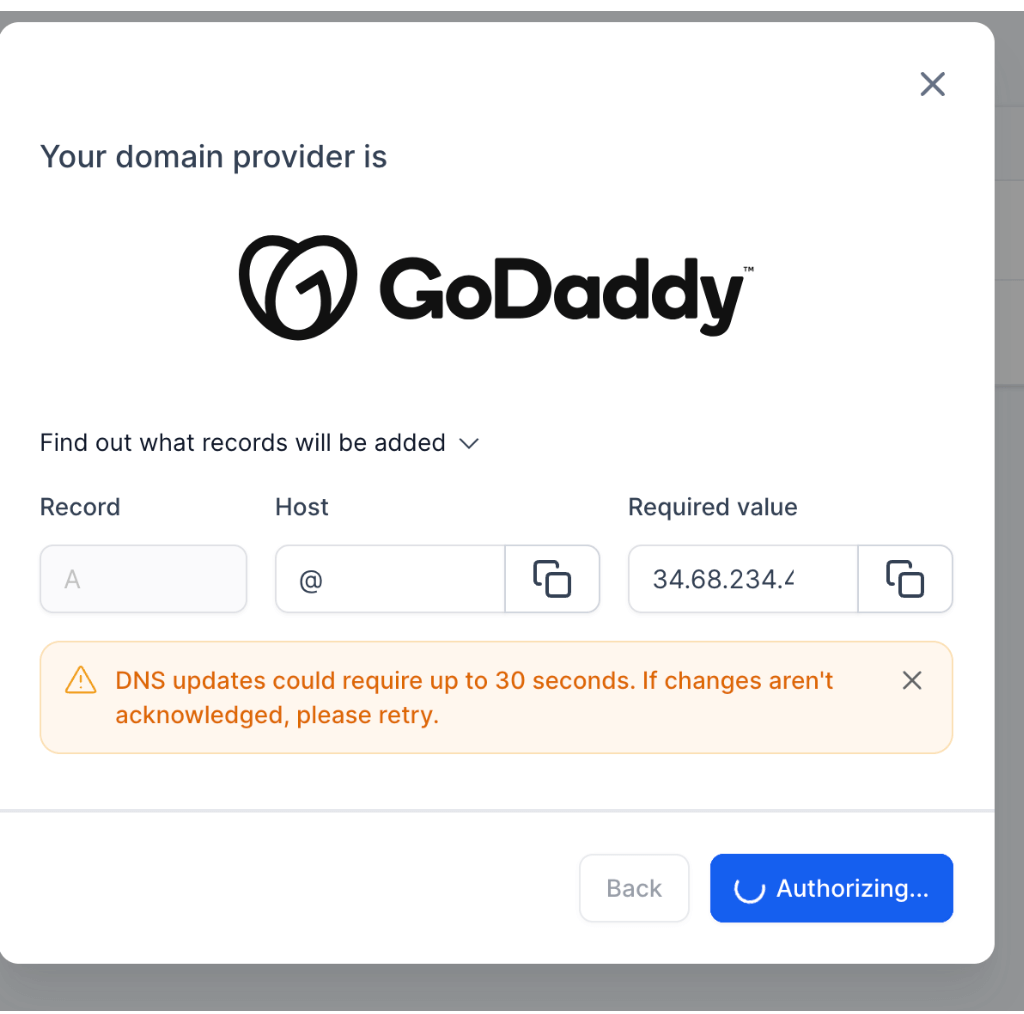
If your domain is within one of the supported providers (Google, Go Daddy, or Cloudflare), you will see an “Authorize” button. Click on it.
This action will take you to your domain provider’s interface to connect or add the required DNS records automatically.
After completing the authorization process, close that tab and return to the Domain Connect interface.
The necessary entries will be added in our system, ensuring the connection between your domain and the desired service or application.
For users who have domain providers that are not currently supported by Domain Connect (such as providers other than Google, Go Daddy, and Cloudflare), they can still manually add the required DNS records with their providers. The process for manual configuration remains the same as before.
Column Modes [New Builder Layout Options] Live in New Funnel/Website Builder
Added New Layout Option to Funnel/Website Builder – (2 Column Mode)
This feature has been added entirely in response to customer inputs, with the goal of enhancing UX for creating Funnels and Websites.
Old Behavior
There was only one layout mode where settings drawer was floating over the canvas
It was a sudden change from the old layout that we had where settings bar was fixed and always open
New Feature
Users can now select which column mode that they want to use, the two options are
2 Column Mode (Default) – Funnel settings panel will be not covering the funnel content
Auto – All panes will be on draw over mode
How it help our customers
The builder area will resize itself without hiding any part of the builder elements thereby reducing funnel build time and increasing efficiency.
Use a clean and clutter-free interface with ample spacing between columns and elements to avoid visual confusion.
Provide a simple, intuitive icon or button to toggle between two-column mode and auto
Payments
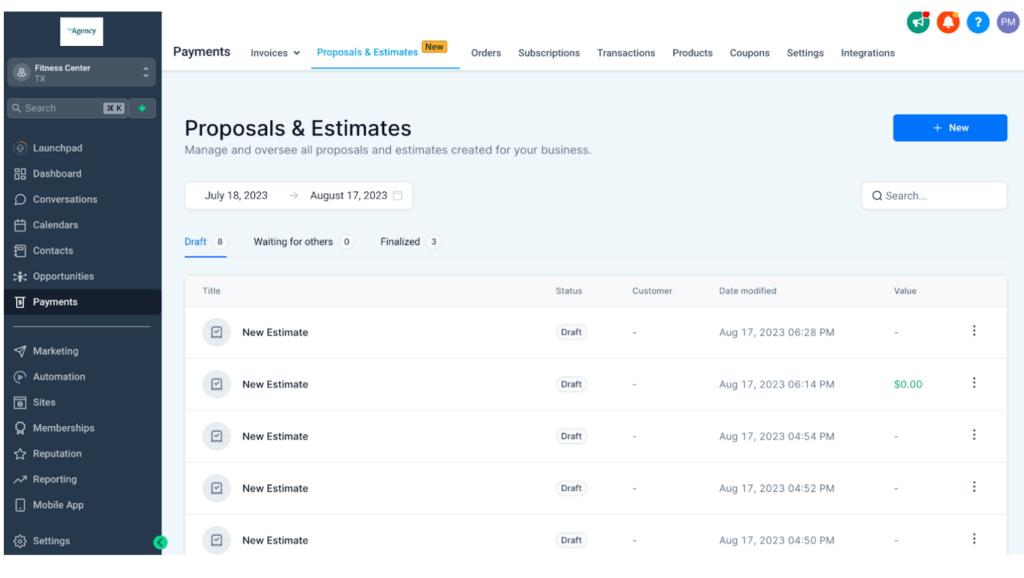
Proposals and Estimates
Users will now be able to send a detailed proposal or an estimate natively within FG Funnels.
This provides the ability to create a formatted document, use custom fonts, and styles, add headings and paragraphs, insert links and bulleted lists
Users will also be able to insert images/video and table elements to make the proposals more informative and appealing to the potential lead
This also provides the ability to insert a product list element and present an approximation of the costs involved in fulfilling the service. Users will be able to add product line items, apply taxes, and offer discounts to showcase the costs associated with the proposal/estimate
This also empowers businesses to accept digital signatures on documents from potential leads or clients using the Signature element. Users can send a document via email and allow potential clients to accept and digitally sign the document after reviewing it.
When a client signs a document digitally, the system will generate a signature certificate by capturing the required information like the IP address and customer name/email to keep the digital signature valid
The signature certificate acts as a valid document for the authenticity of the digital signature and will be added as the last page of the signed copy of the pdf
The customer will automatically receive a signed/finished copy pdf after they accept and mark the document as finished
Reputation Management
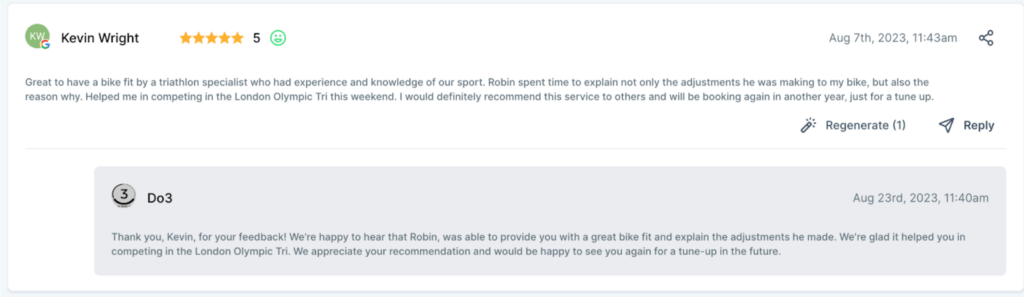
AI Reply For Reviews
We are thrilled to introduce a game-changing enhancement to our platform with the rollout of AI-powered reply capabilities for reviews. This new feature empowers users to craft more efficient and personalized responses to customer reviews, enabling businesses to connect with their customers in a more meaningful way.
How to Access AI Reviews in Reputation Management:
Users can now utilize AI-based smart reviews within the review section of Reputation Management. This allows users to effortlessly generate reviews that align with the sentiments expressed in the customer feedback.
To further refine the review, users have the flexibility to regenerate reviews up to five times. This empowers users to craft responses that accurately represent their brand voice and address specific customer sentiments effectively.
Upcoming Releases:
Review Widget templates
Form Builder
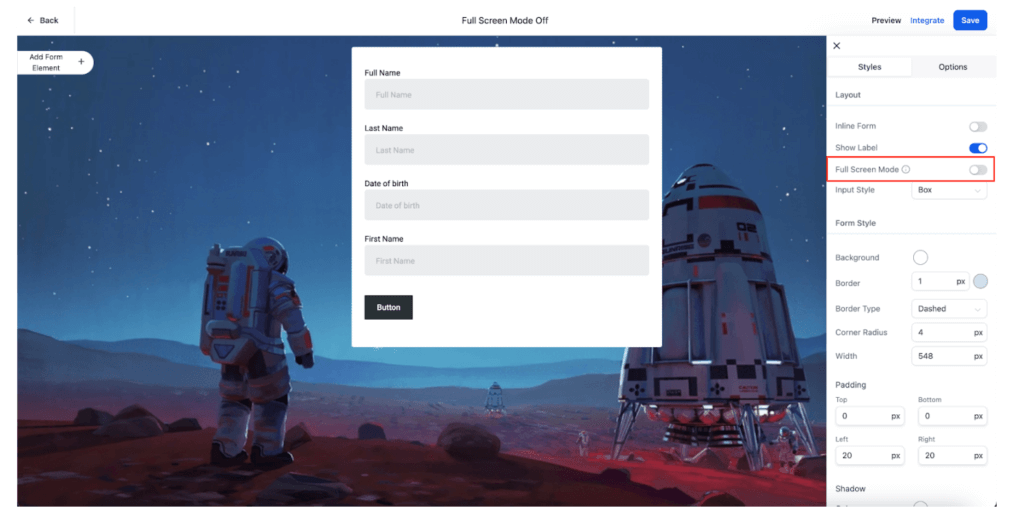
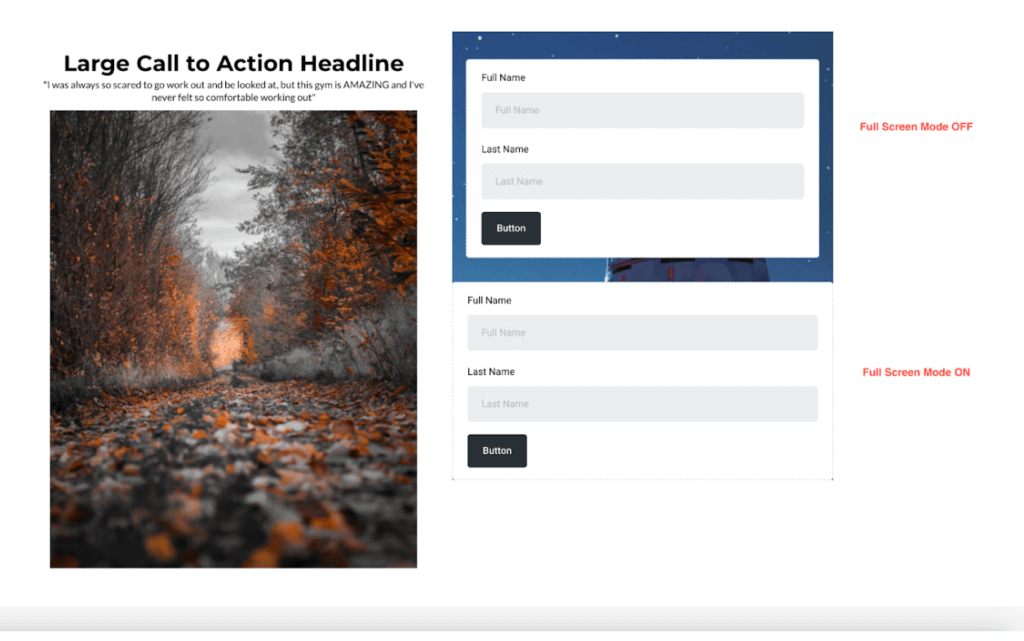
Full Screen Mode
We are thrilled to introduce an exciting enhancement to our New Form Builder that brings a new level of customization to your forms.
Full screen mode in forms refers to a display setting that maximizes the utilization of the entire screen space where it is embedded till its defined form width to enhance the user experience when interacting with the form.
When activated, the form content occupies the complete screen area where it is embedded till its defined form width in builder.
When Deactivated, it works exactly like previously where it was adding extra padding which makes form looks shrink
Key features of New Update
Provide a visible and intuitive way for users to activate and deactivate Full Screen mode.
Complete utilization of space given when embedded in our funnels or third party funnels.
How to use Full Screen Mode:
Go to Location Settings and then go to Labs
You should be able to see “UI Revamp of Form Builder”.
Turn on the Toggle switch for the form builder.
Go to your form builder and you will be able to use the new builder.