


Welcome to your weekly roundup of FG Funnels updates through the week of September 3rd, 2026.
From smarter WhatsApp messaging limits and AI Studio’s leap into full-stack web apps to Managed Agents that now generate audio and video, Conditional Custom Fields for Opportunities, and a brand new Certificate AI — this week’s updates bring some seriously powerful tools to your stack. We’re also rolling out upgrades to Calendars, Domains, Social Planner, Workflows, E-Commerce Stores, and more — all designed to save you time and give your clients a better experience.
If you have any questions about these updates, email us at [email protected] or reach out through live chat inside the app — we’re always happy to help.
Meta changed how WhatsApp messaging limits work, moving from a per-phone-number limit to one shared limit across your entire business portfolio. We’ve updated FG Funnels to match.
What this means for you: all the phone numbers under your portfolio now share a single daily sending limit instead of each having their own. One high-volume number can use up the whole portfolio’s capacity, so it’s important to see the real picture.
The good news? The tiers are simpler now, scaling happens automatically once you’re above 2,000 messages, and Meta re-checks your limit every 6 hours instead of every 24 (as long as you keep quality high and use at least half your limit over 7 days). There’s also no more penalty for occasional quality dips.
We’ve added a new Messaging Limits panel at the portfolio level under WhatsApp Settings, so you see the true shared limit instead of a misleading per-number view.
Where to find it: WhatsApp Settings → Messaging Limits
You now have more control over what info you collect from guests during a booking — not just Name & Email.
Choose from: – Name & Email – Name & Phone – Name, Email & Phone – Guest Count Only (no guest contacts created)
When guest details are collected, a contact is automatically created or matched using their email and/or phone number. New calendars default to Name, Email & Phone, so you capture richer info from the start. Existing calendars keep working exactly as they do now.
Guest contacts also now inherit the primary contact’s timezone instead of defaulting to your business timezone, keeping things consistent across everyone attending.

If your business is closed on weekends (or runs a non-standard schedule), your booking window shouldn’t quietly eat into days you’re not even open. Now it doesn’t have to.
A new Count available days only toggle appears under the Date Range setting on Calendars, Services, and Rentals. Turn it on, and the system skips days outside your availability when counting your booking window — so a 2-day range doesn’t leave a blank calendar on a Friday, it just extends to the next actual working days.
This works with round robin and collective calendars too, and plays nicely with your minimum scheduling notice settings.
How to Use It: 1. Go to Calendars → Calendar Settings and click edit on the calendar you want to update. 2. For Services, navigate to Services → Global Settings → Service Settings. 3. For Rentals, edit a listing and go to Booking Settings. 4. Find the Date range setting. 5. Toggle on Count available days only directly below the Date Range input. 6. Save Changes.

No more triggering workflows one record at a time. You can now select multiple Company or Custom Object records from the list view and send them into an automation together, in a single action.
How to Use: 1. Open Companies or a Custom Object 2. Select the records you want to process 3. Click Trigger Automation 4. Select the workflow 5. Confirm the action 6. Track progress and results from Bulk Actions
This is great for onboarding a batch of new companies at once, running renewal workflows for a group of records, processing records after a migration, or kicking off a one-time campaign without touching your existing workflow triggers.
Pro tip: use list filters first to narrow down exactly the records you want, and review the workflow before running it across a large set.
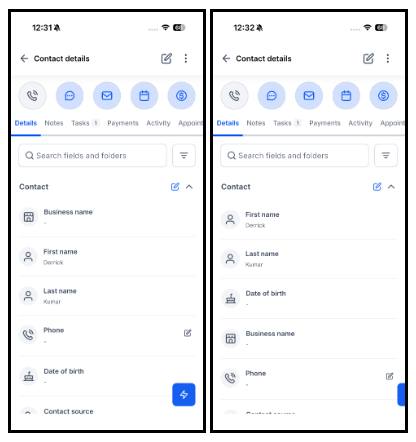
If you’ve customized the contact detail page on web — reordered tabs, hidden fields you don’t use — that layout now follows you into the mobile app too.
Tabs, sections, and fields appear in the exact order and visibility you configured on web, so every contact opens the same way on every device. No more “it looks different on my phone.”
How to Get Started: 1. Customize on web: Open the contact detail customization settings for the sub-account. Reorder or hide tabs, sections, and fields. Save. 2. Open the app: Log in to the same sub-account on mobile and open any contact. 3. See your layout: The tabs and the Details sections and fields now match the web configuration. 4. Updating the layout: If the view configuration changes for your user, restart the app for the changes to reflect.
This is currently view-only on mobile, available on app version 4.22.0 or higher.
You’ll now get two automated heads-up emails to help you keep your domains: a reminder 67 days before your domain expires, and a final notice 10 days after expiry if it lapses.
These emails go out regardless of whether auto-renew is turned on, giving you the maximum practical window to act — turn on auto-renew, update an expired card, or manually renew — before things get serious. A lapsed domain can take down your website, break your email, and kill your funnels, so this is one you don’t want to miss.
No setup required — this runs automatically for every domain.
When you request an EPP/auth code to transfer a domain out, you’ll now see the actual (masked) email address the code was sent to, instead of a generic “an email has been sent” message.
For example, [email protected] now shows as a**y@g***l.com — enough for you to confirm it went where you expected, without exposing the full address. If more than two addresses are involved, you’ll see the first two plus a count for the rest.
Why it matters: no more guessing where to look for your transfer code.
If a domain transfer-in is blocked because DNSSEC is enabled, you’ll now see a clear notice explaining exactly that — instead of a vague “not ready for transfer” message — with a direct link to a help article on disabling it.
The notice also lets you know it can take up to 48 hours for DNSSEC changes to take effect, so you don’t retry too early.
No action needed — this notice appears automatically whenever it applies.
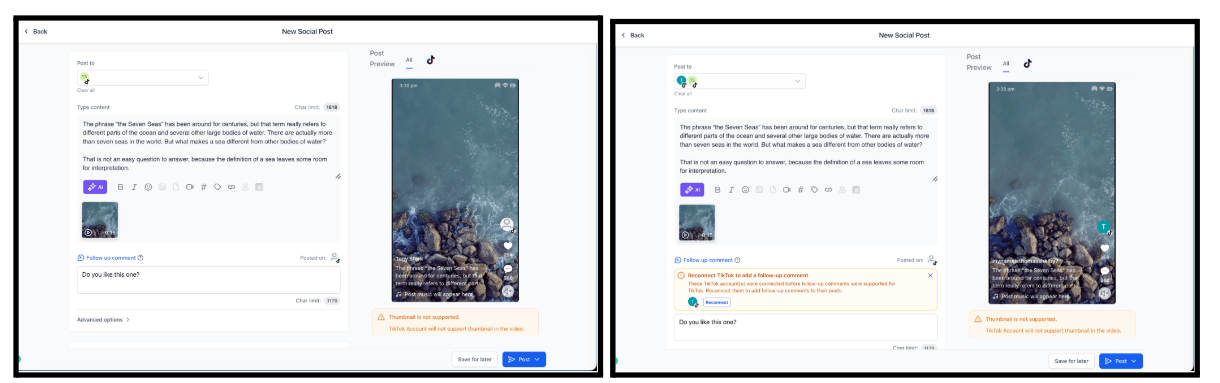
Managing TikTok content just got easier. You can now add a follow-up comment while creating your TikTok post, and Social Planner will automatically publish it once your video goes live — perfect for extra context, a CTA, or a follow-up message, up to 1,200 characters.
Video previews in the approval experience also now have proper playback controls: click to play or pause, toggle sound on/off, and you’ll see a clear “No audio” label on videos without a soundtrack.
How to Use — Follow-Up Comments: 1. Go to Marketing → Social Planner → Create Post 2. Select TikTok 3. Add your video and enter a message in Follow-Up Comment 4. Schedule or publish the post 5. The comment will be posted automatically once the video goes live
How to Use — Video Controls: Open an External Approval Link containing a video and use the play, pause, and sound controls directly on the preview.
Good to know: follow-up comments only work on public posts, and can take 1–3 minutes to appear after the video is published.
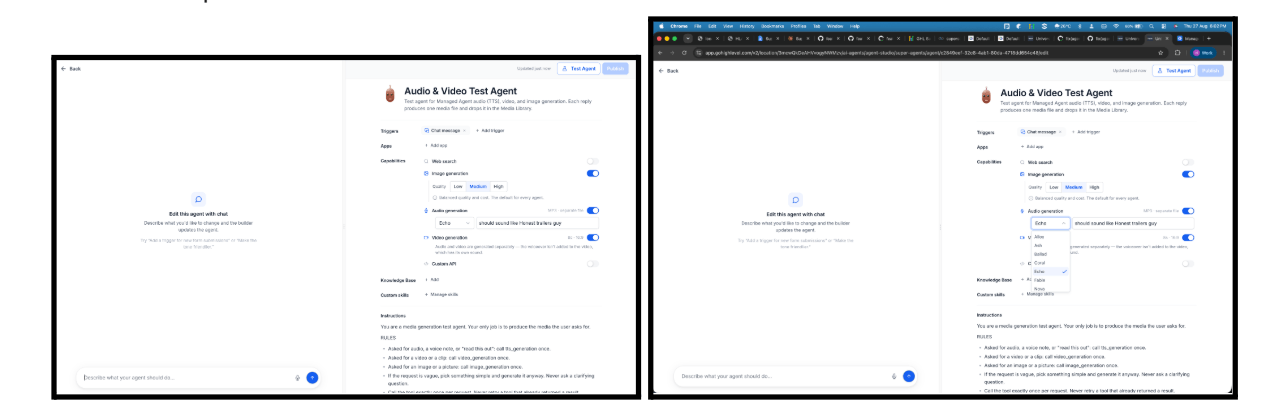
Managed Agents could already create images — now they can generate voiceovers and video too, and everything they make lands as a real, reusable file in your Media Library instead of a link that expires.
Audio: Pick from 11 voices, describe the tone you want (“warm and unhurried”), and your agent returns a playable MP3 — in whatever language you wrote your prompt in.
Video: Get an 8-second, 16:9 clip delivered as a playable attachment (audio and video are generated separately, each with their own sound).
Every generated image, audio file, and video is now saved permanently to your Media Library with a real name you can search for, and videos get a proper thumbnail. This works on scheduled or event-driven agents too, not just live chat — so an agent can produce media unattended. Agents can also attach generated media directly to a social post.
How to turn it on: Open any agent, find the Capabilities section, and switch on Audio generation or Video generation — voice, tone, and clip settings appear right there.
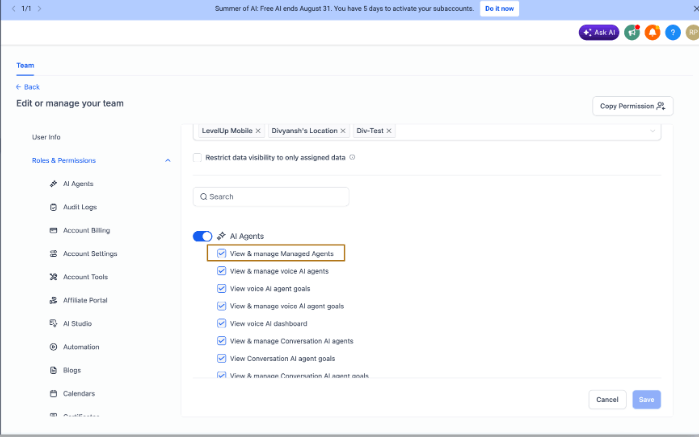
You can now decide exactly which users in a sub-account can view or manage Managed Agents, right from the standard user permissions screen.
Two permissions — View and Manage — let you control access the same way you would for Calendars, Contacts, or any other module. It’s enforced everywhere: the sidebar, the agents directory, the builder, agent chat, and the API all respect the same permission, so there’s no workaround.
How It Works: 1. Open the user: Go to the user permissions screen for any sub-account user. 2. Set the access: Toggle Managed Agents on or off, the same way you would for Calendars, Contacts or any other module. 3. That’s it: The change takes effect immediately across navigation, the directory, the builder and the API — no re-login, no re-sync.
Every existing user keeps the access they have today — this is opt-in whenever you’re ready to restrict it.
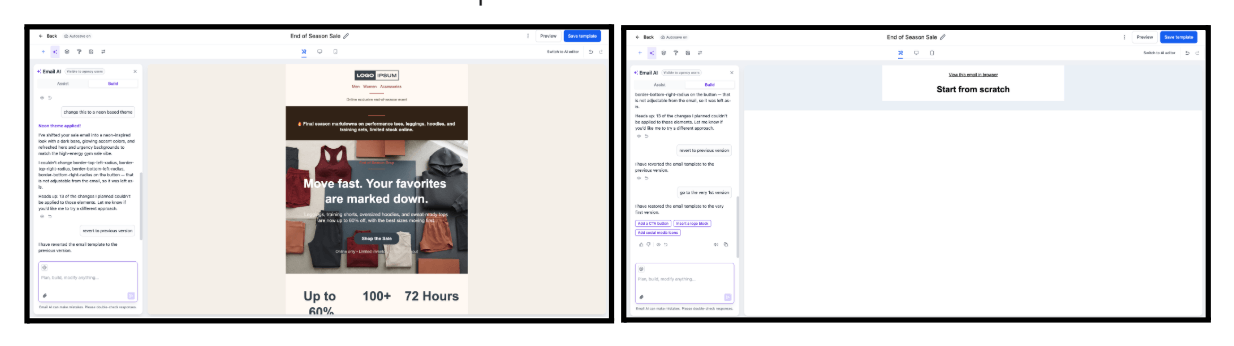
Made an edit you regret? Just ask Email AI to fix it. You can now say “revert to the previous version,” “switch to version 2,” or even “go back to where I changed the colors,” and it’ll restore that version directly on your canvas — no manual re-creating required.
This works for both templates and campaign emails.
How to Use: 1. Open Email AI in Email Builder or Vibe Editor. 2. Request the previous version, a numbered version, or a version associated with an earlier change. 3. Review the restored template on the canvas.
The test phone number field in the Send SMS action now has a proper country flag picker — the same one you see elsewhere in the app. Type your number the way you’d normally dial it, and it just works.
Previously, most people typed their own number without a country code, which failed the test and returned a confusing error. Now the picker defaults to your sub-account’s country, and you can switch it with a click if you’re testing a different market.
How to use it: 1. Open the Send SMS action in your workflow and scroll to Test Phone Number. 2. Leave the flag on your sub-account’s country, or click it and pick another. 3. Type the number in local format and click Send test SMS.

Until now, every workflow in a sub-account sent from the same email domain — so a bad promo blast could put your booking confirmations at risk too. Not anymore.
Workflow Settings now includes a Sender domain dropdown, letting you pick any verified dedicated domain for that specific workflow. Reminders and receipts can sit on one domain, promos and cold outreach on another — so if one campaign lands badly, it doesn’t drag your other emails down with it.
How to use it: 1. Add and verify your domain under Email Services, Dedicated Domains. 2. Open the workflow, go to Settings, and pick the domain under Sender domain. 3. Set a From name and From email, then save. Every email action in the workflow inherits it.

This release brings a batch of reliability and performance improvements to AI Studio: more resilient project sandboxes that stay available through restarts, more consistent live previews, a global file search that now includes unsaved work, better handling of large images, and a cleaner SEO panel tucked into the More menu.
We also fixed a handful of bugs around sandbox recovery, large file uploads, stale previews, and the chat composer overlapping Version History — all in service of a smoother building experience.
Ever had AI Studio stall out because it didn’t know which calendar or CRM form to connect? That’s fixed with HITL (Human-in-the-Loop).
When the AI needs something only you can provide — like picking a calendar — it now pauses mid-build, shows you a picker card right in the chat, and continues the exact same request once you respond. No new prompt, no starting over, no lost context.
How HITL Works: 1. Ask AI Studio to add a booking calendar or connect a form to CRM 2. When it needs your choice, a picker card appears in chat 3. Select the calendar or form 4. Click Connect 5. The same request continues — no new prompt, no lost context
Don’t have anything to connect yet? Create one right from the card, or click Dismiss to keep building and connect it later.
AI Studio now reads the real structure of your files — exports, imports, and routes — instead of relying on a generated summary, which makes it faster and more accurate on everyday requests.
The file you’re actually asking about stays the priority, long conversations get trimmed automatically so they don’t fall over, and this all happens with nothing new for you to click — it’s on by default for every chat.
With AI Studio charges now in effect, you’ll start seeing usage banners that keep you informed before you hit your limits.
Subscription users get alerts at 70% (usage alert), 85% (warning), and near 100% (critical) usage. If you’re on rebilling, you can adjust your limits directly from the banner; otherwise, you can request an increase from us at [email protected]. Pay-per-use users get a notification for every $50 spent.
No action needed — these banners are on by default for everyone with AI Studio access.
You can now export your complete AI Studio codebase — including older versions from your project history — as a ZIP file, so you’re never locked into building exclusively inside AI Studio.
How to Download the Latest Code: – Option #1: Navigate to Code from the top navigation menu, scroll to the bottom, and click Download Codebase. – Option #2: Navigate to Project Settings, find Download Codebase, and click the button.
Want an older version? Open Version History, click the three-dot menu on the version you want, and select Download ZIP.
This is a big one. New AI Studio projects now run on a real full-stack framework (TanStack Start) — not just a frontend, but server-rendered pages, backend server functions, real REST APIs, and a proper secrets vault.
What that means in plain terms: – Your pages are rendered on the server, so search engines and social link previews actually see your real content — not a blank page. – You can build backend logic that runs on the server and never gets exposed to visitors. – You can ship real REST API endpoints, not just a static site. – API keys and tokens go into Secrets and never leak into the browser.
Existing Vite/React projects keep working exactly as they do now — this applies to new projects, with a migration path coming later.
Note: this is currently in private beta, with a public release coming soon.
Selling Printify products just got easier for merchants in different markets. A dedicated Printify shipping profile is now created automatically for your synced products, and live Printify shipping rates show up at checkout.
You can also choose the currency your Printify product prices convert to during import, right from the Printify app settings.
How to Use It: 1. Open the Printify app from the Marketplace and enter your Printify token. 2. Select the Printify store you want to connect. 3. Choose the preferred currency under Convert Product Currency to. 4. Connect and sync your products. The required shipping profile is configured automatically.
Good to know: to keep receiving live shipping rates, products need to stay assigned to the Printify shipping profile.
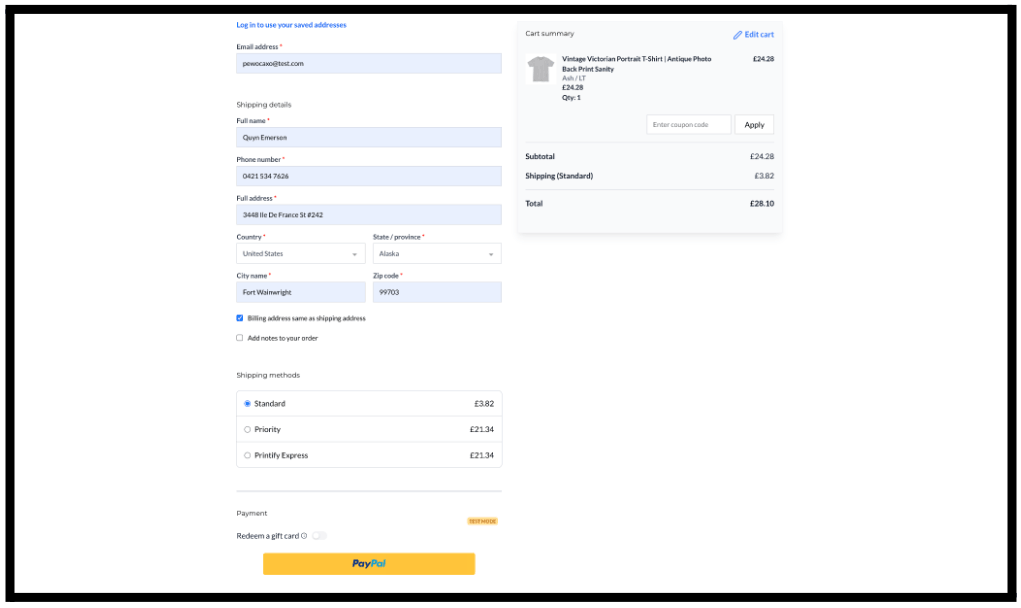
Store owners can now preview or copy a product’s live page link directly from Stores → Products — no need to jump into the Store Builder first.
Each included product now has Preview and Copy link actions. Preview opens the live product page in a new tab; Copy link grabs the resolved URL with a quick confirmation. Products mapped to a Custom PDP automatically use that page instead of the default one.
How to Use It: 1. Go to Stores → Products. 2. From the Included tab, locate the product you want to share or preview. 3. Select Preview to open its live product page, or Copy link to copy the PDP URL. 4. If no custom domain is connected to the store, the product will automatically use the available preview URL.
Time-sensitive campaigns — event registrations, flash sales, contests, webinars — used to stay open indefinitely unless you manually shut them down. Now you can schedule exactly when a Form, Survey, or Quiz opens and closes.
You can set it to open right away or on a specific date, close never or on a specific date, choose the time zone, and decide exactly what visitors see before it opens and after it closes — either a custom message or a redirect to another URL.
How It Works: 1. Open your Form, Survey, or Quiz and navigate to its settings. 2. Enable Schedule visibility. 3. Configure when it should open: Right away, or Pick a date 4. Configure when it should close: Never, or Pick a date 5. Select the appropriate time zone. 6. Configure what visitors should see outside the active window. 7. Choose either: Show a page to display a customized message, or Open a link to redirect visitors to another URL. 8. At the configured opening time, it automatically starts accepting responses. 9. At the closing time, new submissions are automatically blocked and visitors see the experience you configured.
Great for: event registrations that auto-close at the deadline, flash sales with a built-in expiration, “coming soon” pages before a launch, and redirecting post-campaign traffic to your next offer.
Adoption has already been strong — over 150 locations started using this before it was even officially announced.

Not every opportunity field needs to show up for every deal. Conditional Custom Fields let Admins control exactly which fields appear — and which are required — based on the pipeline, stage, status, or other field values.
Build rules with single conditions or AND/OR logic, show individual fields or whole folders only when conditions are met, and make visible fields mandatory so a deal can’t be saved until they’re filled in. There’s even a live preview so you can see the rule in action before saving it. The Lost Reason field, for example, can now automatically appear the moment an opportunity’s status changes to Lost.
How to Use: 1. Go to Settings → Labs and enable Show & Require Opportunity Fields Conditionally for the sub-account. 2. Navigate to Settings → Custom Fields → Opportunity → Conditional Rules. 3. Click Create conditional rule. 4. Select one or more trigger conditions and connect them using AND/OR logic. 5. Choose an outcome: Show field, Show folder, or Make mandatory. 6. Review the live preview and click Save rule.
Alternatively, go to Settings → Opportunities & Pipelines, open a pipeline’s Actions menu, and select Manage conditional rules.
Bottom line: cleaner opportunity forms, more accurate reporting, and standardized sales processes across your teams.

Creating a professional certificate can now start with a simple prompt. Describe what you need — the occasion, style, organization, recipient details, signer — and Certificate AI turns it into a complete, ready-to-edit design.
It’ll even ask follow-up questions when it needs more detail, like your preferred orientation, and once generated, your certificate opens directly in the Certificate Builder so you can keep refining it. There are also quick-start prompts for common use cases like course completion, milestones, and training.
Bottom line: skip the blank canvas — start with a complete design and make it your own.
Certificate AI is currently in Beta, and we’ll keep improving it based on how you use it.

Your AI agents just got a massive toolkit upgrade — 18 new MCP connectors are now available:
Bottom line: more real-world tools your agents can plug into and actually use.
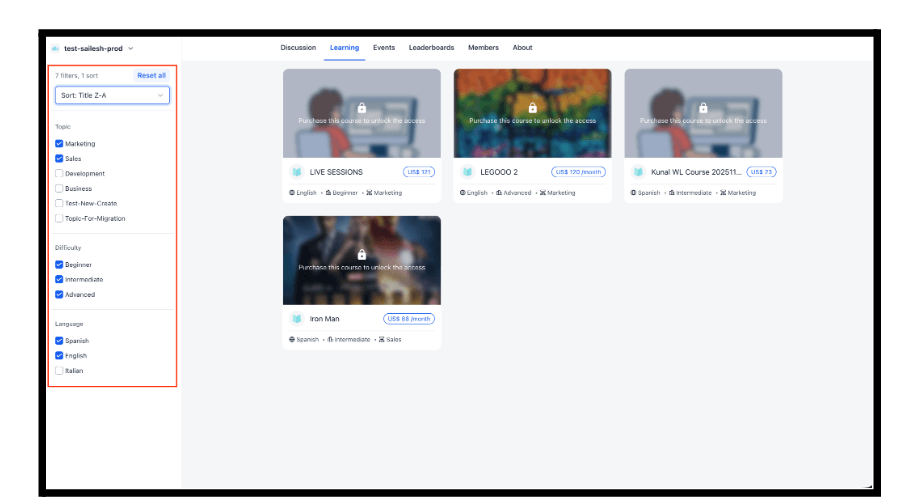
Communities now makes it easier for members to find learning content that fits what they’re looking for. Members can filter courses by Topic, Difficulty, and Language, and sort by Title, Newest, or Oldest.
Course builders can assign topic, difficulty, and language values to their courses, and those become filterable inside Communities automatically.
Bottom line: less time searching, more time learning — especially helpful as your course library grows.
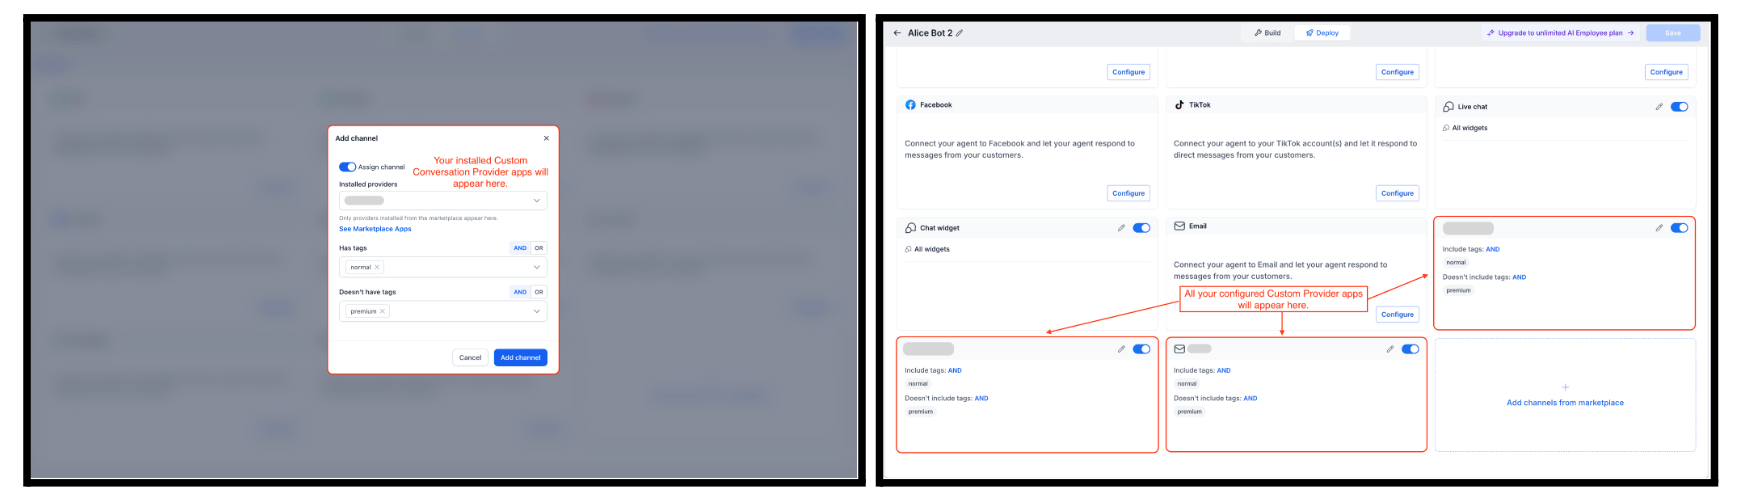
If your business runs on more than native channels, this update’s for you. You can now point your Conversation AI bot at non-native channels delivered through Marketplace apps, so it responds to inbound messages there too.
Install any Marketplace app that supports a Conversation Provider, select it under your bot’s Deploy tab, and every incoming message on that channel gets handled by your assigned bot — just like your native channels.
How to Use It: 1. Enable “Conversations AI Channel Management” from Labs 2. Install a Marketplace app of your choice that supports Conversation Provider 3. Open your bot and navigate to the Deploy tab. 4. Alongside the native channels, add the custom providers you’ve installed and save.
Everything you’ve already got running keeps working — providers that were implicitly active show up pre-configured on your Deploy screen, so nothing breaks.
FGF Notifications