
Welcome to your weekly roundup of FG Funnels updates through the week of November 12th, 2026.
From Client App Builder and industry-ready workspaces to gift cards and receipt printers at checkout, this week’s updates bring some seriously powerful tools to your stack. We’re also rolling out upgrades to Quizzes, Workflows, WhatsApp, Client Portal, AI Studio, Meeting Room, and more. All of it is designed to save you time and give your clients a better experience.
If you have any questions about these updates, email us at [email protected] or reach out through live chat inside the app. We’re always happy to help.
Client Portal AI has a new name: Client App Builder, and it’s now in public beta.
Describe your business, and AI builds a branded client app for both web and mobile. It runs on your FG Funnels contacts, custom objects, pipelines, and payments, with login, access control, security, and notifications built in.
Here’s the fun part. You can now connect the FG Funnels MCP to Claude, ChatGPT, or Cursor and let the AI tool you already use build and edit your apps. Already designed something in Claude Design? Pick “I’ll design it myself” and your design is what gets built.
Every change lands on a private preview first, and nothing goes live until you hit publish. There’s also a new prompt guide with real apps and the prompts that built them, plus faster previews.
Your website gets you clients. Your app keeps them. And now you can build as many as you need.
How to use it:
Your client app can now run on your actual sales process and your own data.
Pipelines: Clients can follow their own journey with you, stage by stage, from “Application received” to “Approved” to “Onboarding.” You choose which pipelines they see and hide any stages they shouldn’t, like internal reviews.
Custom objects: Show records publicly (great for service menus, listings, and price lists) or privately, to signed-in members, a client’s whole company, or just each client’s own records.
Custom fields: Give clients a “My details” page with things like their membership tier or policy number. You pick exactly which fields show up, and everything else stays in your CRM.
It’s safe by default, too. If a page would expose an email or phone number, or a change would affect who can see something, the AI checks with you first.
The result? Fewer “where are we?” calls, because clients can check their own progress anytime.
How to use it:
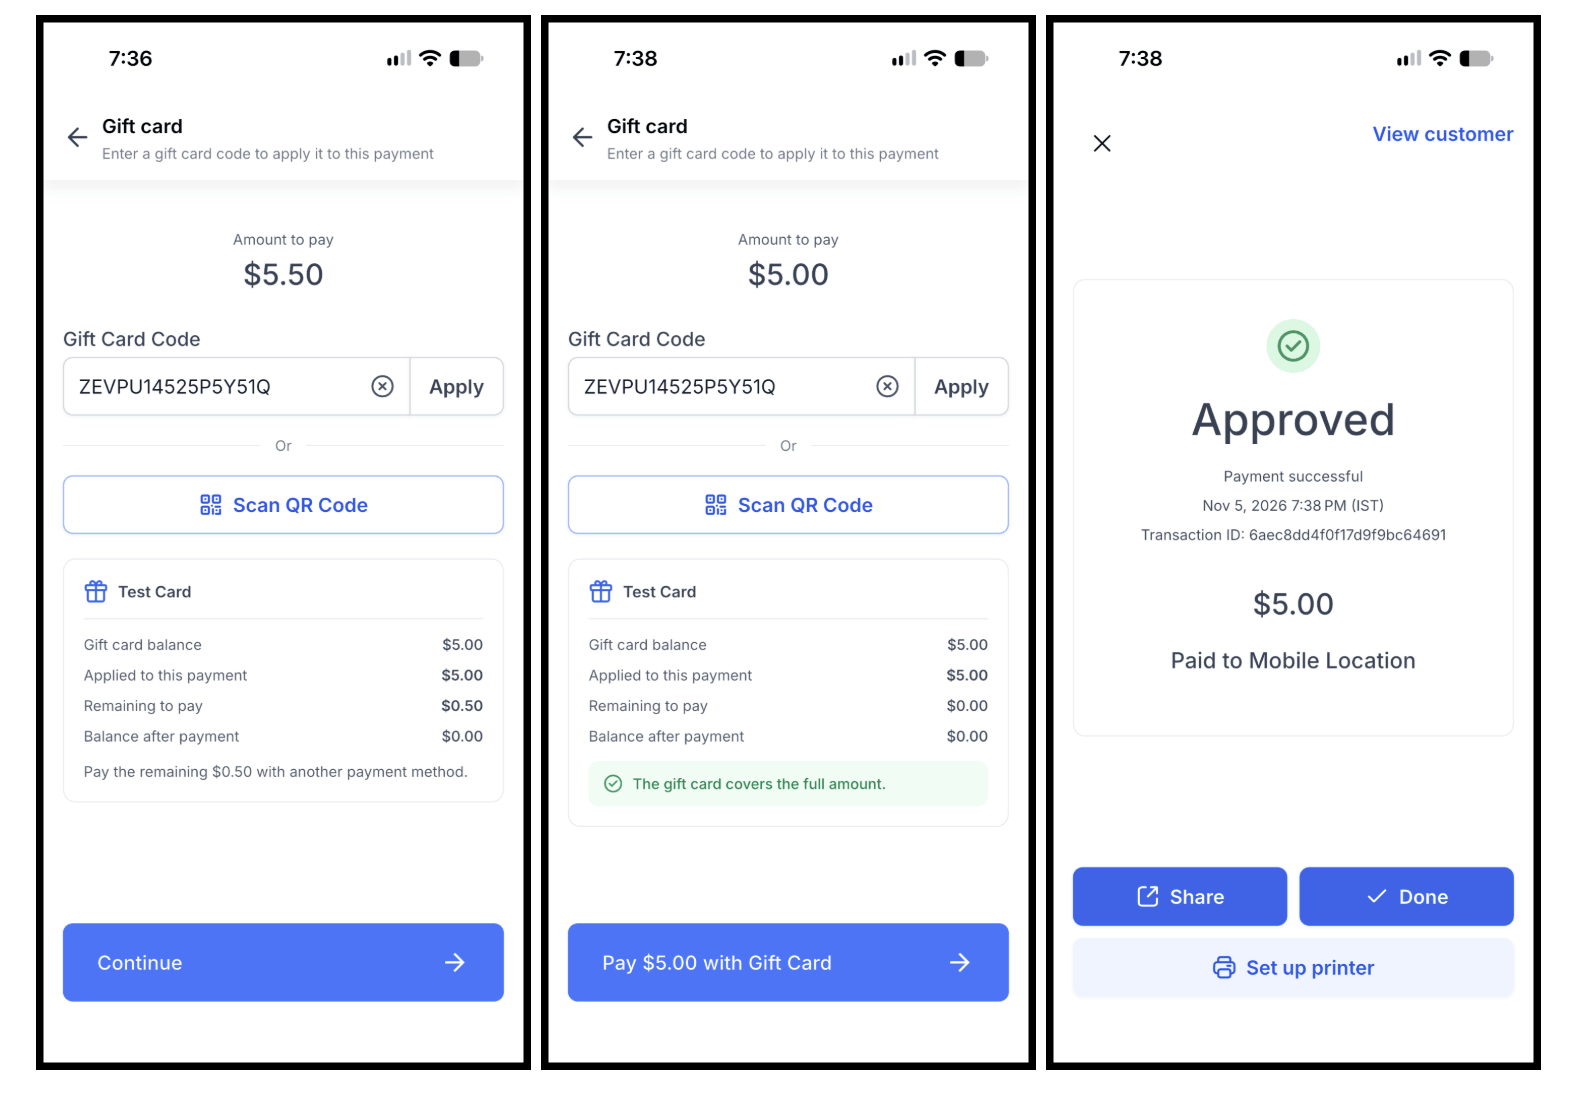
Customers can now pay with your business’s gift cards right in the mobile app. Type in the code or scan the card’s QR code, and you’ll see the card’s balance, how much it covers, and what’s left to pay before anything is charged.
If the card covers everything, you’re done in a tap. If it only covers part, collect the rest with Tap to Pay, a card reader, cash, or another method. Gift cards can even cover the tip.
It works for Point of Sale checkout, invoices, and orders on iOS and Android (app version 4.27.0 and up), and every gift card payment shows up in your transactions and on receipts.
How to use it:
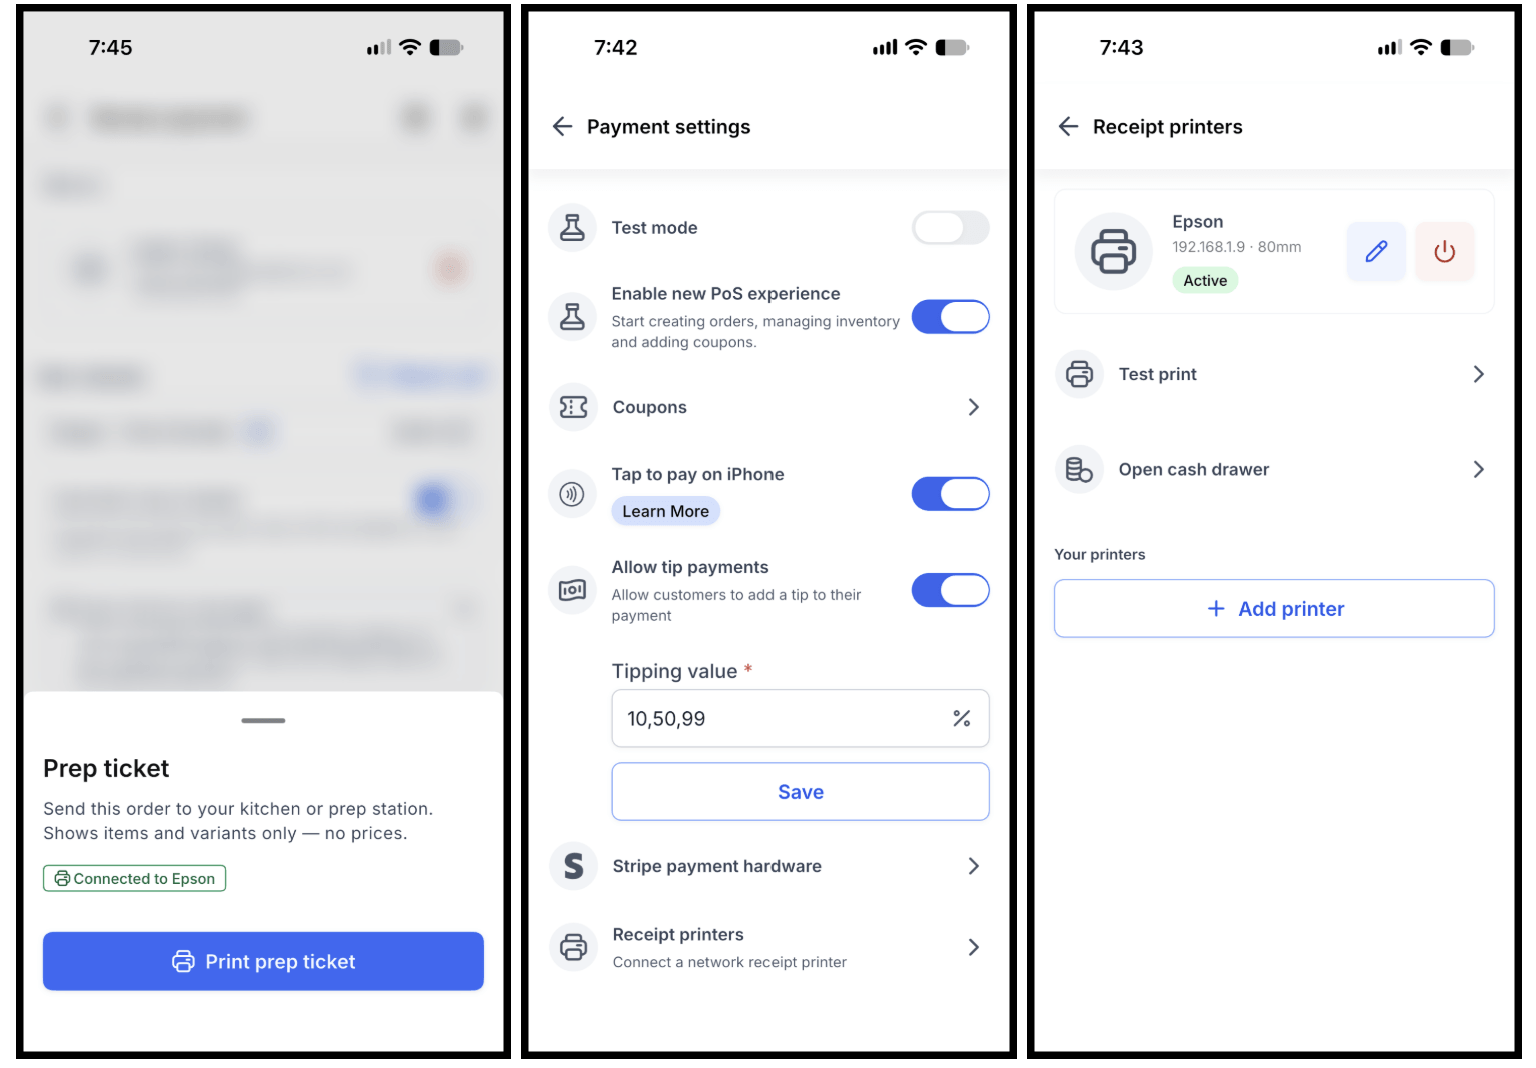
If you take payments at a counter, you can now connect a Wi-Fi receipt printer to the FG Funnels mobile app. No second system needed.
Print customer receipts right after any payment, reprint them later, and open a connected cash drawer with a tap. You can also send prep tickets to your kitchen or prep station, or have them print automatically with every receipt.
Good to know: this works with Wi-Fi thermal receipt printers that support ESC/POS (most receipt printers do). Bluetooth, USB, and Ethernet-only printers aren’t supported, and cash drawers need to plug into the printer’s cash drawer port. Your phone or tablet and the printer need to be on the same Wi-Fi network. Available on iOS and Android, app version 4.27.0 and up.
How to use it:
This is one of the most requested Quizzes features, and it’s finally here: conditional logic!
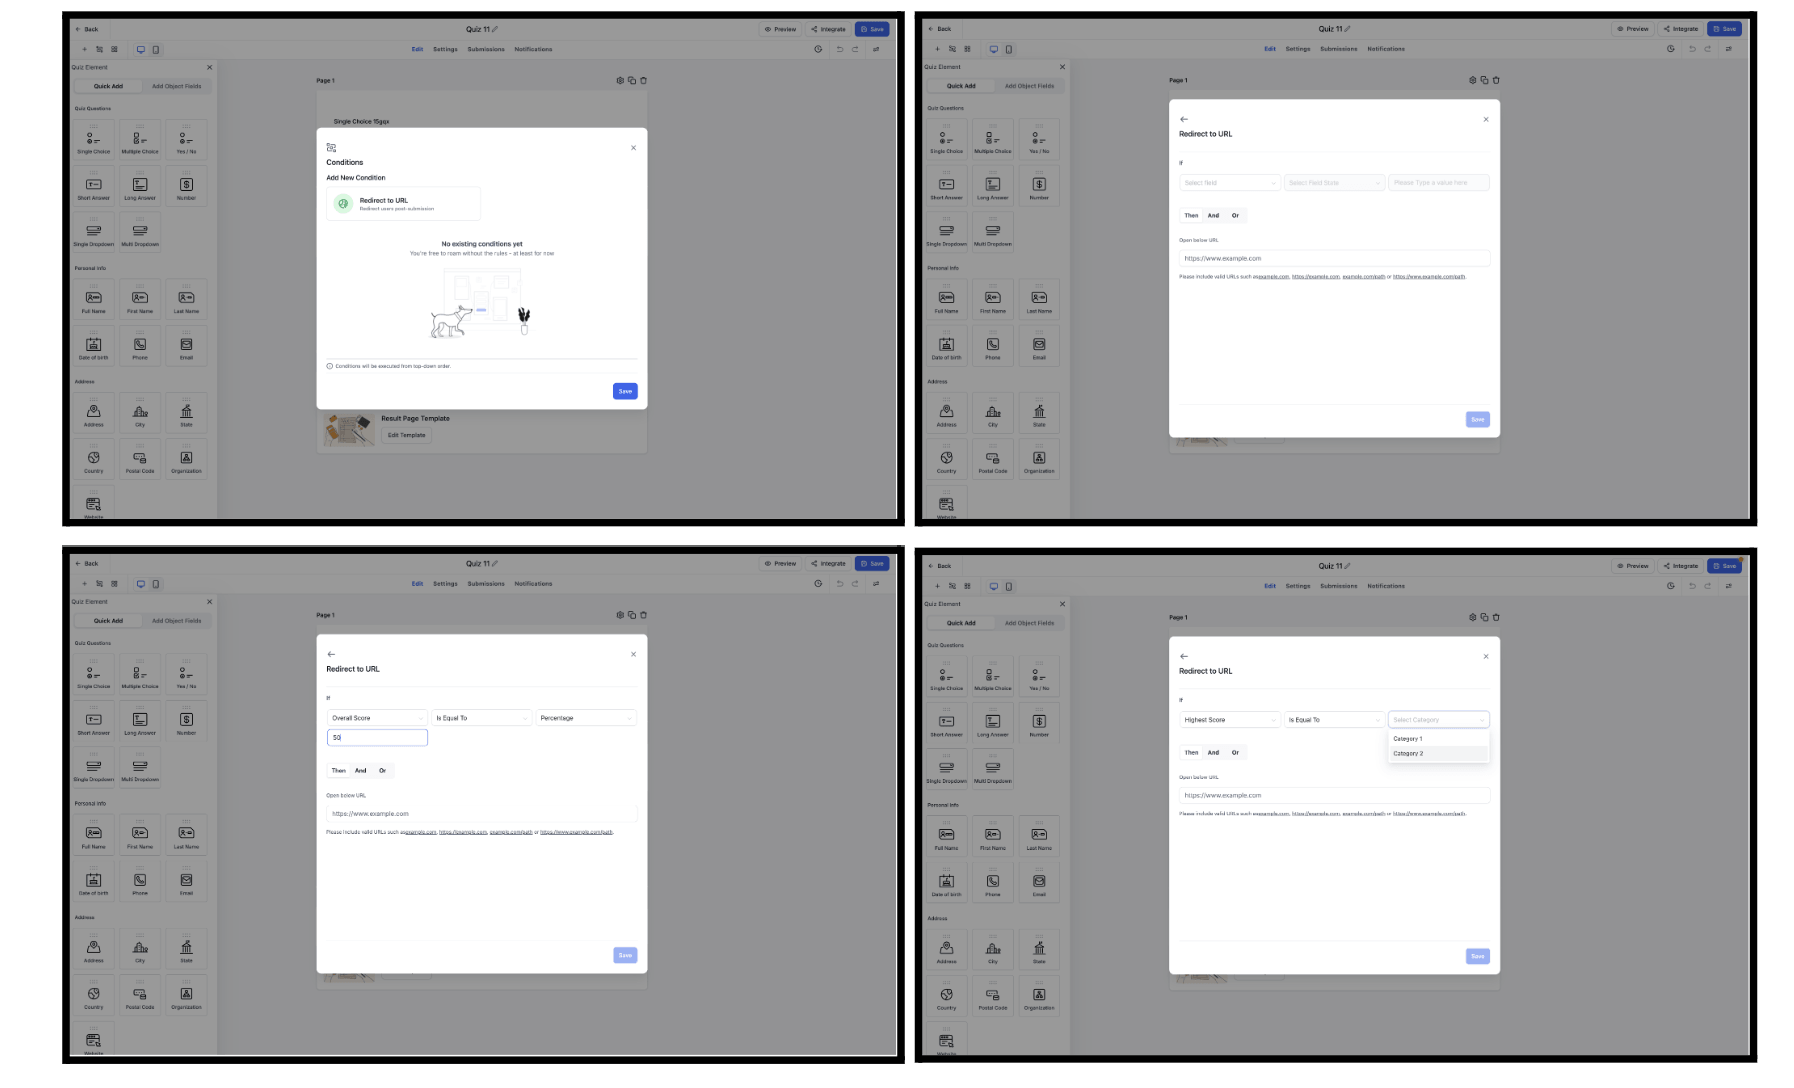
Instead of everyone landing on the same results page, you can now redirect people to different URLs based on their answers or their scores. That opens up a lot of possibilities. Send high scorers to an advanced offer, point others to helpful resources, or recommend a product based on their top category.
Along with the answer-based conditions you already know from Forms and Surveys, you get four new quiz-specific ones: Highest Category, Lowest Category, Overall Score, and Category Score.
Redirect to URL is the first type of logic available in Quizzes, with custom messages, lead disqualification, and show/hide fields on the way.
How to use it:
Figuring out what happened to a contact, or what changed in a workflow, used to mean digging through Enrollment History, Execution Logs, and Version History, then piecing it together yourself. Now you can just ask.
The Workflow AI chat has five new abilities:
See a contact’s path: Ask about a contact and get a step-by-step walkthrough of their latest run, with a button to see that path highlighted on the canvas.
Follow a contact across workflows: See every workflow a contact entered, how each run ended, and where they are right now. You can even ask who’s stuck in several workflows at once.
Check version history: Find out who edited a workflow, what changed, and whether that edit likely caused a problem.
Get PDF reports: Ask for a report and mention PDF, and you’ll get a download button right under the answer. Much nicer to hand a client than a pile of screenshots.
Compare workflows: Put two workflows head to head, or rank your workflows to spot the ones that need attention.
How to use it:

When you edit a WhatsApp template or snippet, your workflows now send the latest version. No more re-saving every workflow step just to update a message.
Say you add the contact’s first name to your “Order Ready” template. Every workflow using it now greets contacts by name. Or change the discount in your “Holiday Offer” snippet from 10% to 15%, and every WhatsApp step using it sends 15%.
One quick note: WhatsApp steps using a snippet that were saved before this update need to be opened and saved once to turn this on.
When a customer messages you on WhatsApp and an automation is working on the reply, they used to see nothing. That silence can make it feel like the bot is broken.
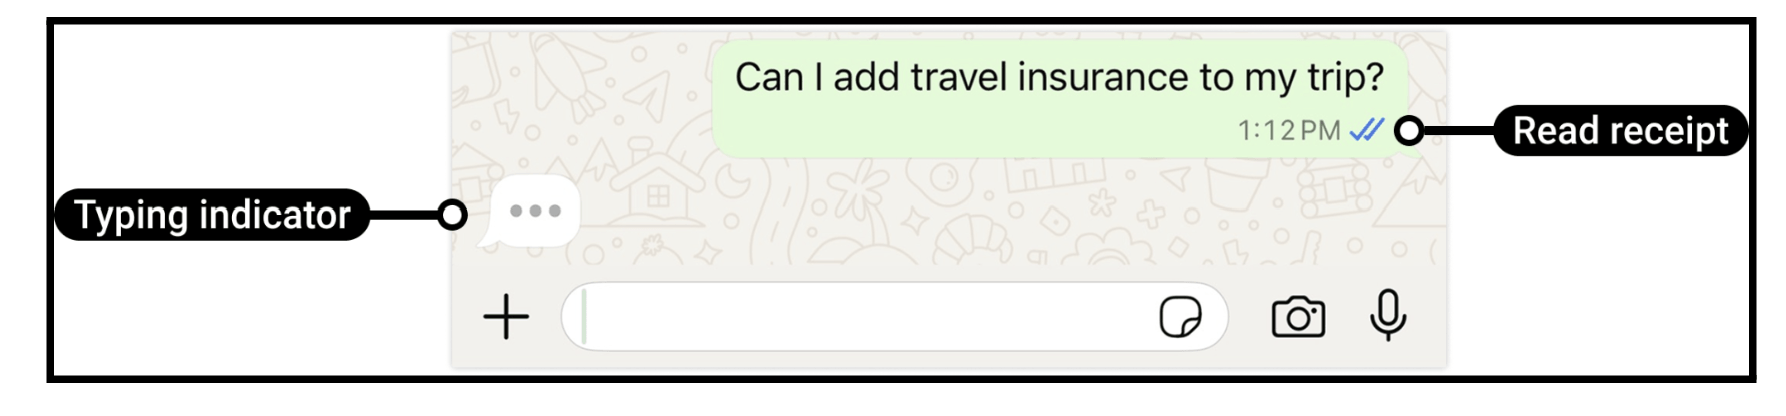
Now you can add a typing indicator action to your workflow, so customers see that familiar “typing…” cue and know a reply is on the way. It’s a small touch that makes automated conversations feel a lot more human. Since you place it yourself, you decide exactly where it shows up, right before the reply.
Managing more than one brand? You can now connect multiple Facebook accounts to the same sub-account, with multiple Pages under each one.
Leads, messages, and automations work across all your connected Pages, and you can manage everything without disconnecting and reconnecting accounts. The Facebook integration has also moved to the Marketplace for a smoother, more secure setup.
This is an early-access feature you’ll need to turn on in Labs. A couple of things to know: Shops and Ad Accounts still support just one Facebook account for now.
How to use it:

Members don’t always remember whether they already have an account, and guessing wrong used to stop them in their tracks.
Now it doesn’t matter which button they pick. A new member who tries to log in with a secure code gets signed up instead. An existing member who tries to sign up gets logged in after they verify their code. No more “user not found” or “user already exists” dead ends.
You also get more control. In Client Portal Builder, under Sign-up & login methods, you can choose whether members see the secure code or password login first, and whether they’re asked to create a password. Members without a password can also set one anytime from Profile → Account.
Fewer stuck members means fewer “I can’t get in” support requests for you.
Adding a chat widget to your AI Studio site? You can now connect a Conversation AI agent to it without ever leaving AI Studio.
Pick an agent from the dropdown, and it starts answering your website visitors. You’ll always see which agent is connected and which contacts it responds to, and you can edit or remove it anytime. It works just like the Agent tab in the Chat Widget builder.
Just keep in mind that agents are still created and trained in Conversation AI. AI Studio connects one you’ve already built.
How to use it:
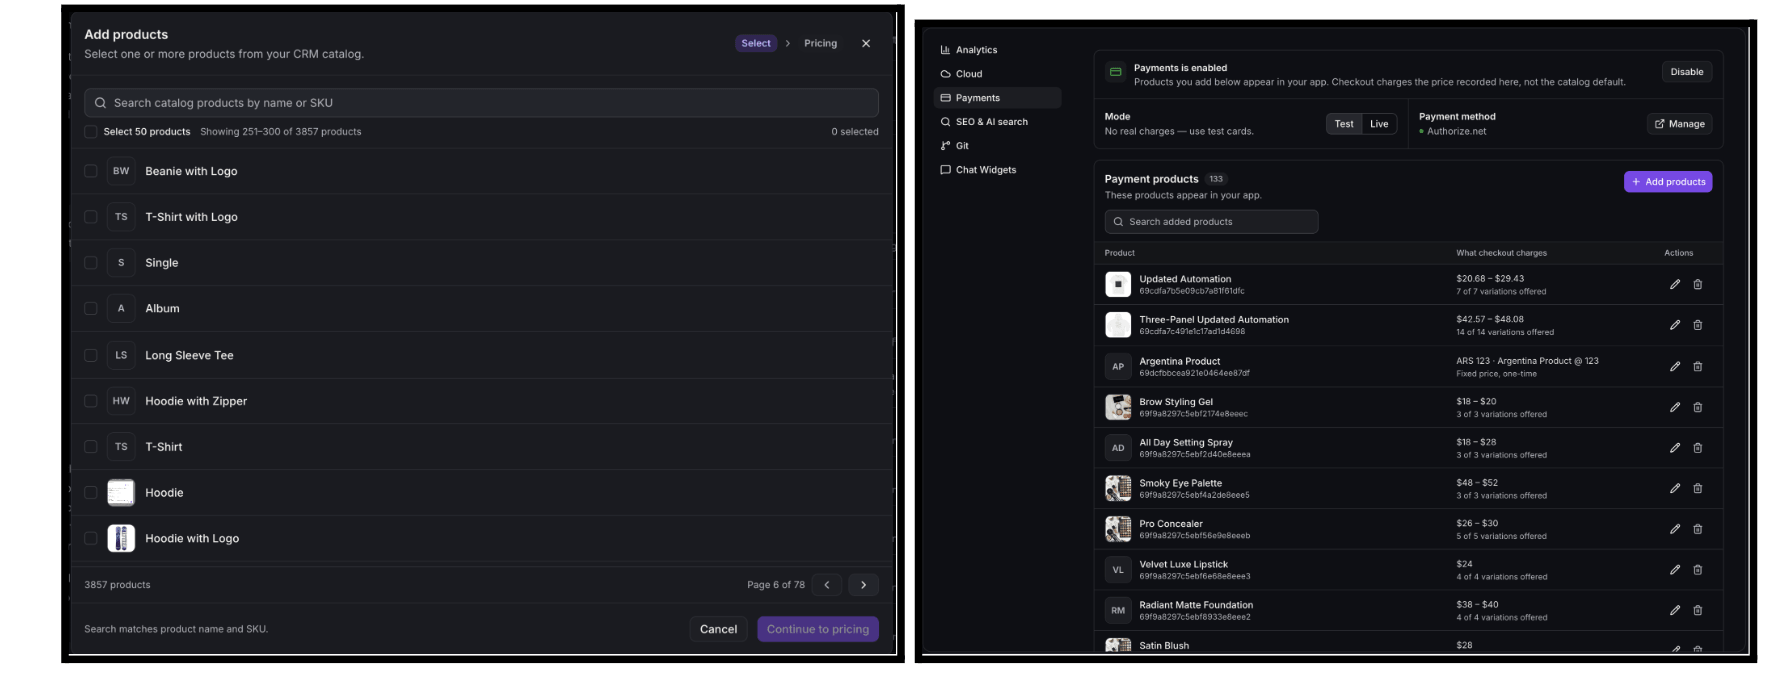
The 100-product limit is gone. You can now add as many products from your store as you need to your AI Studio site.
Add a whole page of products at once, search across your full catalog, and see which products you’ve already added. Large catalogs stay quick and easy to manage.
One thing to know: when checkout is set to “All products,” buyers see your first 100. To sell beyond that, choose the products to offer or link to individual product pages. Your existing products, sites, and checkouts keep working just like before.
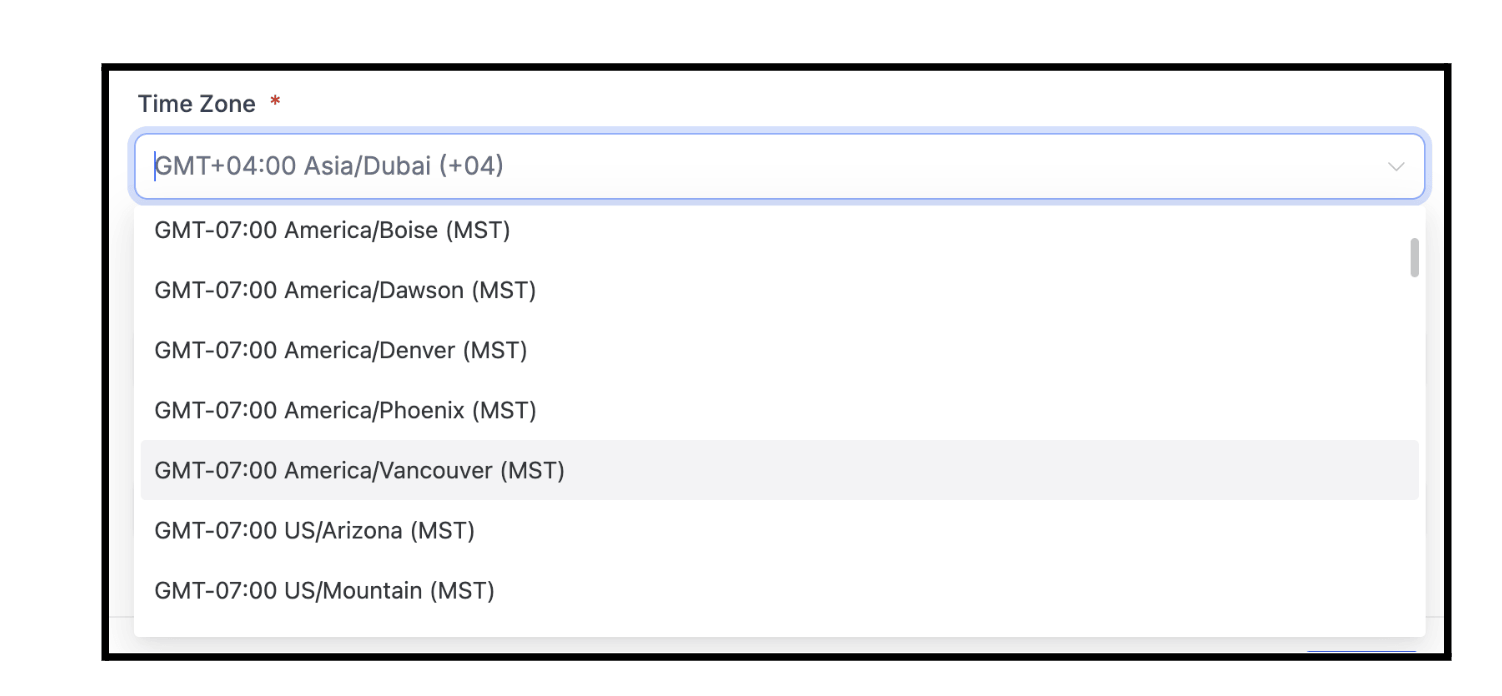
A few regions have changed how they observe time, and FG Funnels now supports the new rules. British Columbia, Alberta, and Manitoba no longer fall back an hour on November 1, 2026, and Morocco has moved to permanent UTC+0.
There’s a new America/Vancouver time zone for British Columbia, and the Alberta, Manitoba, and Morocco time zones have been updated. Choosing the right one keeps your appointments, notifications, and workflows lined up with local time.
Heads up: existing contacts and settings aren’t changed automatically. If you’ve been using a U.S. time zone as a stand-in, you’ll want to switch to the right one.
How to use it:
Meeting Room got a handful of upgrades to keep your calls running smoothly.
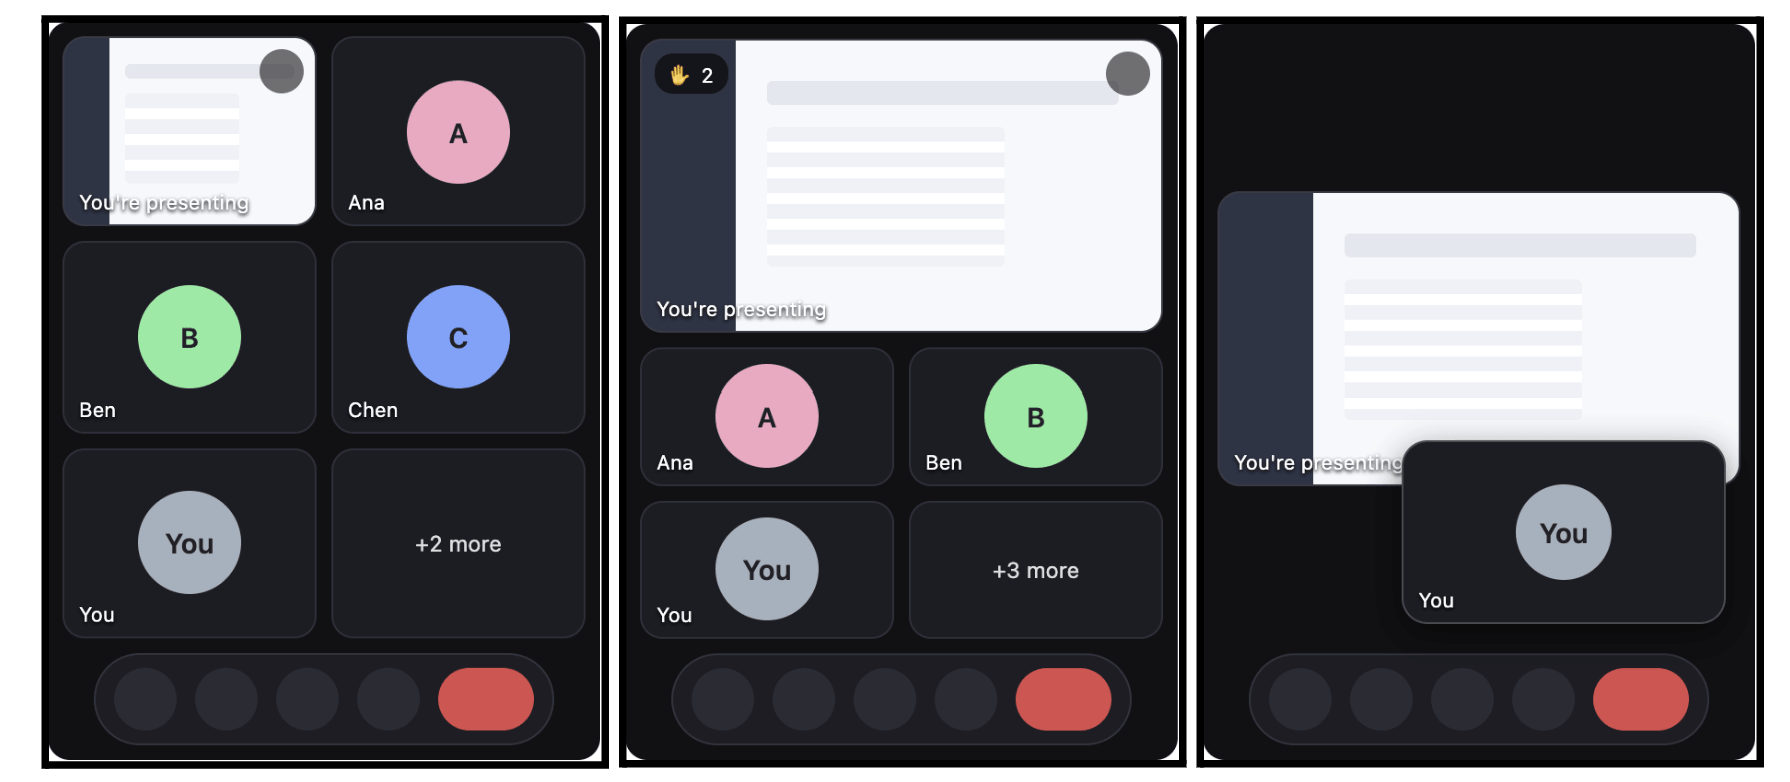
Picture-in-Picture (Chrome desktop): Switch tabs while presenting and your shared screen stays on top, with attendees shown below. Raised hands show up first, in the order they were raised.
Audio that follows your headset (Chrome): Plug in a headset mid-call and it takes over automatically.
Smoother screen sharing: Shares start faster, with fewer “Poor connection” warnings on slow connections.
Adaptive backgrounds: Backgrounds and blur scale down gradually on slower devices instead of stuttering.
We also fixed breakout menus closing on their own, plus a few small display issues. Fewer interruptions, steadier calls.
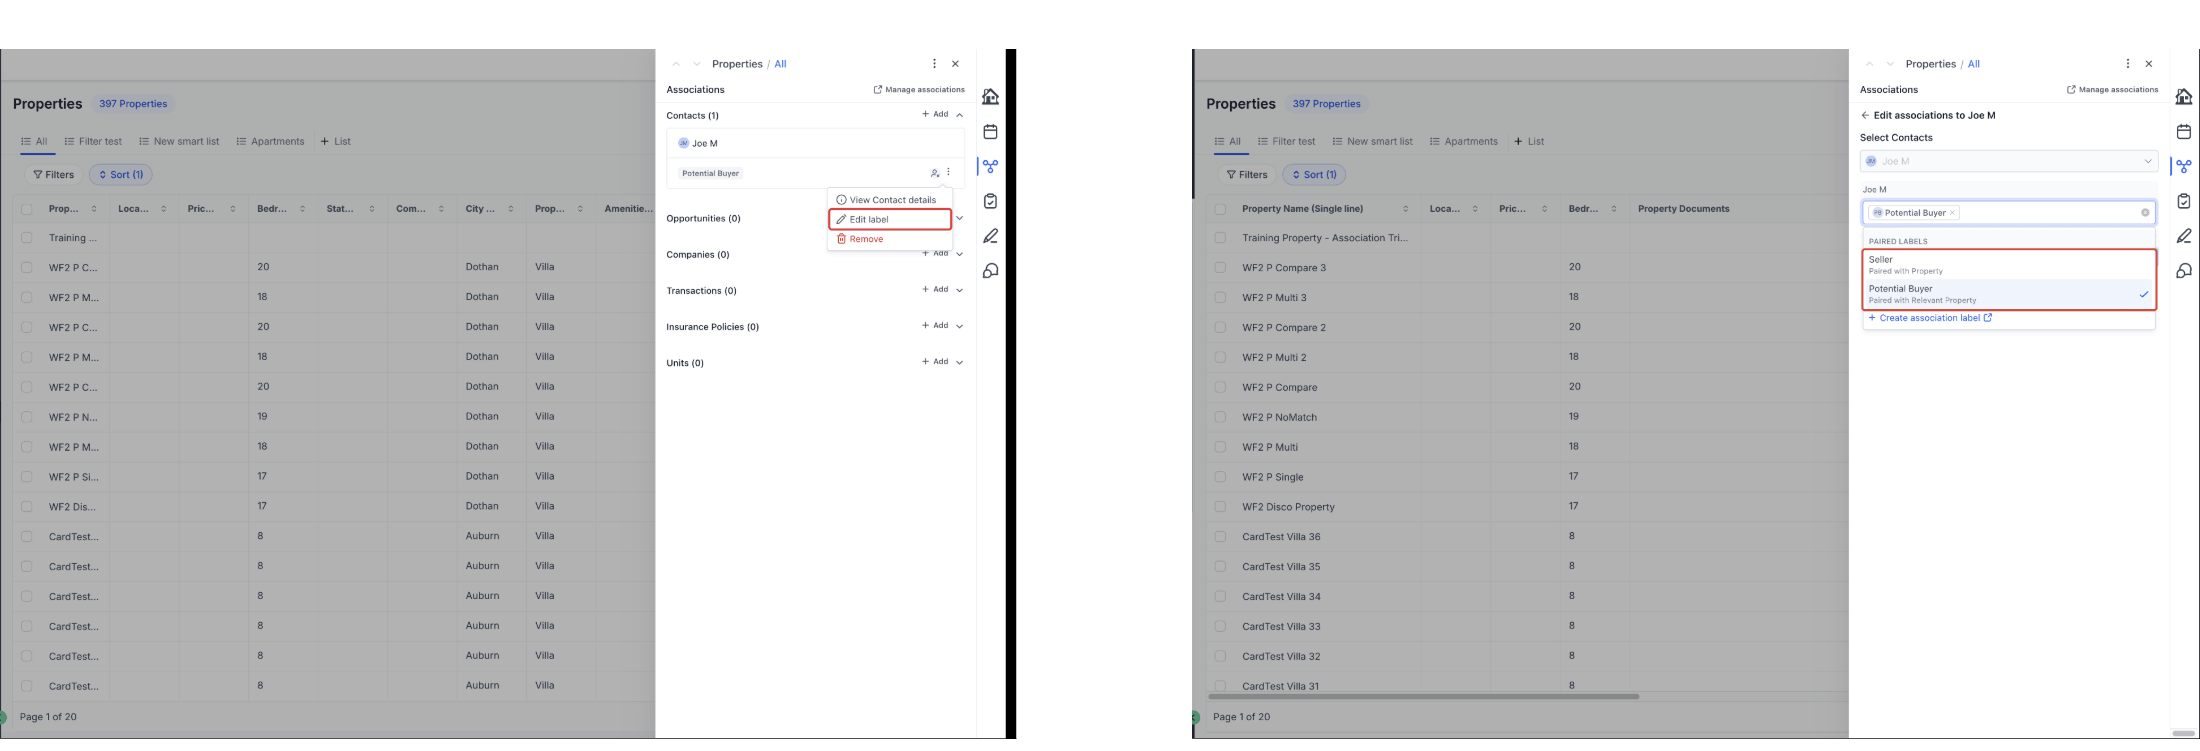
The association label picker on records is now easier to use. Each label shows what it’s paired with on the other record, like Owned company, paired with Owner. That makes similar labels much easier to tell apart, so you pick the right one.
Admins also get a Create association label shortcut right at the bottom of the picker. It opens the right settings page with the form ready to go, so a missing label no longer means a hunt through Settings.
This works on Contact, Company, Opportunity, and Custom Object records.
How to use it:
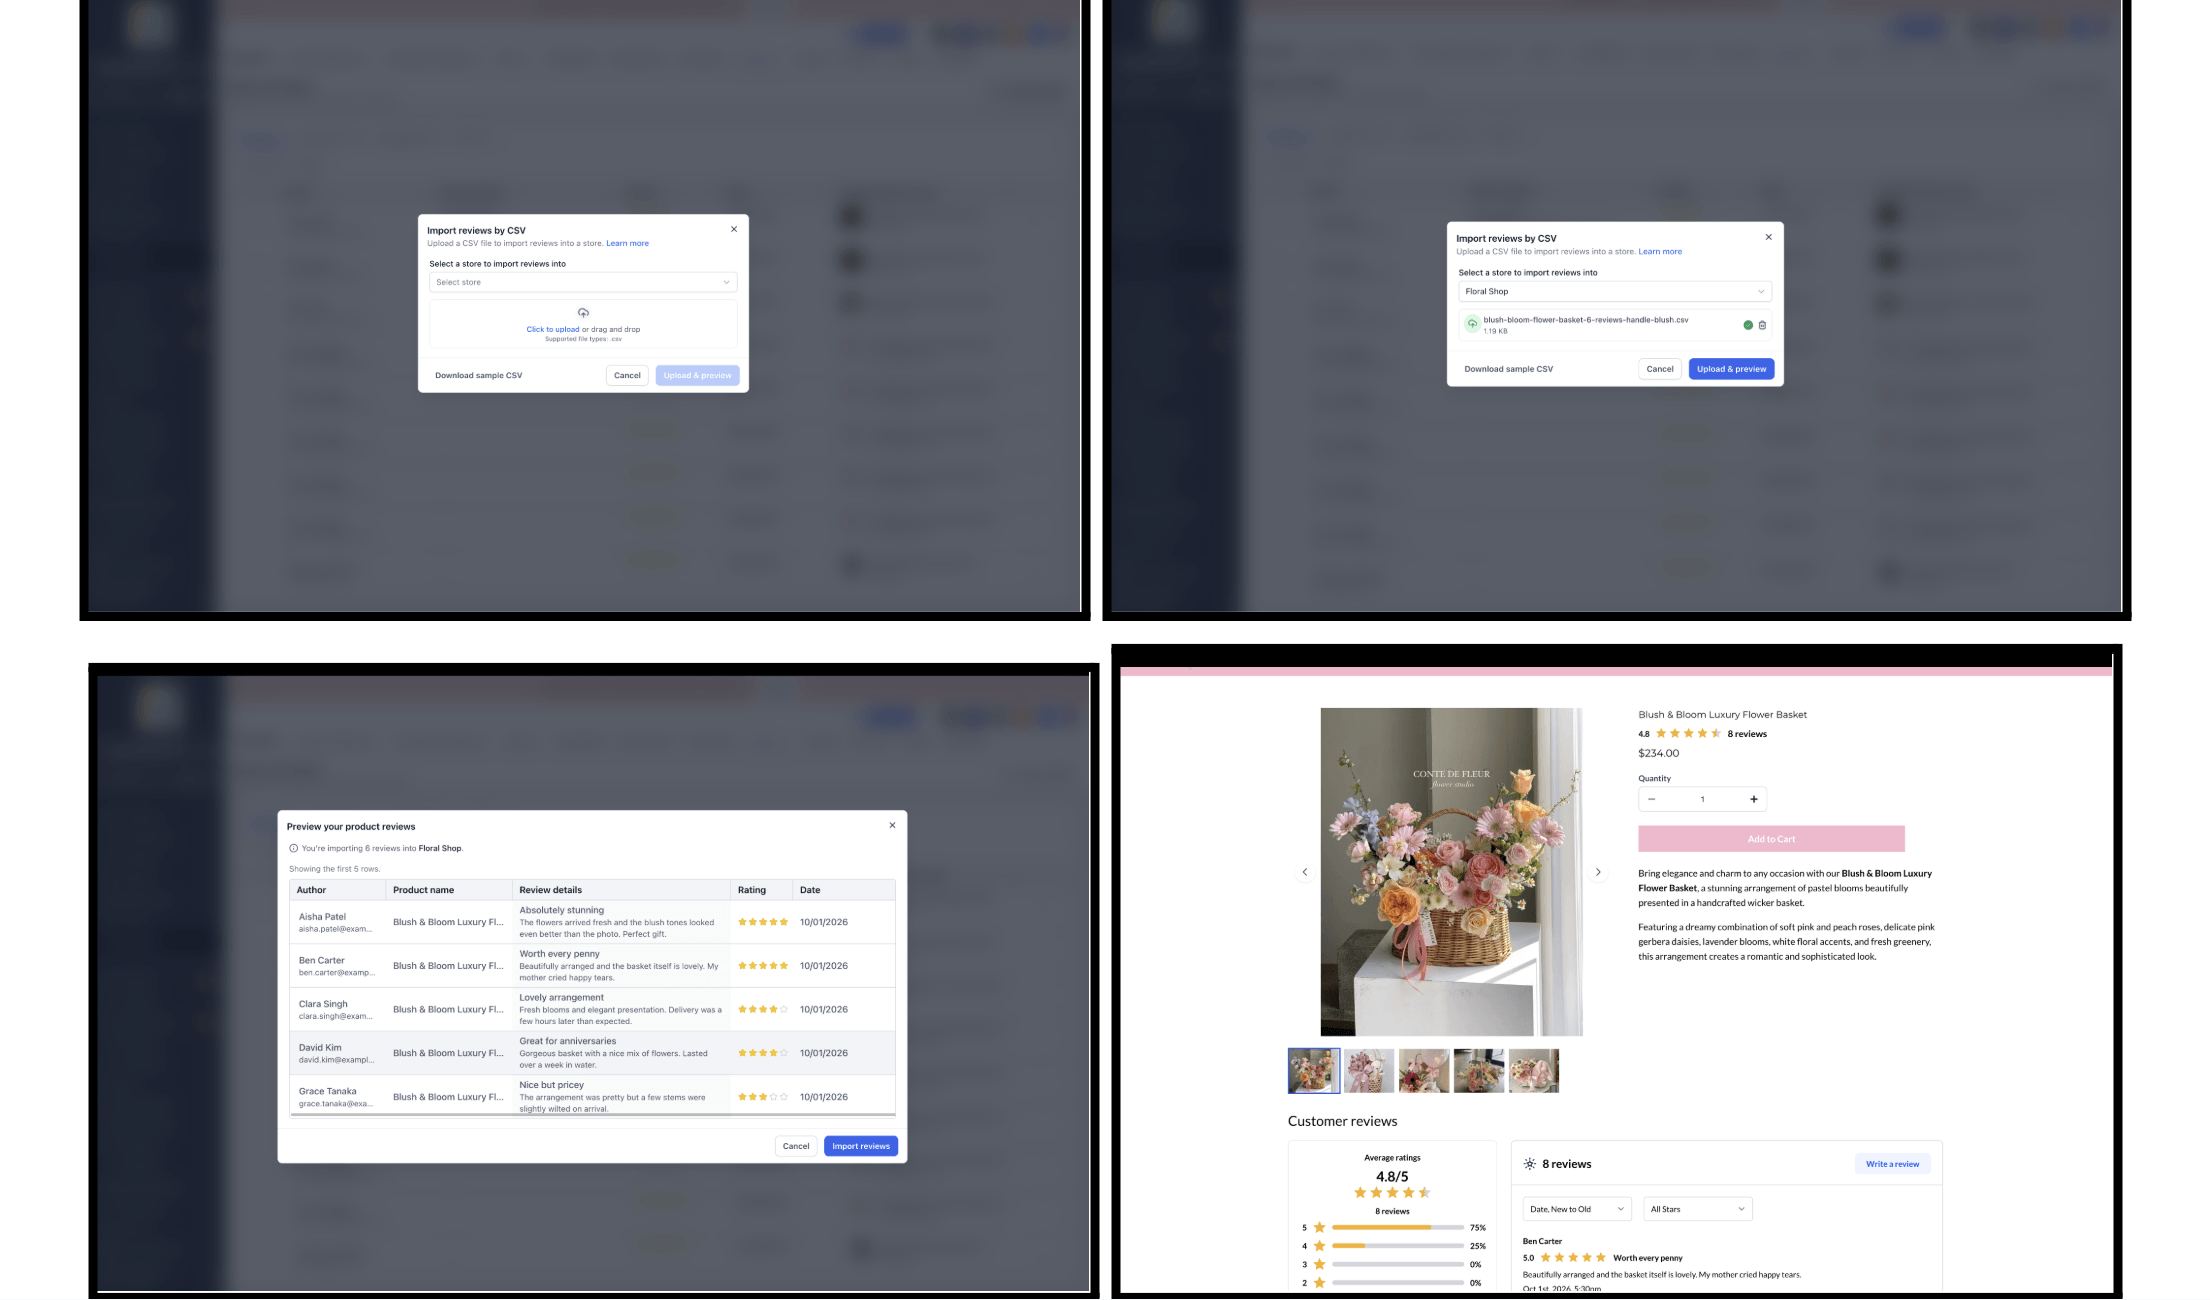
Moving your store over from another platform? You can now bring your product reviews with you.
Upload a CSV of reviews, preview the first few before importing, and they’ll be matched to your existing products automatically. Any reviews that can’t be matched get skipped without affecting the rest, and you’ll get a summary of the results when it’s done. The Reviews & Ratings screen also has a fresh new look.
Just make sure each review’s product handle matches an existing product, since missing products aren’t created automatically.
How to use it:
FGF Notifications