FG Funnels Updates – September 5th, 2024

September 3, 2024
POSTED IN BLOGS › FG Funnels Release Notes    

It is time for all the latest updates in FG Funnels from the week of August 29th through September 5th, 2024. If you have questions about any of these updates, or FG Funnels in general, please reach out to [email protected] or live chat in the app and our team will be happy to help. 


Funnels and Websites

Brand Boards

With over 400 votes in ideas dashboard, we’re rolling out Brand Boards, a new product to make sticking to your brand guidelines a breeze. Here’s what’s new:

Multiple Boards: Create and manage different brand boards for all your needs.

Custom Defaults: Change your default brand board whenever you need.

Easy Access: Save up to 2 logos, 10 colors, and 5 fonts for quick access.

Quick Recommendations: Default colors, fonts, and logos will pop up first in your color picker, font picker, and media library.

Email Builder Ready: Use all brand options in the email builder.

Funnels Update: Funnels now support brand colors in the color picker.

Color Picker Upgrades: New eye dropper tool available in both funnels and emails.

Custom Colors: Save and update custom colors directly in funnels and websites.


 How to Get Started:

  1. Go to Marketing >Brand Boards.
  2. Find Brand Boards in Location Settings.
  3. Enable the feature in Beta Labs to use brand colors in Funnels.


New Prebuilt Section Templates for Funnels and Website Builder

New section templates which will make it easier and faster to create funnels and websites. List of some categories to choose templates from:

Welcome
About
Team
Testimonials
Footers
FAQs
Product
Partners

 How to Use:

  1. Open Funnels and Website Builder -> Click on Add -> Prebuilt Sections -> Choose Category from the List
     
  2. Drop a template and start editing.

Calendar

Hide Third-Party Calendar Details

We’ve added a Private Mode for synced events, allowing users to keep their third-party calendar details confidential. When this setting is enabled, only the user who connected the calendar will be able to view the event details, ensuring that others cannot see them in the platform. 


How to Use:

You can access and manage this feature from two locations: My Profile & Calendar Connections

My Profile

  1. Navigate to Settings > My Profile.
  2. Scroll down to the Calendar Configuration section.
  3. Find the Private Mode for Synced Events option and enable or disable it as needed.


Calendar  Connections

  1. Go to Calendar Settings > Connections.
  2. Scroll to the Private Mode for Synced Events option.
  3. Enable or disable the setting according to your preference.

Note: This feature is available in Labs and is enabled for all users by default. 


Online Listings

Additional Attributes to Online Listing Details

The new Additional Attributes section introduces a variety of fields that allow businesses to capture and highlight their unique qualities, enhancing their overall profile and online presence.

Services: Clearly list the specific services your business offers, helping potential customers understand exactly what you provide.

Associations: Showcase your professional associations, organizations, or affiliations to build credibility and trust.

Brands: Specify the brands you carry or represent, giving customers important context about your product or service offerings.

Languages: Indicate the languages spoken at your business to ensure effective communication with a diverse audience.

Keywords: Add relevant keywords that describe your business to improve online visibility.


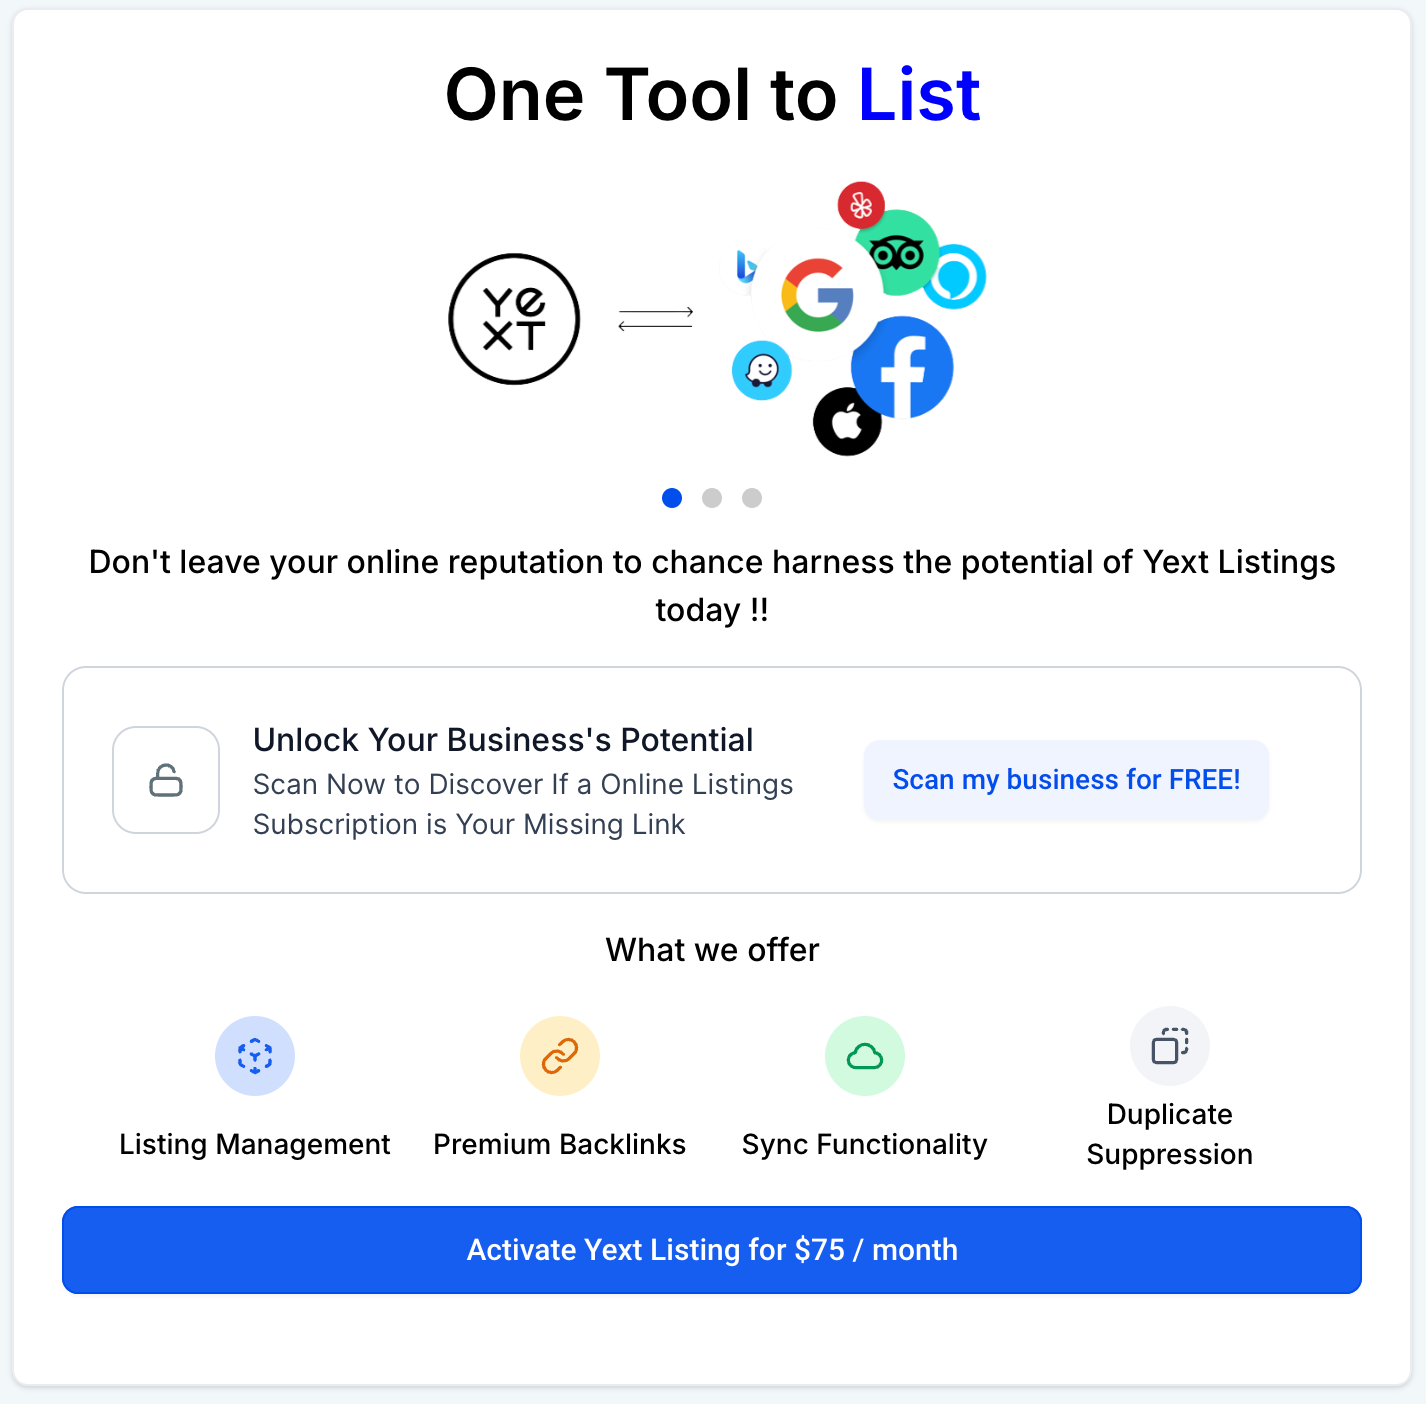
Scan Your Business for FREE

 
This feature empowers locations to evaluate the effectiveness of your Online Listings subscription(Yext) by providing a detailed performance report.
 
Screenshot 2024-08-27 at 15
 
How It Works:
  1. Start by filling out a form that is pre-populated with your business’s basic information. You can verify and update these details to ensure accuracy.
  2.  After submitting the form, our scan tool processes the information and generates a comprehensive report. This report shows how well your current online presence aligns with the provided details.
  3. Scan Results: Access a detailed analysis that includes a summary of your scan results, highlighting key metrics and identifying areas for improvement.


Affiliate Manager

“Affiliate Enrolled In Campaign” Trigger

The “Affiliate Enrolled In Campaign” trigger is now available in workflows, enabling you to automate actions whenever an affiliate is added to a campaign.
 The trigger collects essential information, including: Affiliate Name, Affiliate Email, Affiliate Phone Number, Campaigns associated with the affiliate, Total Revenue generated, Commissions earned, Affiliate Referral Link, Affiliate Portal Link and Magic Login Link (for direct access to the affiliate portal)

How It Works:

  1. Navigate to Automations > Workflows.
  2. Create a new workflow or modify an existing one.
  3. Add the Affiliate Enrolled In Campaign trigger to your workflow.
  4. Rename the trigger as needed.
  5. Apply filters to target specific affiliate campaigns.


Ecommerce Stores Support

Create affiliate campaigns using your online stores, allowing affiliates to promote your products and boost sales.

How It Works:

  1. Go to Affiliate Manager -> Campaigns Page.
  2. Click “Add” to start a new campaign.
  3. Choose Store as the campaign source.
  4. Select your Store and choose the landing page for leads.
  5. Review the product list and set the default commissions.
  6. (Optional) Customize product-based commissions and multi-tier setups.
  7. Finalize your settings and Publish your campaign.


Phone System

IVR Enhancements


Under Settings > Phone Numbers > Edit configuration, you will now be able to see the User linked to a Phone Number.

If there’s a Workflow linked to the Phone Number, you will see it under the same option as shown in the screenshot below:

Some settings are disabled because they are configurable under Workflow options or not available to use because the number is linked to a Workflow

The linked User is also visible under Settings > Phone Numbers > Number Info 

  • IVR Work Flow Calls – We will now show the caller name on the web app when the call is forwarded from IVR/Workflow. Earlier, we used to show ‘IVR’ and not the caller name
  • Call Connect – In case of call connect being enabled and the agent doesn’t press a button after receiving the call, we used to disconnect the call instantly. Now, we will play a message that no input was detected and the end the call.

 Bug Fixes

  • Trigger “Call Status” – This trigger was fired twice for single calls in some edge cases, this has been fixed to fire once per call
  • Call Reporting – Some calls ended with a “Ringing” status and were never updated with the final status, this has been fixed for the new calls


WhatsApp

 Customer Service Window Check

 This powerful condition lets you determine whether an active Customer Service Window is open between your business and your customer. When the window is open, you can send unlimited free-form messages at no cost for the first 1,000 service conversations each month.

Unlike WhatsApp templates, which require Meta’s pre-approval, free-form messages within this window do not need to be pre-approved by Meta. This gives you the flexibility to communicate more spontaneously and efficiently with your customers.

Your WhatsApp Business Account (WABA) is entitled to 1,000 free service conversations per month across all business phone numbers.
This free tier allows you to send messages to customers without incurring additional costs, significantly lowering your communication expenses.

 How It Works:

  • Go to Automations > Workflows > Create Workflow > Start from Scratch
  • Click on the plus button to add an action > Select WhatsApp: Customer Service Window Check
  • This action will create two branches. Open and Closed
  • Under Open branch, select WhatsApp action and select template as None – Free form message
  • Under Closed branch, select WhatsApp action and select marketing/utility template to initiate conversation with the customer


B. Create a Lookalike Audience

  1. The option to create a new lookalike audience is present in the campaign builder flow at the second step – Budget and Audience > Intended Audience section > under ‘Lookalike Audience’ tab.
  2. Click on the lookalike dropdown, ‘Create new or select lookalike audience‘ and the first option is to “Create a Lookalike Audience“.
  3. Click on the “Create a Lookalike Audience” button, a dialog to define the audience details such as Data source for the audience pops open.
  4. Once all the details are mentioned, click on ‘Create audience‘ and the audience creation process is completed.
  5. A lookalike audience after creation takes some time to get into the ready state and eligible to be selected for any campaign as the target audience. It will be in the populating state and once an audience is identified successfully, it will be in the ready state. If Facebook finds this audience to be too small to be used, the status of the audience will change to ‘Audience not created’.


Automations

Wait Action Enhancements

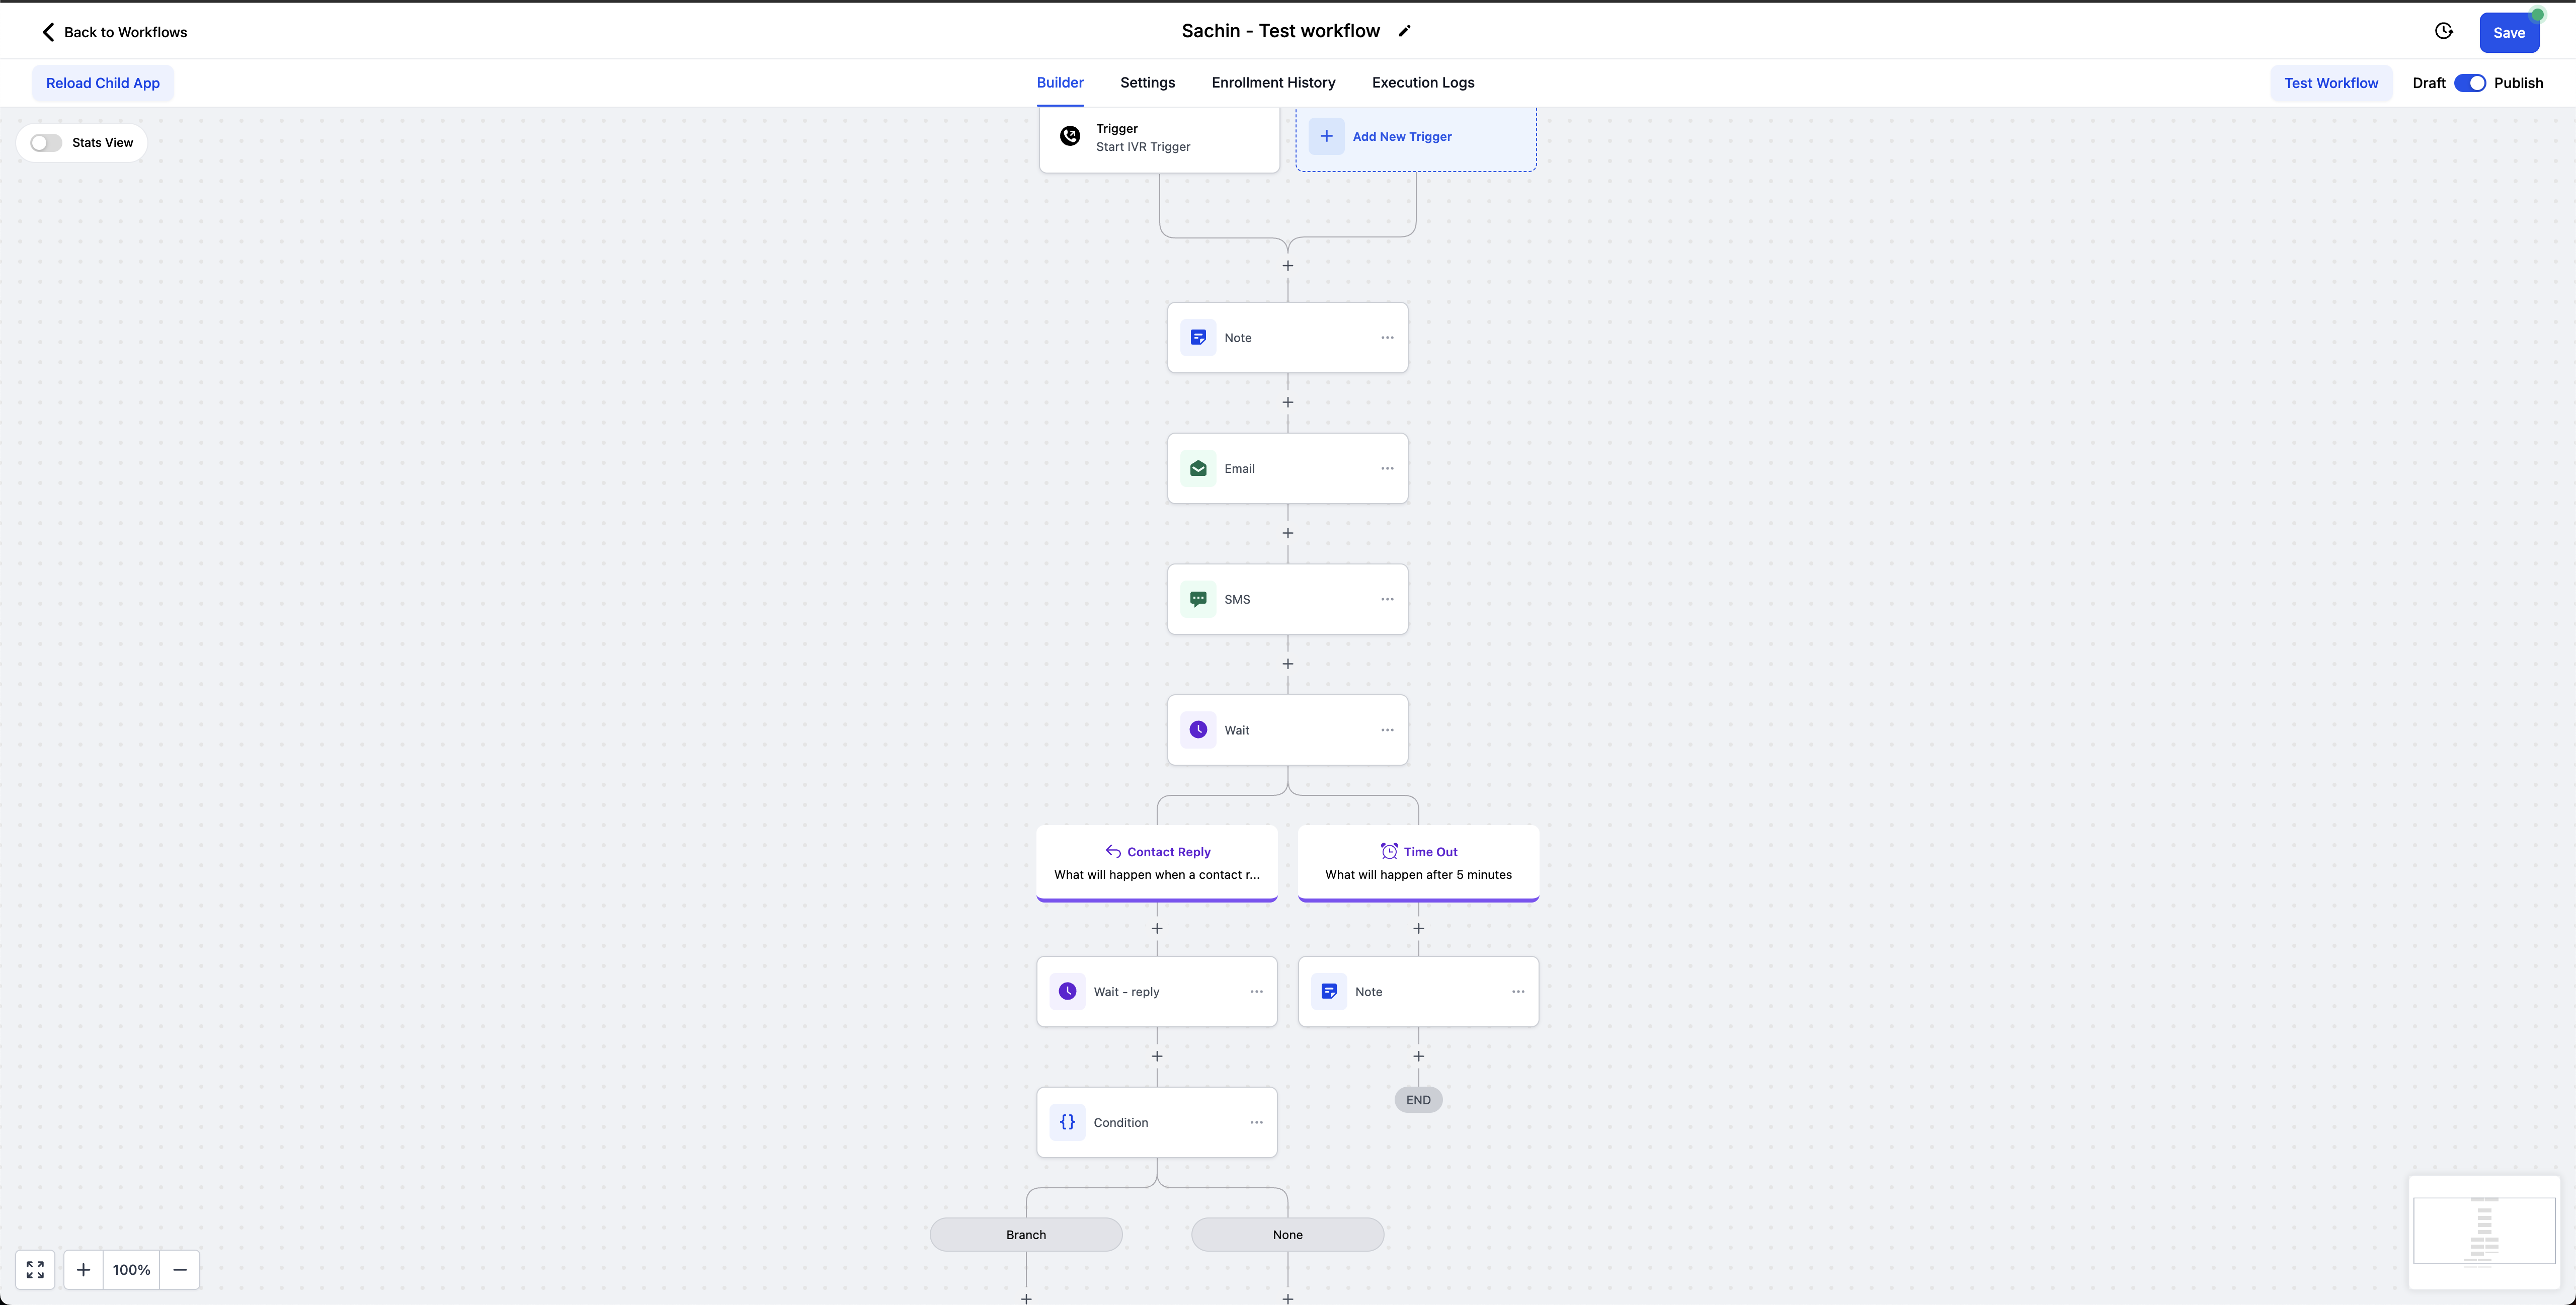
We have made significant changes to the current wait action to make the user experience better and make the action more powerful
  • Branching – Now there will be two separate branches, one for an actual condition and one separate branch for Timeout.  Users can take actions based on if the contact has fulfilled the wait condition or the wait has timed out.
  • Text explanations for each branch – A text explanation for each branch node, which will explain what will happen for that specific branch.
image
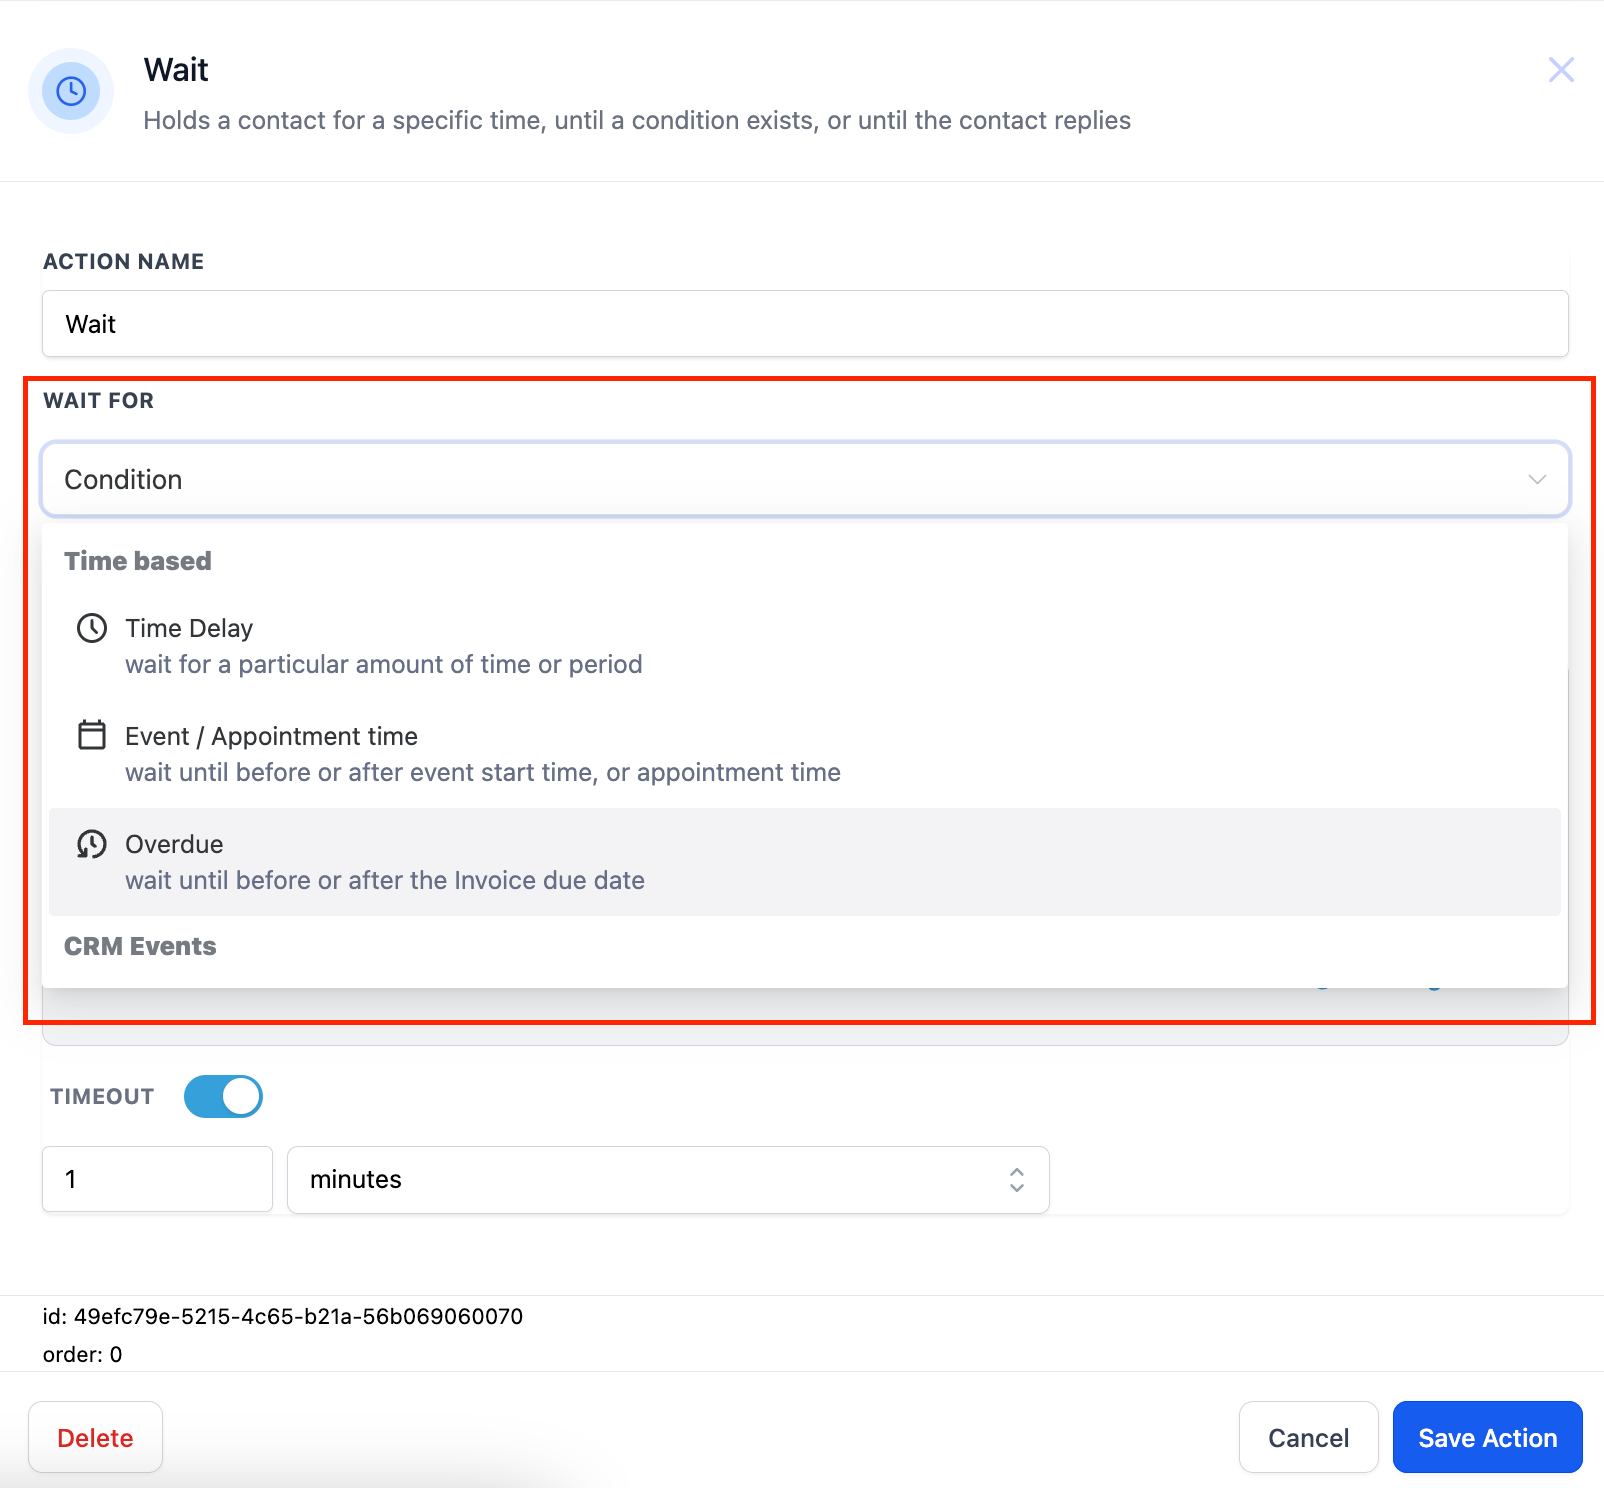
  • New UI for dropdown – A brand new UI for the “Wait For” field to give users more visibility to all the available options
Screenshot 2024-09-02 at 5
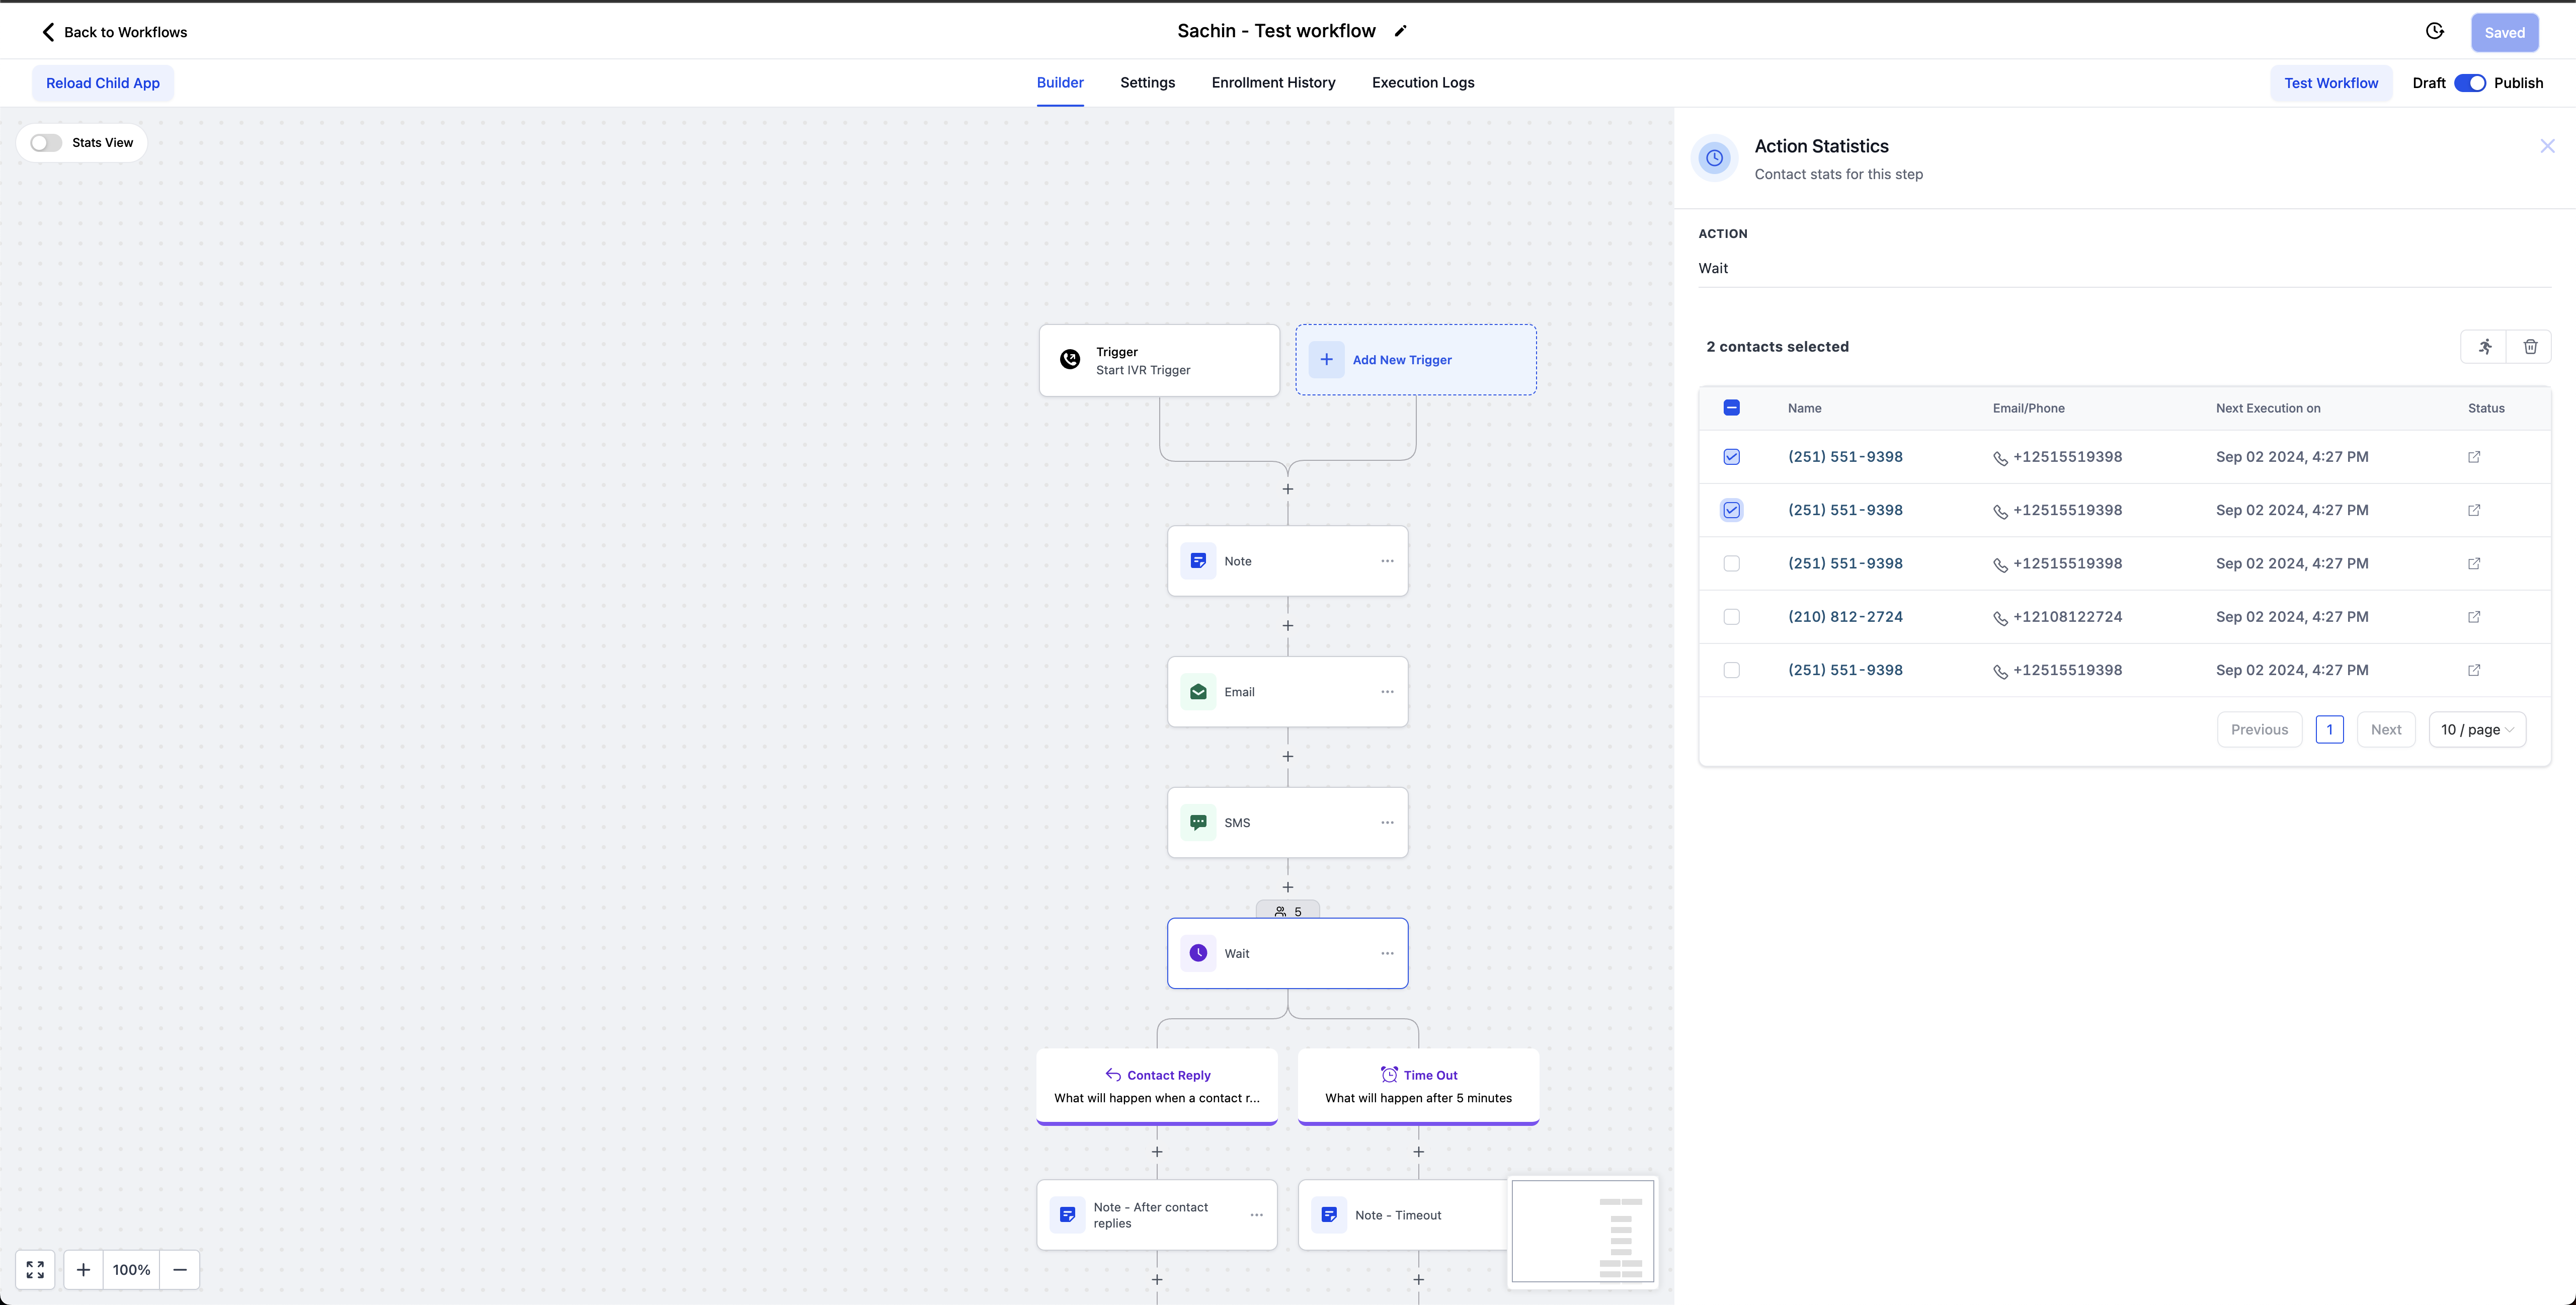
  • Enhanced stats view – Now users can, move/remove selective contacts waiting on wait action, to next action. Also “Next Execution Time” will be displayed on the stats view
image
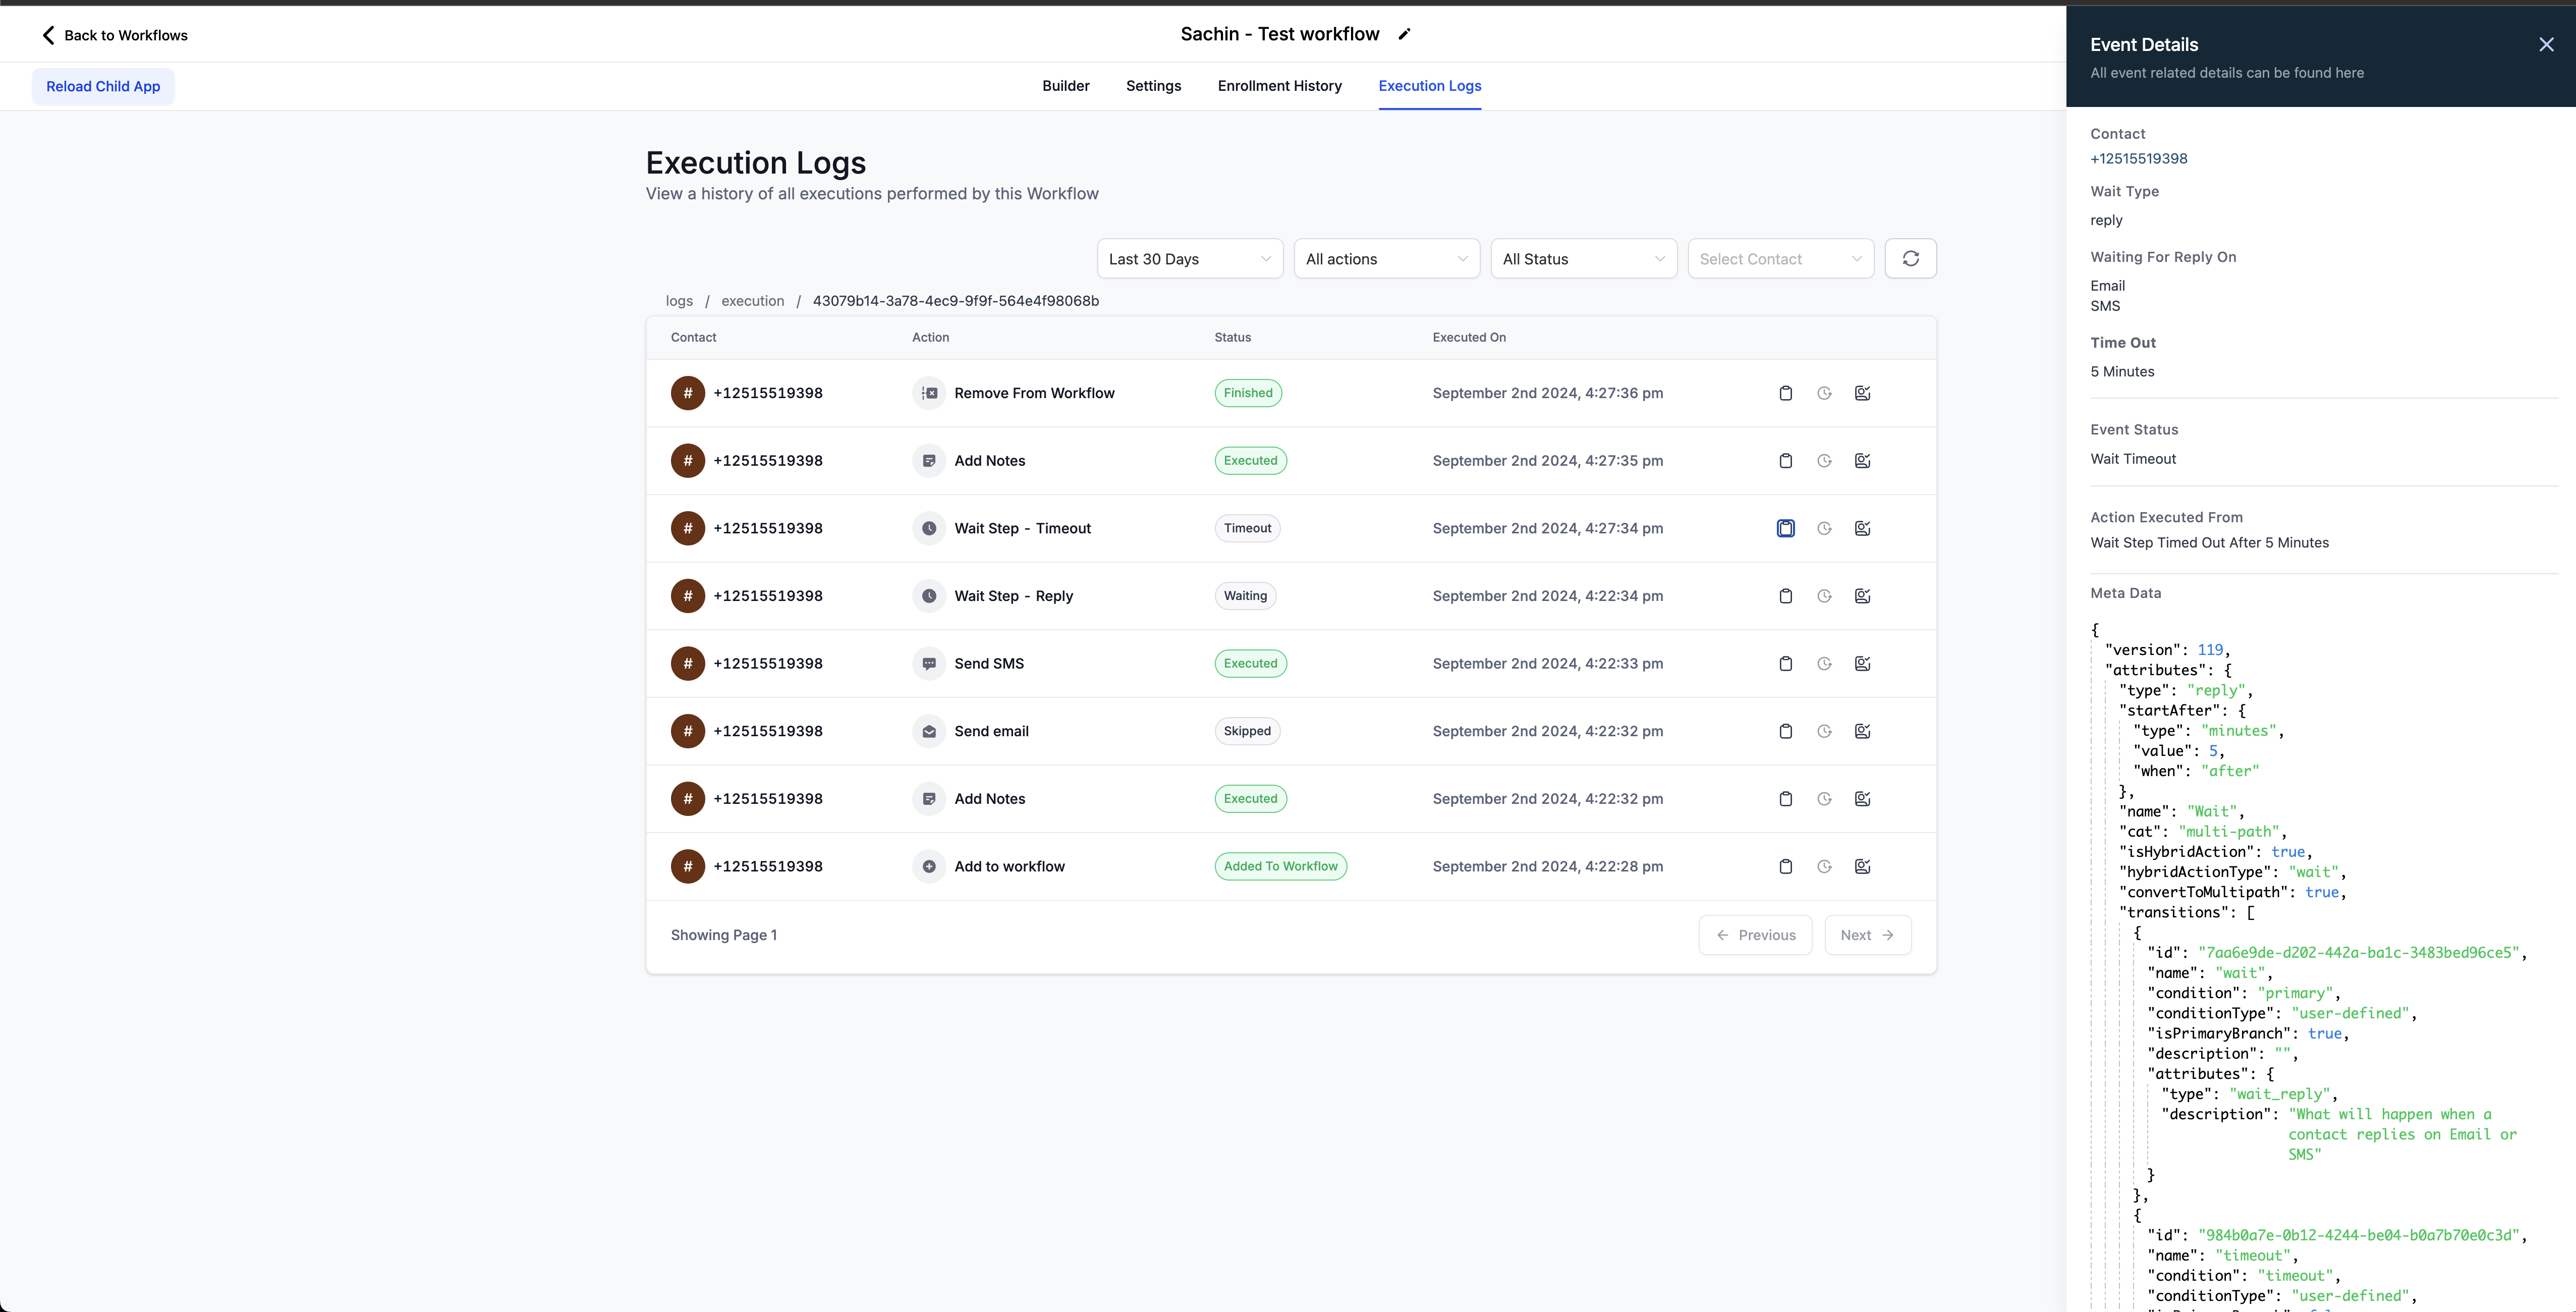
  • Changes in the Execution Logs – We have added bifurcation for the timed out contacts and the contacts that are have fulfilled the conditions in the Execution logs details section.
image
 
What will happen to my existing Wait actions?
 
By default no changes will be done to your current “Wait” actions, these will be working as expected. If you want to switch to the newer version:
  • On opening any older version of Wait action with timeout option, you will see a banner about new branching changes. You can move to new UI by clicking on “Enable branching”
  • A pop up window will open, click on “Confirm”
  • You will see another banner stating that Branching was enabled
  • Save the action


Elimination of Racing conditions for Triggers

In cases where a contact fulfilled the conditions for 2 or more triggers simultaneously, there was a race condition in workflows where the same contact could be enrolled multiple times. Now, only one entry for a contact will be processed at a time even if contact tries to enter through multiple workflows. This will help eliminating duplicates. The functionality would remain the same for appointment, invoice and IVR triggers, where we don’t check for re-entry.


Support Instagram DM action to send out DMs when a “User comments on a post” trigger

When a workflow had a trigger called “User comments on post” and  the action was Instagram DM (the old one, not the interactive messenger), the message would fail. The old action only allowed to send a DM if it was a  new inbound message and if the message was within 24h window.

As a quick patch on our end — we enabled the old Instagram DM action to work with this “user comments on a post” trigger. So now, if there is a “user comments on a post” trigger, and if you use the Instagram DM action, we will try to DM the contact by referencing the comment on the post. If there is no comment found, we will fallback to the old behavior of sending out a DM when the 24h window is active.


Conversations

Line break issues

Users experienced issues with line breaks in the tiptap editor where the content displayed in the tiptap editor differed from what was actually delivered. Additionally, replies to emails were showing inconsistencies in the central panel of the Conversations page. These issues have been fixed. The content displayed in the tiptap editor now matches what is delivered, and replies are consistently displayed across all views on the Conversations page. 


Zapier

New input field in Add/Update Contact action

We have added the capability to add or update a contact’s Date of Birth field in Add/Update Contact action


Dashboard

Only Assigned Data Fix

Users with the “Only Assigned Data” option enabled in Roles and Permissions will now see widgets displaying only the data assigned specifically to them.
 If a widget is hardcoded to filter data for a specific team member, other users will receive a clear “Permission Required” message, avoiding confusion and ensuring data security.

How It Works:

  1.  Go to Settings -> My Staff.
  2. Search for the team member’s profile and click on the Edit action.
  3.  In Roles and Permissions, choose “Only Assigned Data” under Data Visibility Scope.
  4.  Hit Save.

.

FGF Notifications

Sign Up For FG Funnels Updates Via Email

Share On:

Newsletter sign up

    Let’s be Friends

    © 2018-2024 Funnel Gorgeous LLC

    Marketing Magic for Flawless Funnels™