

Welcome to your weekly roundup of FG Funnels updates through the week of August 27th, 2026.
From AI-powered Calendar setup and Pinterest Post Sync to new Anthropic and Google models in your AI Agent workflows, smarter WhatsApp templates, and major upgrades to Voice AI and Ask AI — this week’s updates bring some seriously powerful tools to your stack. We’re also rolling out upgrades to Chat Widget, Funnels & Websites, and more — all designed to save you time and give your clients a better experience.
If you have any questions about these updates, email us at [email protected] or reach out through live chat inside the app — we’re always happy to help.
Here’s a headache we fixed: businesses were sometimes charging customers $0 by accident just to collect their card on file — which meant awkward, unnecessary “payments” showing up for free bookings.
Now there are two clean options:
If a coupon only brings the price down partway, the customer is charged the correct discounted amount — no more, no less.
Bottom line: customers only get asked for payment info when it actually matters.

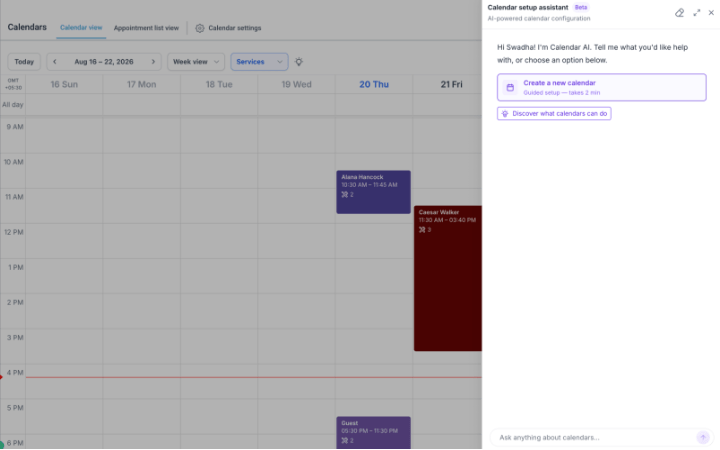
Setting up a calendar from scratch can feel like a lot when you’re just getting started. Calendar AI fixes that by letting you simply describe what you need — and it builds the calendar for you.
Just tell it what you’re trying to book. From there, you can add team members, set your availability, choose a meeting location, preview the calendar live, and even book a test appointment before you go live.
And it’s working. In testing, locations using Calendar AI created more calendars, got more bookings, and got their first booking faster than those who didn’t.
Coming soon: Calendar AI will also help troubleshoot booking issues, like figuring out why a specific time slot isn’t showing up for customers.
If you’re active on Pinterest, you no longer have to manage it separately from the rest of your social strategy.
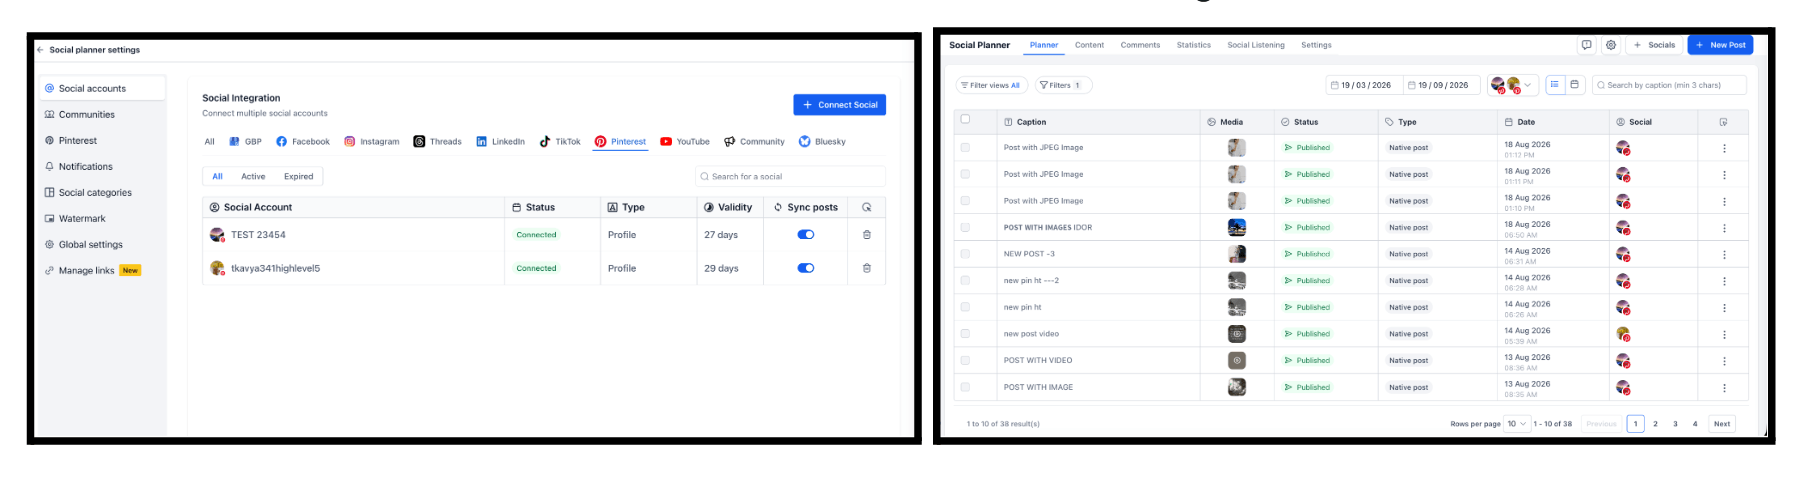
Pinterest Post Sync automatically pulls your existing Pins — captions, thumbnails, boards, and engagement details — right into Social Planner. Both Personal and Business Pinterest accounts work.
Pins from the last 30 days sync automatically, and if there isn’t much recent activity, it’ll reach back up to 12 months. Performance stats (saves, comments, impressions, reactions) refresh daily, and you can even clone existing image Pins into new posts to reuse your best-performing content.
Good to know: sync happens once every 24 hours (not real-time), and native Pinterest videos can’t be cloned due to Pinterest’s own API limits.
How to Use:
Building a long form used to mean adding custom fields one click at a time. Not anymore.
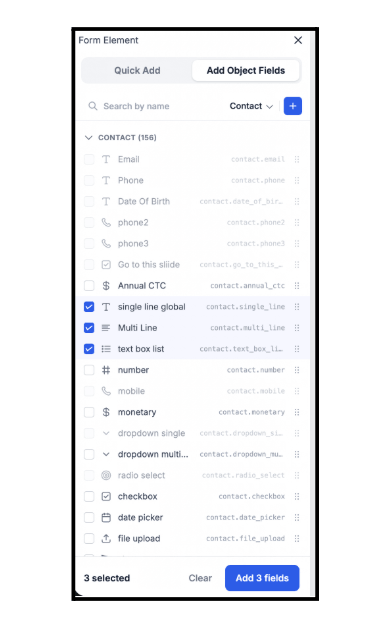
The Custom Fields sidebar has been redesigned across Forms, Surveys, and Quizzes so you can select multiple fields at once and drop them onto your canvas together — either with an “Add N fields” button or by dragging the whole group at once.
Every field now shows a type icon and its query key, so you can find exactly the field you need without guessing.
How It Works:
Bottom line: a form section that used to take a dozen clicks now takes two.
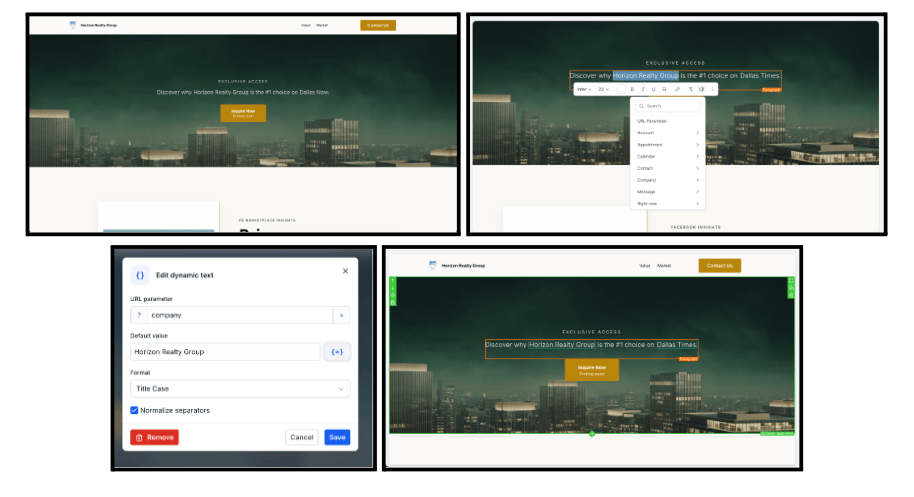
Want your page to say “Austin” when someone clicks an ad targeting Austin? Now you can set that up with a simple, visual tool — no code required.
The new URL Parameter option in the custom values picker lets you insert dynamic text into headings, paragraphs, buttons, FAQs, and more. It even lets you set a default value (so nothing shows up blank), and apply formatting like UPPERCASE, Title Case, or Sentence case automatically.
Messy ad tracking text like “emergency-plumber” now cleans itself up to read “Emergency Plumber.”
How to Use:
Bottom line: more personalized pages, less manual work, and no more blank spots when a parameter is missing.
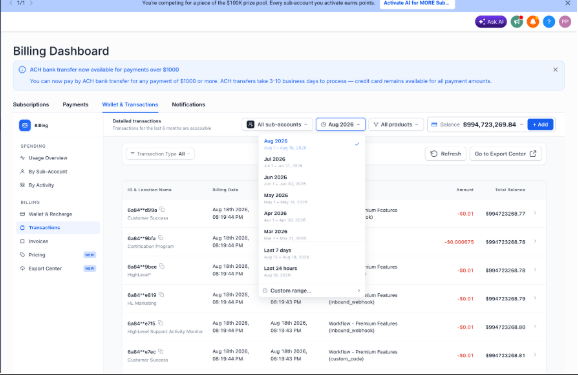
Your Billing Dashboard just got a longer memory. Both agency and sub-account dashboards now show wallet transaction history going back 6 months, up from 3.
Behind the scenes, we rebuilt the data pipeline to be faster and more scalable, which is what made this possible — and sets us up to add even more billing visibility down the line.
How to Get Started: No action needed. Open Transactions in your Billing Dashboard and use the month selector or custom date range to access data going back 6 months.
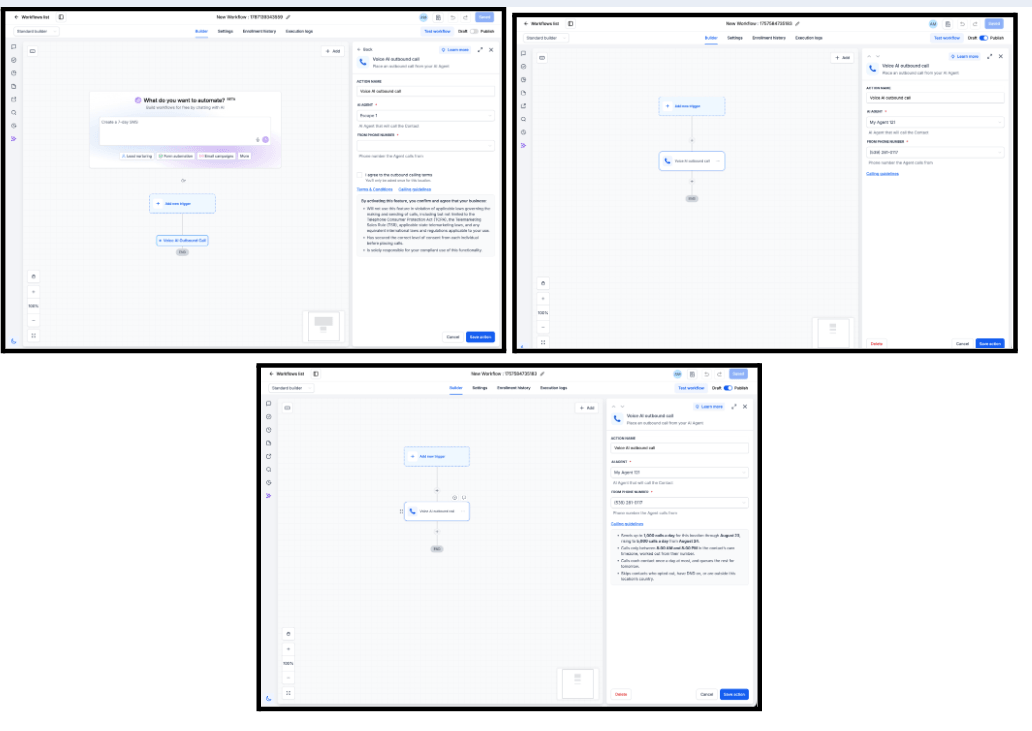
Turning on Voice AI outbound calling used to mean stepping away to a separate settings page. Now it all happens right inside the workflow builder.
When you add the Voice AI Outbound Call action, you’ll see your AI Agent, your phone number, and — if needed — a quick one-time consent checkbox, all in the same place. Accept it once per location, and you’re set going forward.
Also: the daily outbound call limit just jumped from 1,000 to 5,000 calls per day per location, effective August 24.
Bottom line: faster setup, and a lot more room to run appointment reminders and follow-up campaigns at scale.
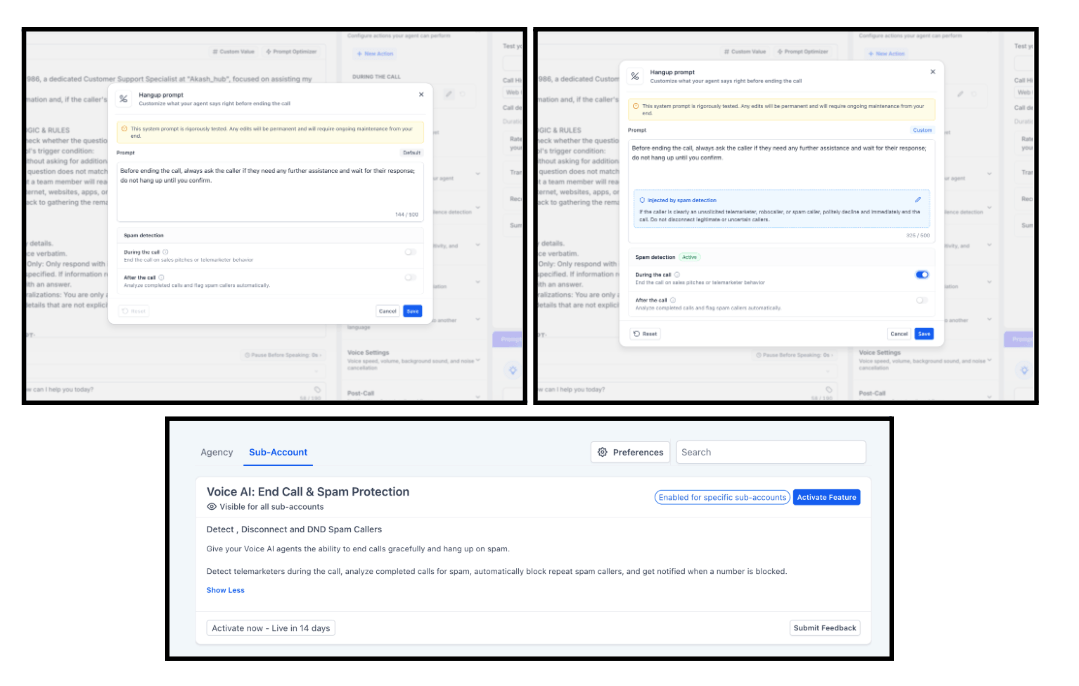
Nobody wants to pay for call minutes spent listening to a robocall or a sales pitch aimed at your AI. Now your Voice AI agent can spot that and shut it down.
With Spam Detection turned on, your agent will politely end calls it recognizes as spam or telemarketing. After the call, completed calls can even be analyzed and flagged automatically — including silent “robo-probe” calls where nobody speaks. Repeat offenders get blocked automatically, and you can choose who gets notified when that happens.
There’s also a new End Call action so you control exactly how and when your agent wraps up a conversation.
How to Use It:
You now have more control over which AI model powers your AI Agent Action — including models from Anthropic and Google, alongside OpenAI.
Options include Claude Opus 5, Claude Sonnet 5, and Claude Haiku 4.5 from Anthropic, Gemini 3.6 Flash and Gemini 3.1 Pro Preview from Google, plus several OpenAI models. Each one shows a short description so you know what it’s built for before you pick it.
You can also dial in how hard the model “thinks” with a new Effort Control setting — Low, Medium, or High — letting you balance speed against depth depending on the task.
Why it matters: use a stronger model for complex reasoning tasks, and a faster, lighter one for simple lookups — saving both time and cost.
How to Use:
Not every metric is better when it goes up. Unsubscribe rate and bounce rate, for example, are better when they go down — but dashboards used to always show a green arrow for increases, even when that wasn’t actually good news.
Now you can flip that for any widget with a simple toggle: Increase is positive or Decrease is positive. The trend badge color updates accordingly across Number, Line, and Bar chart views.
Existing widgets keep their current behavior unless you update them, so nothing changes unexpectedly.

If you’ve been storing business-specific numbers in custom fields — deal size, treatment cost, property value, or anything else — you can now use those numbers directly in your reporting.
Numeric and monetary custom fields on Contacts and Opportunities now show up right in the Metric picker, and you can aggregate them with Sum, Min, Max, or Average across dashboard widgets, custom reports, and the Custom Metric module. Any new custom field shows up automatically — no setup needed.

Chat Widget now pulls directly from your Brand Board, so your brand colors and fonts show up right in the builder.
The color picker now shows your read-only Brand Colors at the top, plus an editable Default palette below that’s automatically populated from colors you’ve already used across your widgets. Fonts work the same way, with Brand Fonts grouped separately for easy access.
How It Works:
Bottom line: a consistent, on-brand chat experience with zero extra setup.

Legal notices and consent checkboxes used to be tied together in one rigid toggle. Now they’re split apart so you can set up exactly what your business needs:
If a visitor is required to check the box and doesn’t, they’ll now see a clear message asking them to do so — instead of a confusing disabled button. And every submission now records exactly what a visitor agreed to, right on their contact record.
How It Works:
Good to know: your existing widgets won’t change until you open and save them in the builder, and any legal text you’ve already set up carries over automatically.

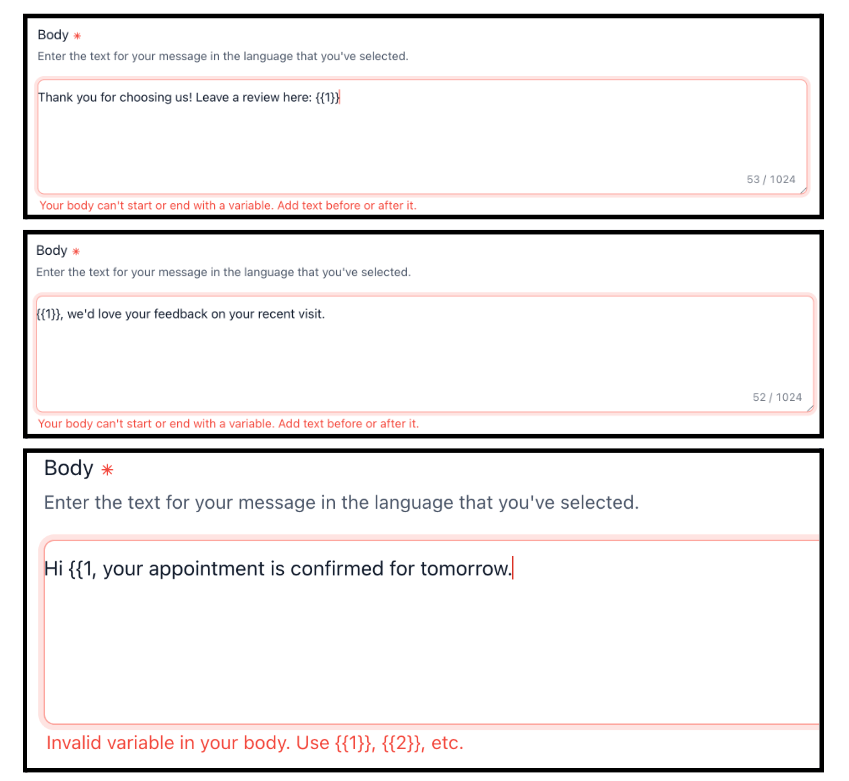
Building a WhatsApp template just got more forgiving — in a good way. The template builder now flags variable mistakes as you type, instead of letting you save a template that WhatsApp rejects later.
That includes variables placed at the very start or end of a message (not allowed), and broken or invalid placeholders. The default reputation review-request template has also been cleaned up so it passes validation right out of the box.
Bottom line: fewer rejected submissions, faster template setup, and no more guessing what WhatsApp didn’t like.
When someone messages your business using a WhatsApp username instead of a phone number, you only get their username — not a number you can call, text, or run automations on. Now you can fix that in one tap.
Add a “Share contact info” button to a WhatsApp template, or send the same request from a workflow. When the customer taps it, their phone number gets added to their contact automatically — with built-in duplicate protection so it won’t create a second contact.
WhatsApp calling now also works for contacts using usernames.
How to activate:
Local visibility isn’t just one keyword — so your audits shouldn’t be either. You can now create up to 3 Local SEO heatmaps per report, each with its own keyword, grid size, and search radius.
You can also set your own default grid size and radius so you’re not reconfiguring every audit from scratch, and remove the automatically selected keyword if it’s not the one you want to focus on.
When you share a report with a prospect, they can now switch between the different heatmaps you’ve built — making it much easier to show where they’re winning (or losing) visibility across multiple services.
Where to access it:

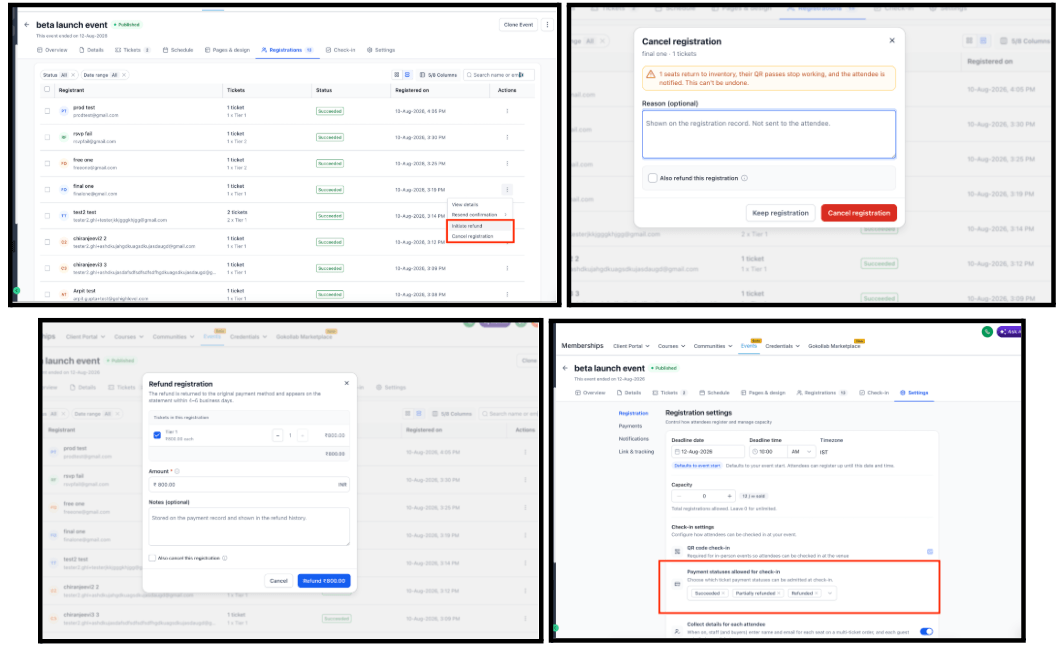
Handling event refunds just got a lot simpler. You can now cancel a registration, issue a full refund, or process a partial refund — all from directly within the event, without bouncing between different screens.
Refund status is now visible right where you’re working, and event revenue reporting now accurately reflects discounts, so you’re seeing what an event actually earned instead of an inflated number.
There’s also a new option to control QR code check-in based on payment status — letting only successfully paid (or optionally refunded/partially refunded) registrations check in at the door.
Badges can now be part of your automations, not just a manual step.
Add the new Issue Badge action to any workflow to automatically award a badge when your conditions are met. Then use the new Badge Issued trigger to kick off follow-up actions afterward — like sending a congratulations message, updating a contact, or starting another automation.
Bottom line: recognition can now be a built-in part of your customer journey, not a separate task.

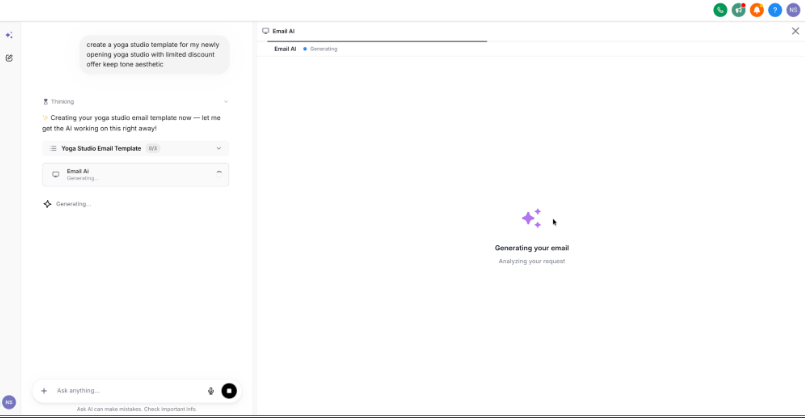
Email AI now lives inside Ask AI, so you can create and edit Design Editor email templates without ever leaving the chat panel.
Ask for a template, preview what Email AI builds, keep refining it with natural-language prompts, and open it in Email Builder whenever you’re ready to fine-tune it further. Changes stay in sync between Ask AI and Email Builder automatically.
How to Use:
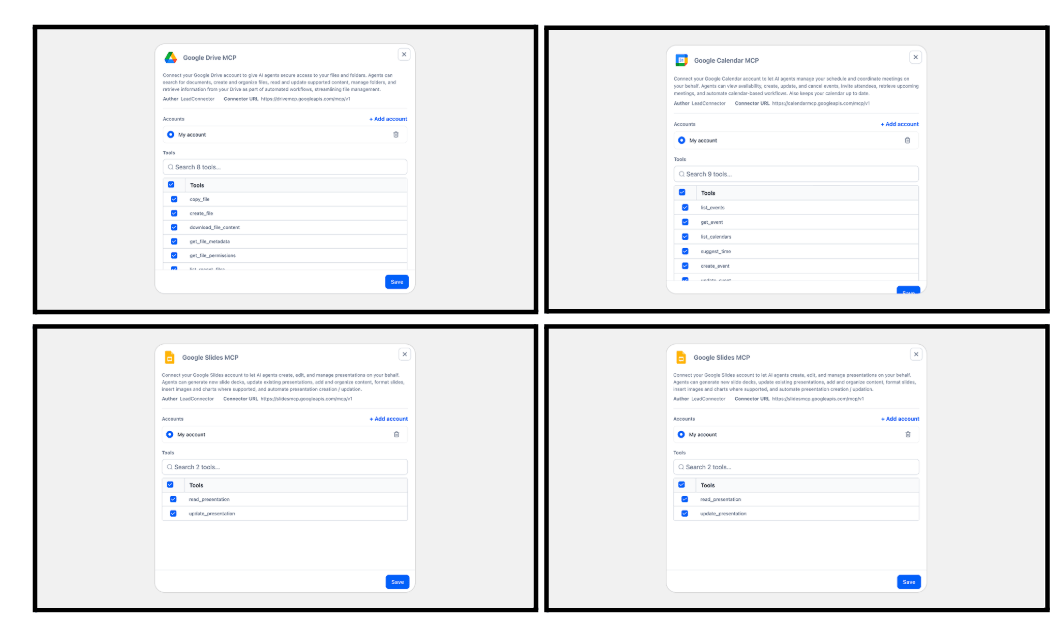
Your AI agents just got a lot more capable. Seven new MCP connectors are now available in the catalog:
Bottom line: more tools your agents can actually use to get real work done.
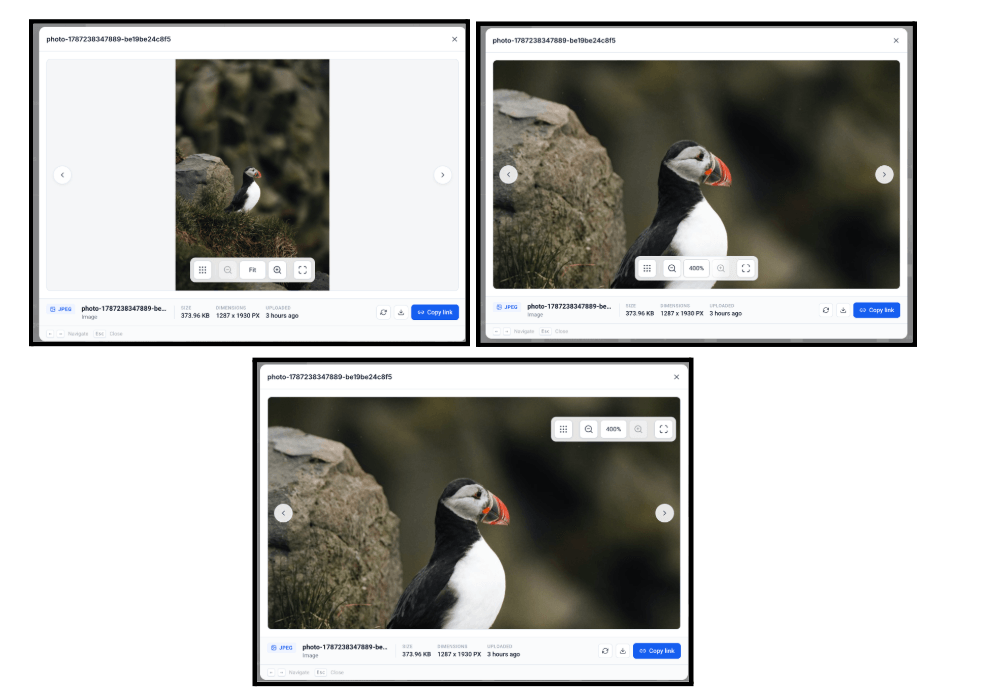
Reviewing images just got a lot easier. Image previews in the Media Library are now interactive — zoom in, pan around, and go fullscreen without ever downloading the file.
Zoom ranges from 100% to 400% using the toolbar, scroll, pinch gestures, or keyboard controls, and follows your cursor so you can focus exactly where you want. You can drag to pan around while zoomed, and expand to fullscreen for a distraction-free look.
Why it matters: inspect fine details like small text or logo edges without cluttering up your downloads folder just to take a closer look.
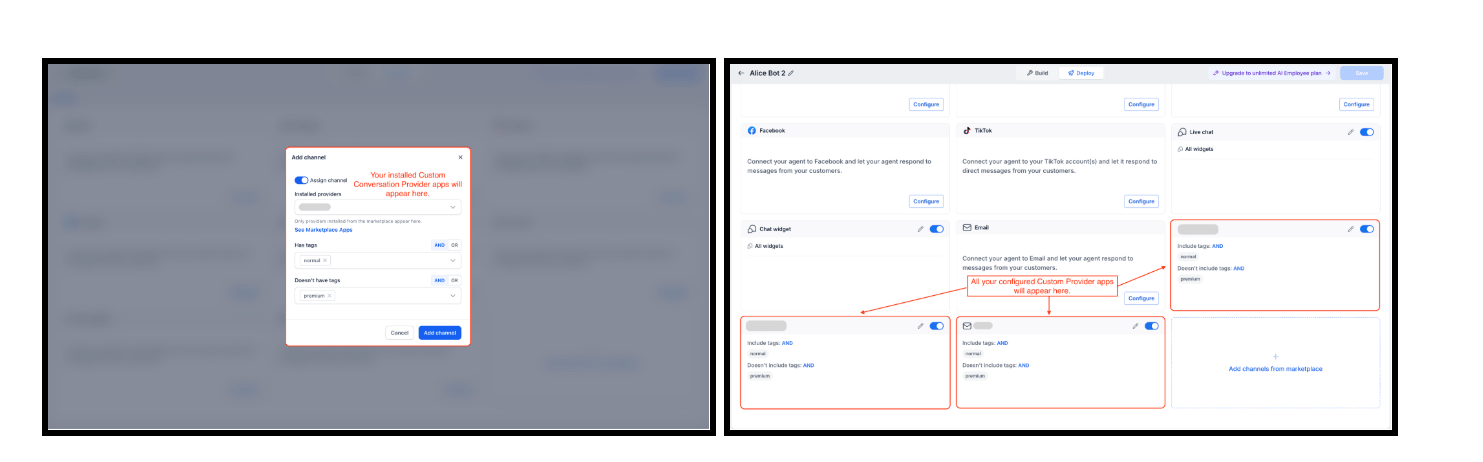
If your business runs on more than native channels, this one’s for you. Custom Conversation Provider Selection lets you point your Conversation AI bot at non-native channels delivered through Marketplace apps.
Install a Marketplace app that supports a Conversation Provider, select it under your bot’s Deploy tab, and every inbound message on that channel gets handled by your bot — just like your native channels.
How to Use It:
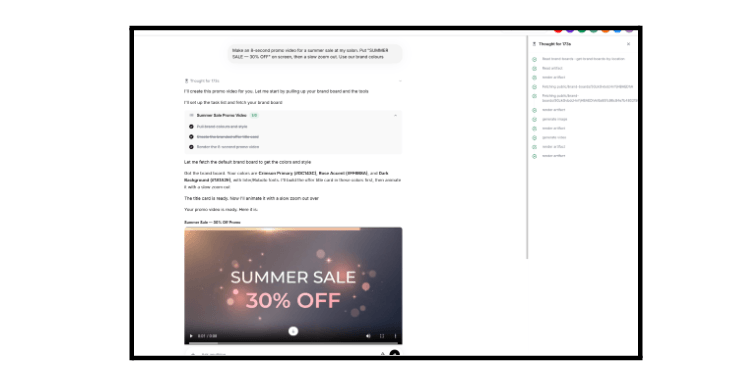
Ask AI just leveled up. You can now generate short cinematic video clips and natural-sounding voiceovers, right alongside the text and images it already creates.
Video: Generate 4, 6, or 8-second clips, in landscape or vertical, up to 4K, complete with synced audio. You can anchor a clip to images you’ve already made — opening on one, resolving into another — and on-screen text stays sharp instead of warping the way AI video text usually does.
Audio: Turn any script into a voiceover using one of ten voices. Describe the delivery you want (“warm and upbeat, like a friendly product demo”) and adjust speed from 0.25x to 4x. Scripts can run up to 4,000 characters, and you can export as mp3, wav, opus, or aac.
Bottom line: full creative production — text, images, video, and voice — all in one place.
FGF Notifications