Welcome to the latest FG Funnels updates for March 13th, 2025! In this update, we have several exciting new features and improvements to share with you. These updates are designed to enhance your experience and provide you with more flexibility and control over your funnels and websites. If you have any questions about these updates or FG Funnels, please reach out to [email protected] or live chat in the app and our team will be happy to assist you.
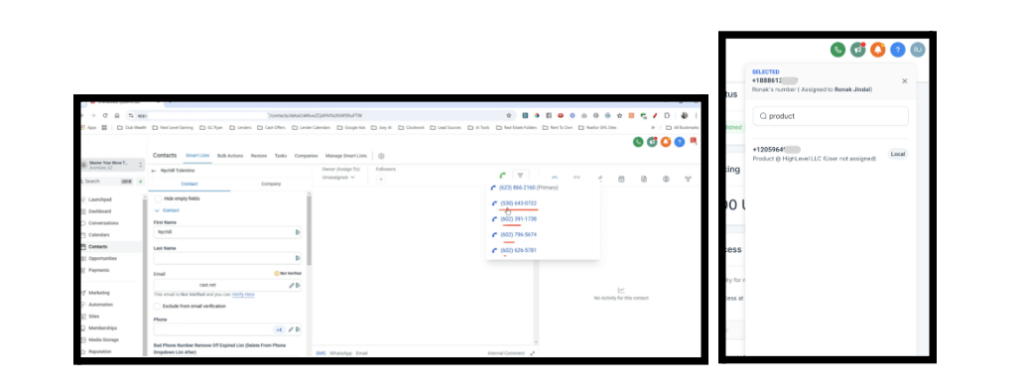
LC Phone
Enhancements & Bug Fixes
- Dialer > Calling From now supports search by Friendly name of the phone number.
- Call any phone number associated with a contact, including secondary numbers
- If a user with an assigned phone number tried calling with the new dialer, the call should use their assigned phone number by default. This was not happening in some cases. It has now been fixed.
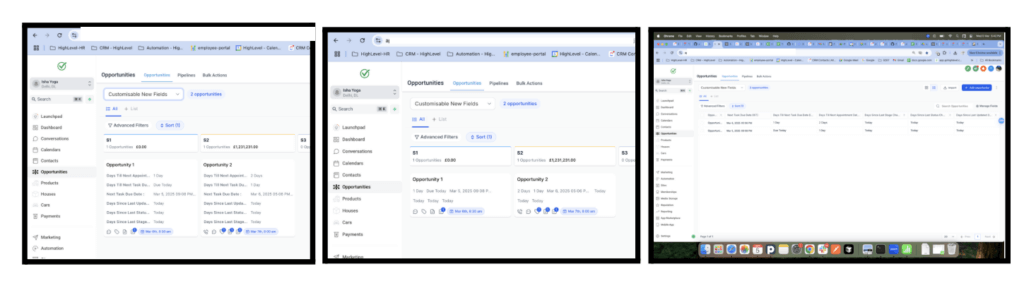
Opportunities
Expanded Opportunity Views
The opportunity list view and Kanban view now include several additional fields to help users monitor and manage their opportunities more effectively:
- Days Since Last Stage Change Date: Quickly assess how long an opportunity has remained in its current stage.
- Days Since Last Status Change Date: Monitor the freshness of the opportunity status for timely follow-ups.
- Days Since Last Updated: Keep track of the most recent interactions or updates.
- Next Task Due Date: Visualize upcoming tasks to manage deadlines efficiently.
- Days Till Next Task Due Date: Calculate the time remaining until the next scheduled task.
- Days Till Next Appointment Date: Anticipate upcoming appointments to ensure all engagements are timely.
Sorting and export features have been extended to the following fields:
- Days Since Last Stage Change Date
- Days Since Last Status Change Date
- Days Since Last Updated
The Contact Details folder has been renamed to Primary Contact Details. This change clarifies the contents of the folder and helps users quickly locate the most relevant contact information, enhancing overall usability and organization.
Funnels & Websites
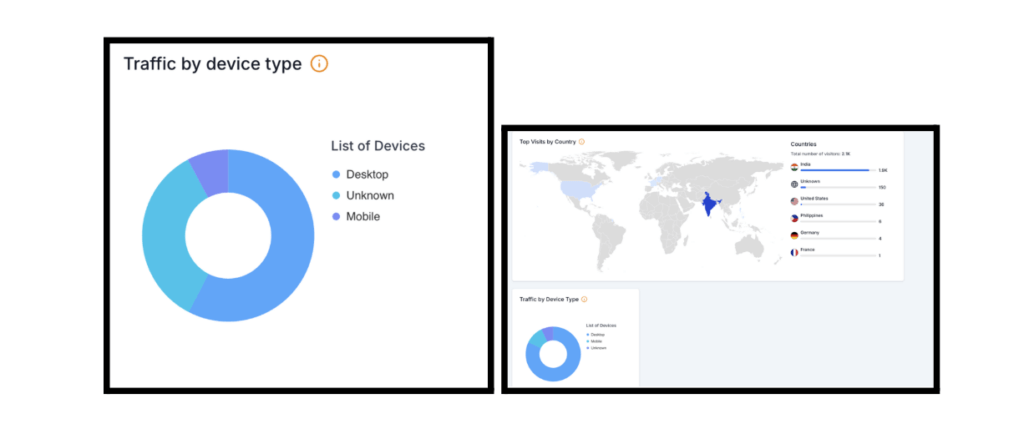
Traffic by Device Type
This new section introduces an interactive pie chart, offering a visual breakdown of your visitors by device category. Now available exclusively in the Page Views section for both Funnels and Websites, this update helps you optimize for your audience’s preferred devices.
How to Get Started:
- Log into your account → Sites section → Analytics tab.
- Use the dropdown to select Funnels, Websites, or both!
- Choose a date range (last 7 days, 30 days, or a custom period).
- Scroll to the “Traffic by Device Type” section & explore the interactive pie chart!
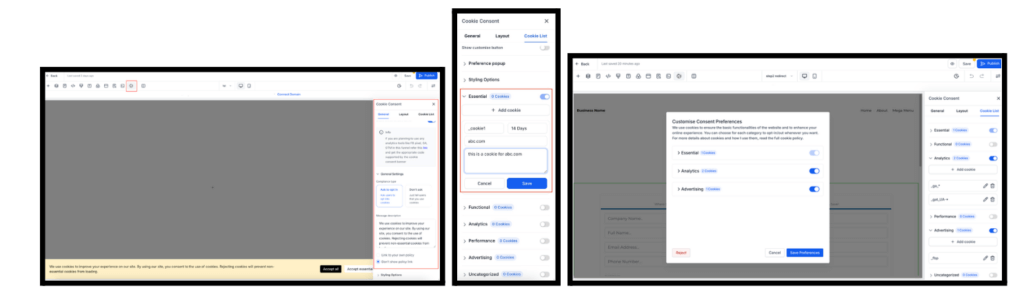
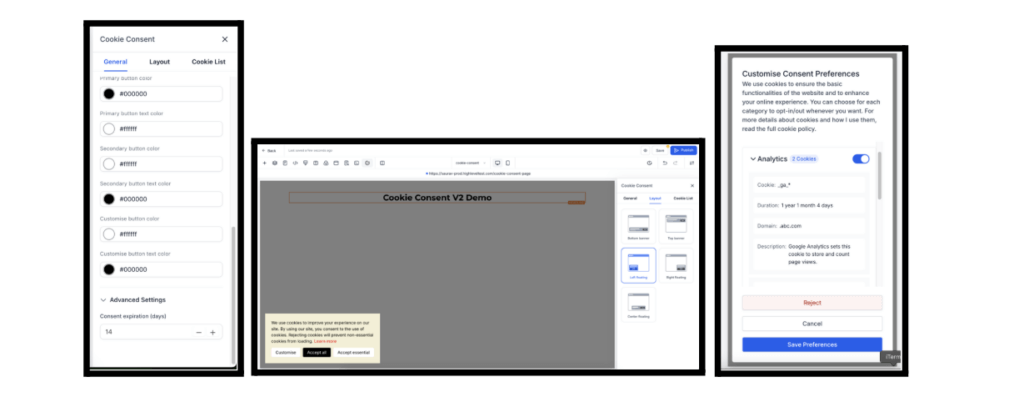
Cookie Consent V2 Overview
The latest updates to the cookie consent banner enhance user control over cookie preferences, ensuring compliance with privacy regulations.
- All-New Layout Options: Users can now choose from various layout positions, including new floating banner styles.
- Customizable Cookie Consent Popup: A new “Customize” button allows visitors to enable or disable predefined cookie categories.
Visitors can also view detailed cookie information, including:
- Cookie key
- Duration/expiry
- Domain
- Description
- Consent Expiration Settings: Users can set a custom expiry period (in days) after which visitors must provide consent again.
- Blocking Non-Essential Cookies by Default: Upon initial page load, all non-essential cookies are blocked until consent is granted. Once consent is given, the page refreshes, allowing scripts to set cookies based on the visitor’s choices. Any cookies that don’t match the specified patterns or categories will not be set.
- Custom Code Samples: New code samples have been added to allow users to read consent types or categories of accepted cookies.
- Managing the Cookie List: The Cookie List feature enables users to enable or disable different types of cookies. Visitors can select which cookies to allow.
- Predefined Cookie Categories:
- Essential – Required for website functionality (always enabled).
- Functional – Supports features like social media sharing and feedback collection.
- Analytics – Tracks visitor behavior (e.g., page views, bounce rates).
- Performance – Helps optimize site speed and user experience.
- Advertising – Used for targeted ads and marketing.
- Uncategorized – Any cookies not assigned to the above categories.
- Adding Cookies to Categories: For each cookie, specify:
- Cookie Key – Name of the cookie (supports regex patterns for multiple cookies). Cookies are blacklisted or whitelisted based on the selected category.
- Duration – How long the cookie lasts (e.g., 1 day, 30 days, 1 year).
- Domain – The domain setting the cookie.
- Description – Purpose of the cookie.
- Using Regex Patterns: You can use regex patterns to match multiple cookies, such as:
- Cookies starting with “ga-” (e.g., ga-1234, ga-3241).
- Meta Pixel cookies.
- Google Analytics cookies.
Reporting
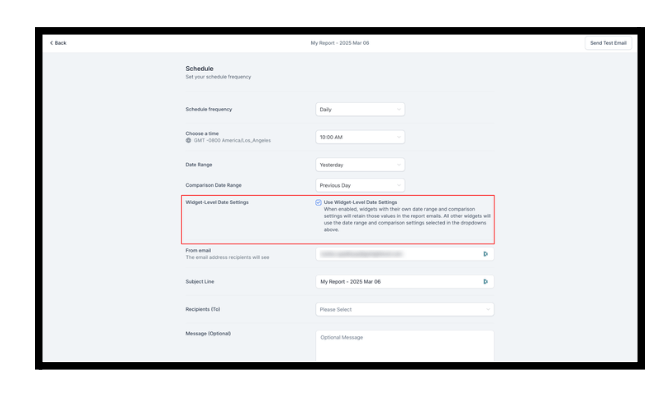
Improved Control Over Date Properties
Previously, when scheduling a report email, you were required to select a global date range, which applied to all widgets—even if some widgets had their own custom date settings.
Now, you have more control over how date properties are handled in your reports with the Use Widget-Level Date Settings option.
How It Works:
- If enabled, widgets with custom date ranges and comparisons will retain those settings in the emailed report.
- If disabled, all widgets will follow the global report date range selected during scheduling.
Payments
Support for Delayed Payments in Custom Invoice Providers
With this update, we’ve expanded the functionality to also support delayed payment methods for transactions associated with invoices, making it easier for clients to manage invoice payments using custom payment providers.
- Delayed Payment Methods for Invoices: Custom payment providers now support delayed payment methods for transactions tied to invoices, in addition to orders.
- Payment Updates via Webhook: Just like orders, the payment.captured webhook event will now update both the transaction and the associated invoice with the relevant data based on the webhook payload.
- Invoice Status Update: The invoice status will be automatically marked as PAID when the transaction is successfully processed, based on the webhook event received.
Impact:
- Improvement in Invoice Management: Clients can now utilize delayed payment methods for invoices via a custom payment provider, allowing for more flexible payment options and better management when processing invoices.
- Hassle-Free Invoice Charging: Clients can now easily charge their invoices to customers, even when using delayed payment methods provided by the custom payment provider, giving them a hassle-free experience.
- Accurate Transaction and Invoice Status Updates: transaction and invoice statuses are now automatically and accurately reflected in FGF once a delayed payment method has been completed for the the custom payment provider.
Configure Stripe Payment methods in various checkouts
Now you can configure Stripe payment methods directly in FGF instead of configuring them on Stripe’s dashboard. These payment methods can be enabled/disabled for multiple product areas as listed below in both Live and Test modes separately. For existing customers the default payment methods against product areas or checkouts would be as per their existing configurations on Stripe. Editing these payment methods on Stripe will be disabled going forward.
Only payment methods available within a checkout would be visible in that product area/checkout’s list. For Subscription products, a separate list under a drop-down called ‘Subscriptions’ is available. If there is a subscription product there in the checkout, this setting would over-write the default settings of that checkout. Also, as per Stripe, this setting is only accessible after addition of at least one subscription in Live mode in that account.
Product Areas/Checkouts Covered:
- Invoices
- Invoices with AutoPayments
- Payment Links
- Funnels – One-Step Order Form
- Funnels – Two-Step Order Form
- Forms
- Ecommerce Stores
- Calendars
- Courses
- Communities
- Subscriptions
Settings can be found under Payments > Integrations > Stripe > Manage Payment Methods.
Prospecting
Customer List Custom Audience using Smart Lists
We’ve added a GBP Claim Status Check to the Marketing Audit Report, allowing users to verify if a business’s Google Business Profile (GBP) is claimed. This enhancement improves visibility and provides valuable insights, making it easier for users to check their GBP status and take the necessary steps to strengthen their online presence. Report data displays key verified GBP details, including:
- Business Address
- Business Website
- Google Photos
- Operational Hours
- Phone Number
A new External Link provides quick access to your Google Business Profile (GBP) for seamless profile management. Additionally, the Unresponded Reviews Section now highlights unanswered reviews from Google and Facebook, helping users quickly identify and respond to feedback, ensuring better engagement with customers.
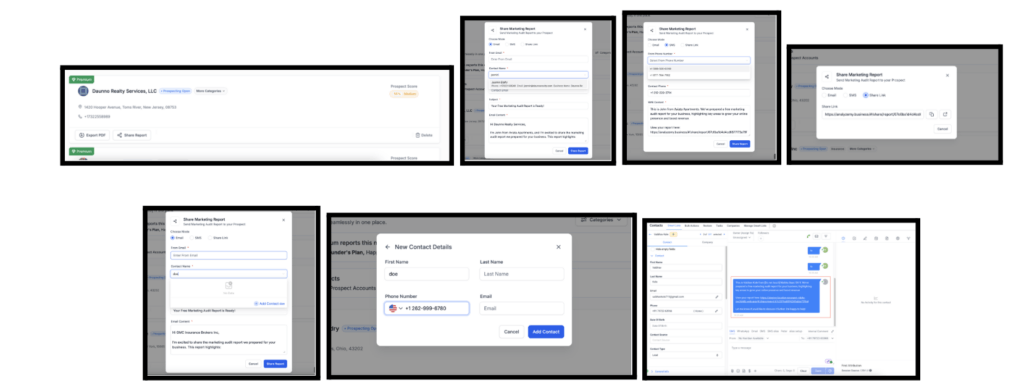
Send Audit Reports To Prospects via Email and SMS
The Prospecting Tool Communication feature offers seamless options for sharing audit reports, eliminating the need for external tools, enhancing communication efficiency, and ensuring timely engagement with prospects.
How to get started?
- Navigate to the Prospecting Dashboard.
- Click the Share Report button.
- Select either Email or SMS mode.
- Search for the Contact by name, phone, email, or business name to whom you want to send the report.
- If the Contact is not found in the search, click Add Contact to add them directly from within the Prospecting Tool.
- A pre-defined Email and SMS template is available, with customizable subject and message body.
- Validate all the details before sending.
- You can continue the follow-up in the Conversations tab.
Documents & Contracts
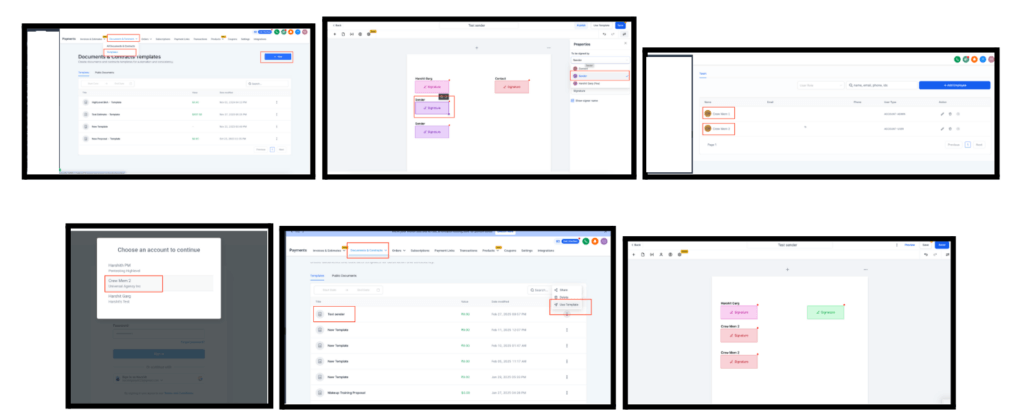
Dynamic Field Assignment To Sender From Templates
For multi-member teams, we’ve added Dynamic Field Assignment to Sender in Documents & Contracts templates. Now, you can assign signature fields to “Sender” instead of selecting your own name. When a crew member sends the document, the signature fields are automatically assigned to them—no manual reassignment needed.
How to Use?
- In your template, select a field (e.g., Signature).
- Under Properties, choose Sender as the signer.
- Click Save.
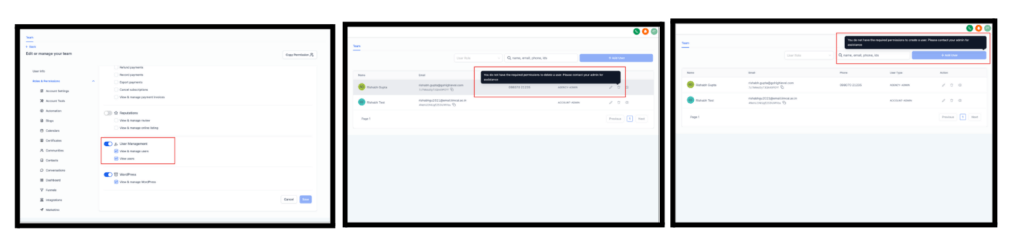
User Management
More Granular Control
We’ve introduced a dedicated permission for User Management, replacing the existing Team Management permissions under Account Settings. This update also includes control over user creation permissions, ensuring better flexibility. New Permission Settings:
- View and Manage Users → Allows users to create, edit, and delete users.
- View Users → Grants view-only access to user list.
Communities
Announcement Channel and Role-Based Access Control
We are excited to introduce the Announcement Channel feature in communities. This feature allows community admins and owners to create a dedicated channel for sharing critical updates, ensuring important information is communicated effectively without being lost in general discussions.
How to Use:
- Create an Announcement Channel
- Navigate to Channel Management Settings.
- Select the option to create a new Announcement Channel or enable it for an existing channel.
- The channel is labeled and configured as an Announcement Channel.
- Posting in the Announcement Channel
- Only admins can post updates.
- Regular members will see a read-only interface.

Membership Courses
Drip Scheduling & Library Sorting
- Now, you can set specific release dates for your course content, providing more flexibility in structuring learning materials.
- We’ve added a sorting option to the course library page. You can now quickly sort and find your products more efficiently. Sorting Options:
- My Courses: Alphabetical (A-Z/Z-A), Library Order, Most/Least Lessons, Most/Least Complete, Recent/Oldest Enrolled, Recent/Oldest Accessed.
- All Courses: Default, Alphabetical (A-Z/Z-A), Oldest/Newest.
- We’ve made key improvements to ensure our platform is more accessible for specially-abled users using screen readers:
- Offer List Page – Improved navigation and screen reader support.
- Dashboard Page – Better structure and labels for easier access.
- Products List Page – Enhanced focus indicators and readability.
Email Campaigns
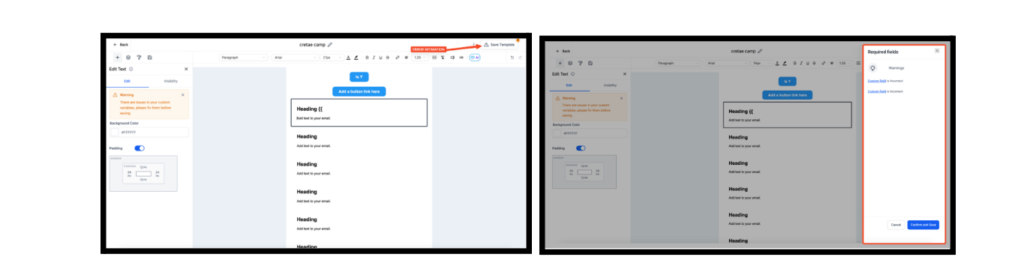
Template Custom Value Error Warnings
We now show warnings for custom value errors in email templates. When an error is detected, the warning appears at the top, and clicking it takes you straight to the problem area.
Custom value errors can cause emails to fail or not be delivered. This feature helps you quickly find and fix errors to avoid delivery issues.
How to Check?
- Go to Marketing → Emails → Templates.
- Add a Text Element with a custom value.
- Introduce a small syntax error.
- A warning will appear at the top at Save —click it to go directly to the error.
- This feature helps ensure your emails are error-free and delivered successfully.
Improved Resend Campaign Visibility & Control
- Pre-configure Resends – Set up unopened email resends in the send or schedule screen.
- Better Visibility – Resend campaigns now appear as “Waiting” in the campaign list.
- More Control – Modify the resend duration or cancel before it sends.
- Resend Batch & RSS Emails – Now supports batch and RSS-scheduled emails.
How to use:
- Create a Campaign
- Click “Send” or “Schedule”
- Enable Resend Settings – Set the resend duration & subject line
- Send the Campaign – The resend is now scheduled with a “Waiting” status
- Modify or Cancel – Click the three dots to edit duration or cancel if needed
GoKollab
Integration of Membership Courses
Creators can now make their membership courses discoverable on Gokollab Marketplace and set an exclusive pricing model for listing courses.
How to list a course on Gokollab Marketplace?
- Login to your account and navigate to Membership >> Gokollab Marketplace
- Navigate into the courses tab and click on + Add Course Button
- From the dropdown list of existing courses, select the one to be made discoverable.
- Select the pricing model and set the subscription type, price etc relevant details.
- Click on Add Course to make it discoverable.
How to manage a discoverable course?
- In the same tab, owners can select / unselect multiple courses to list / un-list them from Gokollab Marketplace.
- How to view all courses users have enrolled in Gokollab?
- In the Gokollab Group Switcher look for a new icon My Courses
- Or, navigate to https://gokollab.com/courses/my-courses to access all courses that users have enrolled.
Workflows
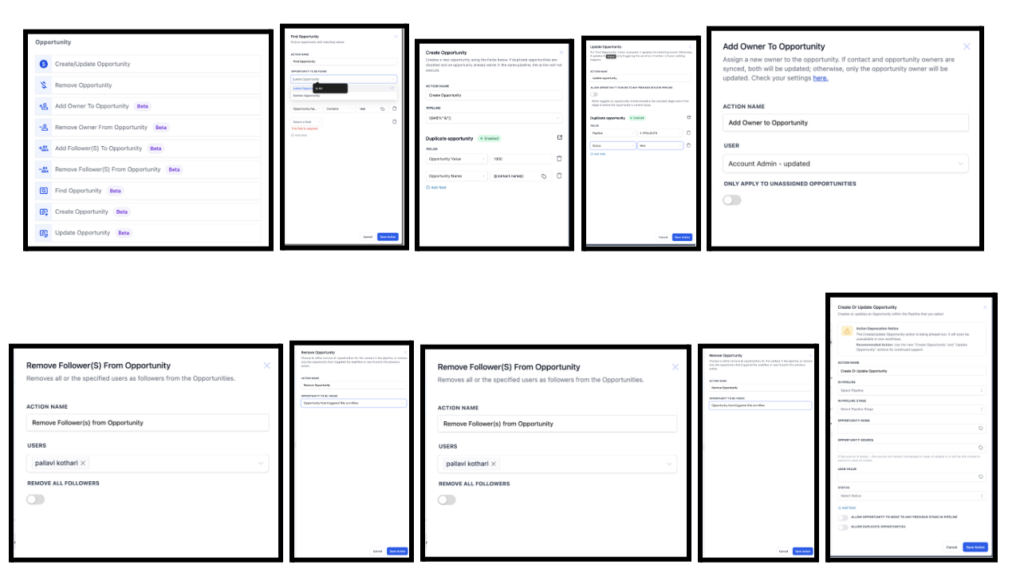
New And Improved Opportunity Workflow Actions
- Find Opportunity: Quickly locate the earliest or latest matching opportunity. Perfect for updating or branching logic based on an existing record.
- Create Opportunity: Easily add new opportunities into any pipeline/stage. Ideal for automating new leads into your sales process.
- Update Opportunity: Modify existing opportunities’ fields (name, value, stage, etc.) or move opportunities amongst pipelines. Great for reflecting real-time changes when leads take action.
- Add/Remove Owner: Precisely assign or clear ownership of an opportunity. Syncs with contact ownership if your settings allow.
- Add/Remove Follower(s): Keep the right people informed—or clear out unnecessary followers.
- Enhanced Remove Opportunity: Now remove a single opportunity that triggered the workflow, one found via “Find Opportunity,” or all in a pipeline. Perfect for targeted cleaning up of canceled or irrelevant deals.
- Deprecation of “Create or Update Opportunity”: We’re phasing out the all-in-one action in favor of separate Create and Update actions for more precise control.
How to Get Started:
- Open Workflows: Navigate to Automations → Workflows in your account.
- Add the Action: Pick from the new Opportunity actions—“Find,” “Create,” “Update,” “Add/Remove Owner,” “Add/Remove Follower,” or “Remove Opportunity.”
- Configure & Save: Fill in the relevant details (pipeline, stage, user assignments, etc.), then save.
- Test & Launch: Run a test contact or scenario to ensure everything works smoothly!
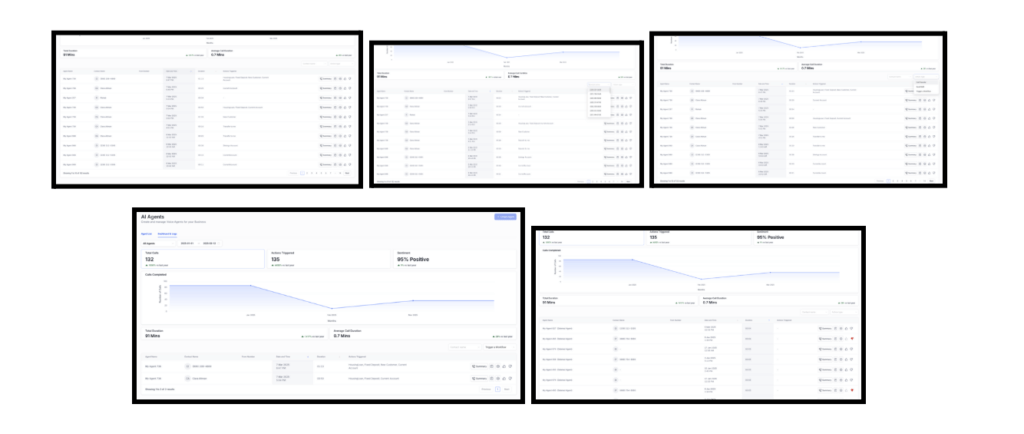
Voice AI
Enabling Sorting and Filters
This enhancement builds on the existing dashboard and supercharges it by enabling Sorting and Filters. We have also made performance improvements to make the dashboard searches much faster.