Hope everyone is enjoying the holiday season! It is time for all the latest updates in FG Funnels from the week of December 19th through December 26th, 2024. If you have questions about any of these updates, or FG Funnels in general, please reach out to [email protected] or live chat in the app and our team will be happy to help.
Blogs
Bulk Delete Option
New bulk delete option allows for removing any unwanted or erroneous entries created or mapped to the current blog.
How to use:
- Navigate to Blog site -> ‘Imported content’
- Click on the three dots on the rightmost corner icon -> ‘Delete import’ CTA.
Evergreen Content Posting with Category Queues
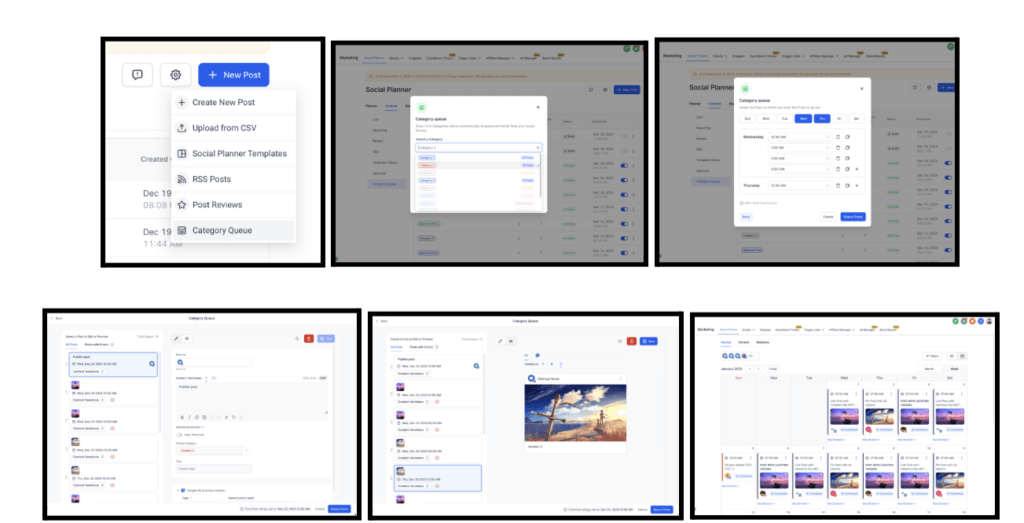
Now you can repurpose your best content and maintain a consistent online presence with the new Category Tagging system in your posting queue. This feature is designed to simplify content management, maximize engagement, and ensure your brand voice remains active across platforms—without additional effort.
Key Highlights:
Evergreen Content Management: Easily categorize your evergreen content, ensuring it gets shared repeatedly over time.
Automatically fill your queue with pre-tagged posts, keeping your timelines active, even on busy days.
Smart Category Tagging: Organize content into categories (e.g., Blog Posts, Tips, Promotions) for precise scheduling.
Set specific posting times for each category, ensuring the right content reaches your audience at the right time.
Consistent Posting Schedules: Never miss a post! The queue intelligently cycles through your categorized content to maintain consistency.
Perfect for building a predictable and reliable brand presence online.
How to use:
- Navigate to New Post button -> Click on Category Queue option.
- Enable options like Enable Future Posting or Prioritize Content by checking the corresponding checkboxes.
- Add any upcoming content published or added to the queues
- Add the new content to the front of the queue to publish first.
- Select the preferred Days and Time for your posts.
- Review and edit the Media or Content of the posts as needed.
- Fix any errors identified by the caution, error and warning messages.
- Click the Queue Post button to Schedule the posts in case no errors are present.
- Click the Queue Post button to finalize and Save as Draft in case any errors are present.
Ecommerce Stores
Custom Column Layout for the Product List Page
Store owners now have the flexibility to customize the number of columns in the Product List page in their stores within the store builder.
How to Use:
- Open your Store Builder under Sites -> Stores and select the Product List element.
- In the Settings tab on the right, go to the General section and scroll down to the Layout Options.
- In the Layout Options, you’ll see the Number of Columns setting, where you can customize the number of columns in the Product List element.
- Set the desired number of columns (minimum = 1, maximum = 5).
- Once you’re done with your changes, click Save and then Publish!

Text Customization Capabilities
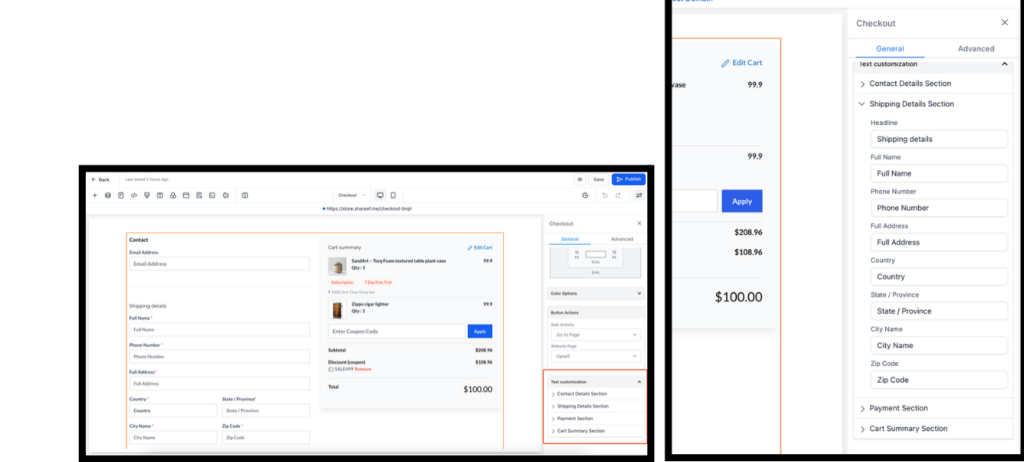
Previously, text customization options were spread across the General and Advanced sections, with many fields being non-customizable. Now, all text settings have been consolidated into a single section within the General settings called “Text Customization.”
How To Use:
- Open the Store Builder Under Sites->Stores and select the element you’d like to customize (e.g., Product List, Product Detail, Upsell, etc.).
- Go to the General section in the Settings tab on the right, and scroll down to bottom to access the “Text Customization” section.
- In the Text Customization section, you’ll find text options organized into sub-sections for different parts of the component (e.g., Shipping Details, Payment Section).
- Edit the text, labels, or headings within each sub-section as needed.
Key Points to Note:
- Some text elements, like error messages or empty result states, may not appear in the builder preview but can still be customized.
- Existing customization options (e.g., Button Options, Form Options) have been moved to the Text Customization section, and the previous options will no longer be available or needed.
- Current stores will continue to function as they are, even if no text settings are updated.
Documents & Contracts
Recurring Payments in 2-in-1 Documents
This enhancement allows senders to collect recurring payments seamlessly right after a document is signed. If the recurring payment schedule coincides with the signing date, the user is immediately redirected to the invoice. If the signing date does not align with the schedule, the invoice will be sent on the next scheduled date.
How to Use:
- Navigate to Documents and Contracts and create a document.
- Add a product list.
- Include a recurring product and set the frequency.
- Configure the payment schedule:
- From Payment Settings, enable Direct Payment.
- Send the document to the user.
- Once the user signs the document, they will be redirected to the recurring invoice immediately if the signing day matches the schedule. Otherwise, invoices will follow the planned recurring schedule.
User Creation Flow
Mandatory For Users To Review and Confirm Permissions
We’ve updated the User Creation Flow to make it mandatory for users to review and confirm associated permissions before completing the process. Additionally, the call-to-action (CTA) on the User Info Screen has been updated from “Save” to “Next” for better clarity.
Steps to Create a New User
- Enter User Information under Settings->My Staff -> Add Employee
- On the User Info screen, input the basic details for the new user. Once completed, click “Next” to proceed to the next step.
- Carefully review the associated permissions, role and type for the new user. After confirming everything is accurate, click “Save” to finalize and create the user.

Voice AI
Increased Rate Limit
Rate limits for calls going to Voice AI have been increased to 200 calls per minute. Older limits still apply to regular calls.
Contact Name Column
Building on the recently introduced Call Logs for agents, we’ve added a new Contact Name column to view the name directly in the call logs. Click on the contact name to instantly navigate to the Contact Details page for more information.
Agent as a Backup Feature
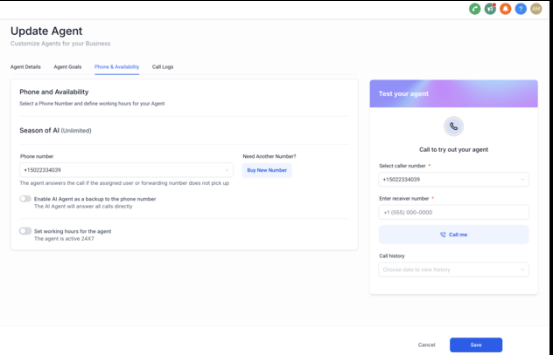
When this feature is enabled, the agent will behave like it always does and will prioritize the existing flow and act as a backup ai employee for the business. Based on the configuration, calls can go to the Voicemail, forwarding number etc. When toggled off calls will always be picked up by the primary agent. This is especially useful while testing and improving voice agents.
If a call is received outside the agent’s working hours, the call will still follow the existing flow and go to the forwarding number even when the Agent as backup is disabled. To You access, head over to the Phone & Availability page, and Enable AI Agent as a backup to the phone number switch.
Contacts
Bulk Actions – Updated Merge Functionality
We’ve enhanced the contact merge functionality to make it smarter, more intuitive, and user-friendly. Here’s what’s new:
- Merging and Adding Additional Email Addresses and Phone Numbers: Retain additional email addresses and phone numbers while merging contacts. Select a primary email and phone number during the merge process as per your requirement.
- Improved DND Preference Management: Gain full control over DND settings by selecting preferences for each communication channel individually.
- Updated UX: Experience a cleaner interface with significant fixes and performance improvements to streamline your workflow.
How to use:
1. Enable the feature under Labs > “Updated Merge Feature.”
2. Select multiple contacts and click on Merge on the top bar.
3. Choose the Master Record.
4. Review and Map Fields.
5. Confirm the Merge.
Bulk Actions – Updated Import Functionality
- Enhanced import stats with categorized success, error, and warning counts.
- Clearer error and warning messages for better troubleshooting.
- Easy download of detailed error and warning logs.
- Added compatibility for more date formats and phone number formats.
- Deduplication settings now unified with universal settings.
- Significant bug fixes and improvements in the experience of importing contacts with upfront details about how the import would happen.
How to Use:
- Navigate to settings and turn on the Labs feature for your account under “Enhanced Contact Import.”
- Go to Contacts and click on Import in the top bar.
- Select “Contacts” and click on Next for importing contacts or select both Contacts and Opportunities to import both.
- Select whether you want to Create, Update, or Create and Update records.
- Match the fields in your file with the corresponding fields in the system.
- Finalize your settings and start the import.
- After the import, check detailed stats under the Bulk Actions page, including success, error, and warning counts.
WhatsApp
Auto Population of E-mail, Flows, Visibility, and Direct Deploy
Auto population of email: The E-mail contact property will be automatically added as soon as an inbound message containing an e-mail address comes. (For contacts who do not have an existing e-mail field).
WhatsApp Flows: Added support for utilizing FGF variables in the header and footer sections of WhatsApp flows, allowing for dynamic content personalization and enhanced flexibility in flow customization.
WhatsApp visibility: To boost WhatsApp adoption, we have updated the WhatsApp condition to be visible to everyone. If the integration is not available or the subscription is inactive, the ‘Connect to WhatsApp‘ option will be displayed instead
Invoices, Estimates, & Payments
Order Submitted Trigger for Payment Links
Order Submitted Trigger is now enabled for payment links. When a customer completes a purchase through a payment link, utilize the Order Submitted Trigger to automate post-purchase workflows.
PayPal Payment Method Support for Recurring Invoices
PayPal is now supported as a payment method for recurring invoices, provided that autopayment is not enabled. If PayPal integration is active in the system, users can offer PayPal as an option for their recurring billing needs.
New Reminders Configuration for Business Timezone and Contact Timezone
Business Hours Feature: Configure your operational hours to streamline reminders and invoicing.
Time Zone Preferences: Choose between using the customer’s time zone or your business’s time zone for all reminders.
Future Invoices: These settings apply automatically to all invoices sent after enabling the feature.
How to Use:
- Navigate to Invoice Settings > Reminders.
- Enable Reminders and add business hours to it
- Select either Customer Time Zone or Business Time Zone based on your preference. By default it will be set to the Business Time Zone.
- Once a reminder is toggled on, all future invoices will adhere to the selected reminder automatically.

Custom Values and Partial Quantity Support For Estimates
Custom values are now available when sending estimates. These custom values can be configured at:
- Editor level: Adjust specific values directly while editing an estimate.
- Settings level: Set predefined custom values for consistent application across all estimates.


Partial Quantity Support
Business users can now configure partial quantities for items within estimates.
This enhancement allows partial quantities for items within estimates. Users can offer services or products in fractions (e.g., 1.5 hours, 0.25 units). Ideal for businesses offering time-based or divisible services/products.
Company Settings
Page Redesign
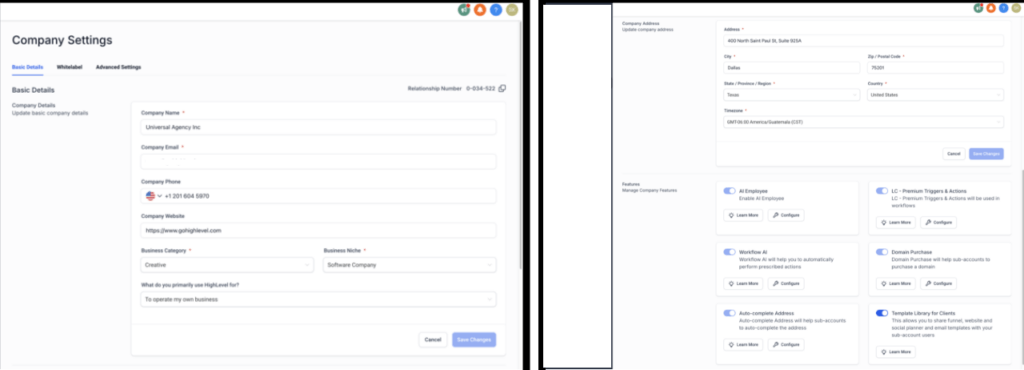
We’ve re-designed the Company Settings Page and introduced a new tabbed interface, replacing the previous single-page layout. Key Enhancements:
- The previous company settings page was added as an Iframe app, which led to various overheads and no code reusability. The page is now migrated to the module-federation approach, simplifying further improvements.
- Common settings are now grouped into tabs such as Basic Details, and Advanced Settings.
- The interface has been refreshed for a cleaner and more user-friendly design.
Domains
Multipath URL Redirect
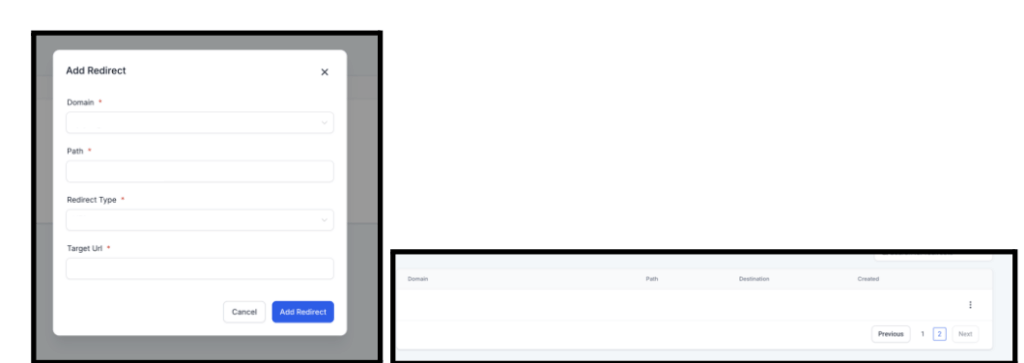
This enhancement allows users to set redirects from domains with multipath structures, such as www.mydomain.com/path1/path2, to a target domain, offering greater control and flexibility over URL management.
How It Works:
- Go to Settings -> “URL Redirects” from the left menu.
- Click ‘Add a Redirect.’
- Fill in the Domain Name.
- Under Path, add a multilevel slug, for example, /path1/path2.
- Fill in the Redirect Type and Target URL.
- Hit the ‘Add Redirect’ button to save the settings.
Note: URL redirect for multipath is only supported for domains pointing to the new CNAME/A Record, i.e., sites.ludicrous.cloud.
Courses
Transcoder V2
With Transcoder V2, we’ve made transformative updates to ensure Uploads are now directly linked to the transcoding process, ensuring all videos are properly processed before streaming. This guarantees secure, high-quality playback. Creators now gain real-time visibility into the upload and transcoding process, similar to YouTube’s progress tracking features. Any issues are flagged instantly, enabling quick fixes and smooth uploads.
Affiliate Manager
Commission Length and Variable Commissions
With these new features, you can better manage how commissions are paid for recurring products and incentivize affiliates more effectively.
- Commission Length: Set a limit on the number of transactions for which affiliates receive commissions for a recurring product.
- Variable Commissions Over Time: Assign different commission rates for specific transaction counts. For example, offer a higher commission for the initial charges and revert to the default commission thereafter.
How It Works:
- In Step 2 of creating or editing an affiliate campaign, set your default commission value.
- Enable Commission Length to limit commissions to a specific number of charges.
- Toggle on Variable Commissions to define custom commission rates for specific charge counts.
- Save and publish your campaign

Client Portal
Notification Preferences For Courses
With this release, enable, disable, and customize notifications for course-related events. This feature provides fine-grained control over how users are informed about critical updates, ensuring timely and relevant communication. Key Highlights:
- Enable/Disable Notifications: Client portal owners can manage notifications for course-specific events, giving users control over which updates they receive.
- Customizable Email Templates: Tailor email notifications for course-related events using the Email Builder to create user-specific, engaging, and actionable communications.
- Centralized Notification Management: The Client Portal now serves as a unified hub for managing notifications across all child apps, simplifying access and increasing adoption by offering an all-in-one solution for notification preferences.
How to Use:
- Go to Sites -> Client Portal -> Settings -> Email Settings -> Courses
- Depending on access to specific child apps (Communities, Certificates, Courses etc.), the option to enable or disable email notifications along with a Email Template button and a preview button will be visible for each corresponding child app.
- Adjust preferences as needed, and click on the Default Template button to choose a new email template or Edit the selected custom template.
- Each option will have an Eye Icon, Click on the Eye icon to preview the selected Email Template
- Edit the selected template on the go and add more elements, custom values.

Countdown Timer
Corner radius, Padding, and Checker Background
The default corner radius and padding made it difficult for designers to integrate the Countdown Timer into emails and websites. Now there’s control of both the corner radius and padding of the Countdown Timer. We’ve also disabled the checker background for the countdown timer builder.
How to Use:
- Go to Marketing → Countdown Timer.
- Create or edit a timer.
- In the Styling section, adjust:
- Corner Radius: Set manually or using the scroll bar.
- Padding: Adjust or disable as needed.
Note: Existing designs will not be impacted due to this release.

Email Builder
Rounding of Layouts
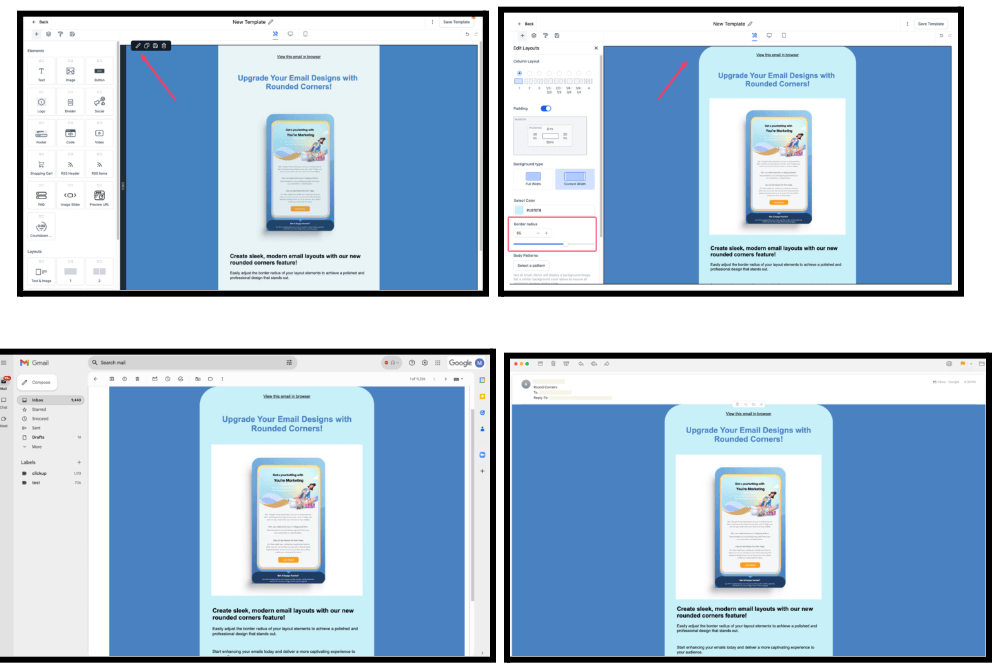
We’ve introduced a new feature to enhance the look and feel of emails by allowing users to round the corners of elements in layouts.
How It Works:
- Start by creating a new campaign or editing an existing one under Marketing>Emails.
- Choose the Layout you want to round.
- Use the “Border Radius” slider or input field to adjust how rounded the corners should be.
- Preview your changes, then save and send your campaign as usual.
