It is time for all the latest updates in FG Funnels from the week of October 17th through October 24th, 2024. We have quite a few new releases this week, so If you have questions about any of these updates, or FG Funnels in general, please reach out to [email protected] or live chat in the app and our team will be happy to help.
Automations
Execution Logs & Enrollment History Enhancements
Execution Logs – UI/UX Changes
- “View Details” Hyperlink: Previously represented by an icon, the “View Details” option is now a more user-friendly hyperlink. This change makes it easier to identify and access execution details for any specific action.
- Improved Error Visibility: When any action encounters an error, the Status field or the View Details link will now be highlighted. This enhancement helps users quickly spot issues and take action without sifting through large amounts of data.
- Highlighting Opened Rows: When the Details section for a specific row item is opened, the row will be highlighted, providing a clear visual reference. This enhancement ensures that users can easily keep track of the current row they are analyzing.
- Action Column Overhaul: Previously, the “Action” column only displayed the action type, which could be confusing if multiple actions of the same type existed. We’ve replaced this with the “Action Name” that you assign.
- Enhanced Sorting in Filters: Within the filter dropdown, actions that are part of the workflow will appear first. In a separate section, other actions will be listed for clarity. This breakdown makes filtering by action types more intuitive and helps users prioritize actions directly linked to their workflows.
- New Workflow Statuses: The statuses displayed in the Enrollment History now provide better insights on why a contact exited or completed a workflow:
- “Workflow Completed”: When the contact completes the workflow naturally.
- “Removed by Workflow Action”: When the contact is removed due to an action within the current workflow.
- “Removed by External Workflow Action”: When the contact is removed because of an action in a different workflow.
- Pagination: Both the Enrollment History and Execution Logs tabs now support pagination. Users can choose how many row items are displayed per page, with options for 10, 25, or 50 rows at a time. This improves performance and usability for large workflows.
Enrollment History – UI/UX Changes
- Pagination: Both the Enrollment History and Execution Logs tabs now support pagination. Users can choose how many row items are displayed per page, with options for 10, 25, or 50 rows at a time. This improves performance and usability for large workflows.
- Go To Action Button: If you are in the Execution history and on checking the details you decide you have to make changes any of the action. Just click on the Go To Action button and it will directly take you to the builder and open the Action Sidebar so that you can make your changes.
- Date Format Update: To optimize space usage, we have changed the date format. Now, dates will appear in the MMM-DD format (e.g., Oct-21). The time will only be shown when the user hovers over the date, keeping the view clean while still providing the necessary details when needed.
- Timezone Additions: The “Executed On” field in the execution logs now includes the timezone in which the action was performed, making it easier to understand when actions were executed in different time zones.
- Custom Date Range Option: Users now have more control over the date range when viewing enrollment history and execution logs. In addition to pre-set options (Today, Yesterday, etc.), users can select a custom start and end date with time, up to a maximum range of 30 days.
- Changes in Contact History: Users can go to the Contact History by clicking the “View Contact History” icon in the Execution Logs. On clicking the icon it will take you to the contact history of that contact. On the top the contact details will be available.
- In the logs all the action executions of the contact will be visible for all the enrollments the contacts have had for this workflow.
- We have improved the breadcrumbs for easier navigation through Contact History and Execution Logs.
- Breadcrumbs are clickable and takes you back to the logs when clicked.
- Changes in Execution History: On clicking the “View Execution History” icon in the Enrollment history or Execution logs. the execution history for that contact for a specific enrollment will open.
Pause Workflow
A new section called “Pause Workflow” has been added to the Global Workflow Settings, allowing you to pause up to 15 date ranges and select multiple or all workflows to pause. When paused, the workflows function as if they are in “Draft” status. For easy tracking, you can view the pause details directly within each workflow’s builder settings.
How to use?
- Navigate to Global Workflow Settings.
- Select the “Start Date” and “End Date”.
- Select the workflows from the list of workflows. You can select “All” or “Individual workflows”.
- You can tick the “Annually” checkbox if you want the workflows to be paused on same dates every year.
- Use the “Clone” or “Delete” icon to Duplicate or Delete a row.
- Click on “Save” to apply the changes.
Important Notes:
- Maximum allowed difference between the start and end date is 15 days.
- A Workflow should not be part of two or more date ranges that are overlapping.
- Pause feature is available for Admin roles only.
Notes for Workflows
With this update, users can add and track important information for each workflow.
Key features:
All New Sidebar: The Stats View is now located in the sidebar alongside the new Notes and Sticky Notes options. By clicking the Stats View icon, you can activate or deactivate this view. When active, the icon will highlight, indicating the feature is enabled.

Workflow Level Notes:Admins can now add Notes for a specific workflow. The notes will be visible to all the users and will get saved when the Workflow is Saved. Workflow notes include Created by / Edited by and Created on / Edited on information, so users can track who made changes and when they were made.
Sticky Notes:The Rich Text Editor is now available in the notes, allowing you to format text with ease. You can also attach images to sticky notes for added context. Additionally, visibility controls give you the option to toggle the notes’ visibility by clicking the “Hide Notes” button, allowing you to choose whether the notes remain always visible or only appear when needed.
Action Level Notes (Formerly known as Comments): When a user hovers over an action, they’ll see the notes icon in the top-right corner. By clicking it, they can add action-specific notes that others can view and build upon. Each note maintains a history of additions, making it easy for teams to track discussions, updates, and feedback on specific actions within a workflow. All Action-Level Notes are also available in the primary Notes section, allowing users to see and search through all notes in one place.
Workflow AI Assistant
Workflow AI is an AI powered assistant that provides step-by-step guidance, suggesting the right actions for the job and insights on how to optimize your workflow. Just type what you want to build and Workflow AI will give you the list of actions and triggers to be added to achieve it and how to configure them.
How to get started with Workflow AI:
- When you open the builder you can find the Workflow AI on the bottom left corner of the builder.
- On clicking the AI icon the chat box will open. There are multiple cards available to help you start the conversation. You can choose any card or began your chat by just typing the prompt.
- Or you can click on the “Suggestions” or “Add Actions” to directly start the conversation from there.
- You can start the conversation by typing your query in the text box.
- You will get 30 credits a day. A credit is 1 questions that you can ask the bot and the credits will reset every day.
- You can clear the chat any time you want and start afresh by clicking on the “Clear Chat” icon present on the top right corner of the chat box.
- You can also export the chat by clicking on the”Export Chat” icon.
- You can ask the bot any information that you need clarity on and the bot will explain it to you. For example in the below attached screenshot the question asked is “What is a trigger” and the bot has shared a detailed explanation of it.
- You can just mention the use case you want to achieve and the bot will share you detailed explanation of the actions and triggers that are to be added and the configuration that is required to be done.
- The bot will share the Step by Step details you need to follow to configure the workflow.
- Also the bot will share the list of actions that are to be added in the workflow.
- Just click on the “+” icon against the action, the “+” icons in the builder will start blinking. Select the place where you want to add the action. The action will be added and the sidebar will be opened for configuring the action.
- The bot will also help you in configuring the actions. Just type in the end goal and the bot will guide you through the implementation. Below are a couple of examples where the user has asked the bot to configure a wait step where the contact should pass when they have opened an email and the second example is one where user wants to create a workflow with multiple actions.
- When you are having the conversation with the bot, it will suggest you what questions can be asked next.
- You can also select if you liked what the bot has answered or you were not satisfied with the answer. This will give us better insights on where the bot needs to be perfected.
Oauth2 In Custom Webhook
With OAuth2 authorization, users will be able to integrate with a large quantity of APIs, such as Google, Facebook, LinkedIn, and others. All these integrations will open a world of possibilities for the product.
How it works:
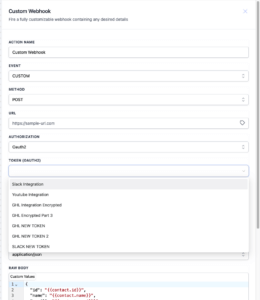
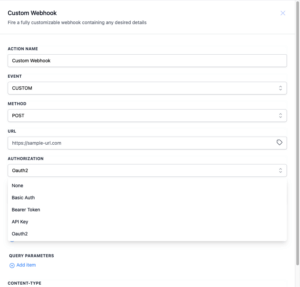
- The user will able to select the OAuth2 as an authorization option in Custom Webhook action.
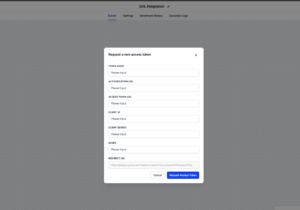
- With this option selected, they can select an existing token or request a new one.
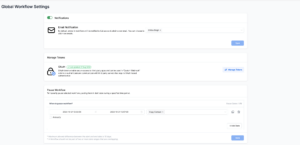
- To Manage the tokens go to “Global Workflow Settings”. There is a section named “Manage Tokens” which can be used to manage the tokens.
- Click on the “Manage Token”, a new pop up screen will open. with the list of all the tokens.
- You can “Update” and “Delete” the tokens from here.
Appointment Options In If-else Action
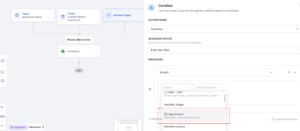
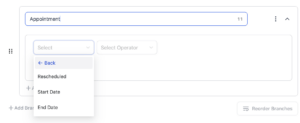
Now you can create new branches based on whether an appointment was rescheduled or not for that execution. There are 3 new options in if-else conditions to select from:
Appointment Rescheduled – Denotes whether the appointment was rescheduled for that specific executions
Start Date – Refers to the start date of the appointment event
End Date – Refers to the end date of the appointment event
How it works?
- Select Appointment option in the if/else branch dropdown
- Now you can select from the following options – Appointment Rescheduled, Start Date and End Date
- Note : Either or both of triggers – Appointment Status or Customer booked appointment needs to selected for this option to be available.
Highlight Contact Path
With the new “Highlight Contact Path” button in the Enrollment History, you can now see the entire path a contact has followed in a workflow at a glance. Clicking on a highlighted path takes you directly to the workflow builder with the corresponding action highlighted, saving you time and effort when reviewing or making adjustments.
How it Works:
- Click on the “Highlight Contact Path” icon in the Enrollment History tab or in Execution History.
- On clicking the icon, the builder will open and the path will be highlighted that the contact has taken in the workflow.
Advanced Filters & Smart List
These powerful tools allow you to filter workflows with multiple criteria and save the results as custom views for easy access later.
How it Works:
Advanced Filters
- Navigate to the Automations tab to view your list of workflows.
- Click on “Advanced Filters” to begin adding filters.
- Choose your desired filter, select an operator, and set the value.
- Add multiple filters by clicking “+And” for an “And” condition or “+ Add Filter” for an “Or” condition.
- Click “Apply” to activate the filters and see the filtered results.
Smart Lists
- Once filters are applied, you’ll notice the “Save” button indicating unsaved changes.
- Click “Save” and select “Save as New Smart List” to create a new list, or choose “Discard Changes” to reset the filters.
- The new Smart List will appear as a new tab next to the “Needs Review” tab.
- You can also create a Smart List from scratch by clicking “+ Smart List”, adding filters, and hitting “Save”.
- To delete a Smart List, click on “Customize List” and choose “Delete”.
- In case there are multiple smart lists, click on the “more” icon to go through all the created Smart Lists.
Social Planner
Social Planner Statistics
Comprehensive Social Media Insights: Track the number of posts, likes, comments, followers, impressions, and reach across both Facebook and Instagram. Visualize your Social Post Performance with an interactive graph, showcasing post trends and weekly performance.
Engagement Breakdown: Get a detailed view of engagement metrics such as total likes, comments, and shares, broken down per platform. Identify which platform drives more engagement, helping you tailor your content strategy accordingly.
Impressions and Post Reach: Measure your content’s visibility with accurate Impressions tracking for both Facebook and Instagram. Analyze your Post Reach to understand how far your posts are spreading and which platforms are driving higher reach.
Gender and Age Demographics: dive into detailed demographic data, including the gender distribution (male, female, and unknown) and age range insights. See your audience breakdown in terms of age groups, providing valuable data to optimize your content for the right audience.
Permissions and Re-authentication Alerts: Receive real-time alerts when your connected accounts require re-authentication to access analytics. This ensures continuous access to up-to-date insights without interruptions.
Users will be able to see the statistics from the next day / when they reconnect their accounts with upgraded permissions.

Review Post Automation
Publish the reviews coming from your Google business profile or Facebook page to publish on social media profiles.
How It Works:
- Go to Marketing > Social Planner
- Click New > Select the Review Post option
- Use the 3-Step Automation Form:
- Step 1: Select platforms to pull reviews from (Facebook or Google). You’ll need Facebook Page or Google Business Profile integration for this. Choose your social accounts and star rating, Decide how many posts to publish per day, week, or year.
- Step 2: Pick or upload multiple background images (supports JPEG/PNG, 1:1 ratio, 5MB max).
- Step 3: Add a custom caption, or use the review content as the caption.Choose how to display the customer’s name (Full name, first name, or initials). Customize font color, background color, and opacity.
LinkedIn Carousel Post And Post PDF As Photos
Now you can upload photos and post them as PDFs on LinkedIn. Additionally, users can import PDFs and convert each page into separate images for posting on LinkedIn and other social platforms.
How to create a LinkedIn Carousel Post/Document Post?
- Navigate to Marketing > Social Planner.
- Connect your LinkedIn account (either a page or profile).
- Click “New Post” and use the post composer to create a new LinkedIn carousel or document post.
- Select the socials from the dropdown and add your post content.
- Click on the file upload icon (located between the image and video upload icons).
- Upload one or more PDFs for LinkedIn carousel or import photos to post as a PDF on LinkedIn.
- You can change the name of the PDF, add a watermark as needed.

Important Notes:
- LinkedIn allows up to 300 pages and a 100 MB limit per document.
- PDFs are converted into images when imported in social planner, and if Instagram is selected, the images are automatically cropped to adhere to Instagram’s aspect ratio constraints.
- Users can now delete media by clicking the ‘X’ that appears when hovering over the media preview.
- When user selects post as a PDF option, all the images are converted into a PDF and posted to LinkedIn.
Facebook Stories
Now you can create Facebook Stories in the social planner.
How to use:
- Navigate Marketing > Social Planner
- Connect your Facebook page(s)
- Click on New Post and use post composer to add the content with image or video.
- Select the socials (add Facebook pages) from dropdown and add your post content
- Schedule the Facebook Story from Social Planner
Important Notes :
- You can add one image or video
- Image is required in JPEG, PNG or GIF, max file size is 4MB.
- Video is allowed in all format with 1GB or minimum 3 seconds and maximum 90 seconds length and minimum dimension of 540*960 px
- Facebook story doesn’t support thumbnail or OG Meta Tag
E-Commerce Stores
Upsell Products In Store Checkout
Now you can upsell additional products after users complete their checkout. In a few clicks, build upsell funnels for the entire customer journey from Checkout Page to Thank You Page and maximize revenue on every sale.
How to use:
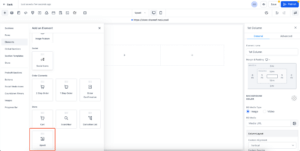
- Create a new page for Upsell along with the current store pages. Add a full width section and a row in it.
- Click on Add Element button then drag and drop the Upsell element in the row. Store owners can add multiple upsell components in different columns in a row.
- Select the upsell element to configure its settings.
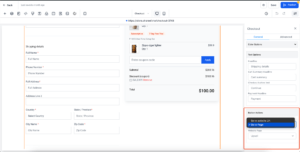
- Enable or disable the shipping charges for each Upsell element by enabling/ disabling the toggle in the builder preview.
- In Upsell settings, user can Search & select the product. Then, Sale Action needs to be configured which decides the redirection after clicking on Buy now button. The redirection can be done to another upsell page or the Thank you page.
- Upsell can be skipped by adding a Button whose Button action can be linked to Thank you page.
- Sale Action has to be chosen as Go to page and Website page has to be selected as the newly created Upsell page.
Important Notes:
- If the Upsell product is purchased, it will create a separate order.
- Shipping options can be enabled or disabled for upsell products. If enabled, users can choose shipping rates from a dropdown in the Upsell component.
- To skip the upsell page, a button must be added to redirect users to the Thank You page without requiring a purchase. Otherwise, users must complete a purchase to access the Thank You page.
- For the best upselling experience, it’s recommended to create a dedicated page featuring the Upsell element.
Shopify Store Migration To FG Funnels
This enhancement enables store owners to migrate their entire Shopify store, including products, collections, contacts, orders, and transactions, into FGF. Additionally, Shopify store owners can leverage FGF’s marketing tools, including triggers like Order Submitted Trigger and Payment Received Trigger for better automation.
How to use:
- Shopify integration can be found within a sub-account at: Settings > Integration > Shopify.
- Users can click on “connect” button to begin the setup. A modal will appear where users must enter Admin API access Token and a valid Shopify store URL as the first step.
- In the second step, users will be directed to the Import Elements screen, where they can select which data to import from their Shopify store. The available options for import are: Contacts, Orders, Transactions, Products, Collections.
- The third and final step takes users to the Sync Settings screen, where users can choose which data to continuously sync from Shopify to FGF in future. The options for syncing include: Contacts, Orders, Transactions, Order submitted trigger, Payment received trigger, Products, Collections.
- After selecting the desired elements to import and sync, click Save. The import and sync process may take some time to complete.
- Once the Shopify integration is successfully connected, users can enable or disable the elements they want to sync for future orders from the Shopify store.
- If users wish to reimport data, they can disconnect and reconnect the integration, allowing them to reimport any data they may have missed during the initial import.
Important Notes:
- Taxes are not mapped in Products while importing or syncing the Products.
- For each order, only one transaction is created in FG Funnels.
- Order statuses are marked as “Completed” or “Cancelled” when synced with Shopify.
- Merged contacts in Shopify will have the primary contact updated in FG Funnels.
- If there are no changes to the SEO details in Shopify (default SEO settings), the data will be received as null in FG Funnels.

Facebook And Instagram Shop Is Live For E-commerce Stores
Store owners can now effortlessly publish and sync products from their Ecommerce stores to Meta Commerce, enabling sales through Facebook and Instagram Shops. With powerful sales and marketing tools available, store owners can easily promote products and target audiences. Automatically sync inventory to Facebook and Instagram shop, allowing users to manage a single inventory and seamlessly run ads across both platforms.
Creating a Facebook Shop:
Store owners can create a shop in Meta Commerce Manager if they don’t already have one. Visit Meta Commerce Manager to get started. Within the Business Portfolio, click on “Add Account” in the Commerce Accounts section to set up a shop
In FG Funnels:
- To use this feature, the Multiple Facebook Pages feature should be enabled from Labs which can be found under Settings -> Labs.
- Settings > Integrations > Facebook & Instagram to access the integration.
- For those connecting for the first time, store owners must link their Facebook account and grant the necessary permissions. After this, they can select the Facebook/Instagram Shop pages they wish to connect with their E-commerce Stores in the “Manage Pages” section.
Reconnection for existing Facebook/ Instagram integration users:
- This integration will be only available in the multiple Facebook feature, hence it should be enabled under Labs Section.
- In order to enable Shops, the users need to disconnect and reconnect the integration.
- Before re-connecting the integration, the LeadConnector integration should be removed in Facebook side as well. It can be found under Facebook Profile –> settings & privacy –> Settings –> Search for “business integrations”.
- Upon connecting again, the Shops should be enabled.
- If the necessary scope is not present, then an error state will be shown that the Catalog Management is disabled.
Connect Pages to Stores:
- Once the desired shop pages are selected, store owners can link them to their Ecommerce stores through the “Messenger Settings” in the Facebook and Instagram Integration card. The Shops tab will display the selected pages, which need to be connected to the respective stores for product publishing and syncing.
- Store owners have the option to enable or disable product sync for each page as required.
Important Notes:
- The Facebook Page should have Product Catalog connected to it, in order for the product sync to happen.
- The Facebook Page should have the category called “E-commerce Website” in order for it to get listed in Shops section.
- The Facebook Page categories can be managed by visiting the Facebook Page and then going to the “About” section of the page. Under “Contact and basic info”, Categories will be present.
- The Facebook Page should be connected to a store under Shops section, in order for the sync to take place.
- Only one time products will get synced to Meta marketplace, Recurring products are not supported in Meta Marketplace.
- If track Inventory is disabled or if the “continue selling out of stock” will set the inventory quantity to 999 as inventory is mandatory in Meta Commerce Manager.
Delivery of Digital Products for E-commerce stores
Store owners can seamlessly deliver digital products to their customers. Upon purchase, customers will receive an instant access to their products via secure download links sent directly to their email. Manage digital files to be delivered post purchase through the Product details page of any product. Digital file can be securely downloaded by the customers via Customer Access Center through the OTP login flow.
For Store Owners:
- While creating product variants, add the type of product as either Physical or Digital at: Payments > Products > Select a Product > Variant Page > Shipping and Delivery.
- For digital products, store owners can upload up to 10 files, each with a maximum size of 100 MB. If additional files are needed, create a ZIP file under 100 MB for upload. Supported file types include images, audio, video, documents, and ZIP files.
- Ensure “Enable Order Confirmation Email” Toggled on to allow delivery of digital products via Email in Payments > Settings > Notifications.
For Customers:
- After completing checkout, customers will receive an Order Confirmation Email that includes an “Access Downloads” button to retrieve their digital files.
- Clicking this button will direct customers to the Customer Access Center, where they must log in using an OTP sent to the email used during checkout.
- Customers can also access their digital downloads directly via the following unique URL: <storeurl>/store/account/orders . Eg. myawesomestore.com/products/store/account/orders.
Important Notes:
- Digital product delivery is available only for orders placed through ECommerce stores.
- Cash on Delivery (COD) will not be applicable if any product in the order is digital.
- No shipping fees apply to digital products. If a physical product is in the cart, standard shipping charges will be calculated.
- If a physical product is purchased using COD, digital upsell products must be paid for with alternative online payment methods.
- Users can download a maximum of 10 files, with each file limited to 100 MB.
- Customers must be logged in to download their files.
- All the files will get downloaded at once as separate files and not as a zipped file
- All digital products in an order will be automatically fulfilled with fulfillment details as empty fields.

Reviews & Ratings for Products for E-commerce stores
This feature allows customers to submit reviews and rate products, which can be published after approval by the store owner. Reviews and ratings can be displayed on product list page and the product details page, offering valuable feedback to future buyers and boosting overall trust of the products in the store.
Enabling Reviews and Ratings:
- Enable “Show Reviews and Ratings” toggle to show ratings along with the count of ratings in the builder preview.
- Ratings count can be enabled/ disabled on both the Product Details page and the Product List page using the “Show Ratings Count” toggle.
Submitting Reviews and Ratings as a Customer:
- Customers can find the Reviews and Ratings section at the bottom of the Product Details page of any product.
- Clicking the “Write a Review” button will open a form where customers can submit their review. The required fields for submission include: Name, Email. Optional fields are: Contact Number, Headline, and Description.
- Once a review is submitted, it will be published only after the store owner approves it. Customers will see a confirmation message on the page after successfully submitting the review.
Publishing and Moderating Reviews and Ratings as a Store Owner:
- To publish or moderate reviews and ratings, navigate to: Payments > Products dropdown > Reviews.
- When a review is submitted by a customer, it will appear in the Pending section of the Reviews dashboard. Store owners can take the following actions (or perform bulk actions): Approve, Unapprove, or Move to Trash.
- Approved reviews are automatically published on the store. Store owners can reply to individual reviews via the side menu by selecting the review.
- Reviews can be filtered by Time Frame, Ratings, Product Name, and Store Name for easier management.
Important Notes:
- Customize the star colors and fonts directly in the builder preview.
- Font style configuration for reviews and ratings in the builder preview.
- Font size is fixed due to multiple content hierarchies.
- Font family will match the content fonts used on the page.
- Font color will be consistent across all reviews and ratings.
- Reviews can only be permanently deleted from the Trash section in the Admin Preview.
Woocommerce Integration
This new feature allows store owners to easily migrate and manage their WooCommerce store by importing contacts, orders, and transactions into FGF. Additionally, WooCommerce store owners can leverage FGF’s marketing tools, including triggers like Order Submitted Trigger and Payment Received Trigger for better automation.
How to use:
- Woocommerce integration can be found under Settings > Integration > Woocommerce.
- Click on “connect” button to begin the setup. A modal will appear where users must enter a valid WooCommerce store URL (e.g., https://yourstore.com without a trailing slash) as the first step.
- In the second step, select which data to import from the WooCommerce store. The available options for import are: Contacts, Orders, Transactions.
- Choose which data to continuously sync from WooCommerce to FGF in the future. The options for syncing include: Contacts, Orders, Transactions, Order submitted trigger, Payment received trigger.
- After selecting the desired elements to import and sync, click Save. The import and sync process may take some time to complete.

Customer Access Center
Customers can view their current order details along with the ability to view past order details. Customers will receive an order confirmation email which will have button through which they can access the customer access center by login via OTP verification.
How to use:
- Enable the order confirmation email to allow their customers to get email through which they can view Customer Access Center. This can be enabled at: Payments > Settings > Notifications > Order confirmation Email for Stores
- Customers can access the Customer Access Center by clicking the “View Order” button in their order confirmation email.
- Customers must log in using the email address they used during checkout to view all of their current order details.
- Fulfillment status by Store owner for the order will also get reflected to end customers whether partial or complete. Customers can view the fulfillment details which will include tracking number, tracking URL, and Carrier name.
- Past orders can be accessed by clicking the “Orders” button in the navigation menu.
- The portal can also be accessed through <storeurl>/store/account/orders .
Important Notes:
- If multiple contacts are associated with the same email, the first created contact will be used for logging into the Customer Access Center.
- With sticky contact enabled, all orders will be consolidated for that browser session.
- Make sure your domain is connected for the Customer Access Center to function properly, and ensure the default path for the domain points to any page in the store.
Blogs
Blogs Importer
Introducing the Blog importer, a simple 3-step tool that lets you import blog posts from any CMS effortlessly. With just one link, you can map fields like titles, categories, and authors, then choose to publish or save as a draft.
Key Features:
- Easy 3-Step Process – Add the blog URL and recent blog post URL to scan and preview the content.
- Note: If the iframe is blocked, the blog post preview will not be displayed but functionality will work.
- Mapping Breakdown – Map the blog title, category/tag, featured images, published date, content, and author from the preview. Review and publish your content when you’re ready! 🙂
- Note: Before you begin, ensure the blog has a sitemap for posts. For example, for a blog at blog.abc.com, check blog.abc.com/sitemap.xml for a sitemap.
How Does It Work?
- Setup Your Import under Sites > Blog> Click on the blog name > Navigate to New Post > Import Blog Post.
- Enter the blog URL and the last published blog post URL.
- Choose where you’re importing from.
- After setup, you can revisit to see the “Scan in Progress” status in the “Imported Content” section.
5. Select the blog title, published date, author name, content, and category/tag. If mapping is incorrect, you can manually select the CSS selector (reference: CSS Selectors).
6. Once the scraping is complete (usually 10-20 minutes for 1,000 posts), you can import each post individually or in bulk. All posts will initially be imported as drafts.
Smart Spam Detection
This feature is designed to protect your reputation by automatically identifying and flagging spam reviews before they can impact your business.
- Automatic Spam Detection: Our advanced algorithm now automatically identifies and flags potential spam reviews.
- Controlled AI Replies: AI-generated replies will be held back for any reviews flagged as spam, ensuring that your responses are only sent to genuine feedback.
- Easy Review Process: Quickly review flagged content and mark genuine reviews as “Not Spam” if needed. This gives you full control over what gets published, helping you maintain an authentic presence.
Review Balancing
Now you can ensure your reviews are distributed across multiple platforms, giving your online reputation the boost it deserves.
- Balanced Review Requests: Gain better visibility by distributing review requests evenly across multiple platforms of your choice. Ensure a fair and strategic spread of feedback across Google, Facebook, Yelp, and more (More Platforms coming soon!)
- Multi-Source Strategy: With this new feature, you can manage and send review requests via email and SMS, customising each request based on the review platform. Optimise your strategy and enhance your presence across the web!
- Smarter Review Management: No more overwhelming one platform with all your reviews—this balanced approach ensures you get a well-rounded, credible online reputation.
How to enable Review Balancing:
- Go to ‘Reputation’ Tab.
- Navigate to ‘Settings’ -> ‘Review Links’.
- Configure Review Balancing to send review requests to customers using multiple review platforms of your choice.
Email Builder
Workflow Email Action Stats Now in Email Marketing
We’ve introduced a similar way to view for all your email campaign statistics—whether sent through workflows or email campaigns—for a more streamlined analysis.
What’s Improved:
- Workflow email stats now under Email Marketing.
- See overall and individual email action stats for a workflow.
- Edit workflows directly from the same screen.
How to Use:
- Go to Email Marketing -> Campaigns -> Workflow Campaigns.
- Click Edit Workflow to access the builder.
- Click Statistics to view workflow stats.
- Use the dropdown to see stats for individual email actions.
Note: The email action creation and syncing with templates/ creating new templates remains unchanged.
We’ve made email personalization even easier by allowing you to add conditional elements within a single email campaign. Only contacts who meet your specified conditions will see those elements.
- Go to Marketing > Email Marketing.
- Create an email campaign or template.
- Select any element and go to the Visibility tab.
- Enable the Conditional Element toggle.
5. Set the conditions based on contact fields.
6. Alternatively, click on the Conditional Element icon in the element overlay action to add conditions easily.
Note: Only single line, text based custom fields, number inputs, radio selects and single select drop-downs are supported.
Forms and Inline Surveys in Email Campaigns
You can easily embed feedback forms, such as NPS, ratings, or like/dislike options, directly into emails, allowing recipients to provide input without leaving their inbox. Simply add a direct link to pre-built forms created on your platform, and all submission details will be available for review in the campaign statistics section. Each submission will lead directly to the corresponding page for a seamless experience.
How to Use:
- Go to Email Marketing.
- Create a new campaign.
- Add a Form Element.
- Choose the feedback type (NPS, ratings, etc.).
- Customize the form design and settings.
- Name the form in the Title field. (This is the title shown in the submission tab of campaign statistics)
- Set a custom success page after submission.
- Send your campaign and monitor feedback via Campaign Statistics.
- Visit the Submissions tab for detailed entries.
- Export the list of respondents if needed.
- For pre-built forms, navigate directly to the submission page.
Note: This works only for email marketing campaigns as of now.
Improved Email Campaign Flow and Campaign Summary Page in Beta Labs
Now you can start campaigns directly from the template library, with an included checklist for missing or incorrect fields, so you can quickly resolve any issues before sending. We’ve also improved the UI of the send or schedule screen where you can see your email design while composing the subject line and preview text for a smoother workflow.
How to Use It:
- Go to Email Marketing -> Campaigns.
- Click New -> Email Marketing Templates.
- Choose a template and click Continue.
- Design your email, then click Send or Schedule.
- Enter key details like subject line, sender info, etc.
- Preview your email on the right, hover to edit if needed.
- Check for warnings in Required Fields, then click Confirm & Send.
Note: As of now the checklist only provides information on the mandatory fields and error in custom fields. We will expand this to provide email limit warnings, content issue etc.
Quizzes
Introducing Brand New Quiz Builder
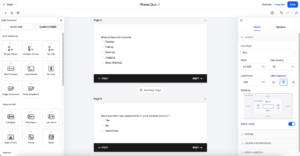
We’re thrilled to announce our Quiz Builder. It is an intuitive and powerful tool designed to streamline the creation and management of quizzes for educators, trainers, and organizations.
- Drag-and-Drop Interface: Create quizzes effortlessly by dragging and dropping question types, multimedia, and answer options into your desired layout.
- Multiple Question Formats: Supports a wide variety of question types, including multiple-choice, true/false, short answers, and essay questions.
- Scoring: Tailor point systems for each question or category, offering flexibility in how quizzes are graded.
- Branching Logic: Create dynamic quizzes where questions are adapted based on participants’ answers, making quizzes more personalized.
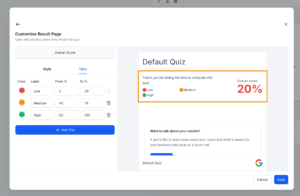
- Tiers: Manage tiers based on scored points for category and over all score
- Quiz Sharing: Share quizzes easily via direct links or integrate them with funnels and websites using embed code
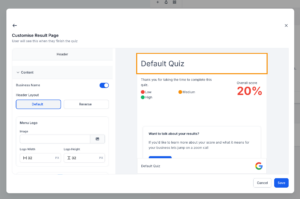
- Result Page Template: Customize the result page as needed using quiz result builder
How It Works:
- Head over to the Quiz Builder under the Sites tab.
- Create Quiz.
- Open left side bar and drag the questions in slides.
- Add Categories and score to questions.
- Customize the result page if needed.
- Save and preview.
CRM
Opportunity Card Customization
This update allows users to personalize the fields displayed on their opportunity cards within the pipeline view. You can now choose up to 7 fields, customize counters, and select between two card layout options to better organize and streamline your workflow.
How to Use:
- Open Opportunities and Access Customization: Navigate to the Opportunities section and click on “Manage Fields”.
- Select Fields and Customize Counters: Choose up to 7 fields from standard, custom, and associated fields to display on the card. Customize the icons for Conversations, Tasks, Notes, Calls, Tags, and Appointments.
- Select either the Default View or the Compact View depending on your preference.
- Save your customizations. You can also apply the changes to all pipelines.
Custom Objects
Custom Objects provides a powerful tool for businesses that need to manage complex data structures beyond simple contact or opportunity records. With the ability to create custom objects and associate them using custom labels, users can now organize, filter, and view their data in a way that best suits their operational needs, streamlining workflows and improving overall data management.
- Custom Object Creation and Management: Users can now create, edit, and delete custom objects directly from the platform. Each custom object can include its own custom fields and attributes, allowing full customization to suit business needs.
- Record Management for Custom Objects: Easily create, edit, or delete custom object records. All records are accessible in a streamlined list view with options to filter, sort, and manage visible fields.
- Associating Custom Objects and Contacts: Users can associate custom objects with other custom objects or contacts using custom labels. Labels can be single (e.g., “Owner”) or paired (e.g., “Parent-Child,” “Manager-Employee”) for more granular relationship mapping.
- Customizable List View: Custom objects can now be viewed in a List View, offering sorting and filtering capabilities. Fields visible in the list can be customized, resized, and reordered based on user preferences. This view offers better visibility and control over the data, allowing users to manage multiple custom objects efficiently.
- Advanced Filtering and Sorting: Apply sorting to any field within the custom object list view, allowing users to prioritize and organize records more effectively. Use advanced filters to narrow down results, helping to quickly find specific object records or associations.
- Audit Logs: Monitor key actions on custom objects, ensuring you can easily review the history of updates or troubleshoot any issues that arise from Day 1 of using Custom Objects under Settings >Audit Logs.
How to Use:
- Create a Custom Object: Navigate to Settings >> Objects section, click Add Custom Object, and define the fields and attributes relevant to your object.
- In the Custom Object list view, create new records, edit or delete existing ones, and view all associated records in one location.
- Use custom labels to link objects with each other or with contacts, allowing for easy navigation and organization of related information.
- Tailor the columns in your list view by selecting which fields to display, resizing columns, and rearranging them to fit your workflow.
Custom Object – Advanced Filters
You can now apply advanced filters across multiple fields, including custom fields. Filters can be set to “AND” or “OR” conditions, allowing for more complex data queries. Select amongst different custom fields from custom objects, allowing you to narrow down data across a wider array of custom attributes.
How to Use Advanced Filters:
- Navigate to the Advanced Filters section within any custom object.
- Use the search bar or expand sections such as Other Details, Carr Info, or Price to select relevant fields.
- Apply filter conditions using “AND” or “OR” logic to refine your search.
- Click “Apply” to run the filter and see the results.
Configuring Searchable Fields For Objects
Admins can now select which fields are searchable for objects such as Contacts, Opportunities, and Custom Objects. You can choose up to 6 fields to be searchable. For Custom objects, the number of searchable fields is 3.
Once updated, the changes apply globally across all search bars in the platform. You will also be able to search for additional email and additional phone fields from the search box.
How to Use:
- Navigate to Settings > Custom Fields.
- Click the kebab menu (three dots) on the top right and select Edit Searchable Fields.
- Choose the object (Contacts, Opportunities, Custom Objects) you want to configure.
- Select up to 6 fields to mark as searchable.
- Click Save and confirm the changes. These updates will be applied globally across all modules and users for the selected object.
Ability To Select ‘From’ Phone Number In Bulk SMS
Users can now select the “From” phone number in the SMS modal from a dropdown list. The dropdown will display all available phone numbers associated with the account, making it easier to choose the correct number for SMS communication. If no phone number is selected, the system will automatically use the default phone number to send the SMS, ensuring no interruption in the sending process.
How to Use:
- Go to Contacts, Select Multiple Contacts and click on “Bulk SMS”
- In the SMS modal, use the “From” field dropdown to select the phone number you wish to use for sending the SMS. If no number is selected, the default number will be automatically used.
- Fill the rest of the details and click on “Send SMS”
Access: Admins can access all the numbers configured in the account. Users can access default number, number assigned to the specific user, unassigned numbers and the last used number to message the contact.

Client Portal
Dashboard & Contracts For Mobile & Web
We’re beyond excited to roll out the Dashboard Revamp and the all-new Contracts feature in the client portal for both Mobile & Web Now, managing your documents and navigating your dashboard has never been easier or more streamlined.
Contract/Document Signing
- Send Contracts/Docs: Easily send contracts or documents for signing to your contacts right from the portal.
- View Under Client Dashboard: Your contacts can view the contracts/documents directly from their personalized dashboard.
- Sign Documents Online: Say goodbye to paperwork! Sign contracts digitally, right inside the portal.
- Download Final Copies: Need the signed documents? You can download them with just a click once they’re completed!
Dashboard Enhancements
- Welcome Section: Personalized greeting to make you feel at home! Your name and profile picture are displayed right at the top.
- Quick Actions: Get one-click access to courses, invoices, messages, and community groups — all from the dashboard.
- App Switcher: Easily switch between child apps in mobile using the new top bar switcher.
- New Mobile Top Bar: Enjoy an optimized navigation experience with a sleek and mobile-friendly top bar, perfect for smaller devices.

Memberships
Communities – Events
Group admins and owners can now set up free or paid events . Plus, pick who can see the event—whether it’s based on a course, private channel, or a specific membership level.
Event Details: Share key details like date, time, location, and descriptions, all in one convenient spot. Add zoom links, google meet links or even a physical address.
Members can register for events, add events to their Google or iCal calendars with one click, and Stay informed on upcoming events with in-app notifications and email reminders.
For mobile – we have revamped the flow a little, with events & profile section now visible under MORE section and notifications + chat icons on top.
Community Chat Feature
- Private Messaging: Chat 1-on-1 with any member of your community, whether you’re an admin or a regular user.
- Share Media & More: Exchange photos, files, GIFs, and, of course, tons of emojis to make your conversations even more fun!
- Push Notifications: Enable notifications on your app for real-time alerts (with sound).
- Disable Chats for Groups: Don’t want to participate in certain group chats? Simply go to Profile > Account Settings > Community Chat and turn off chat for specific groups.
- Block Users: Got someone spamming your inbox? Block any user with ease and keep your DMs spam-free!
- Important Notes: You can only start a chat once you’ve joined a group. Make sure you’re a group member to unlock the messaging feature.

Updates & Enhancements
- New Theme: New Neo Classic Theme for Courses
- Quiz Explanations: Explanations for quiz answers will now display when added, making it easier for students to learn from their mistakes and ace their next attempt.
- Single Choice vs. MCQ Clarity: No more confusion! Single choice and multiple choice (MCQ) questions now have clearly visible tags right next to them, so students know exactly what to expect.
- Course Progress Bar: Keep track of your learning journey with a shiny new progress bar right on the Courses screen. It’s easier than ever to know how far you’ve come and how much is left!
- Clear Locked & Drip Lesson Indicators: Locked and drip categories or lessons are now more distinct, so students can easily spot which sections they need to unlock or wait for.
- Auto-Complete Button: After a successful lesson, quiz, or assignment completion, the “Mark as Complete” button automatically converts to “Completed.”
- Streamlined Start Pages: Whether starting a quiz or an assignment, we’ve made the entry smoother with improved start pages, so you can dive right in with ease.
- Improved Status Pages for Quiz & Assignments: We’ve enhanced the status pages, clearly displaying “In Review,” “Pass,” or “Fail” results.
- Full Quiz Review: After finishing any quiz, learners can now view attempted questions, correct answers, and their total score. It’s feedback heaven!
- Jump Between Questions Faster: Switching between quiz questions is now easier and quicker, helping learners breeze through assessments with speed and confidence.
- Download Control: Now you can stop the downloading file and see the downloading progress, giving you more control over your resources.
- Image Preview: No need to zoom on images anymore! Enjoy a convenient image preview feature for a better visual experience.
- Shimmers Instead of Spinners: We’ve replaced traditional loading spinners with sleek shimmers, providing a more modern and visually appealing loading experience.
Email System
Email Bounce Classification
Monitor critical bounce metrics such as:
- Total Permanent Bounces
- Permanent Bounce Rate
- ESP/ISP Blocks
- Total Delivered Emails and Delivery Rate
Detailed Bounce Classification Breakdown by:
- Email Service Provider (e.g., Gmail, Google Workspace, Apple)
- Category (Mailbox Full, DMARC, Sender Reputation, Internal Errors, etc.)
- Error Code & Status Code for precise issue identification.
- Comprehensive definitions for each bounce category to guide troubleshooting.
Refine reports using filters like:
- Sending Domain
- Email Service Provider
- Email Type
- Sending IP
ESP/ISP Block Tracking displays the count of blocks by email providers like Outlook or Google Workspace due to policy violations or spam association, with easily accessible troubleshooting links to unblock sending IPs or domains. Each bounce reason includes actionable guidance and external links to address issues, such as resolving blacklist problems or SPF/DKIM misconfigurations.
Google Postmaster Tools Integration
This feature provides key insights to improve email performance and ensure higher deliverability with Gmail.
Key Features:
- Domain & IP Reputation Tracking: Monitor your sending reputation to maintain high inbox placement.
- Spam Feedback Monitoring: Detect and address spam complaints.
- Authentication Checks: Verify SPF, DKIM, and DMARC compliance.
- Delivery Insights: Quickly identify and resolve delivery issues.

Online Listings
One-Click GMB and Facebook Integration
Now there is a direct GMB and Facebook Integration to connect your GMB and Facebook Pages directly from the Online Listings dashboard, eliminating the need to log in externally. A simple, guided process walks users through linking their accounts, making it easy and fast to set up. Once linked, all essential business information, reviews, and updates from GMB and Facebook will sync automatically, keeping your listings up-to-date.
Listings Reselling: Expansion to 13 New Countries
Online Listings is now available in 13 new countries:
- Austria – 43 Supported Publishers
- Spain – 42 Supported Publishers
- Ireland – 41 Supported Publishers
- Switzerland – 41 Supported Publishers
- Belgium – 38 Supported Publishers
- Mexico – 38 Supported Publishers
- Brazil – 37 Supported Publishers
- New Zealand – 36 Supported Publishers
- Slovakia – 36 Supported Publishers
- Sweden – 36 Supported Publishers
- South Africa – 35 Supported Publishers
- Norway – 33 Supported Publishers
- Denmark – 34 Supported Publishers
Reporting
Custom Reports
Now, you have full control to design, schedule, and share your reports exactly how you envision them.
- Custom Report Builder: Fully customizable with a drag-and-drop interface, including widgets and elements, so you can design reports to fit your unique style.
- Multi-Page Support: Add multiple pages to a report, each tailored to specific insights, giving you the flexibility to present comprehensive analytics.
- Page List Navigation: Easily access, rename, and reorder your report pages with the page index for seamless organization.
- Page Properties: Personalize each page by adding your logo, changing page colors, and configuring headers. You can even include a cover page for that professional touch.
- Report Scheduler: Automatically generate and send reports to your clients, stakeholders, and team members on a recurring schedule. Set it up once, and it’s done!
How It Works:
- Go to the Reporting section and select “Custom Reports”
- Start from scratch or convert an existing dashboard into a report.
- Use the drag-and-drop builder to add widgets, customize elements, and configure your page properties, including logo and color settings.
- Test your report by sending an email preview before finalizing.
- Save and schedule it to be automatically sent based on your desired frequency.
Dashboard
Themes For Dashboard And Widgets
Customize the appearance of your entire dashboard or individual widgets with stunning themes. Select from a variety of predefined themes or craft your own custom theme with specific colors.
How It Works:
- Go to your dashboard and click the edit icon.
- Switch to the Theme tab.
- Choose a predefined theme or create a custom one that suits your style.
- Save your changes
Custom Fields On Dashboard Widgets
You can now utilize any of your custom fields to filter and define widgets on your dashboard.
Here are the types of custom fields you can use in the Group By/View By properties: Single Line, Date (Only in View By), Phone Number, Monetary, Numerical, Radio, Checkbox, and Multi and Single Options.
How It Works:
- Go to your dashboard and click the edit icon.
- Choose any widget.
- Switch to the Conditions tab.
- Select your custom fields and specify the operator and condition.
- For Donut, Line, or Bar charts, choose your custom field from the Group By/View By dropdown.
- Similarly you can choose a custom date property as well.
- Save your changes.

Comparison Percentage
Instantly see how your metrics have improved or decreased by comparing data with a previous time period.
Green bubbles highlight improvements, while red bubbles show declines, giving you instant insights at a glance. Click on the comparison value to dive deeper and see detailed records from the selected time periods.
How It Works:
- Go to your dashboard and click the edit icon.
- Select any widget from the list.
- In the configure tab, go to Advanced Settings.
- Select your comparison date range.
- Hit Save.
Email Widgets
You can now add a range of predefined email widgets to your dashboards or create custom widgets by applying filters, selecting chart types, and more.
Predefined Widgets:
- Accepted Emails: Number of emails successfully accepted.
- Delivered Emails: Number of emails delivered to recipients.
- Opened Emails: Number of emails opened by recipients.
- Clicked Emails: Number of emails where links were clicked.
- Replied Emails: Number of emails that received replies.
- Soft Bounced Emails: Number of emails with soft bounces.
- Hard Bounced Emails: Number of emails with hard bounces.
- Failed Emails: Number of failed email deliveries.
- Unsubscribed Emails: Number of recipients who unsubscribed.
- Unsubscribed Emails Daily: Daily count of unsubscribed emails.
- Emails By Domain: Emails grouped by recipient domain.
You can apply new filters such as Source, Status, Sent By, and Domain, and choose from multiple email sources like Workflow, Email Marketing Campaigns, and Bulk Actions. You’ll also get access to useful columns like Contact Name, Email, Status, Source, Created On, and more.
How It Works:
- Go to your dashboard.
- Click the edit icon and select “Add Widget.”
- Scroll to the “Emails” section.
- Choose from the predefined widgets or create your own by applying filters and selecting chart types.
- Click “Save” to add the widget to your dashboard.
Note: To use the Group by/View by feature, make sure to select a specific source first, and then choose that source in the Group by/View by options.

Visitor Data Widgets
Predefined Funnel Widgets:
- Total Funnel Views: Tracks all funnel views (customizable by funnel and page type).
- Unique Funnel Views: Counts unique visitors across your funnels.
Total Website Views: Tracks total views for all websites.
- Unique Website Views: Shows unique visitors for all websites.
- Funnel Views Trend: Line chart tracking funnel views over time.
- Website Views Trend: Line chart showing website view trends.
- Top Funnels by Unique Views: Top 5 funnels based on unique views.
- Top Websites by Unique Views: Top 5 websites by unique visitors.
- Total Funnel Page Views (Last Week): Funnel views over the last week.
- Unique Funnel Views (Last Week): Unique funnel visitors in the past week.
- Total Funnel Page Views (Last Month): Total funnel views in the last month.
- Unique Funnel Views (Last Month): Unique funnel views in the last month.
- Total Opt-ins (All Funnels): Total opt-ins across all funnels.
Apply filters like Page Type and Visitor Scope for tailored insights on websites or funnels.
How It Works:
- Go to your dashboard.
- Click the edit icon and select “Add Widget“
- Scroll to the “Visitor Data” section.
- Choose from the predefined widgets or create your own by applying filters and selecting chart types.
- Click “Save” to add the widget to your dashboard.
Integrations
Connect Multiple Facebook Pages
Now you can connect multiple Facebook pages for:
Leads Sync: Sync leads automatically from Facebook Lead Ads across multiple pages with clear attribution to the source
Conversations: Chat with customers across multiple Facebook pages using Facebook and Instagram chat integrations
Automation: Build customised workflows to automate customer engagement across multiple Facebook pages
Reputation: Manage reviews and your review responses across multiple Facebook pages
Affiliate Manager
External Website Support
You can now run affiliate campaigns on any external website—not just FGF websites and funnels. This game-changing update allows your affiliates to promote and sell your products anywhere on the web, giving you more flexibility and reach.
Simply add your external website URL and have affiliates up and running in minutes. Use one affiliate link to track sales across your entire website, including subdomains.
Set up custom commissions for specific products or use default settings for all items sold via your connected Stripe account. Track upgrades, downgrades, and recurring payments automatically, ensuring affiliates earn commissions on every eligible transaction.
How It Works:
- Go to Affiliate Manager and navigate to the Campaigns tab.
- Click +Add to create a new campaign.
- Select “External Website” as the source.
- Enter your website URL to generate an affiliate tracking link.
- Set your default or product-specific commissions, and tier levels if needed.
- Add the tracking script to your external website.
- Publish your campaign and let your affiliates start selling!
Important Note: Only products sold through Stripe are supported for now.One-time products will always follow default commission settings. products can have customised commission rates. Just add the products in the first step to configure product based commissions.
If you want to exclude a product from commissions, simply add it and set the commission to 0%.

Click Tracking
Now, both you and your affiliates can gain deeper insights into campaign performance by tracking referral link clicks. With this feature, clicks are now displayed across various key areas:
- Affiliate Manager Dashboard
- Affiliate List
- Affiliate Profile Page
- Affiliate Portal (for affiliates to monitor their own click performance)
How It Works:
You can track clicks in real time on the Affiliate Manager Dashboard, Affiliate List, and Affiliate Profile Page, while affiliates can view their own click data directly in their Affiliate Portal.
Improved Media Library
The Media Library has been revamped to align with the latest design updates, offering a cleaner and more intuitive experience.
Campaign-Specific Media Management: You can now assign media to individual campaigns or make it accessible for all campaigns, ensuring that affiliates only see the assets relevant to their work.
Quick Copy & Download Actions: Affiliates can easily copy media links or download assets directly from the Affiliate Portal, saving them time and effort.
How It Works:
- Go to the Affiliate Manager and select “Media“
- Click “Add File” to upload a new media asset.
- Choose whether to link the media to a specific campaign or make it available across all campaigns.
- Save your changes, and the media will be ready for affiliate use.
Conversations
Snippets Upgrade: Organize Into Folders
This update introduces folders for better organization, search capabilities for quicker access, and an upgraded snippet builder for consistent formatting. Move your existing snippets into folders with just a few clicks. Select the snippet/snippets, use the “Move to Folder” option to move them into relevant folders.
You can also search by snippet or folder name, or filter by type: Email or SMS
Quick Replies For Facebook And Instagram Messages
You can now set up Quick Replies within the Facebook Interactive Messenger or Instagram Interactive Messenger actions in workflows. Configure up to 13 quick replies, each with a maximum length of 20 characters.
Quick Replies are visible only as part of the most recent message and function as single-tap responses. Once a quick reply is selected, the customer cannot change their choice, ensuring a focused interaction.
All available quick reply options will be displayed in the conversation, offering full visibility to the user. The selected reply will be highlighted in blue and will appear as a received message, ensuring users can clearly see the customer’s selection and the context of the conversation.
Channel-Specific Conditions
Facebook: You can add Quick Replies alongside buttons and images, providing more options for customer interactions.
Instagram: You can either add buttons or Quick Replies in a message. Quick Replies can only be added when no attachments are included in the same message.

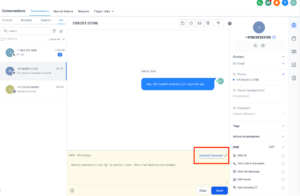
Internal Comments And Mentions
You can now add internal comments to collaborate with your team while engaging in conversations with your contacts. These comments will remain visible only to users and will not be seen by the contact, ensuring smooth and private communication. These comments are not shown to the contact, ensuring private communication within users.
Group Chat For SMS
You can now initiate group SMS conversations from the CRM using LeadConnector phone numbers. The phone number should be of US/Canada to be supported for group chat. This functions exactly like group SMS on your mobile phones. All the participants added to the group will be able to receive and send messages in the group. You can add up to 10 participants in the group, including yourself. 🤩
Creating a group Chat:
- To create a group chat, navigate to the Conversations section, click on Create a new message, and select Group Message.
- Choose the phone number you want to use for the group chat.
- Choose the phone number you want to use for the group chat and select your participants; you can add both primary and secondary numbers of contacts.
- Click on Create Group and send your message. The message will be sent to all contacts added in the group. Once any contact replies in the group, their message will be sent to everyone, keeping all participants updated.
- You can view all the contacts added to the group chat from the top bar and the right panel by clicking on the chevron icon beside the contact names. Clicking on any contact’s name or number will open their contact details in the right panel.
- Once a group is created, messages will still be sent to the initial numbers added, even if a contact is deleted or their number is changed; “Updated” and “Deleted” tags will appear beside those contacts’ names.
- For each message, you can view the status for each contact, indicating whether the message has been sent, delivered, or failed.
Important Notes:
- Users with only assigned data access can create and view the group chats that include only the contacts assigned to them.
- A user can send messages in a group only if they have access to the phone number used to create the group chat.
- Admins have access to all numbers added in the location, while users have access to the default number, number assigned to the user, and all unassigned numbers.
Documents & Contracts
Split Columns Support
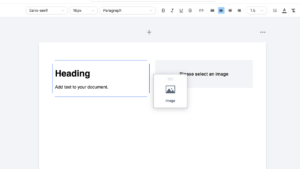
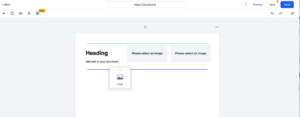
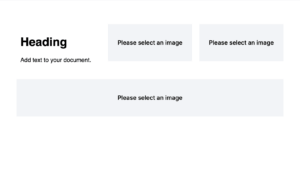
Split Column Functionality is now available in Documents and Contracts. Drag and drop elements side by side to automatically create columns, allowing for better organization and layout.
How to use:
- Drag an element (such as text, an image, or a table) next to another element in the document editor to create a split column layout.
Calendar
Troubleshooting Tool
This new feature provides detailed insights into both available and unavailable slots, allowing users to quickly identify issues with their calendar settings and improve booking efficiency.
How to Use?
- Navigate to Calendar Settings and select your calendar.
- Click on the three dots menu (⋮) and select Troubleshoot Calendar.
- The troubleshooting view will display your potential slots. For each unavailable slot, a reason will be provided to explain why it cannot be booked.
Add Notes Per Appointment
We’ve introduced a new feature that allows users to add and track notes for individual appointments. These notes can be viewed, edited, and deleted in the Appointment Modal and will also appear in the Notes section under the Contacts & Conversations tab.
Additionally, notes added through two-way sync for third-party calendars (like Google or Outlook) will be automatically reflected in the system. Along with this, bookers’ responses in the “Additional Information” field of the default booking form are now visible in the appointment’s notes section for easier access.
How to Use?
- Navigate to the Appointment Modal and select the Notes Tab.
- Click on Add Note, type the information, and hit Save.
- Notes will show the name of the user who added them and the timestamp.
- You can also edit or delete notes as needed.
Recurring Appointment Enhancements (In-App Appointment Modal Only)
- Custom Recurring Appointments: Now create recurring appointments directly using the custom date and time options, even if you have not configured a recurring calendar.
- Bulk Edit/Delete: Easily edit or delete all occurrences of a recurring appointment with one action.
- Flexible Recurrence Rules: Set up advanced recurrence patterns, such as the second Tuesday of every month, only on weekdays or annually on a specific date.
- Infinite Recurrence: Set appointments to repeat indefinitely, end on a specific date, or after a set number of occurrences.
Note: Recurring appointments created via the custom tab in the in-app appointment modal do not check availability and will be booked strictly based on the recurrence rules set.
How to Use?
- Click on New Appointment > Select the calendar, team member, and contact.
- :Choose to end the recurrence never, on a specific date, or after X occurrences.
- Click on save and create a new recurring appointment.
Important Notes:
- Canceling or rescheduling a custom recurring appointment using the cancellation/reschedule link or the contacts/conversations tab will affect the entire series.
- Custom recurring appointments are currently not supported for service and class booking calendars.
- Only one Zoom, Google Meet, or Microsoft Teams meeting link will be generated for the entire series.
Collect Payments for Recurring Appointments (Booking Widget)
You can now choose between two payment options:
- Collect Payment for First Appointment Only: Payment is collected for the first appointment in the series, with manual collection required for subsequent appointments.
- Collect Payment for All Appointments: The total amount for all appointments in the series is collected upfront. The final amount may vary depending on the actual number of appointments booked, based on your availability settings.
Note: Partial payments are not supported for recurring appointments.
How to Use?
- Select the calendar you want to configure.
- Ensure recurring meeting is enabled and default payment provider is set up
- Under the Forms and Payments tab, select either collect payment for “First Appointment Only” or for “All Appointments” and click Save.
Microsoft Teams Integration
By connecting your Microsoft Teams account, you can now automatically generate dynamic meeting links, significantly reducing manual steps when scheduling meetings. Once teams is added as a meeting location in your calendar settings, a unique Teams link will be generated for each new booking and sent along with the calendar invite.
To connect your Microsoft Teams account:
- Go to Calendars > Calendar Settings > Connections.
- Locate the Video Conferencing tab.
- Click on Add New, then click Connect next to Microsoft Teams.
- Sign in with your Microsoft Teams credentials.
- Once integrated, ensure you select Microsoft Teams as your calendar’s meeting locations from Calendar Settings > Meetings Details tab.
Important Notes:
- Only Microsoft Teams accounts for Work and School are eligible for integration.
- Connecting an Outlook calendar does not automatically link Microsoft Teams. You need to connect teams under video conferencing separately.
- To view appointments on your Outlook calendar, ensure that your desired Outlook calendar is both connected and selected as the linked calendar.
- Each user can connect only one Microsoft Teams integration per subaccount.
- Microsoft Teams integration is supported by Personal Booking, Round Robin, Service Calendar and Collective Calendar.
Smart Lists For Appointment List View
Smart lists will save your filter and sorting preferences, so you don’t have to reapply them every time. Three default smart lists are available—upcoming appointments, canceled appointments, and all appointments. You can also create custom smart lists to streamline your booking process.
- Advanced Filters: Filter appointments by calendars, users, status, creator, and whether the appointment is rescheduled. Use AND/OR logic to create complex filters that meet your specific needs.
- Sorting Capabilities: Easily sort appointments by newly added or upcoming appointments to stay on top of your schedule.
- Search by Title: Quickly locate any appointment by searching for its title.
- Rescheduled Tag & Filter: Any rescheduled appointment will now display a Rescheduled tag. Additionally, you can filter for rescheduled appointments using the Is Rescheduled filter.
- Manage Columns: Customize which columns appear in your appointment list and rearrange them as per your preference. Add or remove columns with ease to tailor the view to your needs.
How to Use?
- Navigate to Calendars > Appointments.
- Click on + Smart List.
- Name your Smart List.
- Add filters, manage columns, and apply any sorting you need.
- Once saved, the new Smart List will appear as a tab next to the default ones.
- Each time you click on this tab, it will apply the previously configured filters and show the relevant appointments.
- To edit a smart list, click on the smart list, then select the Customize List button on the right, make your changes, and click Save.
Configure Email Notifications:
- Go to Calendar > Calendar Settings > Select the calendar and click on the Notifications tab.
- Choose the notification type and click Edit.
- Toggle on Email Notification to enable, and customize content for different recipients.
- Choose an existing email template or create a custom subject line and email body, set when Reminder and Follow-Up emails are sent, and send a test email if needed.
- Click Save to apply your settings.
Configure In-App Notifications:
- Choose the notification type and click Edit.
- Go to the In-App tab and toggle on In-App Notification.
- Select the user(s) who should receive the notifications.
- Click Save.
.
Mobile App
Updates And Enhancements
- POS for iPads and Tablets: we’ve got a brand new layout for the Point of Sale on iPads and Android Tablets.
- Support For Payment Terminals: You can now connect select payment terminals (sold by Stripe) to the mobile app and accept payments by having your customers tap, insert, or swipe their cards on the terminal.
- Estimates: new dedicated “Estimates” section accessible from the lefthand navigation drawer or using the POS.
- Consolidated Payment Hub: Access all three payment products – POS, Invoices, and Estimates from one single module. Dynamic Products! While performing a transaction, you are no longer restricted to use the existing details that were configured for the product. Feel free to modify every single thing – Name, Description, Taxes, Price, and Quantity!
- Dynamic Products: While performing a transaction, you are no longer restricted to use the existing details that were configured for the product. Modify every single thing – Name, Description, Taxes, Price, and Quantity.
- Multi-calendar view(public beta): You can now link the schedules of multiple users, calendars, or groups under one single calendar view!
- Calendar Share Links(public beta): share the links of your calendars to potential leads and customers.


